Enter Time Sheet
This lesson's aim is to provide easy help to end users to enter their Time Sheet in Atollon.
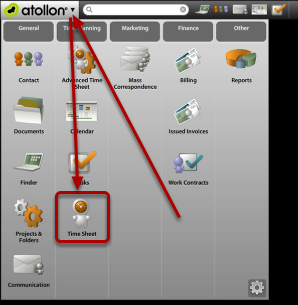
Open Time Sheet Application from Atollon menu
Enter new Time Sheet record
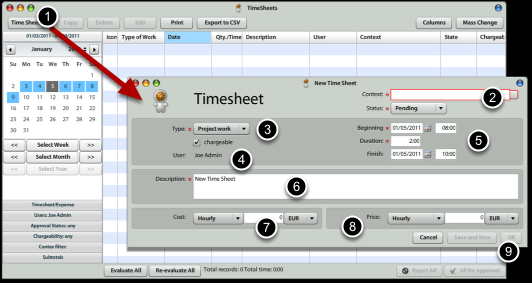
In order to enter new Time Sheet record, you should:
1.) Press on the Time Sheet button (top left) in Time Sheet application.
2.) Select Context: Client > Project > Activity (Milestone) for new Time Sheet record (it is customizable, which level is required)
3.) Select Type of Work
4.) Set whether the Time Sheet is chargeable to client or not
5.) Select Start Date & Duration (HH:MM), optionally also End Date & Time
6.) Write work description
7, 8) Cost & Price Information
You do not need to write Cost or Price, if you subscribed to Octopus Billing Automation solution. This information is not available to users, who do not have rights to view Work Contracts (in case of Cost) or Price Lists (in case of Price).
9.) Press Ok or Save & New, if you want to continue on the same project.
Copy existing Time Sheet records
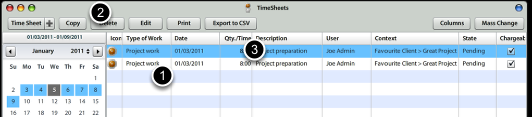
Once you want to create similar record, you can select existing record in Time Sheet grid and press Copy. The new record is displayed in grid and highlighted.
Edit existing Time Sheet record

To edit existing Time Sheet record, just select one & press Edit button.
You can make any changes to the record & press Ok button.
If you change any criteria that will make your record disappear (for instance you change the date range outside of filter), you should be notified.
Revise Time Sheet records before they are sent for approval
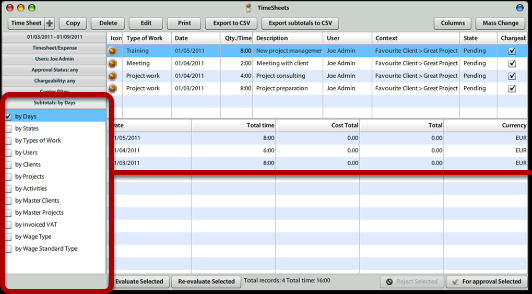
Before confirming your Time Sheet records, you should check whether everything you wanted was entered. You can open quick Time Sheet report, available at Subtotals section (bottom left). By selecting one of the grouping criteria, you will get summary below your Time Sheet. By clicking on any of the summary rows, you get detail above.
Send Time Sheet for approval

You can send one or more Time Sheet records for approval. Only items in Pending state are sent for approval.
1.) Select correct time period (month, week, day)
2.) Make sure you selected all pending items (Approval Status is Any or Pending)
3.) Click on button All (Selected) for Approval