# System Administration
# Context Settings
# Context Settings Overview
## Introduction
See the [Finder](mks://localhost/en/user-manual/general/Finder "en/user-manual/general/Finder") how-to in order to get more information about Finder structure.
### Project Setup Video Tutorial

## General Folder Settings
Folders are containers in first level of Finder.
To edit Folder Types, go to Options & Tools > Context Settings
Folders are formed by the following attributes:
Folder Type
The basic definition of the Folder. Each Folder Type represents different behaviour (Fixed Type, Form, Status, Workflows, Filtering, Templates, Access, etc.)
Folder Fixed Types are: Contact Folder or Simple Folder (both must be defined using MS Win admin interface at Settings > Account & Project > Account Types)
Contact Folder
(Contact Folder is container that holds any information connected with Contact Type (eg. Employee, Applicant, Client, Supplier, Partner, etc.)
Simple Folder
(Simple Folder is container that holds any information, without any particular system-based relations)
Folder Template
Minimally one per Type. New folders are created based on Folder Templates. The Template defines at least initial Status, which must be set. In more advanced scenarios, Templates may define access rights of newly created folders and add different Forms to new folders.
Folder Status
The Folder Status represents actual state of the component in relation to particular company / person or just a simple folder.
Status is Custom & Fixed. Custom Status may be created by user (admin), Fixed Status is: "Initial, Active, Closed".
Folder Relations
Folder relations define relation to another Sub-folder in Finder, to Project created under the Folder and to completely different Folder Types.
In order to start entering new relations, you must have other Project Templates, Folder Templates or Folder Types ready.
Folder Type > Folder Template
Folder Type > Project Template
Folder Type > Folder Type
Form
There are two forms per Folder available - one based on Folder Type and another based on Folder Template. Both must be configured using MS Win admin interface.
To set the Form per type, go to Settings > Account & Project > Account Types > select and edit the type > select or create new Form (see Forms Configuration section)
Folder Numbering
Each Folder Type may be differently numbered. (See Numbering Configuration section)
## Project Folder Configuration
### Prerequisities
Project Folder may be created only under General Folder based on General Folder's relations settings. In General Folder's relations settings, you should add the Project Folder Template, once you would like to create the Project Folder under the General Folder (Client, Partner, etc.).
### Project Folder Type
Project Folder type may act in several business scenarios. Project Folders are used to track several kinds of projects. Some examples might be:
#### Project Folder Base Types
Project Folder Base Types are: Simple Project, Master Project & Slave Project.
##### Simple Project Folders Examples
- Sales Opportunity
- Implementation (of information system?)
- Consulting
- Support
- Services, ...
##### Master Project Folders Examples
- Campaign
- Vacancy
- PR Activity
- Training Services
##### Slave Project Folder Examples
- Campaign Member (for Campaign)
- Selection Procedure (for Vacancy)
- Target Editor (for PR Activity)
- Student (for Training Services)
### Project Folder Templates
In order to create new Project Folder, you must have at least one Project Folder Template, which indicates (at least) initial Status. Optionally it can indicate also default Provider & Customer (for Billing).
MS Windows administration client includes some other options as well, for instance Default Price List setting, custom Access Rights setting & more.
### Project Folder Status
You can define your own set of Project Folder States, incl. its color in Finder, priority indicating it's sort order.
Fixed Status indicate the Finder's Base Statuses: Initial / Active / Closed, and therefore as well the visibility of such a Project Folder in Finder.
### Project Folder Relations
This option provides you the possibility to allow one or more Activity or Milestone Folders to be created under the Project Folder. Activity Folder Template should be assigned to the Project Folder Type. Each Activity Folder may be created automatically, when the Project Folder is created. In order to allow auto-creation of Activity Folder under Project Folder, you should select "Create" flag in Project Folder Relations next to each Activity Folder.
### Project Forms
Project Forms are customizable panels containing several form components, incl. Tabs, Edit Fields (numeric, text, integer), Checkboxes, Combo Fields, Memo Fields, ListBoxes, etc.).
#### Project Form by Type
MS Windows admin interface allows you to set one global form to be set on Project Folder Type.
#### Project Form by Template
MS Windows admin interface allows you to set one custom form to be set on Project Folder Template.
### Project Folder Numbering
MS Windows admin interface allows you to set Numbering for the Project Folder Type. By applying Numbering to Project Type, new number is automatically added to each Project Folder created in Atollon (Job Numbering for advertising agencies).
### Project Folder Roles
In MS Windows admin client, you can set list of Project Roles that are allowed for Project Folder Type.
### Project Folder Dimensions Settings
Project Folder Type may set whether Dimension 1, 2, 3 is optional, required or silent (assigned automatically).
# Folder Type Settings
This manual will show you how to create new Contact Folder Type
### General
Folder is key placeholder for any data in Atollon (root) context. We usually use folders to store data about client (contact folder). Some implementations may utilise folder as root entity in case of Product (asset folder) or Construction project (simple folder).
### Video Tutorial on Folder Types Settings
### Add New Folder Type
In web client Options & Tools > Context Settings you may add new Folder Type. Click on Folders section (top left) first and press Add button below.
The newly created Folder Type is (by default) Contact Folder Type. It is possible to create different Folder Types (Simple Folder & Asset), these are customizable only using Atollon Win Client.
##### Foder System Types
**System type**
**Explanation**
Contact Folder
Folder that is used to track all activities of any **contact** - **person** or **company**
User
Contact folder that may also create user account in the system (this must be setup in Folder Template)
Asset
Folder that tracks any activity regarding **Product**
Simple
Just a folder that may mean anything - it is used mainly to share documents and other company data
##### Folder Categories
Folder categories are used to group various types of folders together. Some examples may be found in the table below:
**Folder category**
**Explanation**
All clients
All folder types that may represent clients (Leads, Prospects, Clients, Customers, Partners, etc.)
Suppliers
All folder types that are available in invoicing on supplier side (Supplier, Partner, etc.)
Our Organization
All folder types that may be (in invoicing) on the side of provider (Our Organization)
...
##### Forms
Custom form that is bound to Folder type should represent any data that are specific to given folder type (you may track something else when you deal with Leads, something else you will track with current Clients, etc.
##### Tracking Categories
You may set whether tracking category (Teams, Product Categories, etc.) will be set on the Folder level (either optional or required).
##### Numbering
You can set new Folder numbering. The Numbering settings will pre-define what number will the new Folder have.
#### Folder States
##### Select or Create Folder States (Client Life Cycle)
You should drag & drop at least one of the **Available States** to **Assigned States**.
Each state must be assinged to one of the "fixed" states: Initial, Active or Closed. Contacts in Closed state will (by default) not appear in Finder, they will be archived/filtered.
##### Conversion of folder types
You may setup that once the folder changes it's status (for example **Lead** contact will become a **Client**), you may change the folder type (ie from **Lead** to **Client**).
To do it, simply create new Folder status (ie "New client") and assign it to the folder, together with target Folder Template. Once your folder reaches desired status, it's type will change according to assigned **Folder Template**.
#### Folder Templates
##### Create Contact Folder Type's Template
In order to enable users creating new Folders, there must at least one Folder Template exist that is allowed to be created in Root. Folders may also be created under different folders (as sub-folders). In such case, you must set-up **Relations** of the parent folder type and allow sub-folder (by their Folder Templates).
There must be at least one Contact Folder Type's Template. Usually it's name may be the same as the Folder Type Name.
When editing the Folder Template, you must select Initial Status.
Check "Can Be Root" to enable this Folder Template to be used in root level of Finder.
Check "Only One For Contact" to disallow creating several Folders of the same Type per one Contact.
Set Dimension: This may be used to pre-set controlling variable of the Contact based on this Folder Template.
##### Additional Folder Template Attributes
You will need to adjust the following additional attributes for Contact Folder Template:
1.) Go to menu: Settings > Account & Project > Account Templates
2.) Select & open newly created Contact Folder Type's Template
3.) Select Form (in Case you want a Custom Form to be used for each new Contact based on the same Template
4.) Select Contact type: Person or Company (select what contact will be created, when creating new Contact directly from Finder)
5.) User Template: select based on which User Template the user will be created (once the Person or Company should have access to your Atollon)
6.) New subject rights: Access Rights Customization (only if you want to customize Access Rights to all Contact Folders created based on this Contact Folder Template)
#### Roles
Folder types may have set-up internal or external roles. There are the following reasons to do this:
1. **Reporting** - you know, who's in charge for the client / lead / partner etc.
2. **Workflow** - you may assign tasks based on user roles assigned to folder type (lead / client / partner) etc.
3. **Access rights** - assigning user to role on folder means for example "Give sales representative permission to access client's details".
##### Roles as access rights
You must pre-define access rights on Folder Temlate. This must be done BEFORE the folder is created. Access rights to roles must be present on the given folder before the user is assigned the role. (This is something we may consider to improve in the future and allow modification of role rights once the user is being assigned).
#### Layout
You must create or assign any existing Folder Layout (we call it Activity Panel). The Folder Layout may be assigned to various **layout (GUI) presets** (ie Professional, Standard, Core) which are then associated to **user profiles** (Manager, Sales Rep, Admin, etc.)
#### Documents
You may add one or more document or e-mail templates to create Client's profile, Applicant's or Employee's profile, etc.
# Project Type Settings
This guide will take you through creating new **Project Type**, the entity allowing you to track part of Business Processes.
#### Video Tutorial on Project Types Settings
#### Create new Project Type
Open Options & Tools and browse to Context Settings. here, select Projects & click Add button to add new Project Type. Then it is necessary to change the Name field from New Type to your desired Project Type Name.
If the new Project Type is **Master Project**, you should check "Is Master Project Type".
If the new Project Type is **Slave Project**, you should check "Is Master Project Required".
Dimension Settings may add controlling variable to be optional or compulsory on the Project.
#### Assign one or more Custom States
Project custom states define project lifecycle from Initial, over In Progress to final Closed / Won / Lost.
Drag & Drop records (Custom States) from Available States into Assigned States or vice-versa. This way you will set-up all the available Project states during it's life-cycle.
#### Create Project Template
The Project Template is necessary in order to create at least one Project. All projects are created based on Project Templates. It is necessary also to set the Initial Status. Without the status, Project would not be visible in Finder.
Setting **Provider** helps to indicate, which entity (Account) will be set as Issuer on the Invoice generated in connection to the Project.
Setting **Customer** helps to indicate, which entity (Account) will be set as payer of the Invoice generated in connection to the Project, that means who will pay for the services in connection to the Project. This option is not typically used, you should change the Customer on each project individually, only once it is different from the Client (expecting that you create the new Project on Client's Contact Folder).
Setting **Journal** will indicate what numbering set will be used for New Invoice.
#### Add Activities / Milestones
Relations Tab on Project Type detail is used to add one or more Activities / Milestones to be allowed for the Project. Activities and Project Milestones can further split Project into several phases, which may be solved and delivered individually. The reason for adding Activities / Milestones is mainly indicating partial status of each of the project deliveries. Activity may also hold all communication, tasks, time sheet, documents, custom form, etc.
Just drag & drop one of the available Activity Templates here.
If you set Create to Yes, the Activity will be created automatically.
#### Allow Project to be created under Folder (of certain Type)
#### Add Custom Form to Project Type or Project Template
In order to assign Custom Form to Project, you may assign it to Project Type or Project Template (both may be used at the same time).
Custom Forms are administered using Atollon Win Client interface. Go to Settings > Account & Project > Account Types and follow the procedure:
1. Select the new Project Type
2. Press on Edit
3. Click on Form (...) field
4. Click / expand one of the Custom Form folders and press on New
5. Write the Custom Form Name (may be the same as the Project Type Name)
6. Press Ok
7. Select the newly created Custom Form
8. Press Ok
9. Save the Project Type settings
In order to design the Custom Form fields, you may return to Custom Forms administration and design the form. Go to Settings > Form > Form Admin.
If you need to add / design new Custom Form also based on template, follow the same procedure as above, just edit the Project Template (not Project Type).
#### Add automated Project Numbering
In order to let Atollon add unique number to your new Project, follow the procedure below:
1. Select the new Project Type
2. Press Edit
3. Click on Numbering (...) field
4. Press on New icon (to create new Numbering Settings)
5. Click on Serial (...) field
6. Press on New icon (to create new Serial Counter)
7. Write the descriptive name for Serial Counter ("Business Cases Serial" ... or there can be existing serial shared among more Project Types)
8. Set what event will cause reset of the Serial Counter (always last number used is remembered)
9. Press Ok
10. Select the newly created Serial Counter and press Ok
11. Add the Name, Number or digits in Serial field & write the Mask (ex.: "01"YYS will generate first number in 2011 year: 01110001)
12. Press Ok
13. Double click on newly created Numbering Settings
14. Save Project Type
## Access Rights
#### Limit rights on project type
Changing access rights on **project type** will influence **rights of users on projects of this type**.
See the screenshot below, you may change rights to project type in Context > Project > select project type that you want to update.
[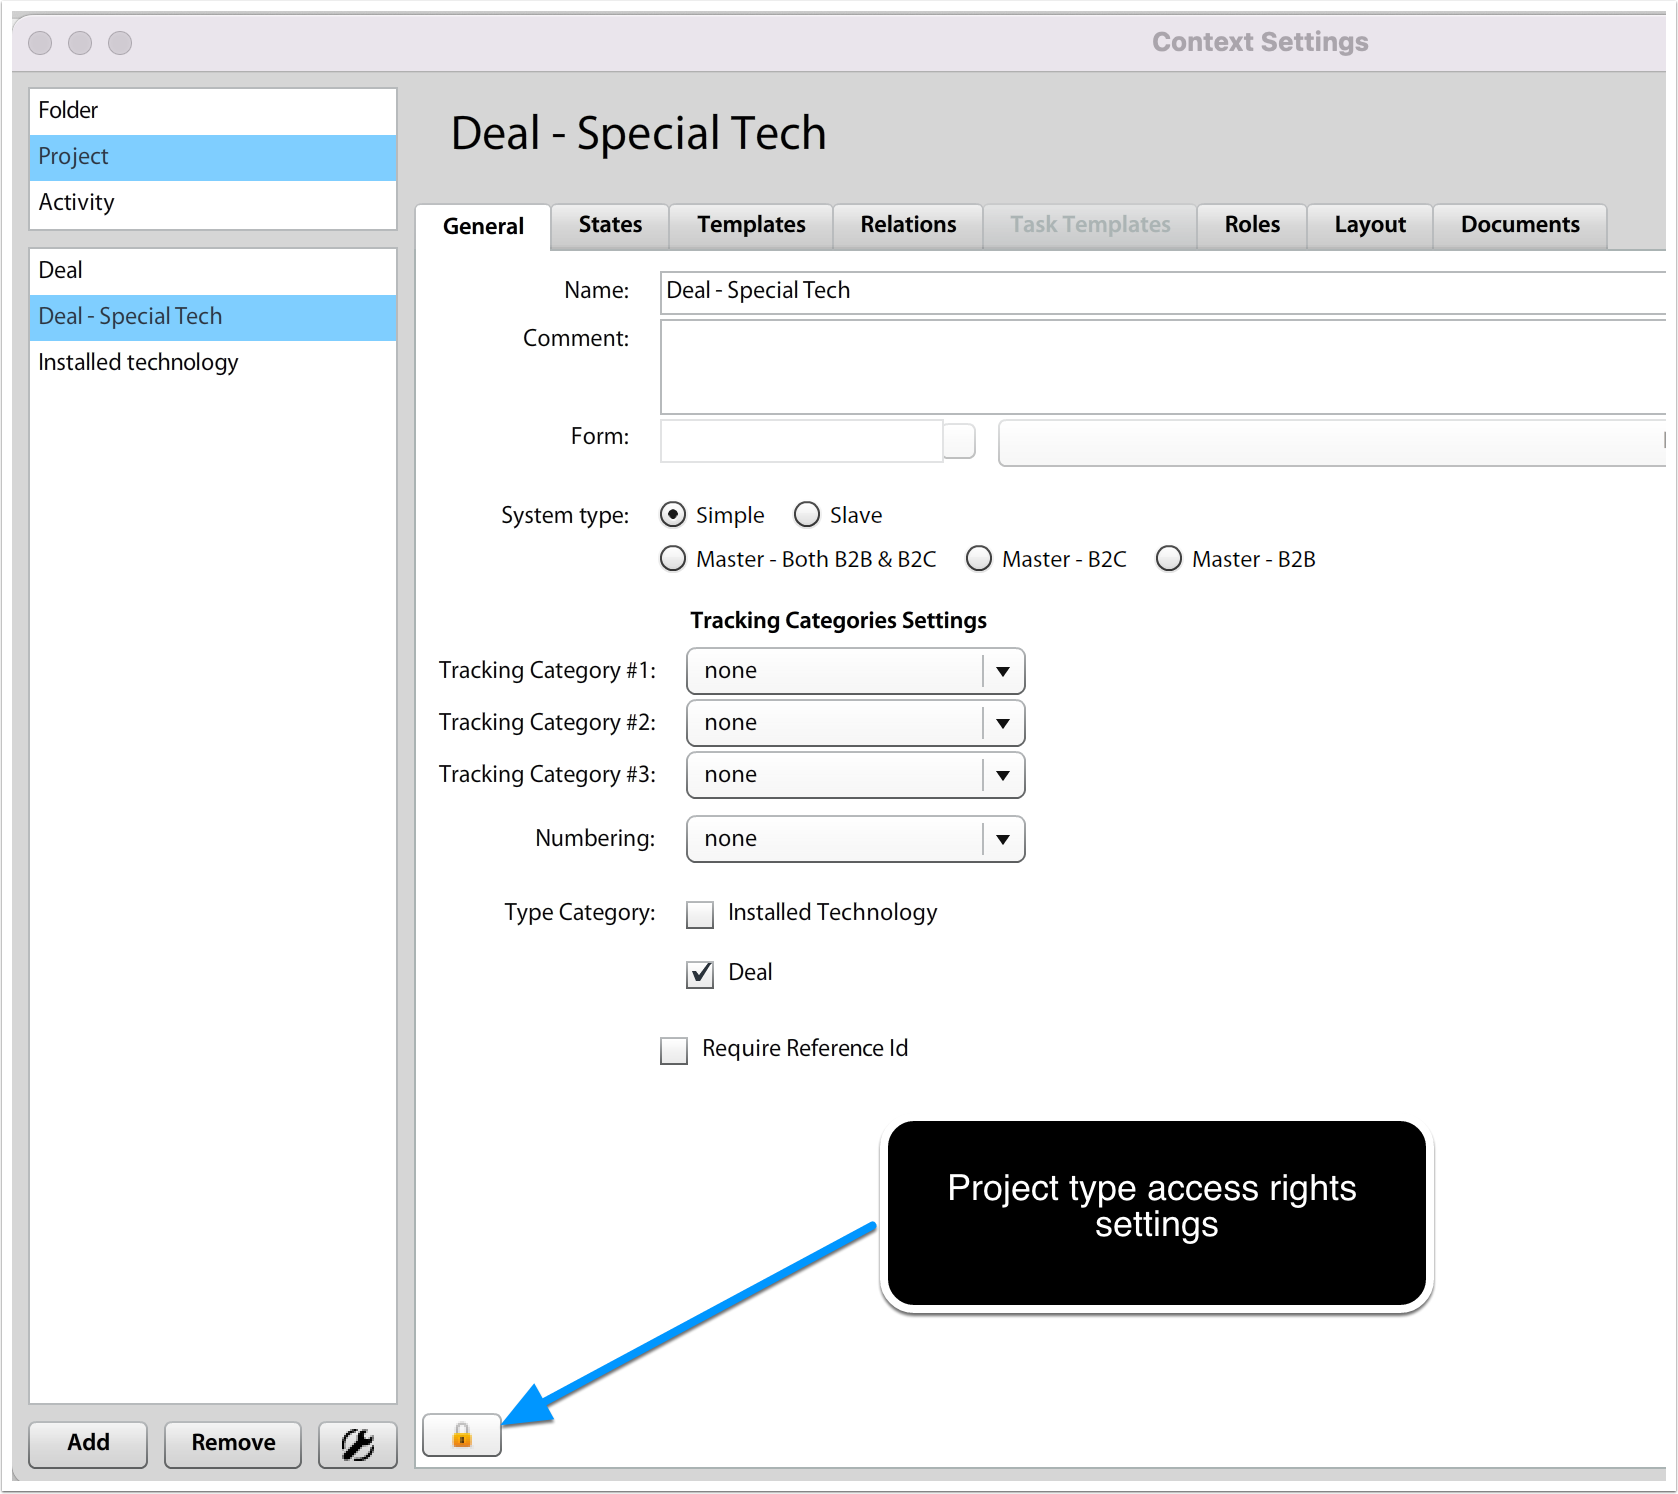](https://help.atollon.com/uploads/images/gallery/2024-02/context-settings-project-type-rights.png)
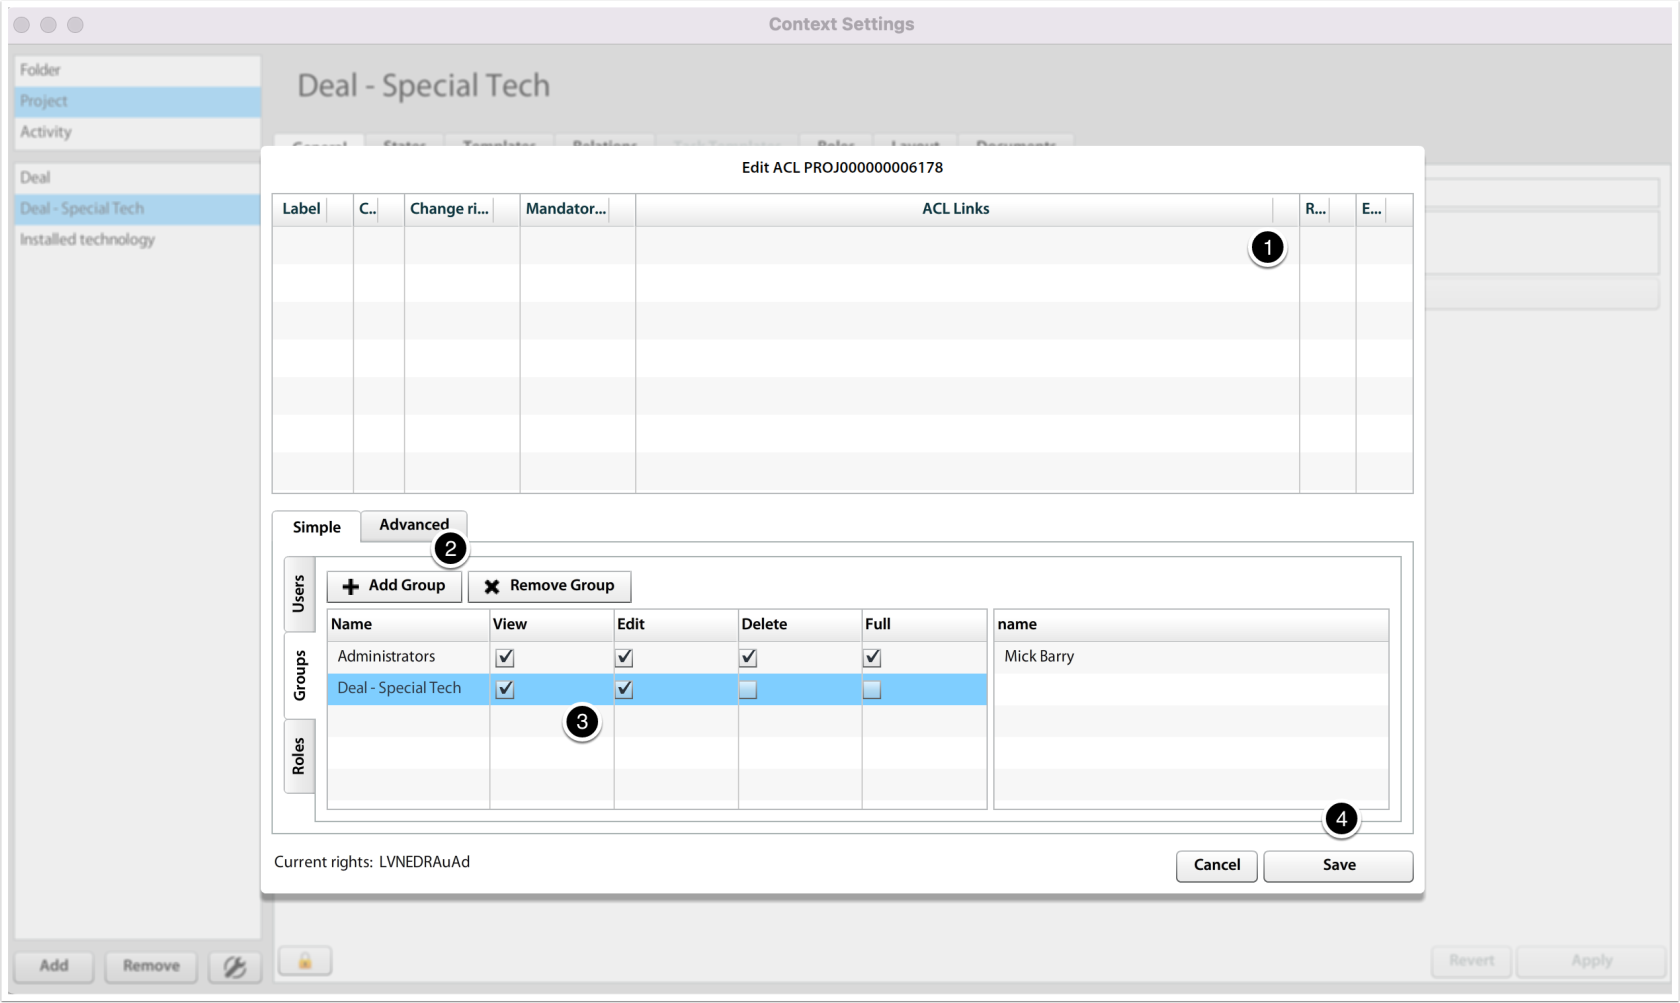
#### Update project type rights
Project type rights have 2 sections - above you can find link to parent tree node, from which rights are inherited. At this moment, you can only add new rights (not reduce, if they should be reduced). You can check what rights are defined (and inherited) following route using the key icon.
If you want to reduce (not add) rights, you should remove the inheritance (press on red delete button).
Before you save new rights, you should add group that will keep access to project type. You may keep group Administrators to have full rights.
[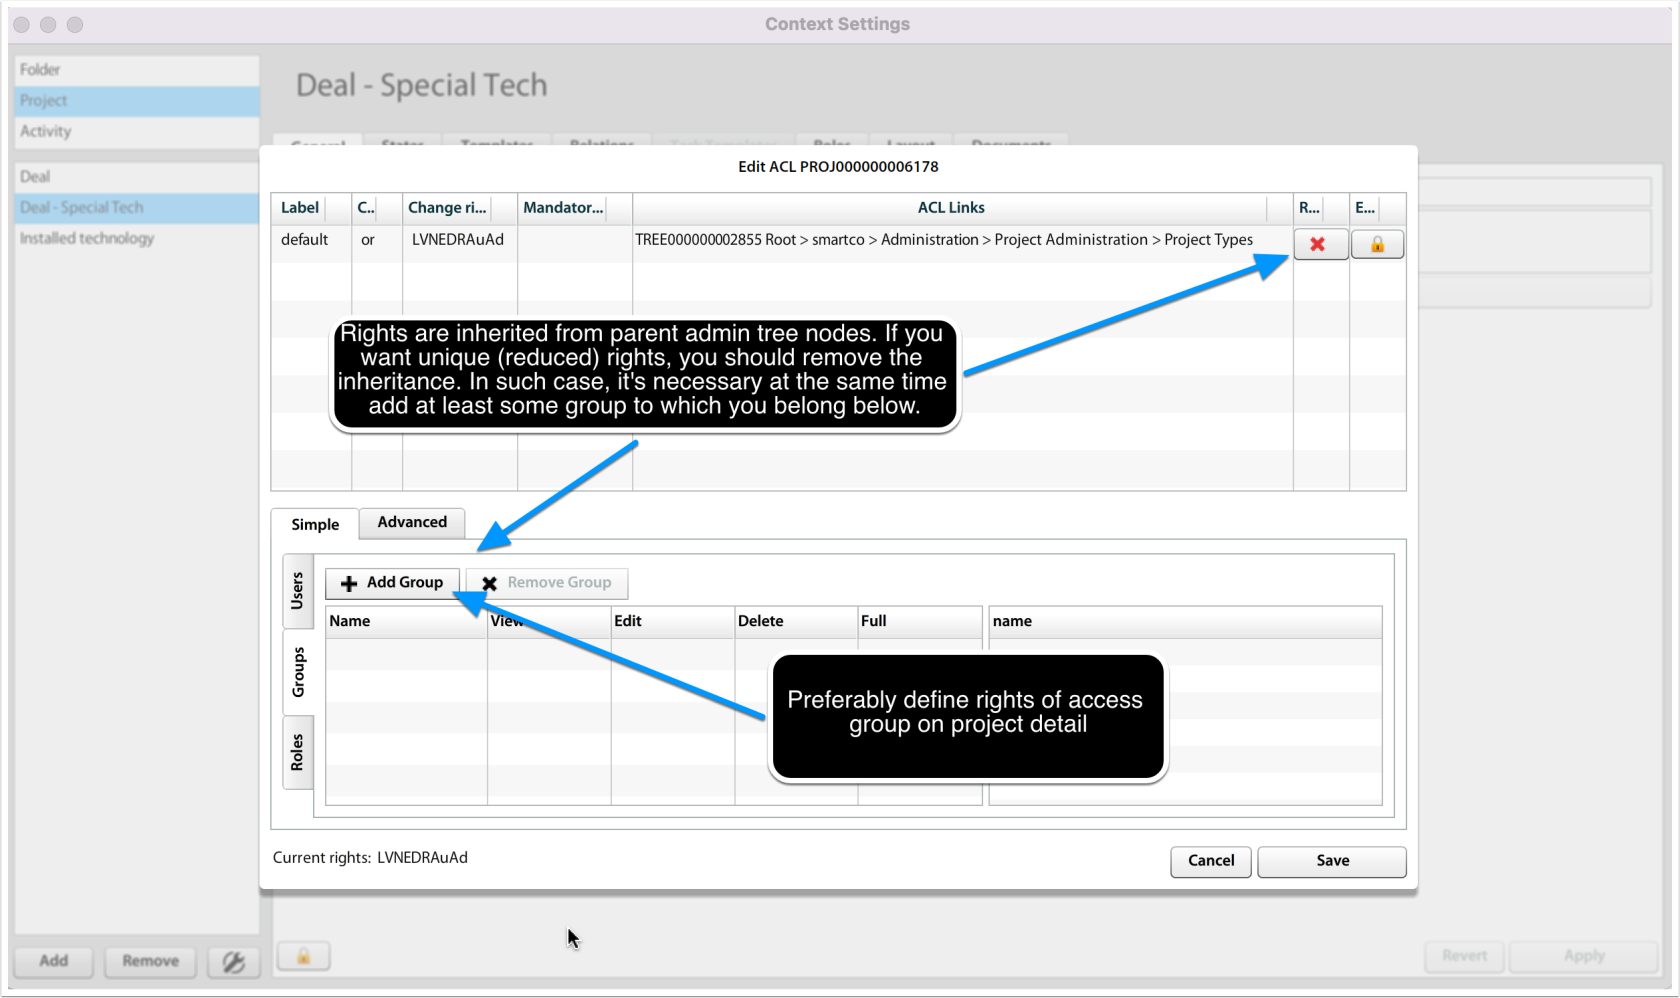](https://help.atollon.com/uploads/images/gallery/2024-02/context-settings-project-type-rights-acl-details.png)
#### Create special group of users with access to project type
If you want group of users have access to the project type, you may want to **create the access group** first.
[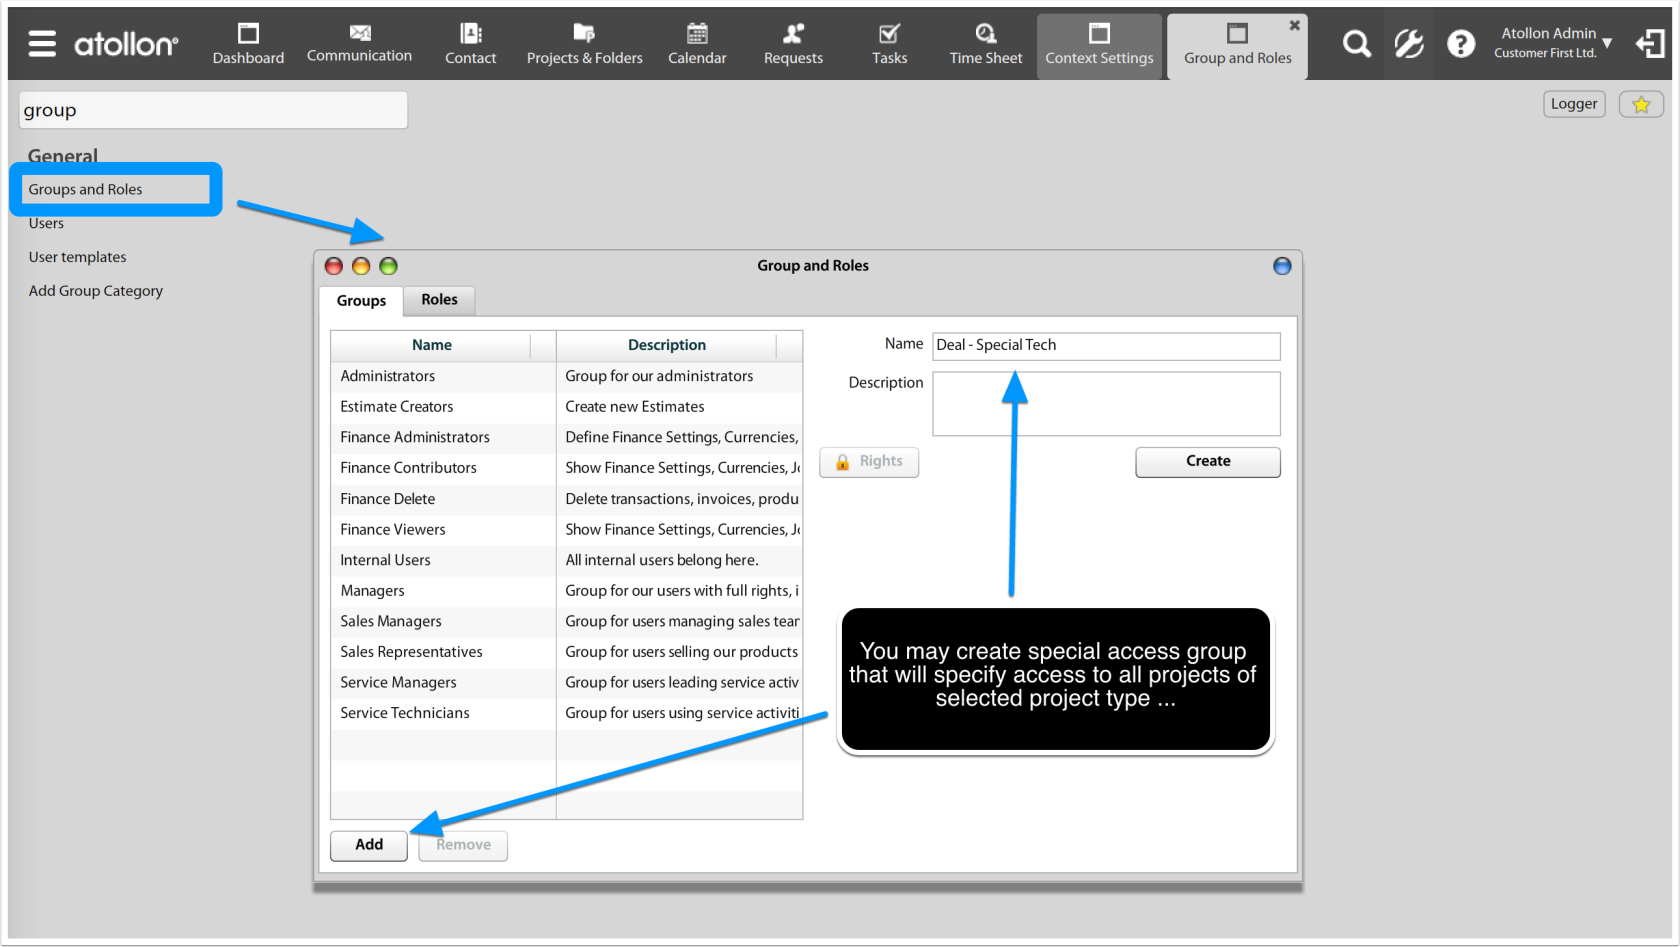](https://help.atollon.com/uploads/images/gallery/2024-02/context-settings-project-type-rights-create-group.png)
#### Add user to group
Users are added to the group by updating the **Access Groups** section in User settings.
[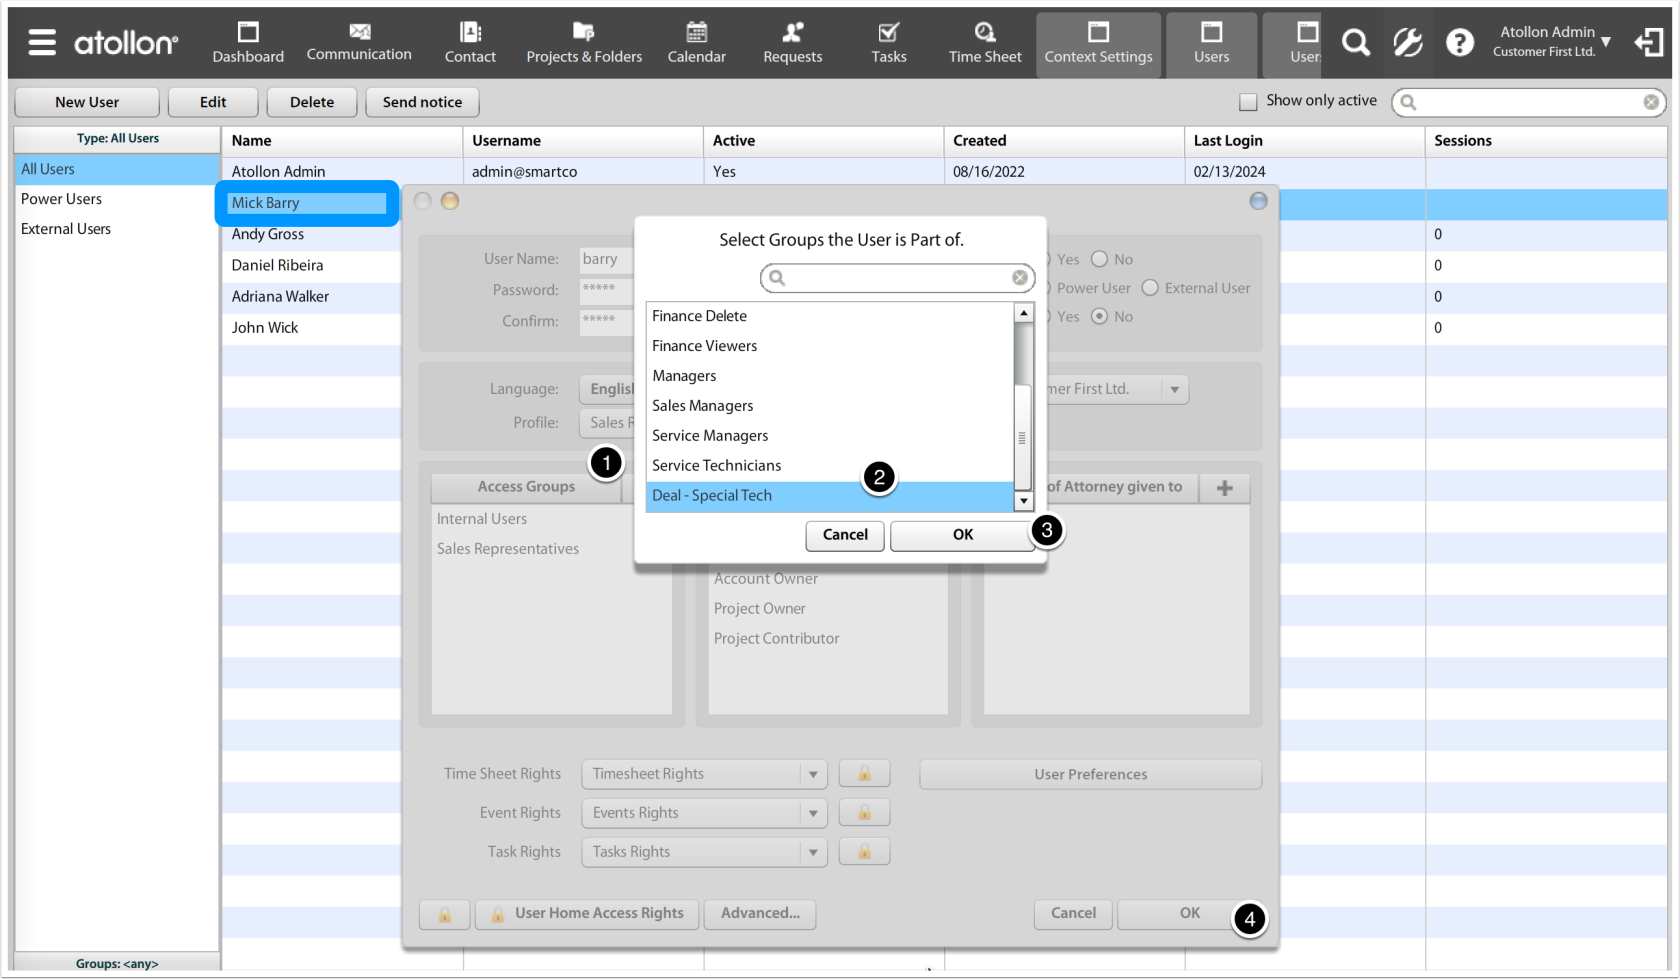](https://help.atollon.com/uploads/images/gallery/2024-02/context-settings-project-type-rights-add-group-to-user.png)
#### Adjust project type rights
If necessary, remove inheritance (top section). Add new groups that should have access to projects based on this project type. Administrators should have full rights, regular users might not have all rights (ie it is advised regular users are not able to delete (communication) from the project.
[](https://help.atollon.com/uploads/images/gallery/2024-02/context-settings-project-type-rights-results.png)
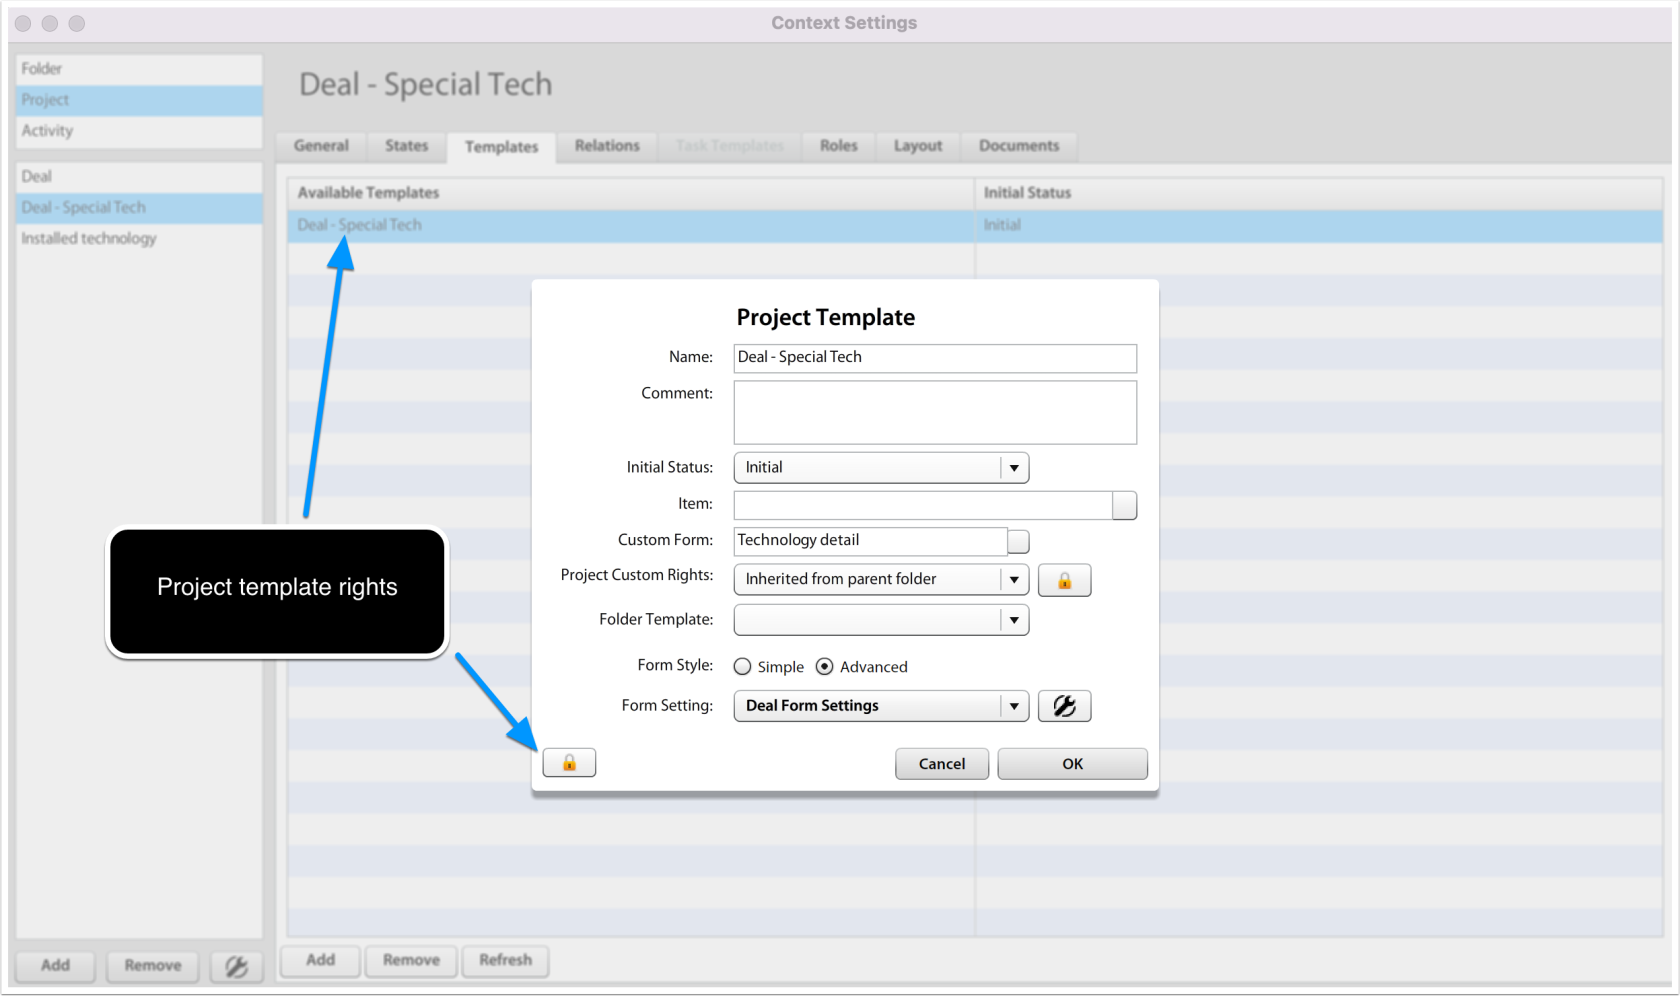
#### Adjust project template rights
Repeat steps above to adjust also project template rights. Now the project template rights stand separately (are not inherited from project type). This may change in future Atollon releases. Until that is changed, you need to do this setting manually once again.
[](https://help.atollon.com/uploads/images/gallery/2024-02/context-settings-project-type-rights-template.png)
# Activity Type Settings
## New Activity Type
This guide will show you how to create Activities. Activity is container used to track Project phases or customer requests, etc. Activity may store communication, tasks, time sheet records, documents and it is possible to assign Custom Form to Activity Type.
#### Create new Activity Type
On Templates Tab, create at least one Activity Template. It is currently used only to set the Initial Status, but it needed to set-up Relations with Project Type properly and in order to create new Activity manually by users.
#### Enable Sub-activities
In order to be able to create new Activity under Project, you must assign Activity Template to Project Type. For example allow creating "Brief" Activity under "Project" Project Type. In this case, you can also click on Create option to create new Activity ("Brief") under new Project based on this Project Type.
1. Select Project section
2. Select the Project Type
3. Select Relations Tab
4. Under Activity Templates, drag & drop the Activity Template and click on Create checkbox, once you want this Activity to be created automatically when creating new Project
#### Assign Custom Form to Activity
To add Custom Form fields to Activity Type, you must open Atollon Win administration client, go to Settings > Account & Project > Activity Types.
1. Select the Activity Type
2. Press on Edit
3. Click on Form (...) button
4. Click on Activities folder
5. Click on New Form button
6. Write Form's descriptive Name
7. Press Ok
8. Select the newly created Custom Form
9. Save Activity Type
Please note that it is not possible to assign Custom Form to Activity using Activity Template (which is possible for Projects and Folders).
#### Add numbering to Activities
Please follow similar procedure indicated when creating new Project Type.
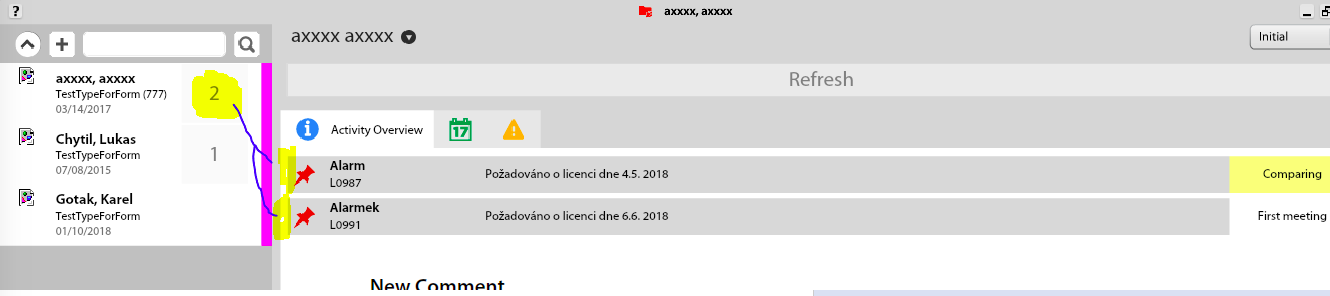
## Activity Overview
#### 1. Create Custom Form
1a. Open FormDesigner and create CustomForm:
[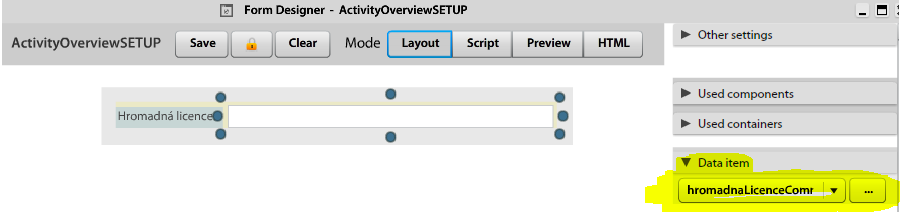](https://help.atollon.com/uploads/images/gallery/2020-03/activity-form-formitem-design.png)
1b. Create and **copy** your DataItem name (From Value Name)
#### 2. Setup Layout Designer
2a. Open ActivityPanel's Layout Designer and add ActivityOverview application: (1)
[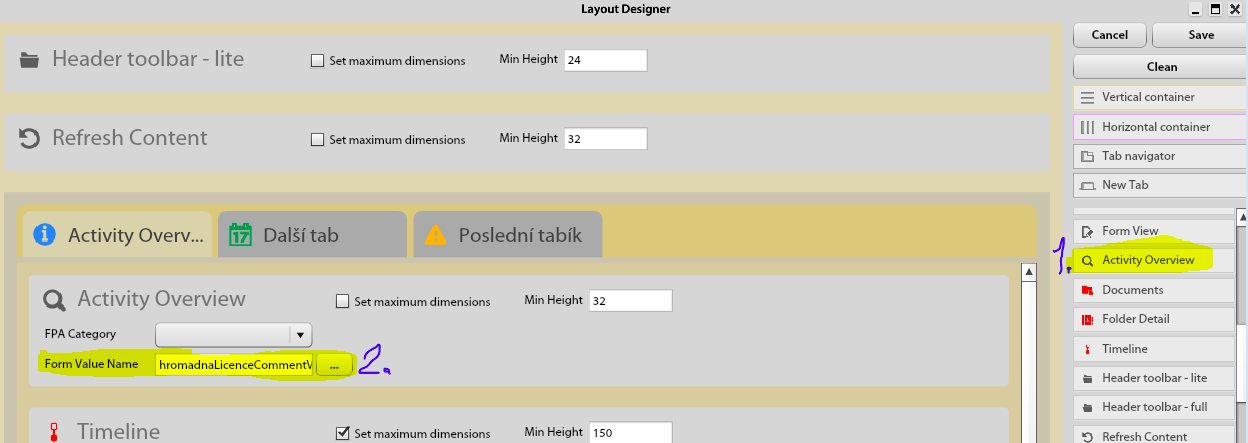](https://help.atollon.com/uploads/images/gallery/2020-03/activity-overview-formitem.png)
2b. Set "From Value Name" (2) - check **1b** step
#### 3. Setup Custom Form
3a. Set CustomForm to your context (Context settings)
3b. (restart Lagoon maybe required)
3c. Try to set some values:
[](https://help.atollon.com/uploads/images/gallery/2020-03/activity-form-formitem-edit.png)
#### 4. Show activity overview on project
**[](https://help.atollon.com/uploads/images/gallery/2020-03/activity-overview-activitypanel.png)**
# Layout Customization
Tabs on Contact Folder Detail, Project Detail are customized using **Activity Panel Settings**. Due to high robustness and customization options, there are several steps that need to be done in order to fully customize Project's or Contact Types's Tabs.
## Set-up User Profiles
There are some default User Profiles already set-up (such as: External User, Internal User, Manager). If you want to create new, go to web client: Options & Tools > Profiles and create the new User Profile (top left).
New User Profiles may be for example: "Accountant, Finance Manager, Developer, Support Engineer, etc."
## Set-up Activity Panel Presets
GUI (Graphical User Interface) sets are configured using Activity Panel Settings. User Profiles may share one Activity Panel Preset or there can be create one Activity Panel Preset for each individual User Profile (that means each User Profile will have it's own configuration of Tabs).
To set-up new Activity Panel Presets, go to Options & Tools > Profiles. On top-rights, you can select preset: Activity Panel and add new records. There are already some existing, but you may add new, such as "GUI for Finance, GUI for Support, GUI for Production, etc.".
Now you need to assign Activity Panel Presets to User Profiles. Let say define that User Profile "Developer" will be using "GUI for Production".
## Define New Activity Panel
For each **Contact Folder Type** and **User Profile**, you may want to create new Activity Panel. If there is no need to set-up various User Profiles, you can (of course) create just one Activity Panel Setting and assign it to all Contact Types and store it in all Activity Panel Presets.
To create new Activity Panel Setting go to Options & Tools > Activity Panel Settings. Add new here, put in some desctiptive name, such as "Prospect view for Finance", save. Once properly saved, you can select what Tabs will be displayed in this Activity Panel and save again.
## Match Activity Panel Setting & Preset
You should add newly created Activity Panel to one or more Activity Panel Presets. For example add Activity Panel "Prospect view for Finance" to Contact Type "Prospect" and Activity Panel Preset called "GUI for Finance".
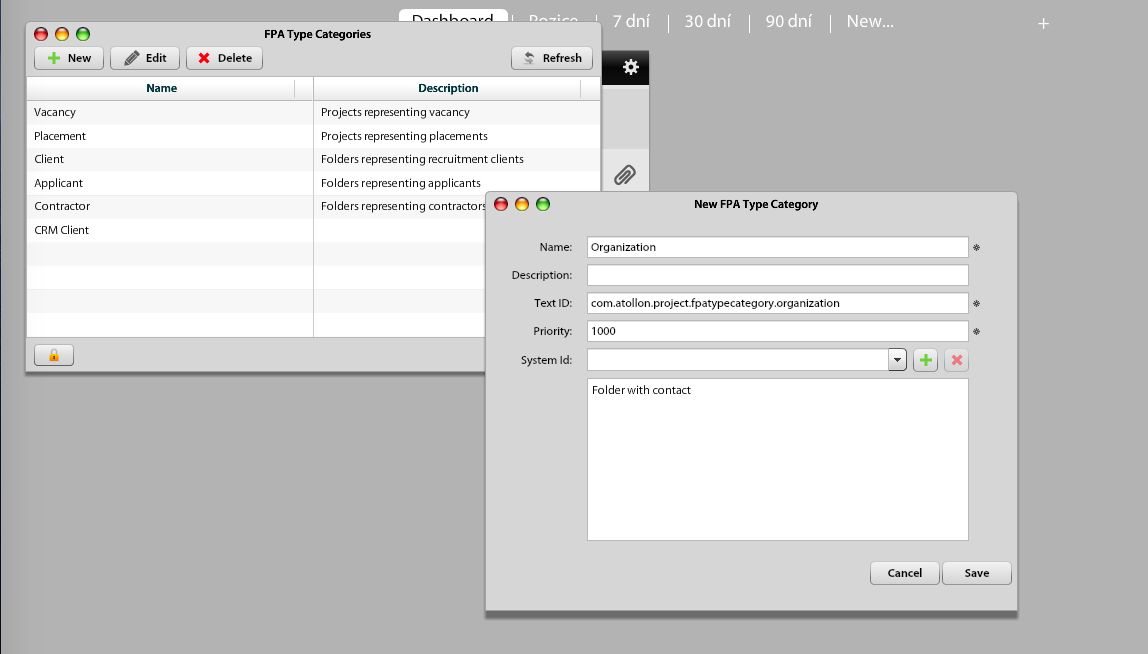
# Context Categories
Context Category is main building block for grouping similar types of Folder Types, Project Types and Activity Types. Internally called "FPATypeCategory".
#### Options & Tools > FPA Type Categories
[](https://help.atollon.com/uploads/images/gallery/2020-04/fpatype-category-new.png)
**Name** = Context category name, example "Client"
**Text ID** = representing pre-set string that should NOT be changed by users (such as com.atollon.project.fpatypecategory.organization representing all folder types that our "Our Organization")
**Priority** = not important, but required (put any number)
**System ID** = system type of the Folder / Project / Activity is required. Set any system type that matches your new category.
# Multi-organization folder view
By default user can see only folders from organization where he is logged in. In case of viewing folders from organization A within another organization, he must switch back to organization A. To allow user to list folders from another organization without switching back and forth, he must have the Multiorganization View checked in user's setting.
To set this up go to: Settings > Users > select user and click Edit > button Advanced > tab Multiorganization View. There you can see two columns grid, where first column contains checkboxes and the second names of the organizations. If checkbox is checked, it means the folders from the organization will be listed wherever is the user logged in.
This setup doesn't take in consideration wrong consultant's setting. That means, for having this working properly, the organization's settings have to be shared almost entirely.
Scenario:
There are 3 organizations: A, B and C. User has only organization B checked in the Multiorganization View and he's currently assigned (logged in) to organization A.
- If user lists the folder there, he sees folders from organizations A and B.
- If user switches to organization C, he will get folders from organizations B and C.
- And if user switches to organization B, he will get folders only from organization B.
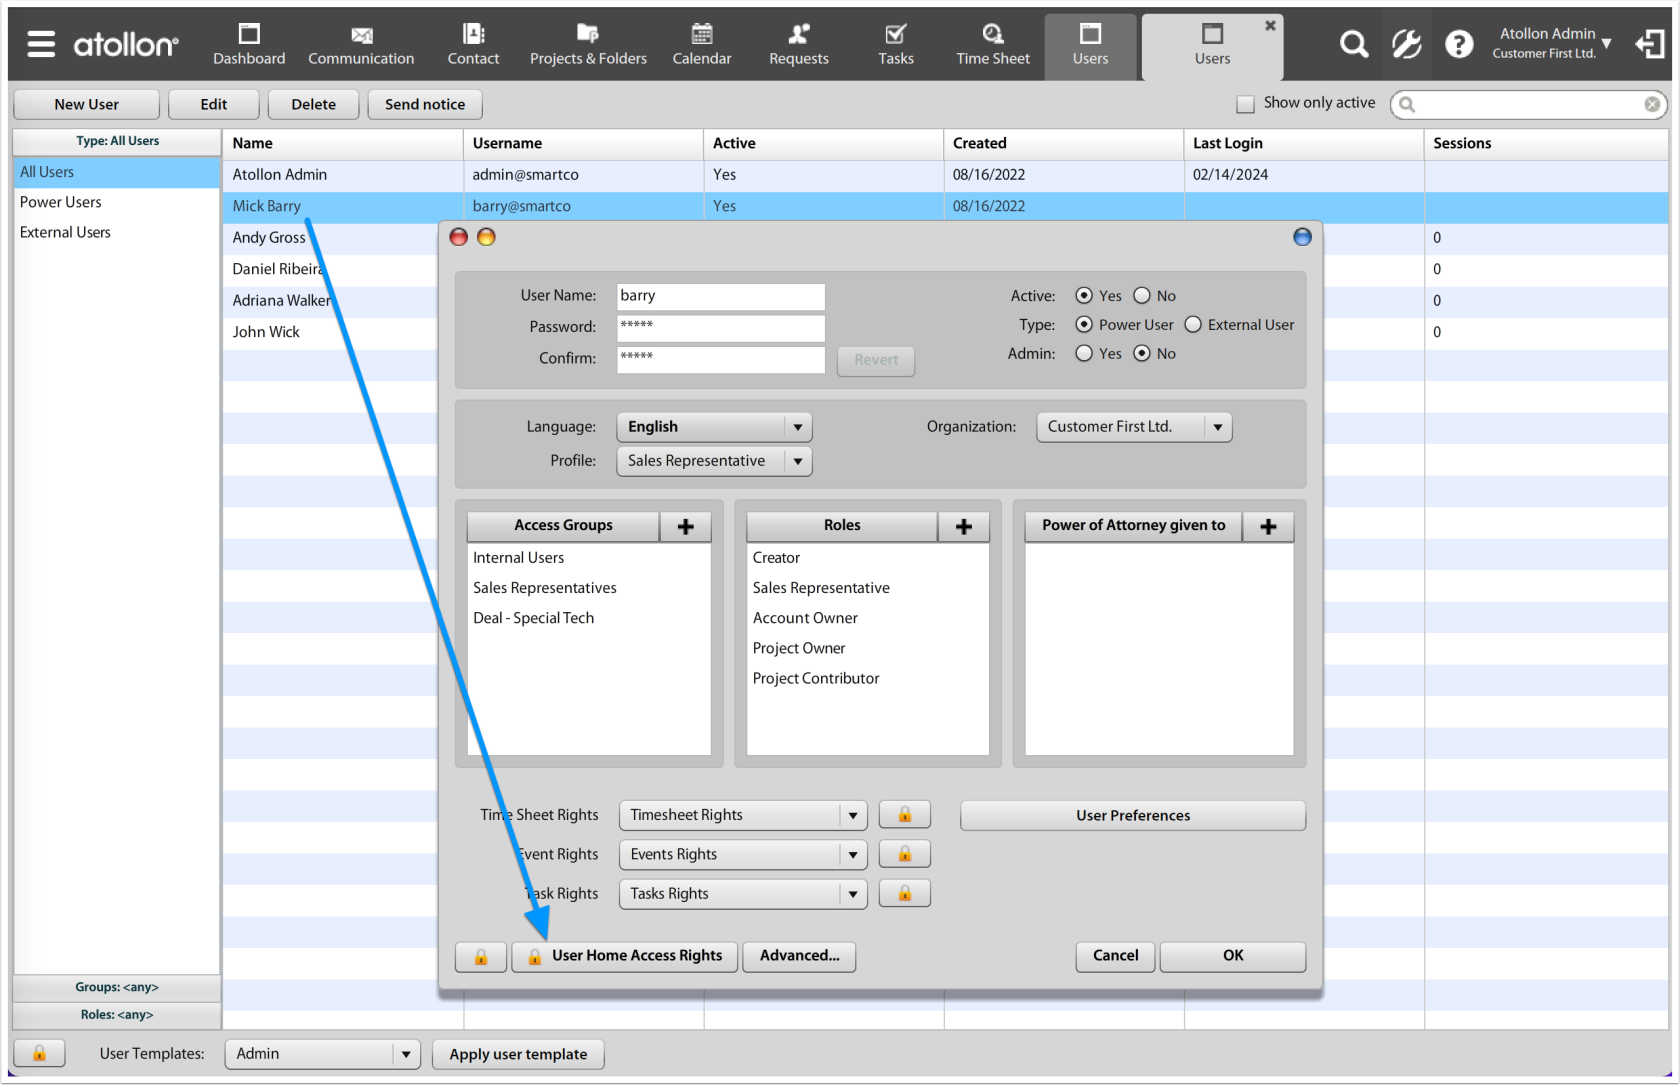
# Access Rights
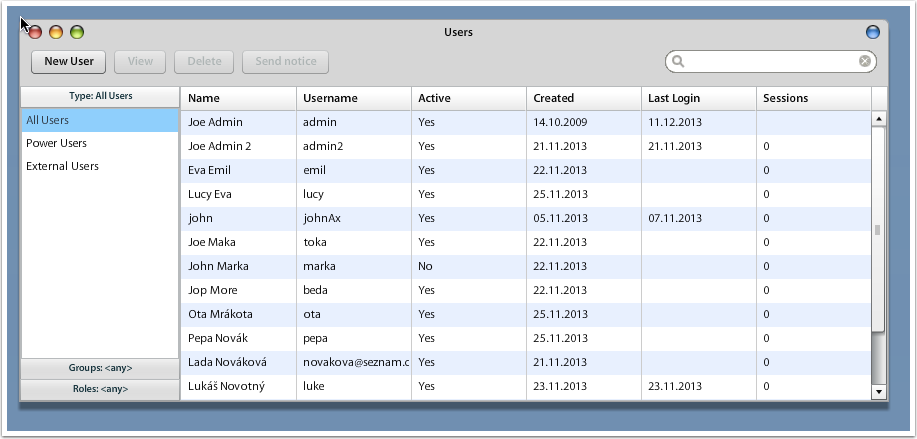
# Users
This page provides you with overview about Atollon Users database. You can filter for Power Users or External Users, as well as look-up users by their (Access) Groups or Roles.
[](https://help.atollon.com/uploads/images/gallery/2020-03/users.png)
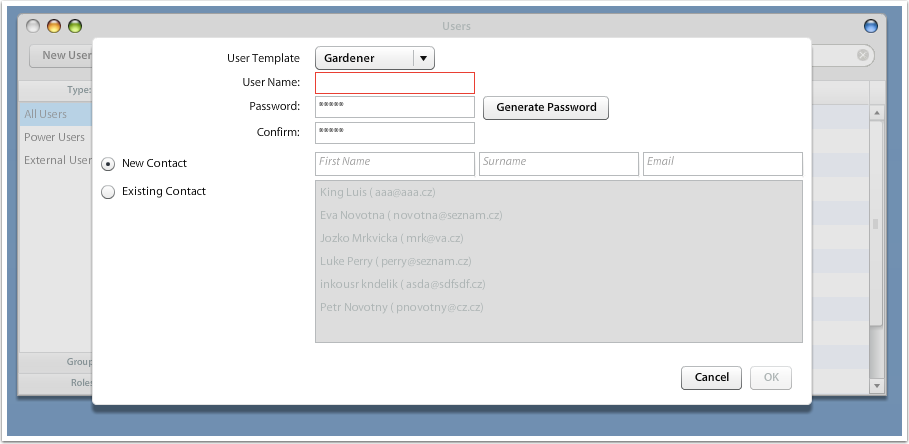
### Create New User
You can create new user based on any (existing) User Template. In case there are no templates available, you can create new using Options & Tools > User Templates.
[](https://help.atollon.com/uploads/images/gallery/2020-03/users-new1.png)
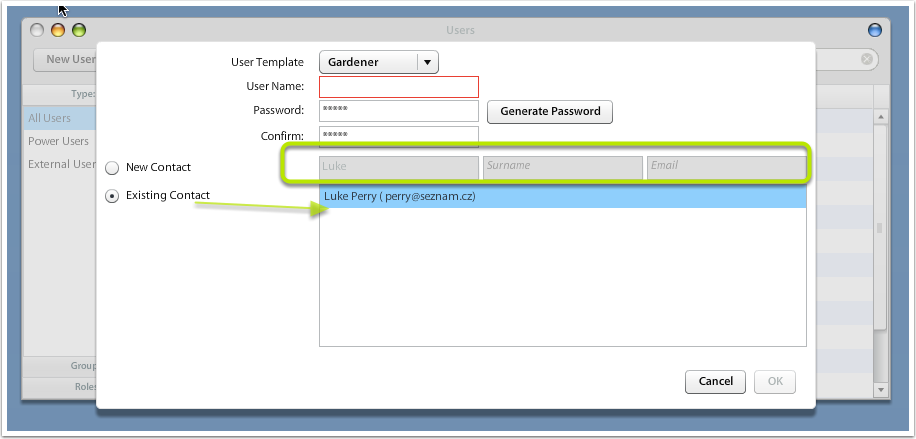
##### Create new contact vs. select existing
You have option to create new contact for newly created user or if you know there is already user's contact in your database, you can search for the existing contact. Just write person's First Name, Surname or E-mail & switch to "Existing Contact" option. Application should filter for your contact. In case the contact is not user yet, you'll be able to select existing contact, to which the new User account will be associated.
[](https://help.atollon.com/uploads/images/gallery/2020-03/users-new2.png)
#### User Base Types
##### Power User
Power User is internal, fully licensed user, whom you may add any rights to use Atollon in it's full potential.
##### External User
External User is free, restricted user. The conditions for using this type of users are restricted by Atollon Company.
See how to [add new User](mks://localhost/en/user-manual/options-and-tools/users/Add_New_User "en/user-manual/options-and-tools/users/Add New User").
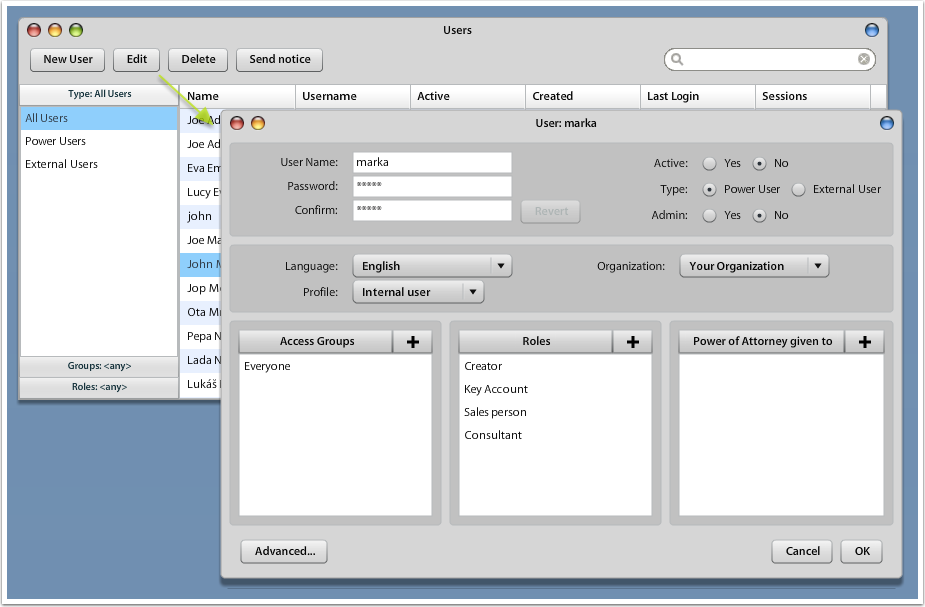
#### User Edit Details
[](https://help.atollon.com/uploads/images/gallery/2020-03/users-edit.png)
#### User Fields
##### User Name
Indicates the user in the system. You can rename this field at any time and it will not have effect on Atollon (all records, where the User Name was indicated will be renamed at the same time).
**If you want to change users first name and surname (contact name) you can do it in contacts. Open contacts, find specified contact that belongs to the user and change the name there.**
##### Password + Confirm
Fill-in the User's Password and confirm it (write the same password once more).
##### Active (Yes/No)
Indicates whether the user can login to system and whether it will be available to other users.
##### Type (Power User/External User)
Switch whether the User is regular (Power) user or whether it is your limited (External) user, for example client or partner.
##### Admin (Yes/No)
Indicate whether this user will have access to administration features. Some Atollon features may be accessible only to administrators.
##### Language
Indicate preferred user's language for the application interface. Some Atollon features provide (by default) multi-lingual information in user's language. Please note that in communication with users using Mass Mail or Workflow, Preferred Language on contact is used instead.
##### Organization
Default Organization (for Atollon set-up in multi-organization mode).
##### Profile
User's default application interface behavior.
### User's Access Rights Options
#### Access Groups
Add the user to one or more Access Groups to assign the user immediately permission to selected modules, functions and data. By default, there are several access groups pre-configured to meet general needs. More advanced users may customize Atollon access rights fully using Atollon Windows Administration interface.
#### Roles
Allow the user to occupy one or more Roles. The user is authorized to use Role's permission only once the user is added to the same Role on Project or Atollon's Folder.
#### Power of Attorney given to
This option allows you to add this user's rights temporarily or permanently to some other user(s). It may be useful once the user gets on vacation, to give some other people her access rights for the same time. Please note that also personal data are available in the same time, incl. calendar, tasks & messages.
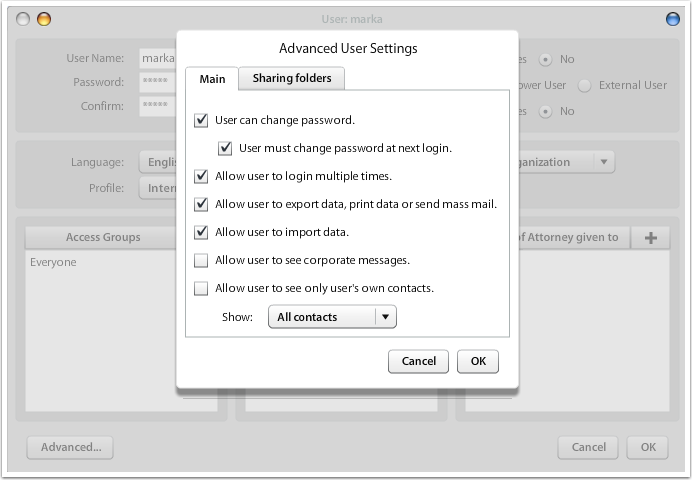
### Advanced Options
[](https://help.atollon.com/uploads/images/gallery/2020-03/users-edit-advanced.png)
#### User can change password
Otherwise user can't
#### User must change password at next login
The user will be required to change their password after logging in. This is a necessary step for [setting up a calendar on an iPhone.](https://help.atollon.com/books/atollon-core/page/atollon-calendar-in-iphone)
#### Allow user to login multiple times
Should the user be able to login several times to Atollon? If not selected, the user will destroy all open sessions, when logout.
#### Allow user to export data
Should the user have possibility to use export functions?
#### Allow user to import data
Should the user have possibility to use import functions?
#### Allow the user to see only user's own contacts
What are user's own contacts?
- User created the contact
- User edited the contact
- User is primary responsible for the Account (Contact Folder)
#### Sharing Folders
This options allows user(s) to share folders with another organization.
Example:
- Organization A (Legal services): Clients (separate)
- Organization B (IT Support): Clients (separate)
- Both Organization A + B: Prospects (shared database of potential customers coming from web)
*(Note to Atollon consultants: When setting-up organizations, please make sure that in order for system to work properly, it is necessary to share Folder (Type, Template, Status, Forms, etc.) settings.)*
## Remove or Deactivate User
### Temporary block user account
1. Options & Tools -> Users -> double click user -> set **Active** option to No.
2. [Redirect existing mail address](https://help.atollon.com/en/admin/mail-set-up/Redirect_existing_mail_address "en/admin/mail-set-up/Redirect_existing_mail_address")
[](https://help.atollon.com/uploads/images/gallery/2020-03/user-deactivate.png)
### Permanently remove user account
1. Options & Tools -> Users
2. Select the user & Delete
Please be aware that by deleting the user you won't be able to filter for user's records any more (incl. any Time Sheet records she created, Projects, Clients, etc.) In case the user has track record that should remain in the system, do not delete the user, instead just make the user inactive (so it can be activated temporarily, if necessary).
User is never technically deleted from the database. In case you accidentally deleted the user record and need to return it to it's previous state, you may contact Atollon technical support for help. Please note that this operation requires server restart and is enabled only on dedicated Atollon instances.
## User Home Privacy
Each user get her own **User Home** folders that may contain private (personal) messages, private e-mails, private documents, etc.
By default Atollon shares all communication within company. If you want to avoid sharing personal data, you should verify User Home settings and disallow inheriting global rights.
### Check User Home rights
Go to Options & Tools > User. Open detail of each of the users. Open User Home Rights.
[](https://help.atollon.com/uploads/images/gallery/2024-02/user-home-1.png)
### User's Home Folder Rights
After clicking **User Home Rights** button, you get to see rights of user's mail inbox. Look at what rights are inherited from parent ACL tree nodes, until you get to **user@instance** folder ACL settings ([user@instance](mailto:user@instance) will contain your user's username, such as [barry@smartco](mailto:barry@smartco) on below screenshot).
[](https://help.atollon.com/uploads/images/gallery/2024-02/user-home-2.png)
### Remove user's folder global rights
Once you get to **user@instance** ACL settings (see highlighted title on screenshot), you may remove the inheritance of this user's folder to it's parent (User Home folder).
Before saving, you need to add the **User's own Full rights** (they should be already preset) and **Administrators** full rights (they may be missing). If you want to avoid Administrator's rights to user's home folder, you need to make this configuration under **root** user. That is the only user, who may limit access rights to anyone except the User Home folder owner.
[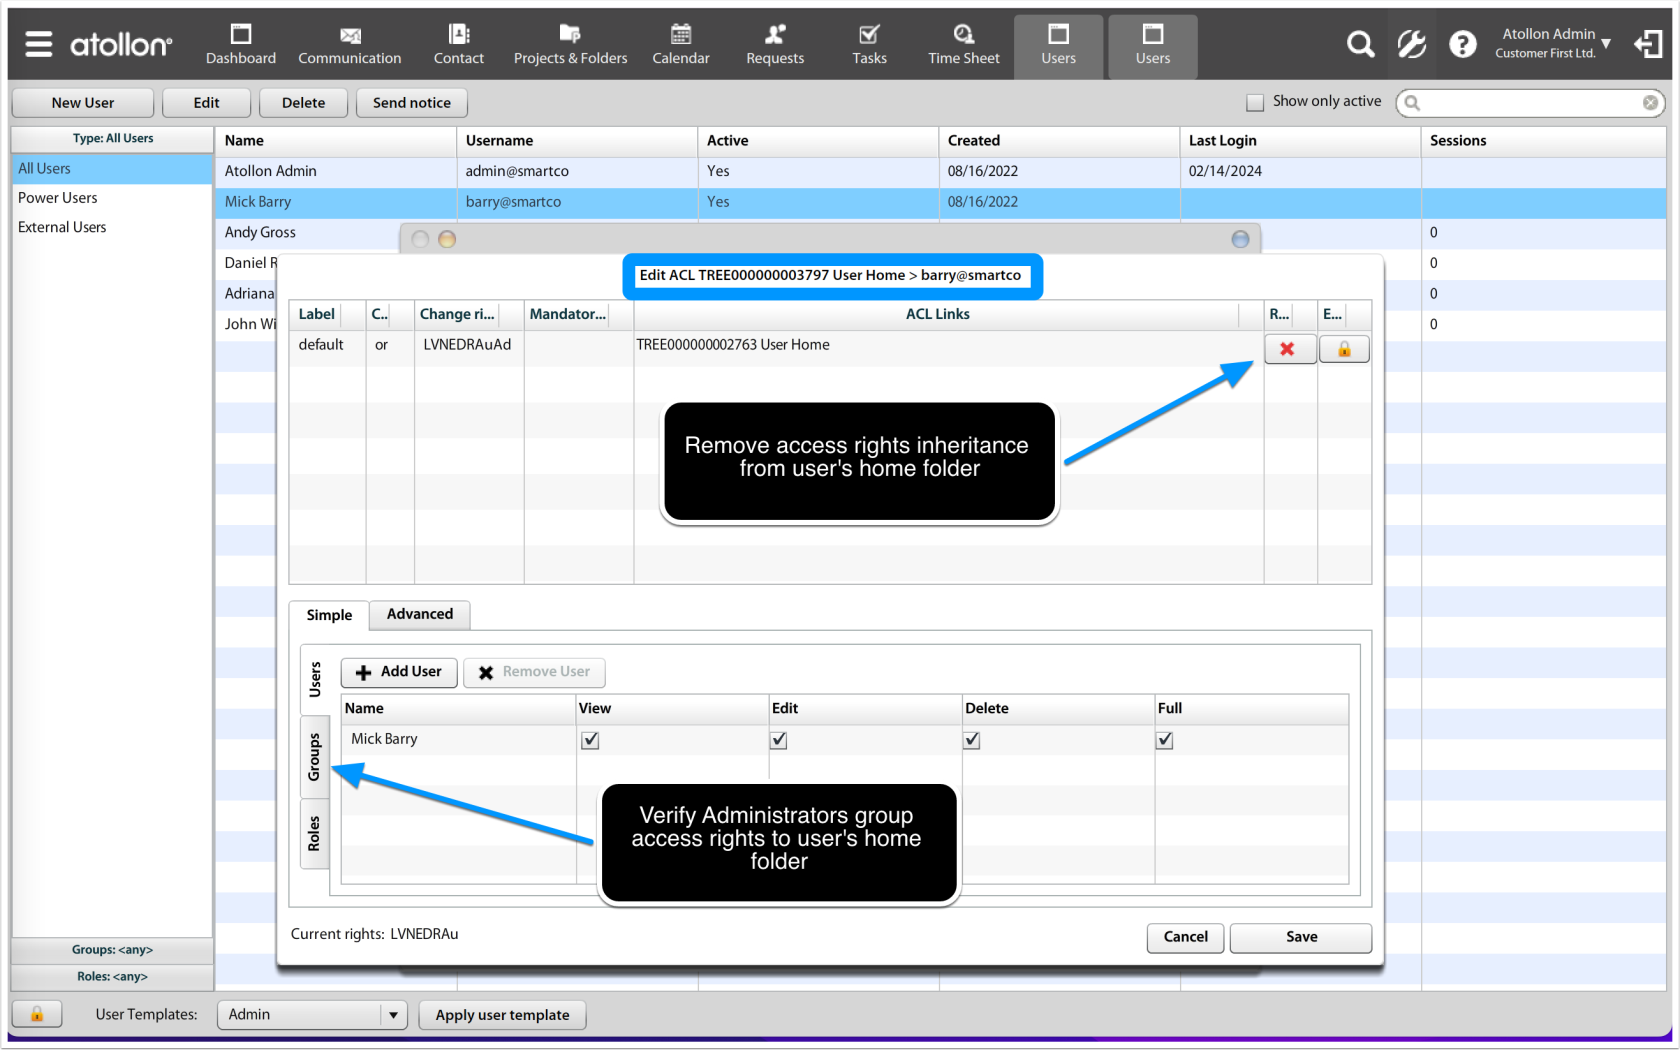](https://help.atollon.com/uploads/images/gallery/2024-02/user-home-3.png)
# General
### Atollon Directory
Access Rights in Atollon server are based on tree-hierarchical structure. See the attached document for the Atollon Directory scheme.
## Roles
**Role** is **Access Rights** entity that can be assigned to users in connection to **Folder (Account)** or **Project**. **User** must be allowed to fit into specific role. See **User Settings** to add user into role. By adding user into role, you specify that anyone with R (Rights) permissions can assign the **User** into the **Role**. Nothing else. **User** does not get any rights only by adding the user into the **Role** (this is different compared to **Access** **Group** rights). **User** gets permission specified by **Role** rights only after *Account Manager*, *Project Manager* or any other authorized **User** adds the user into **Role** on **Project** or **Folder** (Account).
### Role "Creator"
**Creator** role is specific system-generated **Role**, which helps assign User into **Creator** role automatically after creating the **Folder** (Account) or **Project** based on **Folder** / **Project Template**.
### Define Project Role Rights
**Project Template (Folder Template)** may define specific access rights that any **User** assigned to **Project** **Role** on specific **Project** may receive. To amend **Project Role** rights, go to **Project Template Settings** and change **Custom Rights** options. These rights are pre-definable only to new projects. If you want to change rights to existing projects, you should check function of mass-project rights change in **Reporting** (only Win client).
If the **Project Role** rights are not specified by **Project Template**, but are allowed by **Project Type**, system automatically assigns full rights to the user on the project.
### Conditions of adding User to Role on Project
1. Check whether **User** may be assigned to **Role** (see User Settings)
2. Check whether **Project Type** contains the specific **Role**
3. Check whether user assigning other users has **R** (Rights) permissions on the particular **Project**.
Please be aware that usually projects are visible (editable / approvable) also by **Access Group** rights to large number of users (P*roject Managers, Administrators, Everyone*, etc.) depending on **Project** default access rights settings (based on **Project Template**).
## Access Rights Properties
### ACL (Access Control List)
Atollon system access rights utilize per-object access rights. That means each Container or Leaf Node may have it's own Access Rights definition.
### Access Rights Definition
Users, Groups and Roles may be assigned to have authorization to **List**, **View**, **Create**, **Edit**, **Authorize** or amend **Rights** of each individual object that is associated to the ACL. Special rights include **Admin** (this right can be editable by root user only and disallows changing this permission to any other users) and **Finalize** (this right means that the permission is set for the current object only and can not be inherited).
### Access Rights Inheritance
Access Rights to one object (ACL) may be automatically taken from another ACL (or multiple ACLs). This is used when setting-up rights for more records (messages, documents, etc.) at the same time. It is enought to set rights in parent node / folder / container and the objects linking to this container will get the same rights as the container itself.
**Example**: Set that the group Everyone will see the project "Company Party". Any message or document created/uploaded under project "Company Party" gets the same rights as the "Company Party" project, because the new message/document has ACL that links to it's parent (the project folder).
#### How is the inheritance ensured?
Rights are automatically inherited, because they are (ussually) created based on Template ACL. The Template ACL is the object's property that holds the definition of new (child object) ACL to be created. This Template ACL, by default has set that the newly created (child) objects will link to it's parent (current object).
#### Multi-link ACL
Some records, such as Folders, Projects, Activities or Invoices are multi-linked. That means their ACL is inherited from several parent nodes, incl. for example **Folder Type and** **Parent Folder** (in case of Folder). When linking rights, **filters** are applied. That means that in order to get L, V rights to the Folder, you have to have L rights to it's parent, etc.
#### Are there any exceptions?
Yes, in Project or Folder Templates, administrators may set-up different behavior for creating new ACLs for newly created Folders & Projects. They may change the Template ACL to link to different container and in that way change default rights of various Folders & Projects, based on selected Folder or Project Template.
#### How to check what righs are inherited?
You just open the ACL detail and click on "Show linked rights". The condition is that the ACL links to other ACL.
#### How do I avoid inheritance
You can either change this in Template ACL (remove the linking) or you can change it on already created object (again, remove the linking). You can not remove rights that were set as Admin. Those can be removed only by super user.
### Proxy Rights
Proxy Rights are used to temporarily or permanently give rights of one user to another. To set-up Proxy Rights, you must open User's details (the one that give the Power of Attorney) and add the other user (the one who will get those rights).
Example: Person leaves for vacation and you want other user to take over the responsibility in the time of absence. Go to the absent user's details and add full Power of Attorney to another user. Please note that this change is global, therefore it affects also the user's personal messages and documents.
Enable:
Edit events in other users calendar: Need access on other users timesheets
Conflict: If enabled editing callendars also editing timesheets is enabled and vice versa
Disable:
### Found proxy connection
there is script what found you all proxy use on virtual server instances: [listProxtThroughDatabases.sh](mks://localhost/en/@api/deki/files/1069/=listProxtThroughDatabases.sh "listProxtThroughDatabases.sh")
move him to /tmp/, su postgress and run:
```
sh /tmp/listProxtThroughDatabases.sh
```
Output looks like:
```
database | id | username | proxyid | proxyname
-----------+------------+------------+-----------+--------------
harfonie | 190086000 | snadova | 67385000 | rytova
harfonie | 190099000 | marsala | 67385000 | rytova
harfonie | 1099228000 | hamalova | 190099000 | marsala
```
# Implementation of Access Rights Best Practices
Template implementations have some of the access rights preconfigured. Any other access rights may be customised for individual client's needs.
### User vs. Group Access Rights
When defining new access rights, please rather use **Groups** instead of **Users**. Users and their roles may change time from time, so it would be easier to hand over the role in the company to someone else just by changing user's group membership.
### Assign User to Groups
#### Power Users
All Power Users should be placed into group **Everyone** or **Internal** at least.
All Power Users should be placed into role **Creator** & role based on person's working relationship to the company.
All Power Users should be set to one Profile (used for GUI) - the default is based on template.
#### External Associates
All External Associates should be placed into group **External Users**.
All External Associates should be set to one **Profile** (used for GUI) - the default is based on template.
#### Clients
All Clients should be placed into group External Users.
All Clients should be set to one Profile (used for GUI) - the default is based on template.
## Access Rights to Estimates, Invoices, Orders
All access rights are based on the group access rights level set-up for each individual node in Atollon Directory Administration.
### Estimates, Invoices, Orders
Estimate / Invoice Approver
Estimate / Invoice / Order Editor
Estimate / Invoice / Order Reader
## Time Sheet
Timesheet Approval group - users enabled to see / approve timesheets of other users.
# Removing Users Accounts
## Temporary block user account
1\. **Options & Tools** -> Users -> double click user -> select "No" from active Radio Buttons
2\. Redirect existing mail address
## Permanently remove user account
Please note that user accounts are never permanently deleted, there must always track dent of the user existance in the system. We recommend to deactive user's account rather than deleting it. It may be difficult to restore once deleted user account. Also, sometimes you might want to use user for reporting. In case you delete the user completely, it might be difficult to report on user's records (Time Sheet data, Invoices, Folders & Projects, etc.).
1. Options & Tools -> user accounts -> double click user ->
a) set Active combo box to No,
b) change its passwords,
c). remove user from all groups and roles,
d) **don't delete that user account.**
2. Redirect existing mail address
3. Remove its mailbox.
4. Find user in contacts (you might see users contact name in users table under Setting -> Access -> Users -> Contact column)
a) right click that contact -> Edit -> go to tab Others,
b) remove relationship to System user by clicking the "C" button.
# Events Access Rights
## **General**
**Tasks**, **Events** and **Time Sheet** records have rights calculated by combination of rights to context (Folder, Project or Activity on which the Task is stored) and rights of User's Event, Task, TS rights. s
### Rights to User's Events, Tasks, Time Sheet
**Each user may authorize other users** to create / edit / read / delete / authorize their Calendar Events, Tasks or Time Sheet records. This setting is usually setup by system administrator.
[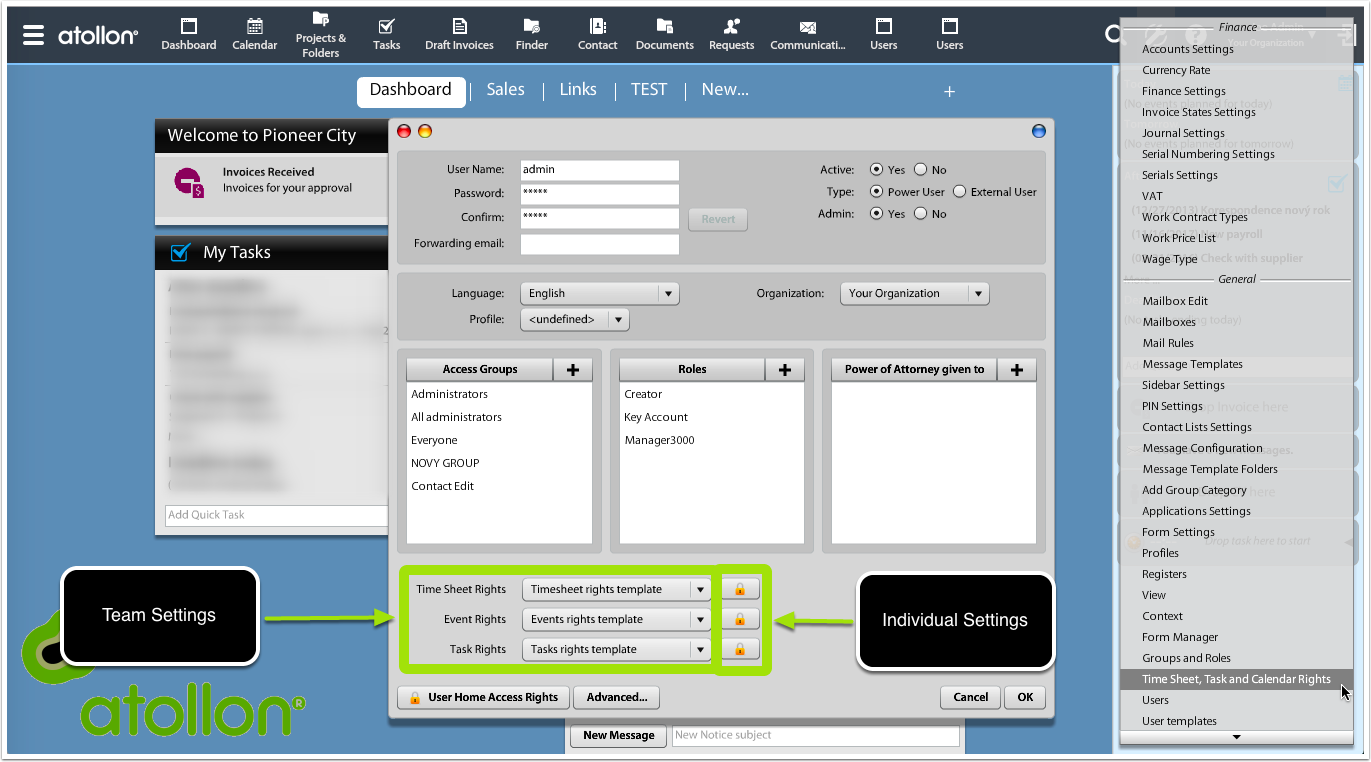](https://help.atollon.com/uploads/images/gallery/2020-01/atollon-event-task-ts-rights.png)
Go to **Users** > **User detail** screen. In the bottom part, you have 2 options how to edit right of any users to selected user's Events, Tasks or Time Sheet entries:
#### Individual Settings
You can set who may create or modify records belonging to particular users.
#### Team Settings
You may create Rights Templates for Events, Tasks and Time Sheet Entries. These templates are usually created to hold team members that have access to colleague's records.
## Advanced Team Access Rights Configuration
### Event, Task, Time Sheet Rights Templates
In order to keep rights to records in good order for company teams, it is possible to create any number of Rights Template for Tasks. Each team member's User settings would be selected with "Team Alfa" access right template for Tasks. In this setup, anyone having the access to the Tasks Rights Template called "Team Alfa" would get access to any user in the same team. We expect that access group "Team Alfa" would be created and the rights of this group would be added to the Task Rights template.
[](https://help.atollon.com/uploads/images/gallery/2020-01/task-template-rights.png)
To set-up teams, follow the procedure:
1. Create Access Group "Team Alfa"
2. Create Task Rights Template "Team Alfa Rights"
3. Add "Team Alfa" Access Group to "Team Alfa Rights" container (see the picture above)
4. Update User to have Task Rights template set to "Team Alfa Rights"
# Invoice Access Rights
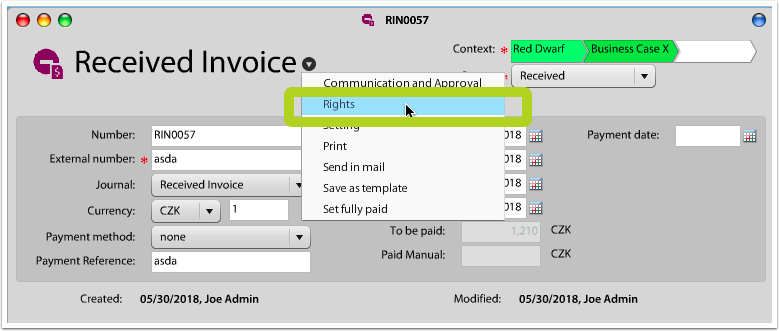
Each Invoice has it's own ACL (information about who can access the record). That means, each individual Invoice may have different access rights. This behavior is used when sending Invoice for approval. Each approving user is automatically assigned appropriate **edit** rights to approve the invoice.
#### Edit Individual Invoice Rights
[](https://help.atollon.com/uploads/images/gallery/2020-03/atollon-invoice-rights.png)
## Default Invoice Rights
Invoice's rights are inherited from 3 different parent ACLs.
[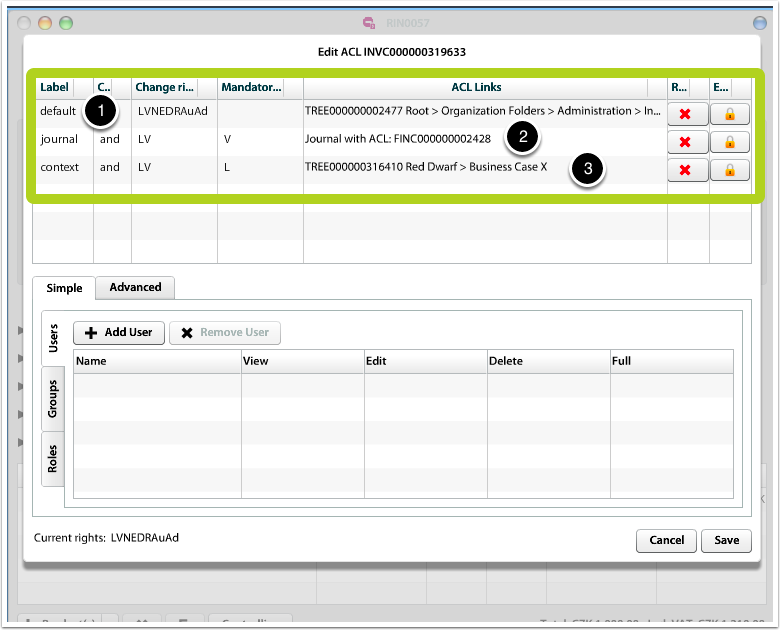](https://help.atollon.com/uploads/images/gallery/2020-03/atollon-invoice-rights-detail.png)
### 1) Invoice Administration Node
Each Invoice application (Invoice Issued, Invoice Received, Purchase Order, Received Order, Estimate) has it's own administration node that takes care about default access rights to all Invoices stored to this particular node. As mentioned in the "Change Rights" filter (see screenshot), all rights of the Invoice node are inherited by the individual invoices.
In case you want to allow users read / write invoices, add their Access Group the the Invoice administration node. You can do this by clicking on "lock" button next to the first row (where Label = default).
### 2.) Journal
Each Invoice (or other document from invoice module) has Journal (such as "Domestic Invoices" or "Foreign Invoices" or "Secret Invoices"). In order to allow users see any invoice that is in "Secret Invoices", the user must have the VIEW rights to the Journal. In case the user does not have VIEW rights on "Secret Invoices" journal, she won't see these invoices. This works even if the users sees all other invoices...
In order to edit Journal access rights, you may directly get to the configuration using "Lock" button next to 2nd row (where Label = journal) or you may go to Options & Tools > Journal Settings > Edit each journal and set the desired access rights.
### 3.) Context
Each Invoice (based on it's header) may be stored to any **context** (Folder, Project or Activity). The user must have LIST rights on the context (Project, where the invoice is stored) in order to get the READ (L, V) rights to the invoice. For example, if the user has rights to "Secret Invoices" based on the invoice journal, but does not have L rights to "Super secret project", the user won't see such invoice.
## Invoice Approval Rights
Invoice approval rights are administered using **Journal settings**. The user must have L, V, E rights in order to approve the invoice. The user **must NOT have Authorize** right in order to use the rights defined by Journal settings. Users **having** Authorize right (based on invoice ACL) are **super users**, who may approve or change invoice status to any status **ignoring** the Journal settings.
# Options & Tools Access
We display settings in Options & Tools menu based on user access rights to particular setting. The following list describes most of the setting options and what rights the user must have to see these settings. This information is necessary for administrators to set-up settings visibility properly for all users.
### Settings visibility
**Settings Option**
**Who can see**
**What node is checked**
VAT
verify access rights (Edit)
FINANCESETTINGSNODE
Work Contract Type
verify access rights (Edit)
WORKCONTRACTSNODE
Wage Price List
verify access rights (Edit)
PROJECTPRICINGNODE
Wage Type
verify access rights (Edit)
WAGEREPORTNODE
Mailboxes
verify access rights (Edit)
MAILBOXESNODE
Message Templates
verify access rights (Edit)
MESSAGETEMPLATESNODE
Add Group Category
verify access rights (Edit)
DISTRIBUTIONGROUPCATEGORYNODE
Profiles
show to Admin only
Registers
show to Admin only
View
verify access rights (Edit)
VIEWSETTINGSNODE
Activity Panel Presets
verify access rights (Edit)
ACTIVITYPANELNODE
Activity Panel
verify access rights (Edit)
ACTIVITYPANELNODE
Context
verify access rights (Edit)
SUBJECTTYPENODE
Users
verify access rights (Edit)
USERNODE
Background
show to Admin only
Dimension Settings
verify access rights (Edit)
DIMENSIONSNODE
Workflow Actions
verify access rights (Edit)
WORKFLOWSETTINGSNODE
Workflow Filters
verify access rights (Edit)
WORKFLOWSETTINGSNODE
Workflow
verify access rights (Edit)
WORKFLOWSETTINGSNODE
International
show to all
Manage Print Templates
show to Admin only
About Lagoon
show to all
Logger
show to all
Event Workflow
verify access rights (Edit)
TASKWORKFLOWNODE
Resource Categories
verify access rights (Edit)
RESOURCE\_NODE
Task Escalation
verify access rights (Edit)
TASK\_ESCALATION\_NODE
Task Templates
verify access rights (Edit)
SCHEDULERTEMPLATETASK
Task Workflow
verify access rights (Edit)
TASKWORKFLOWNODE
Time Sheet Coefficient
verify access rights (Edit)
TIMESHEETCOEFFICIENTNODE
Advanced Time Sheet Type
verify access rights (Edit)
SCHEDREPORTTYPENODE
Type of Work on Context
verify access rights (Edit)
TYPEOFWORK
Type of Work
verify access rights (Edit)
TYPEOFWORK
Request Tracking Accounts
verify access rights (Edit)
REQUESTTRACKINGNODE
Severity
verify access rights (Edit)
SLASETTINGSNODE
Service Level Agreement
verify access rights (Edit)
SLASETTINGSNODE
Service Hours
verify access rights (Edit)
SLASETTINGSNODE
Product Price List
verify access rights (Edit)
ITEMPRICINGNODE
Item
verify access rights (Edit)
PRODUCTSETTINGSNODE
Applications Settings
verify access rights (Edit)
USERPROFILENODE
Form Manager
verify access rights (Edit)
FORMADMINNODE
Education Levels
show to Admin only
EDUCATIONLEVELSNODE
Education Fields
show to Admin only
EDUCATIONFIELDSNODE
Education Subfields
show to Admin only
EDUCATIONSUBFIELDSNODE
Document Types, Categories & Location
verify access rights (Edit)
DOCCATEGORYNODE
Manage Print Templates
verify access rights (Edit)
DOCCATEGORYNODE
# Groups & Roles
## About
Groups & Roles is utility that allows you to create **Groups** (or Roles) of users. This functionality works mainly to set-up system access rights. Using groups, you assign access rights to users in that group. Once you assign right to the (Access) Group, all users in that group will receive the same rights immediately. That is different from Roles. Access rights of users in Role(s) is not given to the users until they are assigned the Role on each individual Project, Folder or Activity. Assigning User to Role means they are allowed to occupy that particular Role.
[](https://help.atollon.com/uploads/images/gallery/2020-03/groups-roles-admin.png)
## User Roles
### Video Tutorial on Roles
# User Profiles
**User Profiles** set Atollon **user interface** to default state, in which it reflect needs of user's **organization role**.
Each Profile may be associated with one application **Preset**. Each Atollon application may have one or more Presets. Preset holds any settings that are needed to customize Atollon to the need of your organization or your organization's role.
By combining User Profiles and Application Presets you may create unique set-ups of user interfaces, which is helpful when adjusting new organization roles.
#### Create New User Profile
In order to create new User Profile, you may press on "Add" above Users Profiles table and press on Save. One of the User Profiles may become Default. Default is used once the user would not have assigned any profile.
#### Create New Application Preset
In order to create Application Preset, select the Module on right (for example Activity Panel) and click on Add, give the new record some name and press Save. One of the Application Presets may be set as default. This Preset is used when no one is assigned to User Profile.
#### Match Preset to Profile
You may set Application Preset to User Profile by selecting both records: Preset on right and Profile on left and pressing Assing. This way Atollon User, who has the User Profile will get the Application Preset.
[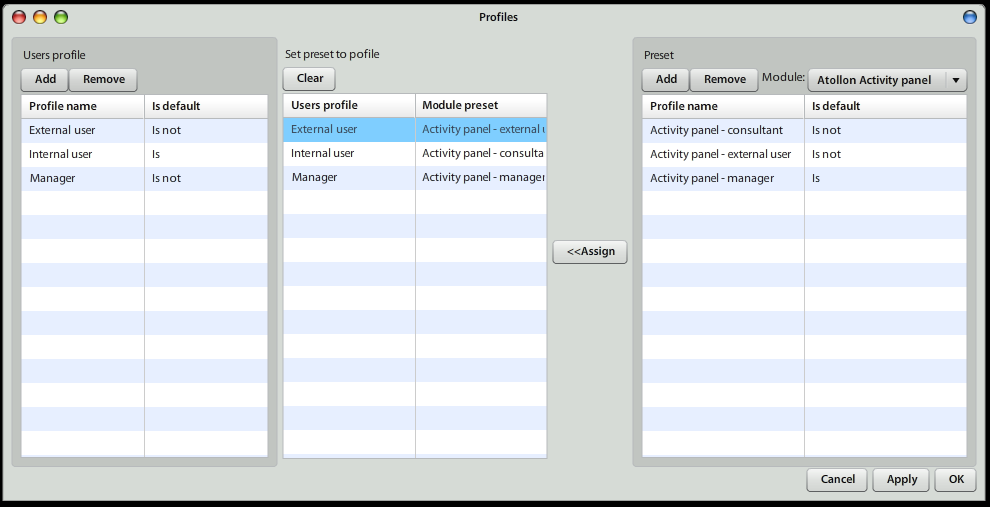](https://help.atollon.com/uploads/images/gallery/2020-03/profiles-settings.png)
### Example
You may want to hide/show some tabs on Client's detail. This is accomplished using Activity Panels. Each type of Folder (Client, Prospect, ...) may have one or more definitions of what Tabs will be displayed for each particular organization role (ie Sales, Management, Service, ...). You may create as many Activity Panels as you want and store the mapping of Activity Panel to Folder Type into Application Preset. This Preset then may be assigned to User's Profile.
# User Templates
User Templates allow you predefine newly created User's settings. Change in User template does not have any effect on users that were created based on the selected template, they are just helpful when creating new users (so you don't have to reinvent the wheel all the time you need to create new user(s)).
[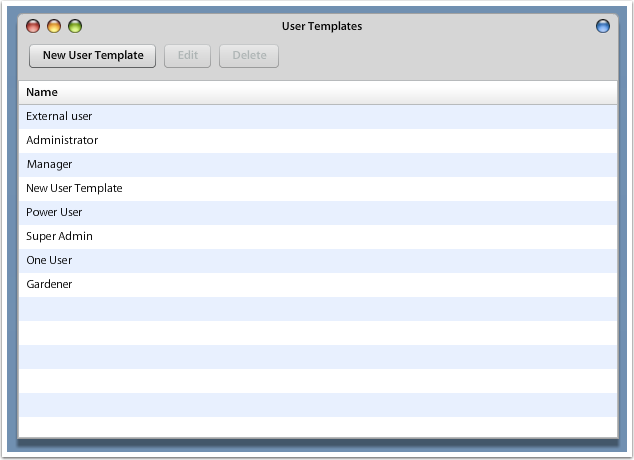](https://help.atollon.com/uploads/images/gallery/2020-03/user-templates.png)
## New User Template
The New User Template has all the same attributes that has New User. Please refer to [Users](mks://localhost/en/user-manual/options-and-tools/users "Users") documentation for more details.
[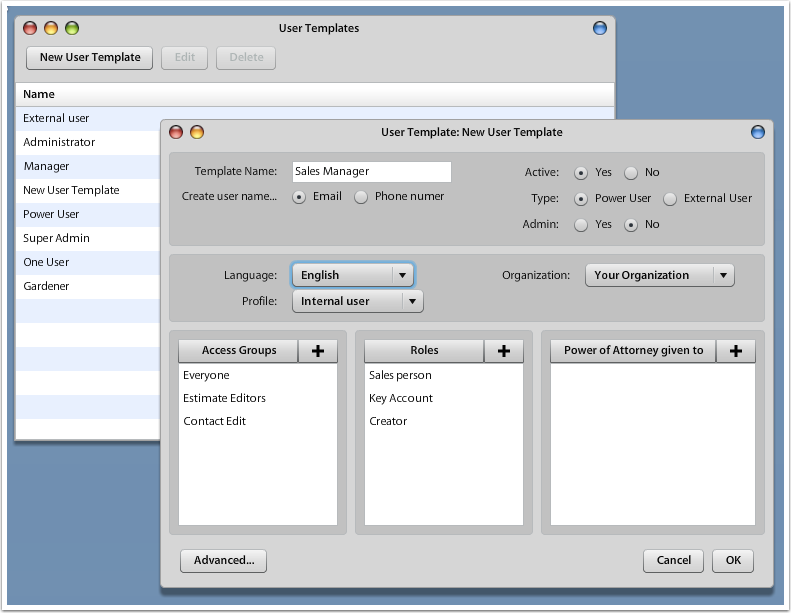](https://help.atollon.com/uploads/images/gallery/2020-03/user-template-new.png)
# Atollon Desktop Client
# Manual Uninstall
## Atollon desktop - Uninstall Win App
#### 1) Uninstall the application - regular attempt to remove
a) uninstall via WIndows (if msi) (**Add or remove programs**)
or
C:\\Program Files (x86)\\Atollon\\Uninstall.exe (if installation via .exe)
or
delete complete folder C:\\Program Files (x86)\\Atollon
#### 2) Delete the content that has been downloaded via loader
Open **cmd** (command line)
```shell
cd c:\Users\%{USERNAME}\AppData\Roaming
rmdir /s Atollon
```
Where %{USERNAME} is to be replaced by your user name in Windows. Delete this folder for every local user if your workstation is shared.
#### 3) Remove AtollonSetup.exe from Downloads
## Atollon desktop - Uninstall Mac App
As local admin user (in Terminal > sudo su) run the following:
```shell
sh removeApp.sh
```
Download script here:
[removeApp.sh](https://help.atollon.com/attachments/248)
# Adobe Air error message - macOSX Catalina
Some of our customers running Atollon using Adobe Air on Mac OS X Catalina have experienced the following issue:
**“Adobe AIR.framework” is damaged and can’t be opened.**
If you recently upgraded to Mac OS X Catalina, you may have this issue. You can resolve it by opening Terminal application (Open Finder and press Cmd+Shift+U > which opens Applications > Utilities and find Terminal).
Copy & paste the following commands:
```
cd /Library/Frameworks
sudo xattr -r -d com.apple.quarantine ./Adobe\ AIR.framework
```
You will need to enter your Mac OS administrator password.
Then try to install Adobe Air and Atollon Air client once again.
# Fix Atollon Protocol
### Bacillus
On Mac OS X, it may happen that atollon:// protocol is not working properly. Ie you can not open links with Desktop app.
### Treatment
You can fix your Atollon protocol by following next steps:
1. download fix script [FixAtollonProtocol.command](https://help.atollon.com/attachments/429)
2. open Terminal (go to Cmd + Shift + U)
3. drag & drop the command file to Terminal
4. change the permissions of the file: chmod a+ x FixAtollonProtocol.command
5. run the FixAtollonProtocol.command
Video Guide
# Modules Configuration
# Contacts Configuration
## Basic Contacts Configuration
Most of the contacts lists are configurable, you can add/remove particular records of the following system fields:
- Language (Preferred communication language)
- Category (Any record, without special meaning)
- Contact Source (Where you got contact from?)
- Contact Address Type (Several base types supported: Invoicing, Delivery, Permanent, Temporary, etc.)
- Contact Type (Contact's relations to organization)
- Contact Information Type (E-mail, phone, mobile, web, LinkedIn, Facebook, Twitter, etc.)
- Groups (Newsletter, etc.)
- Company / Company Relation Types (Mother/Division, Partner/Partner, etc.)
- Company / Person: Department (What department does the person work in?)
- Company / Person: Position (What position does the person work in?)
- Person / Person Relation Types (Parent/Child, Superior/Subordinate, Partner/Partner, Friend/Friend)
- Company Industry (What industries is the company part of?)
- Company Legal Form (What is the company legal form, ie Ltd., SA, Branch Office, etc.)
You can amend most of these lists in MS Windows administration: Settings > Contacts > Configuration, where you can select one of the lists in top left combo selector and add/remove individual records. Please note that it is possible to remove these records only once they were not used previously.
Contact Groups are amended separately in accordeon directly in contacts application (add new Contact Group). In MS Windows client they are referred as Distribution Groups.
Contact Types are configured as Finder's Folder Types, see the Contact Types section below.
## Contact Types / Accounts
Contact Type is **role of the contact in relation to the organization**. There are applicable several Contact Types, ie Client, Partner, Employee, etc. In another SW solutions they are called **Accounts**.
If Atollon user does not set any Contact Type to the contact, the contact remains in the system only for purpose of storing basic contact information (ie Address, Contact Details, Categorization, etc.). Once the contact becomes organization's Client, Partner, Supplier, etc. - that means the contact (person or company) has some relation to the organization, you should set it's Contact Type.
### Set Contact Type
To set Contact Type, you can either open the contact detail and at Contact Type section mark one of the Contact Types or you can drag & drop selected contact(s) into the Contact Type item withing contacts database.
### Understanding Contacts & Finder
In order to **get contact into Finder** - that means to **create Finder folder for the contact** (in another words create "Account"), you need to set the contact's Contact Type.
Once you set the contact's Contact Type, there is automatically new **Account** (Finder's Contact Folder) created. There is always one Contact Folder / Account created for each of the Contact Types.
### How to configure new Contact Type?
Go to **[Context Settings](mks://localhost/en/user-manual/general/Finder/context-settings "en/user-manual/general/Finder/context-settings")** and create new Folder Type (base type: Contact Folder). *To the date this manual was written, it is not possible to change the Base Type of new Folder Type in web client, it is possible to change it only in MS Win client.* You should also create at least one **Folder Template** and set the initial **status** to the Folder Template. See [**Finder Configuration**](mks://localhost/en/user-manual/general/Finder/context-settings "en/user-manual/general/Finder/context-settings") for more details.
### Additional Account Attributes
Each Contact Folder / Account has the following additional attributes:
#### Account Status
Status indicating whether Client, Partner, Supplier, etc. is currently Potential, Active, Hot, Lost or Not Interested, etc.
#### Account Responsible User
Each Partner, Client, Supplier, etc. may have one or more **Responsible Users** (sometimes called as Key Accounts as well). The Responsible User is organization's internal responsible person for taking care about the Account (Client, Partner, etc.) Each Responsible User may have different **Role** in relation to the Account (eg. Mr. "Smith" might be "Sales Manager" with company "Acme").
#### Account Custom Form
If you want to add one or more custom fields to extend information tracked in relation to Account, you may set-up two custom Forms in relation to either Contact Folder Type or Contact Folder Template. General folder (available for all Accounts of the same type) should be set to Contact Folder Type. See more information at Finder Configuration on how to add Form to Folder Type.
##### Example
You want to prepare your contact database to **segment your customers database** with additional details that are not standard part of Atollon set-up.
You might want to add:
- Special product categories (Form: **List Field**)
- Date fields indicating important deadlines (Form: **Edit Field** with **Date** constraint)
- Importance of the client (Form: **Combo Field**)
- Client's yearly turnover (Form: **Edit Field** with **Numeric** constraint)
- Indication that client signed contract (Form: **Checkbox**)
- Indication of date when client signed contract (Form: **Edit Field** with **Date** constraint)
- Clients interests (Form: **Memo Field**)
## Contacts & Users
It is possible to create new contact with new user account as well. In order to do this, you need to have the following entities prepared:
- User Template
- Finder's Folder Type
- Finder's Folder Template
New user account is ussualy a person contact. There is one person contact with user account creation pre-configured in basic template. It is called "Employee". Once you create new Employee, new Contact + User + Contact Folder (Employee) is created.
Once you create new **User Template**, Finder's **Folder Type** & **Folder Template**, edit Folder Template settings in MS Windows client and select User Template for the Folder Template (called Subject Template in MS Win client under Account & Project Settings).
You can create new User Template in MS Windows client: Settings > Access > User Template.
# Custom Forms Scripting
Since web version of form designer, custom forms bring custom scripting, which is pretty powerfull feature. It is evolving part of application, based on needs of our clients, so there is no definite state of this feature. Scripting is pretty straitforward and selfexplanatory (you just write an ActionScript to it), but you need to know some basic principles, like accessing the form elements, accessing the selected context value or interaction with the application itself. Those features are providet by scripting API - set of functions which enables these features.
### Accessing component in form
If you want to acces some component in form, you ahve to set the identifier for this component. Then you can access it by method **getComp**. Then you can work this the component as you wish, access its methods and properties.
The following example will sum values from components textInputA and textinputB into component textfieldC:
```
var valueA:Number = Number(getComp("textInputA").value);
var valueB:Number = Number(getComp("textInputB").value);
getComp("textfieldC").text = valueA + valueB;
```
You can find component properties on Adobe documentation, for example Textfield:
[http://help.adobe.com/cs\_CZ/FlashPlatform/reference/actionscript/3/flash/text/TextField.html](http://help.adobe.com/cs_CZ/FlashPlatform/reference/actionscript/3/flash/text/TextField.html "http://help.adobe.com/cs_CZ/FlashPlatform/reference/actionscript/3/flash/text/TextField.html")
### Accesing information from application
The script is running in isolated enviroment, but there is a way how to recieve some information from the system. It is exspecially usefull in cooperation with workflow scripts or other web applications, where you can call them and add contextId, session, server and other information as a parameter.
Method **getKeyValue** has list of predefined values, which can be used in scripting. Here is the list of keys:
```
keyValuesDictionary["contextId"] = context;
keyValuesDictionary["formId"] = formId;
keyValuesDictionary["formValuesId"] = formValuesId;
keyValuesDictionary["instanceName"] = SessionApplication.instance.instanceName; //not working
keyValuesDictionary["serverName"] = SessionApplication.instance.serverName; //not working
keyValuesDictionary["baseUrl"] = SessionApplication.instance.baseUrl;
keyValuesDictionary["endpointUrl"] = SessionApplication.instance.endpointUrl;
keyValuesDictionary["rootDomain"] = SessionApplication.instance.getFullRootDomain();
keyValuesDictionary["wsdlFolderUrl"] = SessionApplication.instance.wsdlFolderUrl;
keyValuesDictionary["username"] = SessionApplication.instance.serviceManager.session.userName;
keyValuesDictionary["userId"] = SessionApplication.instance.serviceManager.session.userId;
keyValuesDictionary["organizationId"] = SessionApplication.instance.serviceManager.session.organizationId;
keyValuesDictionary["session"] = SessionApplication.instance.serviceManager.session.session;
keyValuesDictionary["server"] = SessionApplication.instance.serviceManager.session.server;
```
Here you can see usage of such a key:
```
trace(getKeyValue("server")); //traces pioneer
trace(getKeyValue("username")); //traves admin@pioneer
var text:String = "";
text += "\n" + "contextId " + getKeyValue("contextId");
text += "\n" + "formId " + getKeyValue("formId");
text += "\n" + "formValuesId " + getKeyValue("formValuesId");
text += "\n" + "instanceName " + getKeyValue("instanceName");
text += "\n" + "serverName " + getKeyValue("serverName");
text += "\n" + "baseUrl " + getKeyValue("baseUrl");
text += "\n" + "endpointUrl " + getKeyValue("endpointUrl");
text += "\n" + "rootDomain " + getKeyValue("rootDomain");
text += "\n" + "wsdlFolderUrl " + getKeyValue("wsdlFolderUrl");
text += "\n" + "loggedUser ID " + getKeyValue("loggedUser");
text += "\n" + "username " + getKeyValue("username");
text += "\n" + "userId " + getKeyValue("userId");
text += "\n" + "organizationId " + getKeyValue("organizationId");
text += "\n" + "session " + getKeyValue("session");
text += "\n" + "server " + getKeyValue("server");
getComp("textArea").text = text;
```
### Triggering events
When you know how to work with components, next step is define, when to run the event. The events are solved method **createListener** which takes 3 parameters - name of object where we listen, name of event and function to be triggered.
Following function will show you how to trigger the functionality from previous example on change of bot inputs - textInputA and textInputB.
```
this.createListener("textInputA", "change", sumInputs);
this.createListener("textInputB", "change", sumInputs);
function sumInputs(evt:Object):void
{
var valueA:Number = Number(getComp("textInputA").value);
var valueB:Number = Number(getComp("textInputB").value);
getComp("textfieldC").text = valueA + valueB;
}
```
You can find events on objects using classical ActionsScript reference, for example button events like click, mouseDown, mouseUp, rollOver, mouseOut and so can be found on link:
[http://help.adobe.com/en\_US/FlashPlatform/reference/actionscript/3/fl/controls/Button.html](http://help.adobe.com/en_US/FlashPlatform/reference/actionscript/3/fl/controls/Button.html "http://help.adobe.com/en_US/FlashPlatform/reference/actionscript/3/fl/controls/Button.html")
### Alert window
Sometimes we need to tell user that some other action is needed or so. Alert is typical way how to do so, so we can use prepared method showAlert. It encapsulates classical MessagePopUp with the same
\* @param type - type of icon - ERROR, WARNING or INFO
\* @param message
\* @param description
\* @param buttons
\* @param closeHandler
function showAlert(type:String, message:String, description:String, buttons:Array = null, closeHandler:Function = null):void;
Here is an example how to show alert and react on the close.
```
this.createListener("btn", "click", btnHandler);
function btnHandler(evt:Object):void
{
showAlert("ERROR", "ALERT!","Wow cool text", ["OK", "Cancel", "I do not know"], closeHandler);
}
function closeHandler(btnIndex:Number):void
{
getComp("btn").label = btnIndex;
}
```
### Opening URL
Since the function navigateToUrl is not working becuase of security reasons, we have to use our own function for url opening. See example bellow:
```
this.createListener("button", "click", btnHandler);
function btnHandler(evt:Object):void
{
openUrl("https://google.com");
}
```
### Calling external URL
Sometimes you need to call external URL and load something (without opening new browser window). That can be solved by method callUrl.
\* @param url
\* @param resultHandler
\* @param failHandler
function callUrl(url:String, resultHandler:Function = null, failHandler:Function = null):void;
```
callUrl("https://fangtooth.atollon.com/external.js", loadComplete, loadFailed);
function loadComplete(data:Object):void
{
getComp("textArea").text = data;
}
function loadFailed(evt:Object):void
{
getComp("textArea").text = evt;
}
```
### Escape URL parameters
Since URL does not support symbols like " ", "/", ":", "=" or unsuported ascii characters in URL parametes, it is important to excape all of the parameters, so you prevent problems with some specific strings and other data. This is solved by URLVariables, see method createUrlParams in example bellow:
```
this.createListener("Lic_proc_button", "click", btnHandler);
function btnHandler(evt:Object):void
{
var urlParams:String = createUrlParams();
var scriptLocation:String = getKeyValue("rootDomain") + "/fo/imp-exp";
var fullUrl:String = scriptLocation + "?" + urlParams;
getComp("Lic_proc_link").text = fullUrl;
openUrl(fullUrl);
}
function createUrlParams():String
{
// creation of URLVariables
var urlVariables:URLVariables = new URLVariables();
// fill URL variables
urlVariables["company"] = "REAL TRADE PRAHA a.s.";
urlVariables["ico"] = "25642740";
urlVariables["street"] = "náměstí 14. října";
urlVariables["city"] = "Praha 5 - Smíchov";
urlVariables["street_no"] = "1307/2";
urlVariables["pemr"] = getComp("Lic_proc_authnumber").text;
urlVariables["zip"] = "15000";
urlVariables["id"] = getKeyValue("formValuesId");
urlVariables["endpoint"] = getKeyValue("endpointUrl");
urlVariables["instance"] = getKeyValue("server");
urlVariables["session"] = getKeyValue("session");
// toString method of URLVariables returns escaped string
// so for example Praha 5 - Smíchov looks like:
// city=Praha%205%20%2D%20Sm%C3%ADchov
return urlVariables.toString();
}
```
### Debugging code
Sometimes it is complicated to find a problem in the script. Usually typo in the name of component, sometimes it is somehting different. To make the debugging as easy as possible, we added function log(message) into the scripting. There are different ways how is hte log shown. The log message will appear in the log view under the script when debugging in formDesigner or as popUp Alert when the form presented when displayng form in the finder.
### An example how this works in OSSPO
this.createListener("SmlouvaNaDobu", "change", updateSmlouvaNaDobu);
this.createListener("SmlouvaNaDobu2", "change", updateSmlouvaNaDobu);
this.createListener("SmlouvaNaDobu3", "change", updateSmlouvaNaDobu);
this.createListener("DatumUzavreniSmlouvy", "change", updateSmlouvaNaDobu);
this.createListener("DatumUzavreniSmlouvy2", "change", updateSmlouvaNaDobu);
this.createListener("DatumUzavreniSmlouvy3", "change", updateSmlouvaNaDobu);
this.createListener("SmlouvaNaDobuCelkem", "change", updateSmlouvaNaDobu);
function updateSmlouvaNaDobu(evt:Object):void
{
if(getComp("DatumUzavreniSmlouvy").text != "")
{
getComp("SmlouvaNaDobuCelkem").text = getComp("SmlouvaNaDobu").text;
}
if(getComp("DatumUzavreniSmlouvy2").text != "")
{
getComp("SmlouvaNaDobuCelkem").text = getComp("SmlouvaNaDobu2").text;
}
if(getComp("DatumUzavreniSmlouvy3").text != "")
{
getComp("SmlouvaNaDobuCelkem").text = getComp("SmlouvaNaDobu3").text;
}
}
# Finance Settings
It is necessary to set-up **Finance Settings**, once you want to use **Estimates**, **Invoices** or **Orders**.
## Set-up Journals
Options & Tools > Finance > Journals
Add all journals that are necessary, minimal supported set is:
- Issued Invoice
- Received Order
- Received Invoice
- Issued Order
- Estimate
## Set-up Invoice States
It is necessary to set-up at least one **state** per the **Invoice** Document.
### Estimate States
For Estimates, set-up at least:
- Issued
- For Approval
- Approved
- Dispproval
- Billed
- Approved by client
Set properly Status priorities 0 .. 100 to sort workflow order of states.
After Estimate has been converted into Project Budget, the status is automatically switched to fixed status Billed.
### Invoice States
For invoices, set-up at least the following states:
- Issued
- For Approval
- Approved
- Paid
- Partially Paid
- Cancelled
Please note that Cancelled state does not have any effect in system's calculations of total invoicing. Should be considered for future development.
## Finance Settings
- Set home currency.
- Set-up Billing period.
Go to Options & Tools > Finance > Settings
## Set-up Exchange Rates
If you use foreign currencies, it is necessary to set-up Exchange rates at least once at the beginning of the period. Exchange rates are used, when calculating foreign-currency sales opportunity items & billing items for Financial Reporting purpose.
## Check provider information
See if all information you need (provider's name, address, registration number, VAT number, bank account, etc.) is entered at provider's contact. This information is necessary to properly issue new invoice / estimate.
## Set-Up Items/Products
You should be able to create new products/items. Check that you can define Item Type (ie Product, Service, ...) and that you can create new item. If not, then you should check product/item settings in Win client.
## Access Rights on Invoices
Access rights on invoices (separately for received, issued), orders (sales and purchase), estimates (received and sent) are calculated from from 4 sources:
- Invoice itself (one particular invoice may have it's own list of users / groups
- Invoice Received treenode (administration node for each of the types of invoices / orders / estimates)
- Journal (numbered list of documents)
- Context (clients, projects, folders, etc.)
[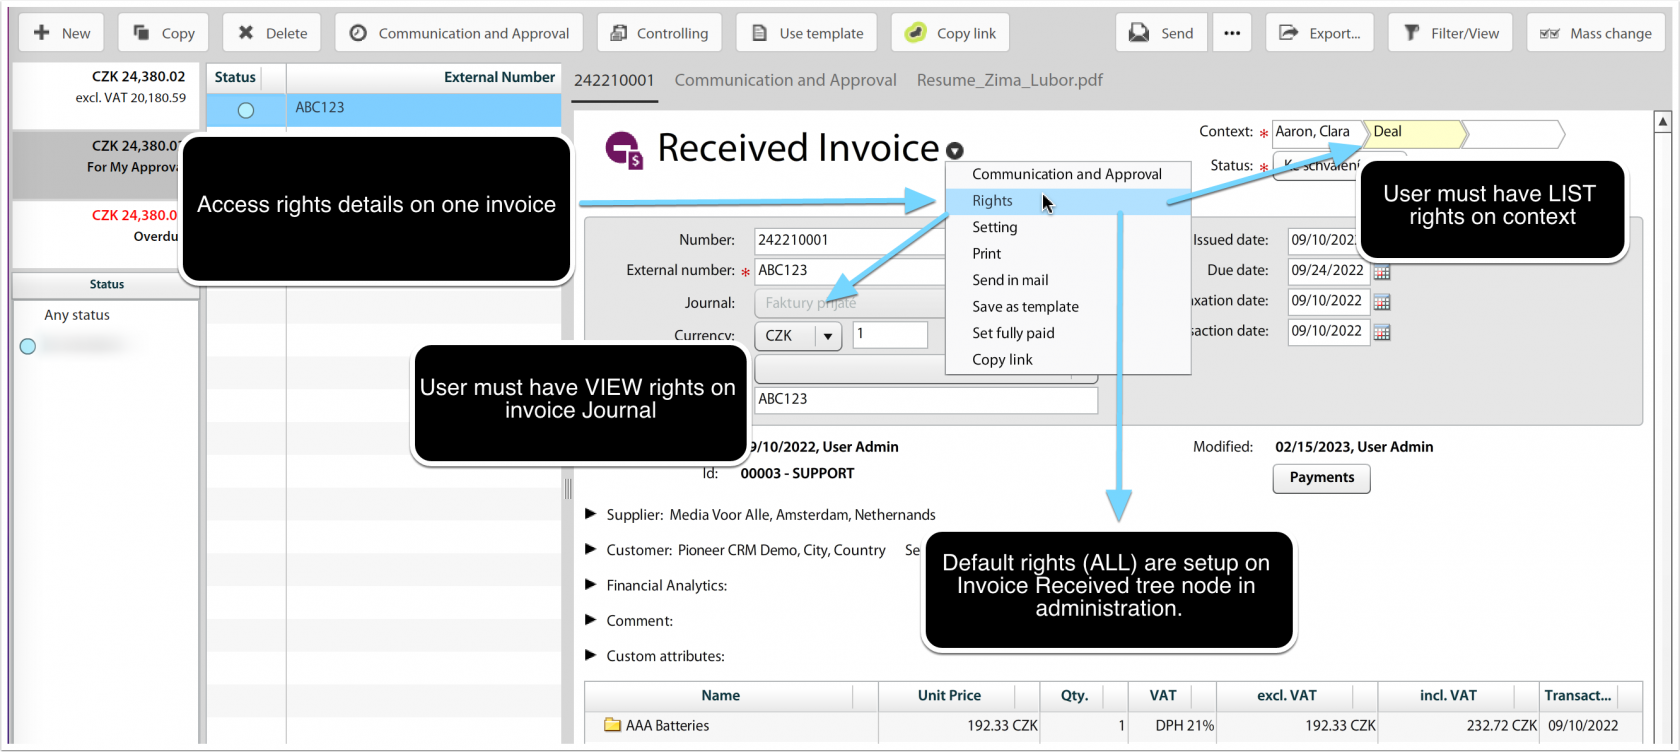](https://help.atollon.com/uploads/images/gallery/2023-03/atollon-invoice-access-rights.png)
### Customize access rights on invoices
#### See who has access to one particular invoice
You can see each invoice's ACL (Access Control List) and see who has access to the document. You will also see what are your rights on the document. This link to see Rights is available only to users with RIGHTS on the invoice.
Rights are inherited, you need to research the tree structure to find out where the rights are taken.
[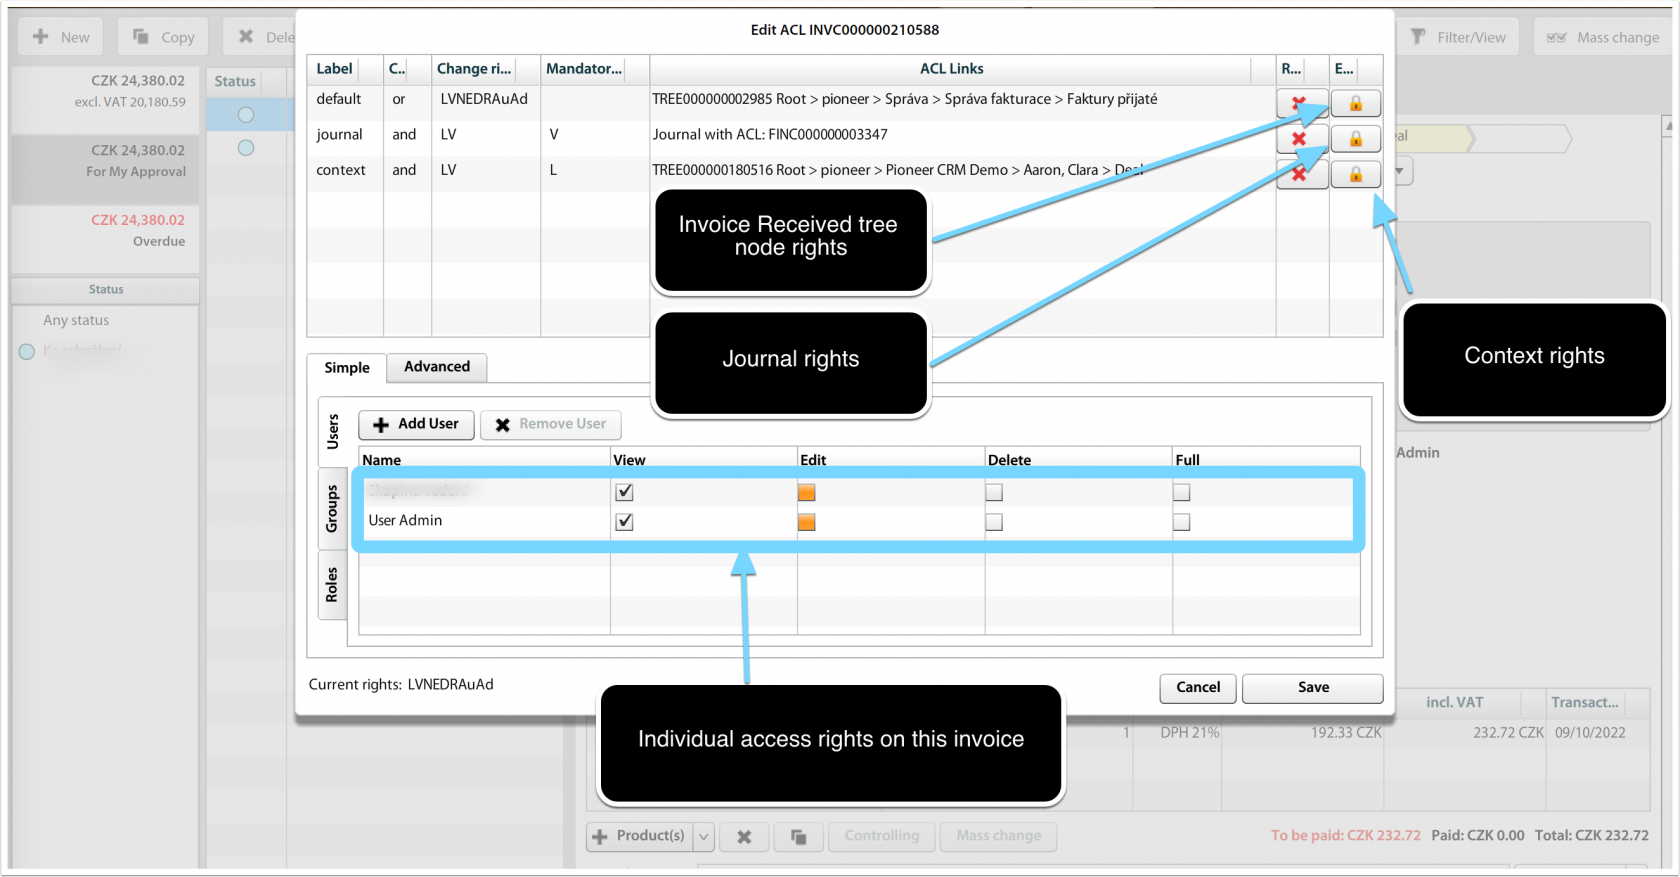](https://help.atollon.com/uploads/images/gallery/2023-03/atollon-invoice-acl-settings.png)
#### Customize access to document type (ie Received Invoices)
If you want to limit access of users (or preferably user groups) on the whole set of all received invoices (or issued invoices or sales orders, etc.), you should customize Invoice Received treenode.
You can see the treenode access rights clicking on particular path (lock) button (ie Root > workspace > Administration > Invoice Received Administration).
You will get window like this:
[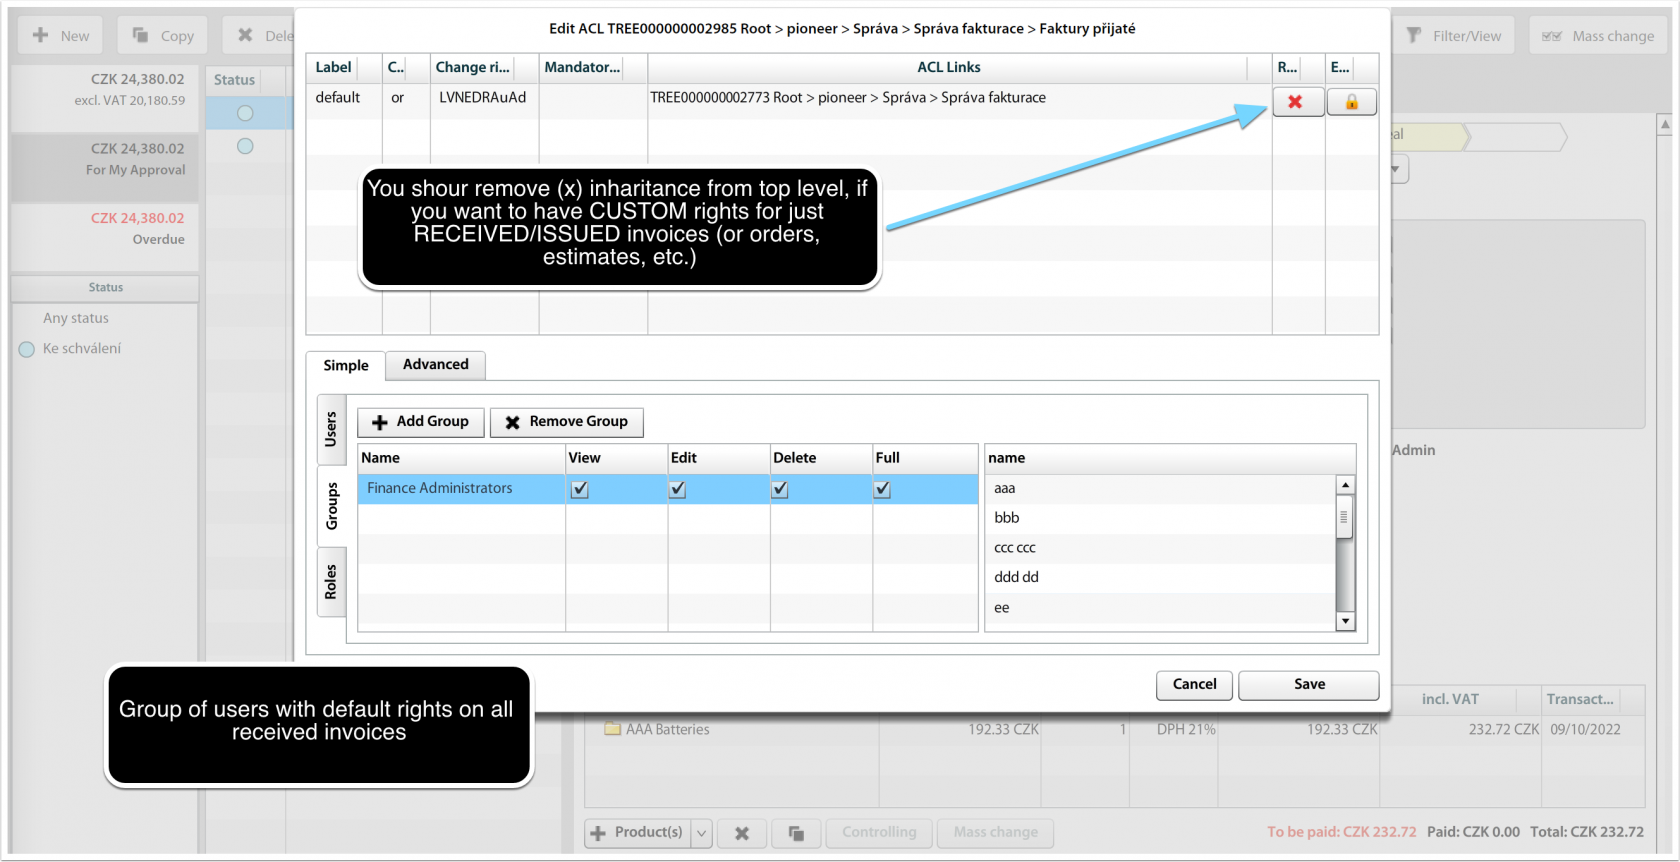](https://help.atollon.com/uploads/images/gallery/2023-03/atollon-customize-rights-on-received-invoices.png)
Here you modify rights in Groups section (you may add / remove groups, create special group for "Invoices Received" and add this group desired rights, ie. View & Edit). To avoid inheritance of rights from top level, you can remove the inheritance by clicking on delete (x) button in top section of ACL edit window.
After saving, only users in "Invoices Received" group will get the View & Edit rights to received invoices.
#### Customize rights for one particular Journal (ie Internal Received Invoices)
If you want to limit access to only selected set of invoices, you can adjust access rights to selected Journal. Journal represents set of invoices with particular controlling and approval workflow and may contain sensitive information, such as remuneration of company partners. In such case it's probably good to limit rights only to narrow group of (for instance) "Invoice Received - HR".
The procedure is similar, only users with View rights (you need to switch to Advanced tab in ACL settings) may see the invoice from respective Journal.
[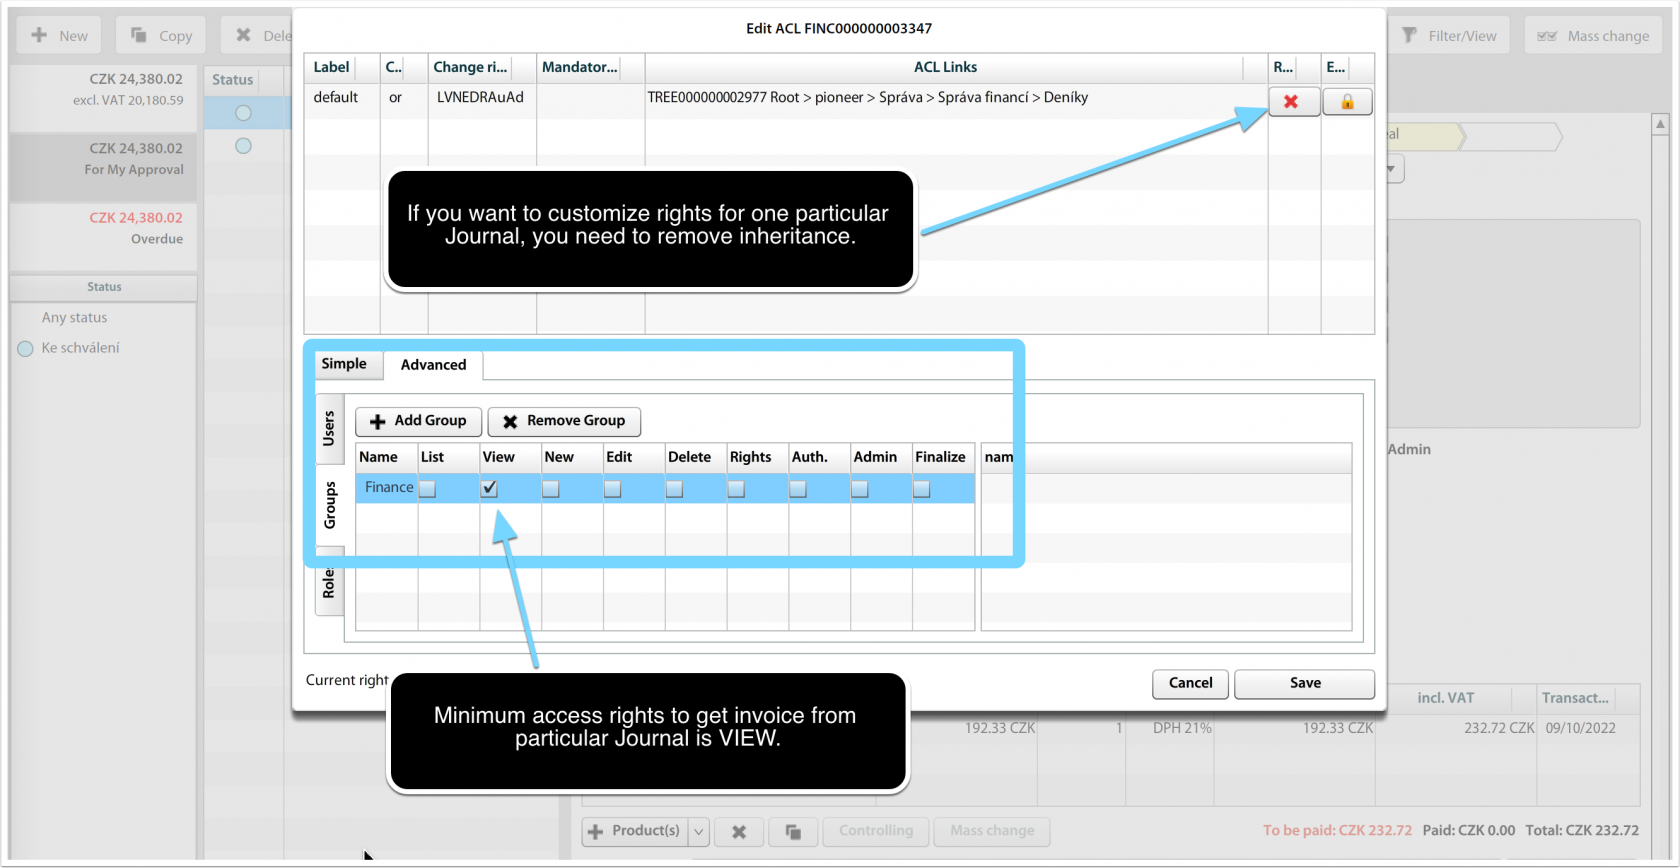](https://help.atollon.com/uploads/images/gallery/2023-03/atollon-acl-journal.png)
### Estimate Templates Access Rights
User must have full rights on INVOICERECEIVEDNODE (see Options & Tools > Tree > Invoice Administration).
# Invoice Administration
Invoices allow you to administer several settings / features of Invoice document. If your company uses payment transactions, it is possible to add Payment journal and allow Payment button visibility on Invoice detail.
The systemId **com.atollon.core.admin.finance.journal.payment** must be associated to the Payment journal.
# Document Library Configuration
## Document Categories
To create new document category, go to Options & Tools > Document Category, Type, Location.
[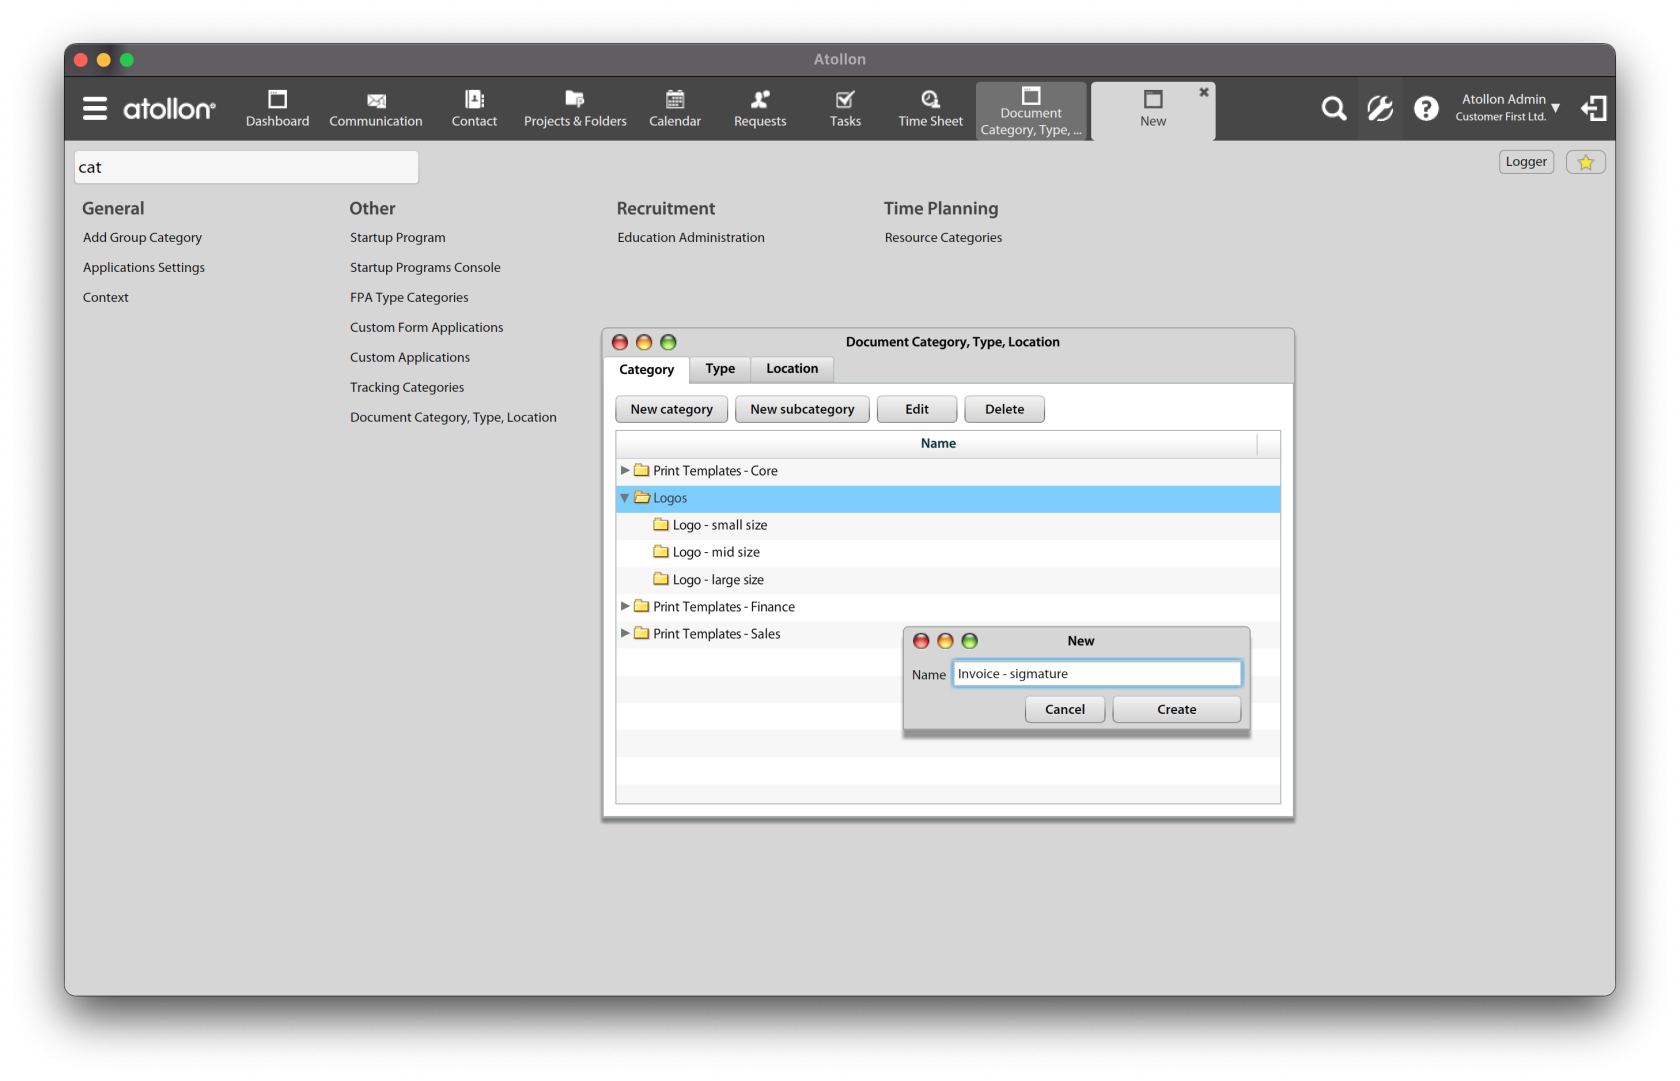](https://help.atollon.com/uploads/images/gallery/2024-01/doc-categories.png)
### Document categories for creators of print templates
Some document categories are used to label particular documents/images for technical purposes, such as you can use document category to label **company logo** for **invoice print**.
The category itself is not sufficient, print tool finds the proper document category (and corresponding document) not by document category name, but by **systemId** setting. SystemId setting maps fixed term (ie identifier of the document category) to internal Id (document category Id).
#### Some examples
In case you want to show logo on print templates, upload the logo to Our Organization's default folder (or the folder associated with the issued invoice Supplier) and label the logo (image) with the document category associated with this systemId.
Folder of the organization or invoice supplier's folder, when used on Issued invoice
In case you want to place signature image that is dependent on invoice supplier (usually one of our organizations). Place the image into Supplier's folder and set document category associated to this systemId.
Folder of the organization or invoice supplier's folder, when used on Issued invoice
#### How to get document category ID
Before saving the category (when creating or updating), open **Logger** application to find out ID of created document category record in Create / UpdateDocumentCategory function.
[](https://help.atollon.com/uploads/images/gallery/2024-01/new-doc-category-id.png)
#### How to set the systemId
Once you get the ID of the new **document category**, save it in relation to systemId text string.
[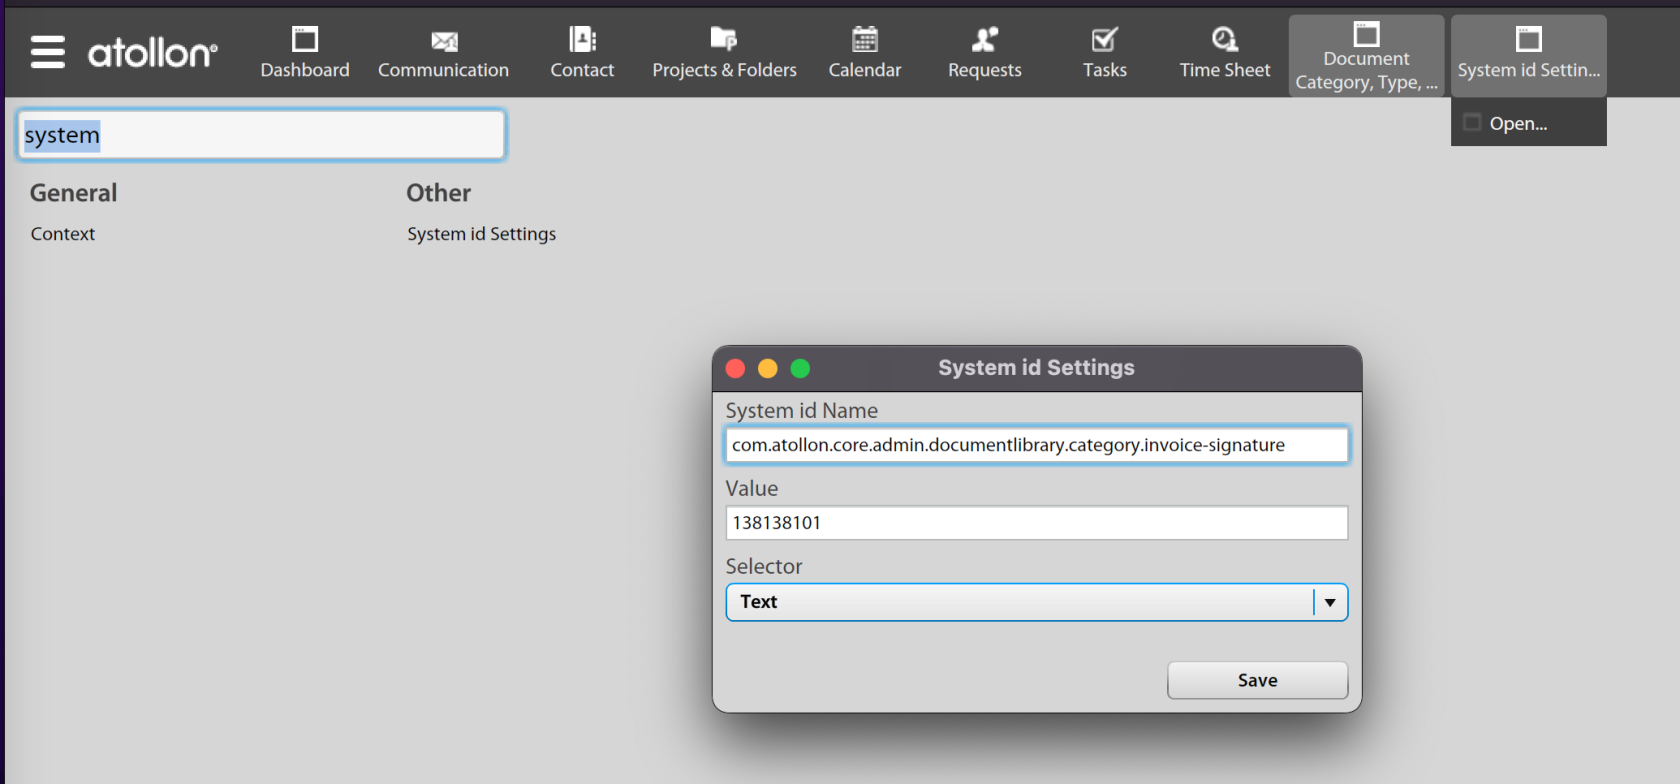](https://help.atollon.com/uploads/images/gallery/2024-01/doc-category-system-id.png)
#### Upload the document
Upload the image to organisation's (or supplier's) folder and choose the proper category on the document/image for company invoice logo or signature.
# Mails
# Mail Set-Up
## Mail Set-Up Options
There are two basic options to set-up mail in Atollon, the differences are described below:
Atollon as Primary Mail Server
Atollon as Secondary Mail Server
Atollon may act as your primary mail server (our preferred option). That means that all your e-mail communication will be managed with Atollon use. We will take care about spam filtering, the benefit of using Atollon as primary e-mail system is it's tight connection to other Atollon's components and easier access rights. Disadvantage may be that it is possible to get mail only using integrated Atollon's e-mail client. If you therefore prefer using other e-mail clients, select the second option.
You can decide to use Atollon only as archive tool for e-mails or occasional e-mail solution. In this case, server will be set as secondary mail server. This option requires primary e-mail server managed by different mail services provider. In order to get e-mails into Atollon, you may need to set-up mail forwarding of selected (or all) mailboxes to addresses configured when setting-up Atollon mail.
Below mentioned guides will follow you in mail set-up. If you need assistance, do not hesitate to ask your Atollon Consultant.
## [Set-Up Mailbox](https://help.atollon.com/books/system-administration/page/set-up-mailbox "Set-Up Mailbox")
## [Set-Up Domain MX Records](https://help.atollon.com/books/system-administration/page/set-up-domain-mx-records "Set-Up Domain MX Records")
# Mass Mail
If you are willing to use mass mail function which is available in Atollon, you should probably follow next steps before you starts.
### Introduction - how does it work?
First of all you need a distribution group. This can be done by following examples
1. create report and use send mass mail button,
2. create your own distribution group within Contact module and drag&drop contact you would like to have in this group,
3. use some nifty sql functions to create your distribution group :).
#### Wanna language-based sending?
This feature is actually not working in mass mailing so the nifty sql's are needed to create language-based distribution groups. Then you of course can send emails which speak the same language recipient does.
Just to show you how you might do that:
1. Create empty distribution group in contacts.
2. Find out it's id using SELECT id from contact\_distributiongroups where name like 'name-of-your-group';
3. Insert all contact which belongs to your organization and speak Czech:
insert into contact\_bind\_distrgroup(dgroup, contact)
select $YOUR-DISTRIBUTION-GROUP-ID, occ.contact from organization\_contact\_context occ
left join
contact\_personinfo cpi on occ.contact = cpi.contact
where
occ.organization = 1085000 and
cpi.preferedlang = 2607000
;
If you are done with distribution group creation process you can switch to real sending. But wait. We should speak more about what's behind it. Sooo
### Default folder aka organization\_contact\_context table
I would say you probably don't know what do I speak about. Let me just explain you. Every contact has its own default folder. As you probably know, every contact can have more than one folder. In this case - who knows which one is the default one? The answer is **default folder**. And also, you probably don't want to create folder for every *person* you have in your system. In this case **Default folder** is your very big friend again.
If you don't want to create Folder for every person in the system (what you probably really don't want to) you can easily update Default Folder using person's **relationship with employer**. This is pretty great because if you update Default Folder for the people you are willing to send your newsletter to, this message will actually stay on the person's employer's Folder.
#### What's the organization\_contact\_context table structure
That's quite simple. Table takes in consideration the contact might have different Default Folder accross organizations which are implemented in the system. So for that you can see following columns within it:
- organization
- contact
- subject
- project
- activity
#### Updating default folder
But first of all you have to update **Primary Employer**. In order to do that there is already (working) function within the Atollon. Just open up windows client and go to Settings -> Contacts -> Contacts maintainance -> Setup default main contact. Run it and make yourself a cup of coffee.
Output of the following command is delete/insert sql function list. You can use **\\o /tmp/your-update-scrip.sql** directly within psql so the output of the select is sent to the update script on your drive and you can import it after using **psql -d $YOUR-DATABASE -f /tmp/your-update-scrip.sql**. The command includes two values you should find and replace before you'll go to use it.
1. $ORGANIZATION-ID - is id of your organization, of course,
2. $ORGANIZATION-SUJBECT - is subject id of the organization.
```
SELECT 'delete from organization_contact_context where contact = '||cm.id||'; insert into organization_contact_context(organization, contact, subject, project) values($ORGANIZATION-ID, '||cm.id||', '||ss.id||', NULL);' from contact_main cm
left join (
select distinct on (cpc.contact) s.id, cpc.contact as contact from subject s
inner join contact_personcompany cpc on s.contact = cpc.company
where
cpc.isprimary = true
order by contact
) ss on cm.id = ss.contact
where
ss.id > 0 and
cm.id in (
select contact from contact_personcompany where company in (
SELECT contact from subject where organization = $ORGANIZATION-ID group by contact
)
) and
cm.id not in (
select contact from organization_contact_context where subject <> $ORGANIZATION-SUJBECT
)
order by
cm.id
;
```
The command itself might be a bit more updated because:
1. company can have two Folders and we are selecting just first one (but how we can know which is the correct one?),
2. person can have only one Primary Employer but he might also be excluded (he got fired) from that company and then validTo timestamp should be considered in that select too.
### Done with distribution groups, ready for mass mailing
If you did update default folder, created your distribution group and are happy what you have you can switch to the real [mass mail sending](mks://localhost/en/user-manual/marketing/Mass_Correspondence "mass-correspondence").
### Bugging
What if something went bad ...
#### Flash player crashed by mass mailing
Well ... that's great question. I was checking contact\_mmlist\_temp table for some changes and experienced some status changes but are those messages being still send or not?
Small hint - use following command where $MASS-MAIL-ISSUE-ID is id of your last sending (you might find it by selecting over all issues and trying to remember for how many contact did you send that mass mail) and check for changes.
SELECT status, count(status) from cONTACT\_MMLIST\_TEMP where issue = $MASS-MAIL-ISSUE-ID group by status;
#### Can not create mass mail list on the server side
This means your temporary mass mail list couldn't be created. This might be probably really bad bug. In my case the problem was in the insert of the distributiongroupid and contactid in the contact\_mmlist\_temp. I found out which insert was the wrong one and tried to apply it manually within plsql where I didn't experience any problem.
# Redirect existing mail address
## **In windows client**
1. **Setting -> Mail -> Mail boxes ->** doubleclick user to be redirected -> set combobox Active to No.
2. **Scribe down** (to notepad or piece of paper) users mail (just the name - part before @) and its aliases.
3. **Setting -> Mail -> Mail boxes ->** doubleclick user to redirect to -> push "+" button in Aliases section -> fill up user aliases which you were scribbing down
# Email Settings
Atollon Mail operates as an independent email server. There are two basic ways to configure email reception in Atollon:
### **Atollon as the Primary Email Server**
This option is the default system setting, where all email communication is directed to Atollon servers.
##### **Domain Settings at the Registrar**
The customer must configure their domain's MX records to point to Atollon servers. Add the following MX records to your domain's DNS:
1
10 mx1.atollon.com
##### **Domain settings in the system**
Into the system, enter a second-level domain (e.g., company.com), under which individual email accounts will be created.
##### **Sending messages**
The sender's identity is the same as the specific email account, e.g., mailbox@company.com.
##### **Nastavení SPF**
It is necessary to add the following TXT record to the DNS records of the domain "company.com":
**Recommended SPF setting:**
1
v=spf1 mx include: spf.atollon.com -all
If you also send emails from other servers, they must be included in the SPF rules as well.
Example of what the record might look like when using multiple mail providers:
### **Atollon as a secondary email server**
This option is suitable if Atollon is intended to serve purely as a mail archiving tool (not as the primary email server), or if the goal is for Atollon to manage only a specific portion of the email communication (selected mailboxes).
##### **Domain settings in the system**
Into the system, you enter the settings for a third-level email domain (e.g., INSTANCENAME.atollon.com), for which only selected email mailboxes are created. On the primary email server (at the current email service provider), email forwarding is then set up for individual mailboxes from to .
##### **Sending messages**
After creating the mailboxes, it is advisable to change the sender's identity within the Atollon system. Instead of , it is recommended to set it to . For this to function correctly, the DNS records for the domain "company.com" must be updated—specifically, the SPF rule must be supplemented—see below.
**SPF Settings**
Just as when using Atollon as your primary email server, you must add the following TXT record to the DNS records of the "**company.com**" domain:
Recommended SPF settings:
Just as when using Atollon as your primary email server, you must add the following TXT record to the DNS records of the "**company.com**" domain:
**Recommended SPF settings:**
1
v=spf1 mx include:spf.atollon.com -all
If you also send mail from other servers, these must also be included in the SPF rules.
Example of what the record might look like when multiple mail providers are involved:
#### **How to set up forwarding of your email to Atollon**
**Office 365 Configuration Example**
In the case of using Atollon as a secondary email server while utilizing Microsoft 365, it is necessary to enable forwarding to an external email address; a link to the instructions can be found [(here)](https://learn.microsoft.com/en-us/defender-office-365/anti-spam-policies-configure). In the **Admin Center**, select **Security**. Then expand the **Outbound spam filter policy (always ON)** menu and click the **Edit policy** button. Here, you need to change the setting from the default "Automatic – system-controlled" to **On – forwarding is enabled** and **Save** the changes.
**Forwarding at the Email System Level**
At the email system settings level, it is necessary to set up automatic forwarding (auto-forward) for each mailbox whose messages are to be delivered to Atollon – for example, from the address thomas@company.com to thomas@company.atollon.com.
# Set-Up Mailbox
The following guide will show you how to add or edit Atollon Mailbox.
## Open Mailbox Settings
First, select the user, who will be the owner of the mailbox. Each user may have several mailboxes at the same time. One mailbox is always primary (used first when sending new e-mail from Atollon).
## Edit Mailbox Settings
There are the following Mailbox options that you should fill-in:
1. **E-mail name** is the identification of Mailbox in the system and primary Mailbox name in the same time. This is the part that will be **before "@"**.
2. **Domain** is the mail server identification. This is the part that will be **after"@"**.
3. **Identity** is the default Mailbox owner's identity, when sending e-mails. Be careful, when changing this field and keep suggested syntax emailName@domain.
4. **Store messages to**: you have option either to distribute new e-mail to user's individual message folder (To Do) or select any folder or project from contexts.
5. **Active (Yes/No)**: indicates whether Atollon receives mail on this address or not.
6. **Default box (Yes/No)**: indicates, whether this Mailbox is used first when sending new E-mail by the owner.
7. **Signature**: fill-in owner's signature.
8. **Aliases**: you can add more names to this Mailbox. Please note that Alias must not have the same name as some other existing Mailbox. Aliases are used only for receiving emails. You need to create new mailbox if you want to send mails with some other name. Aliases are always in same domain as the mailbox they are specified in. Do not write "@domain" part here.
##### Mailbox Advanced Options
- Auto - respond settings = it allows you to enable and set up automatic response when out-of office or unavailable
- Forward settings = it allows you to enable automatic forwarding of incoming e-mails (**Allow forwarding**), where you can choose **Save forwarded** option (all incoming messages will by saved in your mailbox, otherwise forwarded only); finally you can set up/ manage forward e-mail addresses.
#### Mailbox Access Rights
In Mailbox detail: Bottom left you may find access rights to each individual mailbox. Each user must have View & Edit rights to their mailbox in order to be able to:
1. Use the mailbox
2. Edit own signature in Mailbox Settings.
To set up user rights just push the **Add User** button and select the name of mailbox owner from the list, select appropriate user rights and commit changes by pushing **Save** button.
After you are ready, press Ok to save your mailbox settings. If Domain MX records are properly set, you should soon be able to receive new Mail.
**Next Step:**
If you have not done so, [set-up your Domain MX records.](https://help.atollon.com/books/system-administration/page/set-up-domain-mx-records "Set-Up Domain MX Records")
# Message Configuration
Message Configuration options allows you to configure different message types as per your requirements.
1\. Go to **Options & Tools**
**[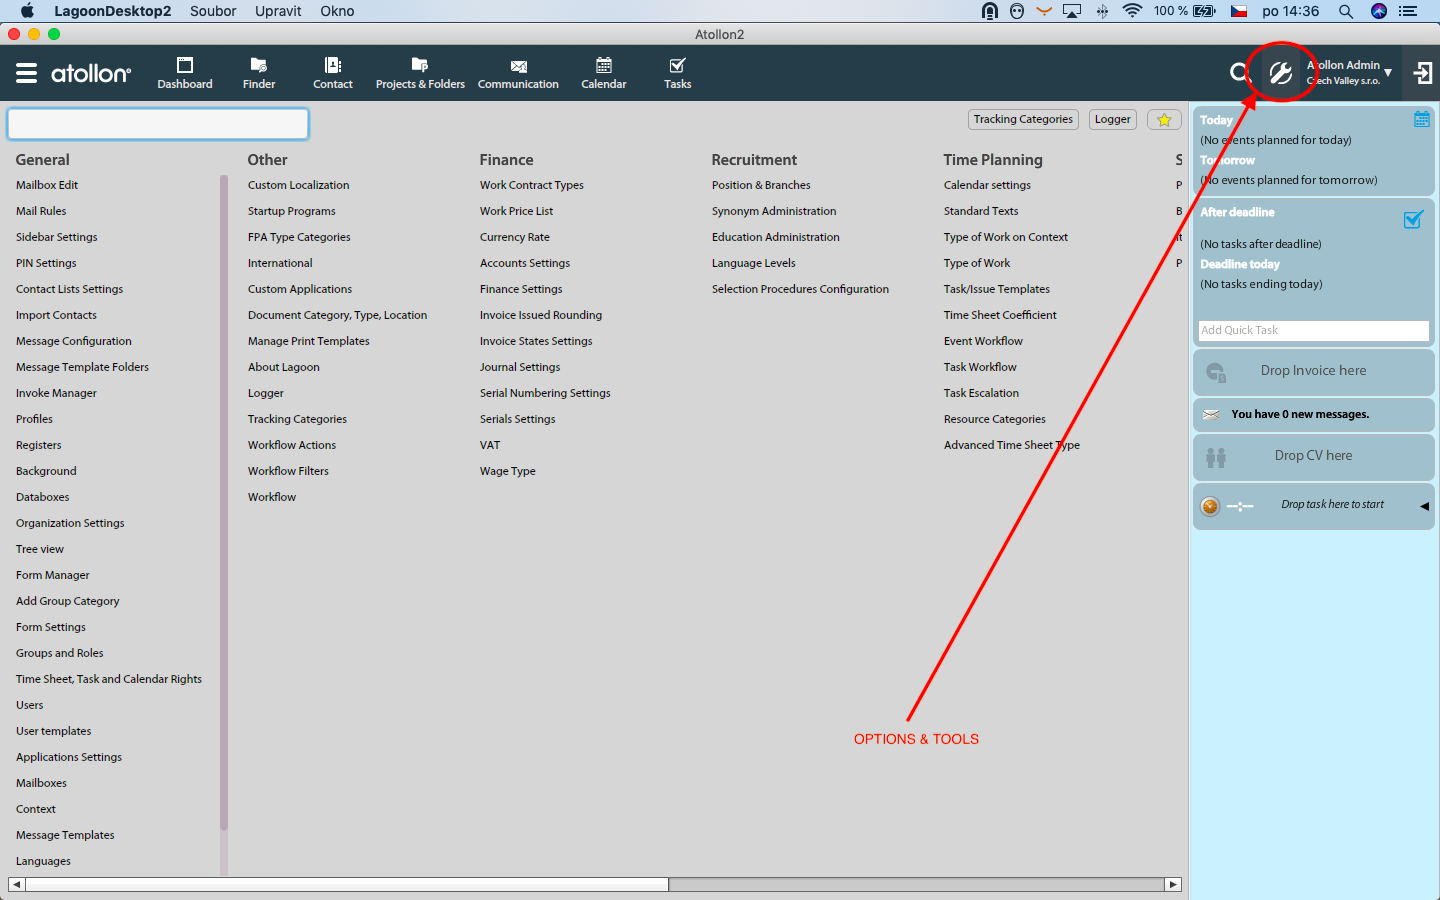](https://help.atollon.com/uploads/images/gallery/2020-06/options-and-tools.png)**
2\. Type "message" into the text field there, the application will filter only those settings relating to messaging
3\. Choose **Message Configuration** option, in order to call for appropriate dialog
4\. Use the buttons in dialog as per your need
- create new item (new message type)
- edit existing item
- delete exiting item
[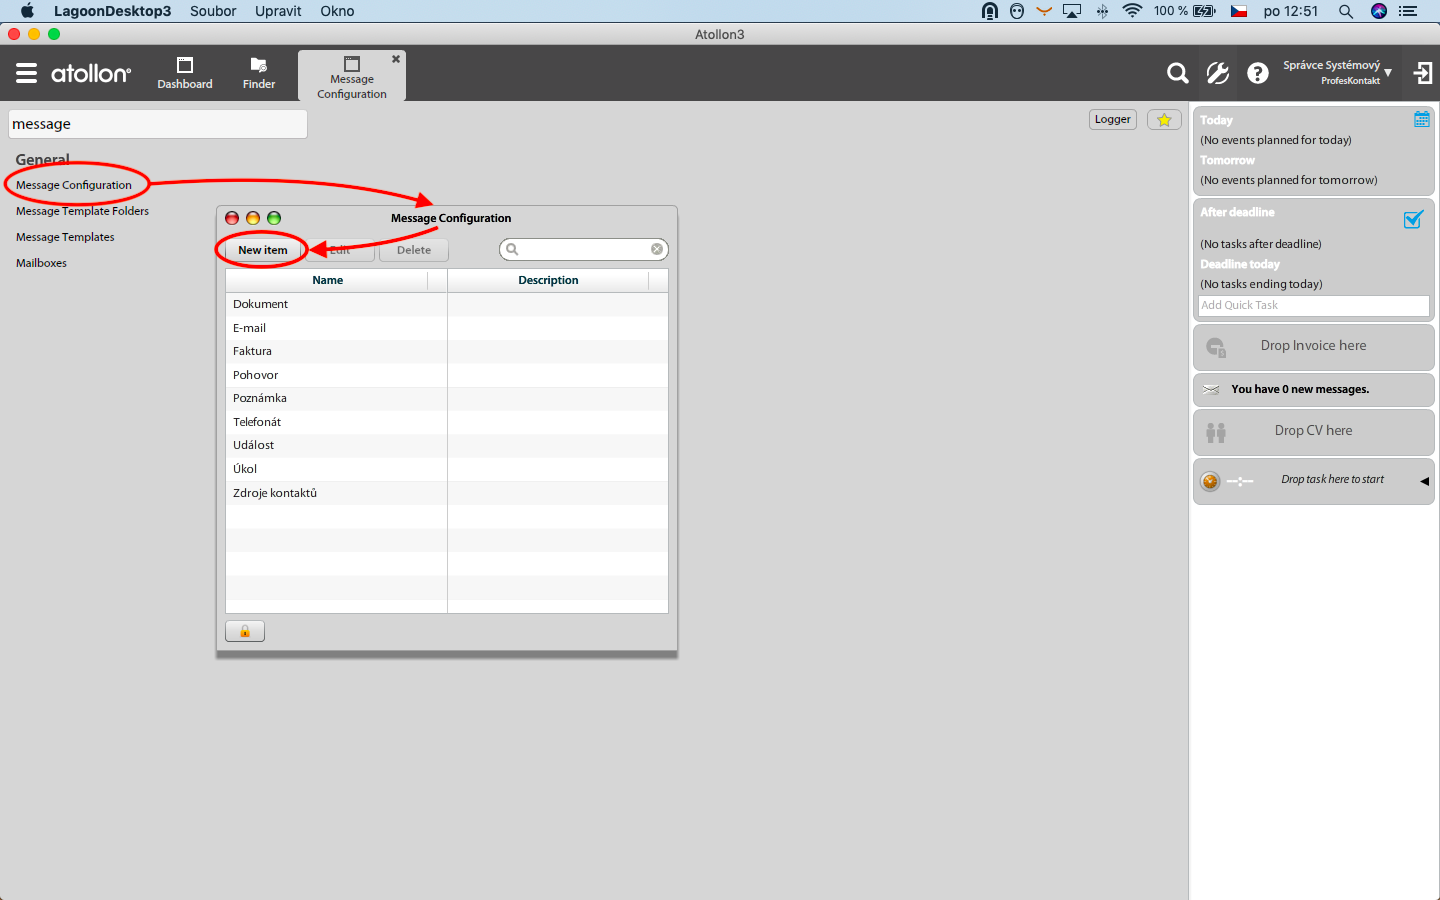](https://help.atollon.com/uploads/images/gallery/2020-06/5Rbmessage_config.png)
[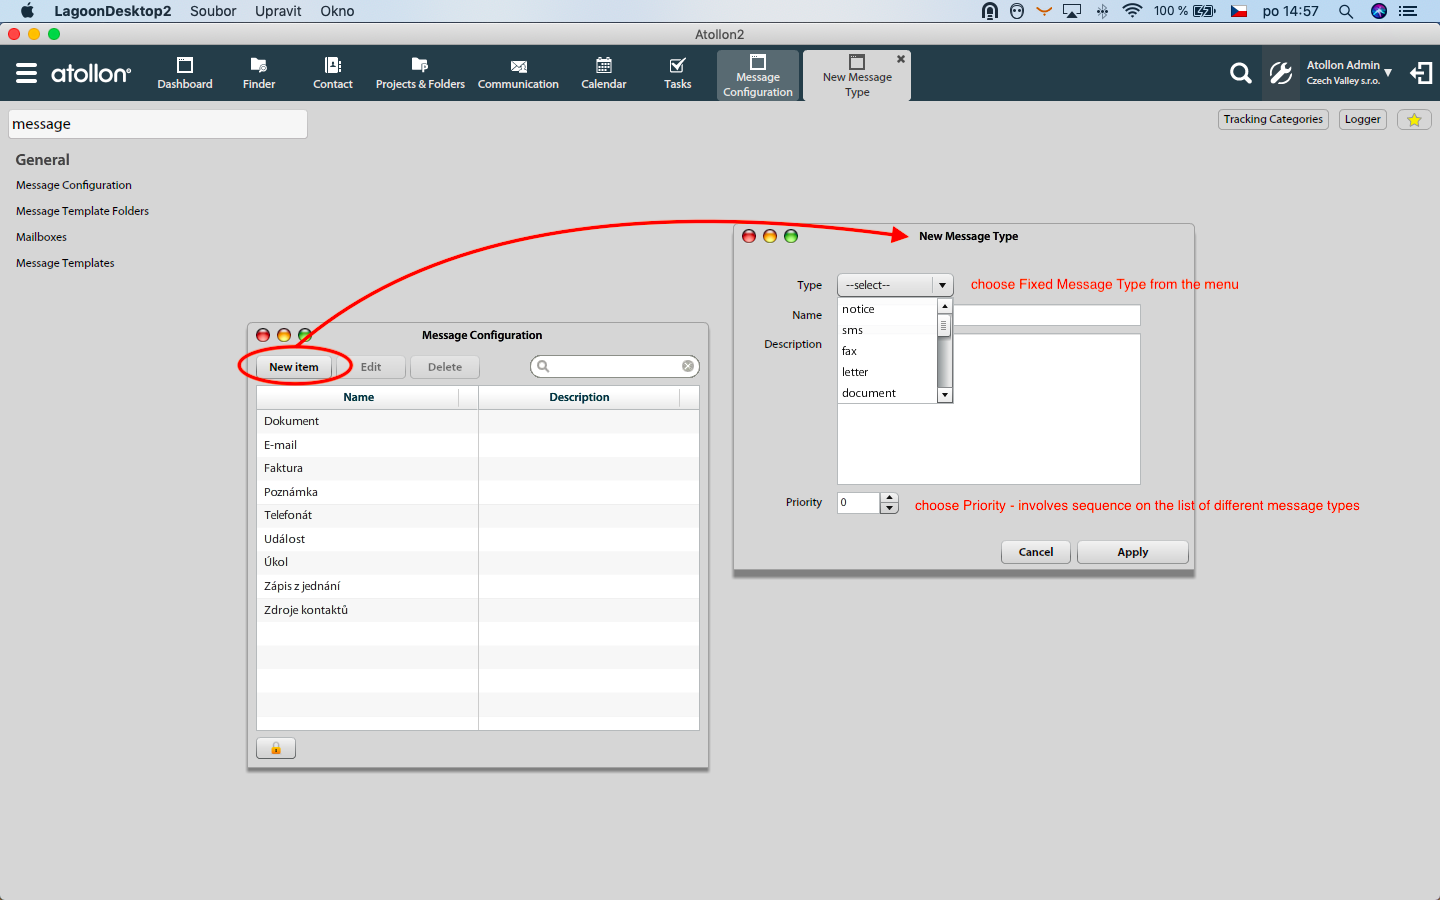](https://help.atollon.com/uploads/images/gallery/2020-06/new-message-type.png)
# Reporting
# Generic Reports
Atollon Generic reports provide users with tool to create view on system data. The benefit of reporting, compared to online views, is that you can include various data fields across the whole system and combine for example:
- projects with messages
- clients with tasks
- activities with time sheet records, etc.
- any simple views on deals, clients, service records, etc.
### Reporting Features
Report is generated as definition for data querying. Each time the report is run, new query is sent to server, the query is placed into queue and the client side is waiting for the results to appear. On backend, there is copy of all records stored in table and you can run simple queries on the generated results (for example group/sum/count records on any fields).
#### Access Rights
It is possible to allow / disallow individual users or group of users to create new Report Definition or run the report using existing Report Definition. Users may get results for only records that are visible to users.
**In case the report results is stored, report results are accessible to anyone with the access rights to report results!!!**
#### Fields
You can add as many fields into the report you want, you just should understand that not all combinations of fields may generate some results. For instance it is not possible or it has no sense to generate report, which contains events & messaging at the same time. Instead, you should create **one** report **for messaging** and **another for events**.
In order to display the filed in the report result, just tick the (x) in the column "**Show in result**" in Report definition.
Fields are displayed in Tree structure, in order to select appropriate fields, you have to expand any Reporting category, for instance Account (Folder), Contact, Form, Messaging, Project, ... After you expanded the category, you are allowed to select any field that will be displayed in report results.
You can sort order the fields (columns) in report results by pressing button "**Column order**". In the displayed pop-up you may arrange the column order.
#### Filtering
The report definition may contain already pre-set filters in Report Definition. It is adviced to filter on criteria just to limit the results into the requested set of data, for instance Contact Foler Type = "Client" or Project Type = "Sales Opportunity", etc.
In order to enable / disable filtering based on selected criteria, just tick the (x) in the colum just in front of the field name. It is adviced not to check all fields this way, but just those that you desire to filter.
It is also possible to filter for any field displayed in report results, before you actually run the report generation.
#### Sorting
It is possible to sort the report results by one selected field. If you want to order report results by more than one field, you should use Grouping feature.
In order to sort the report results by the selected field, select (x) in the Sort column.
#### Grouping results
In order to group results by the selected criteria, just tick (x) the field under column Group by. You can set order of grouping and re-arrange it using Group By order (see button on top of report definition). You should select at least one aggregate function (**Count** / **Sum** / **Avg**) on any appropriate field that you want to count, sum or make average. Please note that Sum and Avg may be used only in connection with numeric fields.
#### Reporting Form values
Reporting allows you to include **Form Values** in report results. The only tricky part is that you need to define which **Form** is used for which reporting use. For instance, you used form "Client Form" as form set-up at Folder Type "Client". This way you should right-click on the form (displayed at left side of the Report Definition window) and select that it is "Subject Global Form".
Once you added the form into Report Definition, new fields (defined on form) should be added into the list of available fields. You are now able to filter on form fields, use them in report results, etc.
### Report Results Features
#### Access Rights
Each user will receive only those results that are enabled to the user. Therefore report results may differ based on who runs the predefined report.
#### Working with report results
You are allowed to work with data in report results. Once there is Contact Folder, Project, Activity/Milestone, Message, Task or Event displayed, you should be able to open it's detail. There are several actions working on multiple records selection.
#### Exporting report results
You are allowed to export report results into CSV (Web client) or XLS (Win client) or print them (Win client).
#### Saving report results
If you want to keep the generated report results, you are allowed to store them (using Windows client only).
### Known Issues
Web client provides view on designed reports, but does not support 100% of all of them. You need to test the report results before you put the report into production. For instance some criteria can not be grouped under Web client interface yet. We are working on resolving these issues.
- You can not filter on fields that are not displayed in report results.
- You should not use Sum / Avg aggregate functions on non-numeric fields.
- You should not combine fields in the same report result, which should not be combined.
- You should not filter on criteria, based on which you group at the same time.
### Example
Combine reporting of Contact Folders, in connection with communication, tasks or time sheet.
### Create New Report
In order to create the report properly, some basic understanding of system data structure is required. You can create new report using MS Windows Administration interface.
Go to tab **Reports** > **Report selection** and press **New report**.
## Report Results Mass Actions
On report results, you can run several mass-account or mass-project actions. Just select records using either Ctrl+A or Ctrl + click or Ctril + click 1st & click last record. Right-click with mouse - wait & select one of the options. Please note that these functions sometimes require to have Folder Type or Project Type column in the report results. The process of displaying the pop-up menu may be very slow on larger record sets.
### Change Multiple Responsible Users
# Generic Report Scenarios
Below mentioned examples / scenarios present only the most common reporting usage.
### Show Clients Overview
In new report, select at least reporting criteria **Account** and field **Name**. Press (x) in Show in results column at this criteria.
Because system may contain several Folder Types (including Client, Partner, Simple Folders, etc.), you should filter for criteria **Account** > **Type**. Double click into "**Filter value**" column in the same row and select the "Clients" Folder Type (or any appropriate).
Additional to these two required fields, you may add another criteria, for instance:
Field Name
Description
Created from/to
Date the Client was created
Custom ID
Client reference number
Type
Folder Type
Status
Fixed status values (Initial, Active, Closed)
Custom Status
Any user-based status (Potential, Hot, VIP, Current, Lost, ...)
Path
Once the report is used for reporting folders, you can display the whole path to the folder. It may also be used once the client is created in multi-level organization structure, including branches of larger organizations.
Parent folder
Once the folder is stored within another folder in tree structure, it may contain the Parent folder
First contact date
The date of first communication with Client
Last contact date
The date of last communication with Client
Contact > Person > \*
Is the Client person? If yes, you may use this category.
Contact > Company > \*
Is the Client company? If yes, you may use this category.
Contact > Primary contacts > \*
In any case you can use this category and show primary contact data, incl. primary e-mail, phone, mobile, address, etc.
Contact > Contact address > \*
Show any address associated with the Client. In case there are more addresses, the report will generate more rows in report results.
Contact > Contact information > \*
Show any Client's contact information (e-mail, phone, etc.). If there are more contacts found (several mail addresses), the report results will display new row for each of the contacts.
Contact > Bank > \*
Show Client's bank account.
Contact > Valid from, Valid to, Keyword, Comment, Distribution group, Source database, Reference
Show additional Client contact details.
Subject Global Form > \*
Once you assign the Form based on Folder Type = Client here, you will be able to include the Client's form values in the report results.
Form > \*
Once you assign the Form based on Folder Template = Client here, you will be able to include the Client's form values in the report results.
Responsible team / user > \*
Include these fields if you want to show Key Account for the Client. In case there are more responsible users for the same Client, the report results will show new row for each User and Client. In order to avoid this, you may filter only for Primary User.
Account state history > \*
This is special reporting option allowing you to display history of Client status changes & user responsibility assignments.
By including any of the above fields, you may generate simple Clients overview reports.
### Projects Reporting
We discussed basic project reporting in one of the last chapters of Core Set-up. One of the core reports is [Project Status Overview](mks://localhost/en/Resources/Business_Growth_Engine_Program/01_Core_Set-up#Project_Overview "http://wiki.atollon.com/en/Resources/Business_Growth_Engine_Program/01_Core_Set-up#Project_Overview") report, which will indicate number of projects in particular Custom Status as well as primary responsible person for the project.
### Tasks Status Reporting
You can create reports that will indicate number of pending tasks or tasks waiting for your client's input easily. Please configure the following report, if it's not yet available in your Atollon:
Field Name
Filtering
Grouping Criteria
Description
Task/Event.Custom Status
Group by
Group By criteria
Task/Event.User
Group by
Task Solver
Task/Event.Name
Count
Task Title (add Count criteria)
Folder.Name
Indicates a **Folder Name** (for example Client Name).
Project.Name
Indicates the **Project Name**, on which the Task is assigned.
Project.Type
Select types of projects that you want to watch. These should preferable include your Job, Case or Project and not your Sales Opportunity, which belongs to sales performance overview.
Your Project Type, belonging to production process.
Task/Event.Type
You can switch whether you want to report from Events or Tasks (in this case we need Tasks).
Task/Event.Date from
Date Task starts
Task/Event.Date to
Task Deadline
Task/Event.Type of work
(optionally Group by)
Type of work
Task/Event.Completed
Date Task was completed
Task/Event.Description
Task Description
Task/Event.Created by
Task Created Date
Task/Event.Status
Pending, Missed Deadline
The resulting report set-up should look like:
[](https://help.atollon.com/uploads/images/gallery/2020-03/report-task-status.png)
### Activity Reporting using Messages
You can set-up report, which will show you communication frequency of your team workers. Again, you can focus only on communication connected with execution projects. Always when interpreting your report results, you should consider factors that influence the results. Of course, it would be strange if your main executive force is the most communicating and on the other side your projects coordinator has only few notes.
Field Name
Filtering
Grouping
Description
Project Messaging.Created by
Group by
Who created the message
Project Messaging.Message Type
Group by
What type of message was created
Project Messaging.Subject
Count
What was written
Folder.Name
Name of the Client / Folder
Project.Name
Name of the Project
Project Messaging.Created from/to
Last 30 days
Project Messaging.To
Whom the message was sent (in XML format)
Project.Type
Any execution type projects
You want to get only your production type of communication.
This project will give you nice overview of how you care about your existing projects / clients. Once you communicate frequently, it may increase the security of your client and improve your relations with them.
The resulting report set-up will look like:
[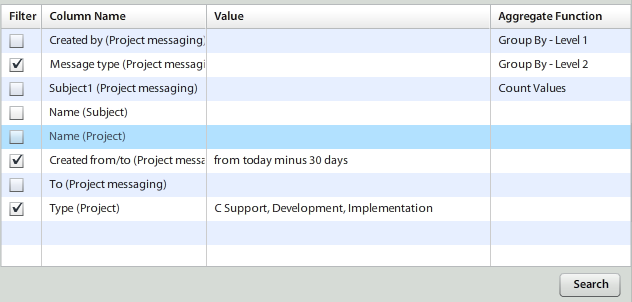](https://help.atollon.com/uploads/images/gallery/2020-03/report-messages.png)
Please feel free to design your own reports that will help you measure your production effectiveness. Using strong base that you get in Atollon, when properly used, you can manage your company based on numbers, as an supportive tool for your management decisions.
# Working with Generic Reports
### Export / Print Functions
#### Enable / disable export / print function
It is possible to disable export / print functions from Reporting. You can change these options in User Settings (Options & Tools > Users). In advanced options, check / uncheck the option to Export / print.
[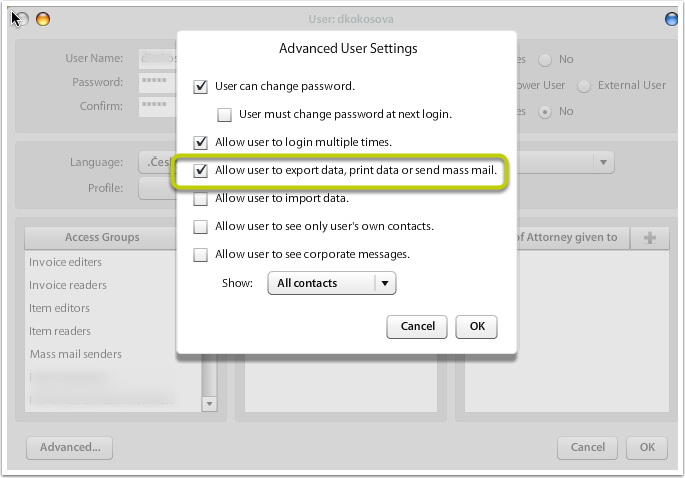](https://help.atollon.com/uploads/images/gallery/2020-03/report-allow-export-print.png)
### Export / Mass changes on Clients
#### Mass folder responsible user change / Mass function
The mas changes are being done in section Report, where you will choose in tree structure Leads ***Management / Leads by Source***. By double click, you will open the window, with your all clients.
[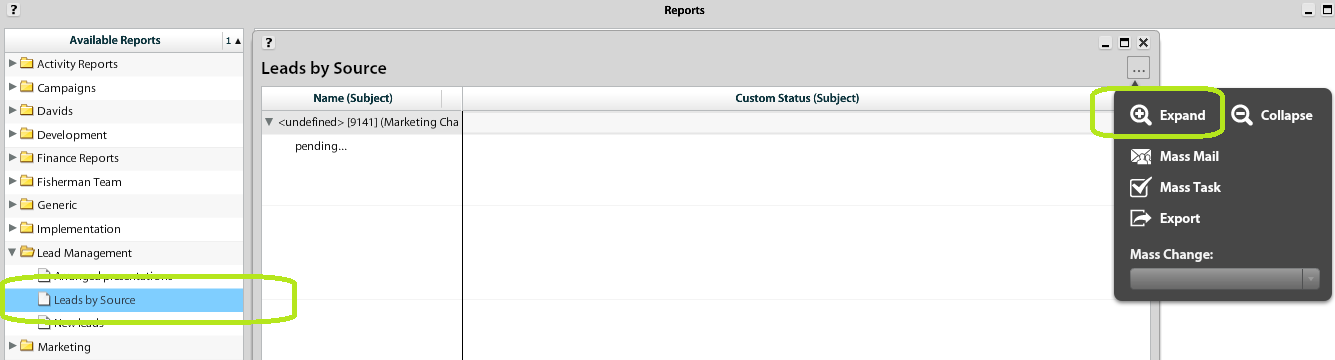](https://help.atollon.com/uploads/images/gallery/2020-03/report-mass-change.png)
\*) if you have only one-row use function Expand
Then choose by highlight two or more clients, where you need to make a change. For change use function Mass folder responsible user change.
[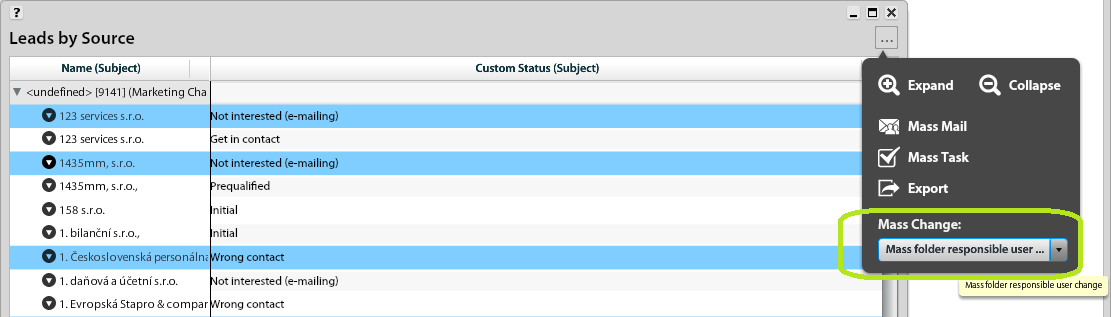](https://help.atollon.com/uploads/images/gallery/2020-03/report-mass-change-2.png)
In a new open window, you can choose User ( user to replace ) and Replace with ( new responsible user).
# Setup Weekly Reporting
## Introduction
**Weekly reports** are **Report packs** (set of generic reports) sent to **Contact group** of users in predefined frequency. The frequency is defined using **Timer service** that runs workflow plugin **Report generator** configured to your needs.
### Tools used
**Tool**
**Explanation**
**Report pack**
Tool (Applications > Report packs) that allows you to generate more reports at once.
**Generic report**
View on your data in ATOLLON, configurable to your needs, may consist view on deals, leads, clients, service activities, technology tracked, calendar events, tasks, time sheet, etc.
**Contact group**
Functionality of contacts module that allows you to group similar contacts together. For the purpose of automated report generation, only system users may be addressed.
**Timer service**
Tool for running regular system tasks, ie run **Workflows**.
**Workflow**
Definition of conditions, under which **Workflow Activities** can be executed.
**Workflow activity**
Any action that can be run using **Workflow**.
**Workflow plugin**
Any tool that can be executed and configured using **Workflow Activity**.
**Report generator**
Custom workflow plugin that configures what report or report pack is sent to which contact group of users.
## Create or update Weekly Report Pack
Report pack allows you to select set of reports to be generated in one run. The report pack can be sent using workflow automation and timer services on regular level to selected recipients.
[](https://help.atollon.com/uploads/images/gallery/2023-01/add-reports-to-report-pack.gif)
### Create new weekly report
If you want to add another report to weekly report pack, you can copy any existing report and just add weekly filter criteria, or you can create brand new report. Below you can find example on how to copy & modify one of existing reports.
[](https://help.atollon.com/uploads/images/gallery/2023-01/copy-report.gif)
After you have created new report, you can go back to Report pack (see video above) and add the report to the weekly report pack.
### Add weekly report recipients
Weekly report recipients are system users added to one of groups in User engagement group category, see video below on how to add user to the contact group that receives the report.
[](https://help.atollon.com/uploads/images/gallery/2023-01/add-contacts-to-user-engagement-group.gif)
## Timer service setup
Below you can find the way to setup timer service that runs the workflow plugin **Report generator** exection.
*Note: The current setup is not yet user friendly, it requires getting report pack ID and contact group ID from Logger app. More advanced user level in software is required.*
# Workflow
# Starting with Workflow
Workflow is automatization of processes in system.
## Basic priciple
##### How does it work?
Workflow functionality uses server module that is watching change (create,update) on [objects](mks://localhost/en/admin/Workflow/Workflow_objects "Workflow objects"). If some change matches with workflow setting, workflow will run it's actions.
A different kind is **time-managed workflow**. Admin will set period, how often will be workflow lanunched. It will take all objects that match the filter in workflow setting and run actions assigned to it.
[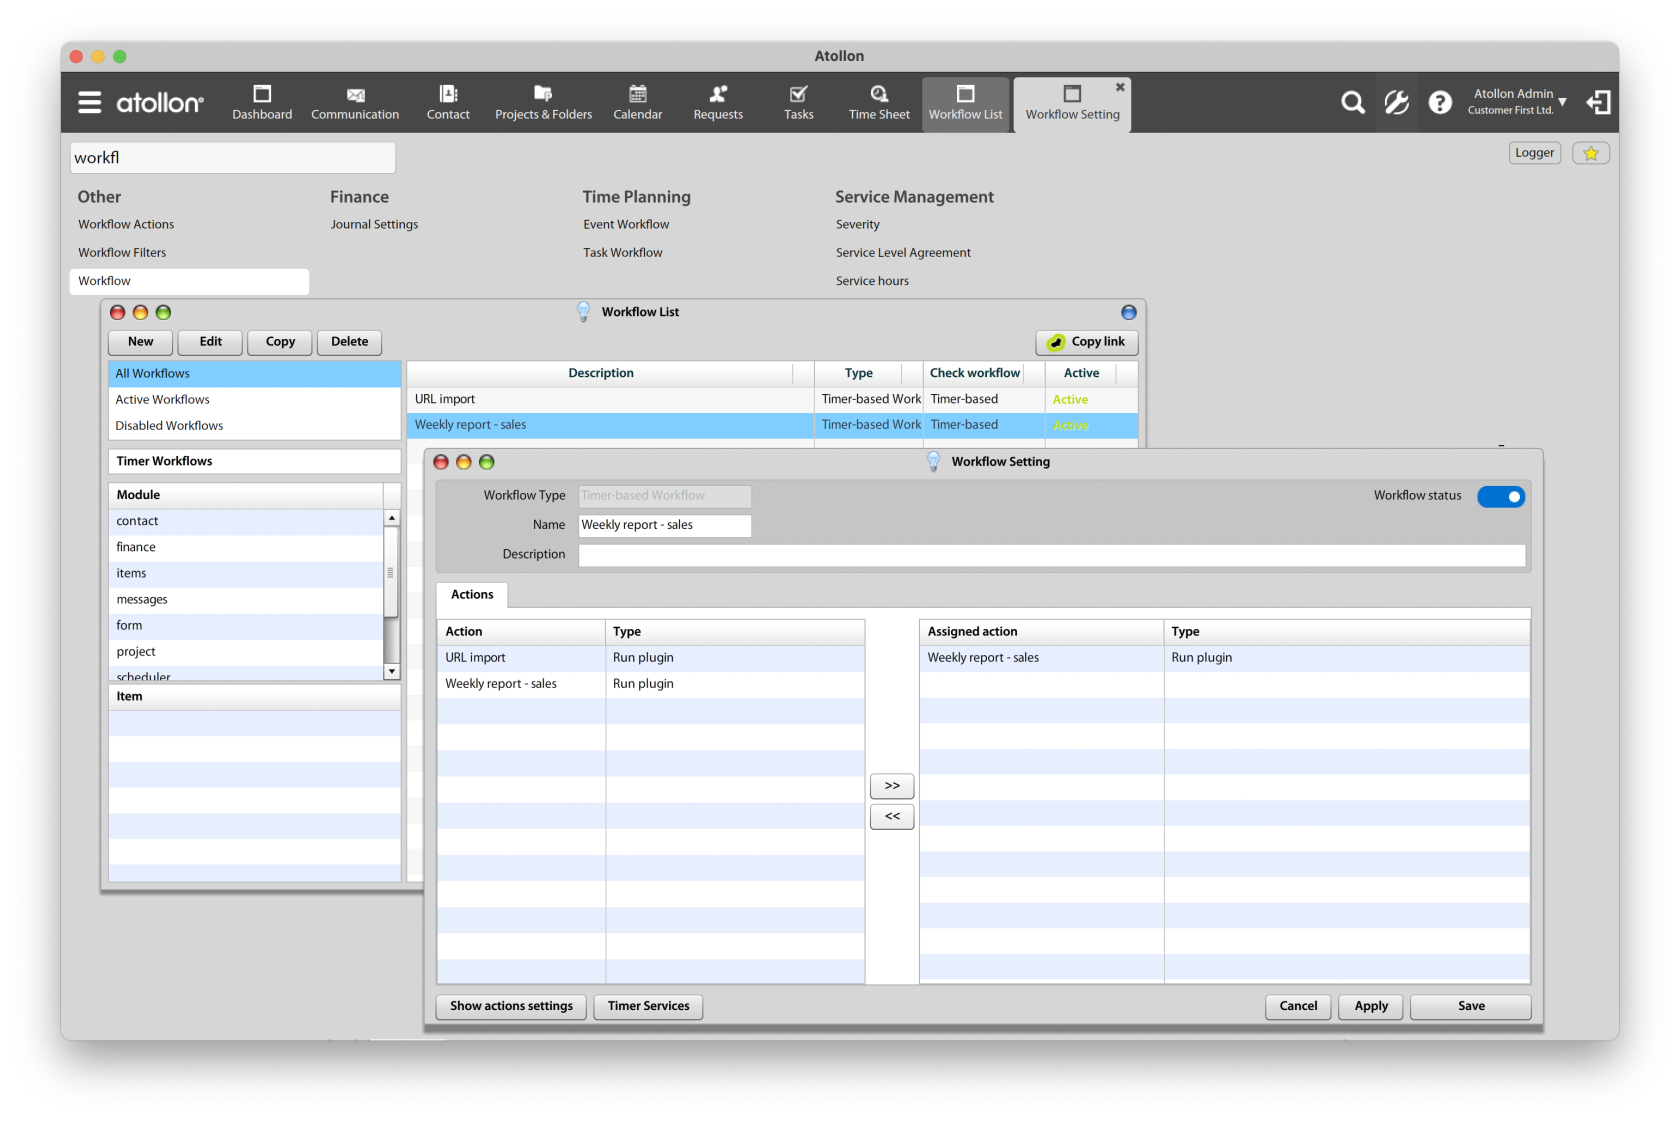](https://help.atollon.com/uploads/images/gallery/2024-04/workflow-settings.png)
## Workflow Setting structure
Each workflow contains name, description and important switch "Workflow is active", which makes workflow enabled/disabled.
There are three types of workflow settings:
- At Update - workflow is checked, when some object is changing
- At Create - worfklow is checked, when some object is creating
- Managed by time - workflow runs in some period, which will pick object that fits to filter
#### At update
Workflow setting is composed from:
- Filter after change
- Chagned fields
- Filter before change
- Actions
#### At create
Workflow setting is composed from
- Filter
- Actions
#### Managed by time
Workflow setting is composed from:
- Filter
- Execution interval
- Actions
### How does it really work
Base of all is object like Timesheet, Project, Folder, Task etc. Each object is assigned to some module. Eg. Timesheet is in module scheduler, Folder is in module Project and so on. These objects defines, what filters can be used for filtering.
## Workflow Time Filters
Sometimes it may be confusing on how the workflow time-based filters work. Below you may find the explanation:
**FIlter type**
**Description**
**Example**
**Day**
Filter data in one particular day in past or in the future.
Comparison is <today> +/- number of days = "date" of the record.
You usually run this workflow **once each day**.
<today> + 30 days = 30 days in the future
<today> -30 days = 30 days in the past
<today> **- 30** = Last contact date => Create action **30 days after** Last contact date (of client).
## Workflow Example
Best practice on how to explain workflow behavior is to show example on it.
Workflow is based on: **change -> call action**.
As an examle we will set-up workflow: if project type "**Sales opportunity**" under folder "**Client**" changes status to "**Won**" (from state "In process") we need to switch "Client" status to "Active" (from status "Potential") and create new project "Project realization".
In order to execute this process we will split workflow into two workflow steps:
- "Won" Sales opurtunity -> change status of folder "Client" from "Initial" to "Active"
- and status when status of Client is changed to "Active" -> create new project "Project realization"
### 1. Won Sales opportunity -> change state of folder to "Active"
#### Create new Workflow setting
click on "Settings" -> "Workflow settings"
Sales opurtunity is project and change state of folder is action. So project is object that will call action for changing state.
Select (module) "**project**" -> (Item) "**Project**" and click New. This will show form for editing workflow.
Type name "Sales -> folder in progress" and check "Workflow is active". Let radiobutton "At Update" selected (do not select other radiobutton).
#### Set filter
In tab "Filter after change":
1. Add state filter
- double click on "State" (table on left). This will add new filter condition (new item in table on right). Click into "Value" column and select state "Won"
2. Add type filter
- double click on "Type" (table on left). This will add new filter condition (new item in table on right). Click into "Value" column and select type "Sales opurtunity"
In tab "Changed fields":
1. Double click on "State" - it means that workflow will react on change of state (otherwise it will react every time, when project is saved, and after this save is project in state "Won")
We now set: If state is changed, project's type is Sales opurtunity and state, which is it switched in, is "Won", call action.
#### Set action
In tab "Actions:
1. Click on button "Show actions settings" (it will show form of all actions for project object)
1. Click "New"
2. In right panel type title of new action: "Folder to Active"
3. Select "Change folder's state" in combobox "Type" (under title) - you can see that form was changed.
4. Select "Active" in combobox "Set folder to state"
5. Click save and close window
2. You can see that our new action is in left panel
1. Double click on it - it will be added into actions, that will be called from this worklfow settings.
3. Click on "Save"
That's it. We jus created workflow, which will change state of folder, when state of project was chagned. You can test it.
### 2. In progress -> create project Project realization
Workflow reacts also on chagnes caused by workflow (not only by user). This makes it really strong tool.
#### Create new Workflow setting
If you closed all windows, than click on Settings -> Workflow settings.
Object, which caused action is folder, because (action) project creation will be called after folder state was changed.
Select (module) project -> (Item) Folder and click New.
Type name "In progress -> create Project realization" and check "Workflow is active". Let radiobutton "At Update" selected (do not select other radiobutton).
#### Set filter
In tab "Filter after change":
1. Add state filter
- double click on "State" (table on left). This will add new filter condition (new item in table on right). Click into "Value" column and select state "Active"
2. Add type filter
- double click on "Type" (table on left). This will add new filter condition (new item in table on right). Click into "Value" column and select type "Client"
In tab "Changed fields":
1. Double click on "State" - it means that workflow will react on change of state
We now set: If state is changed, folders's type is Client and state, which is it switched in, is "Active", call action.
#### Set action
In tab "Actions:
1. Click on button "Show actions settings" (it will show form of all actions for project object)
1. Click "New"
2. In right panel type title of new action: "Create Realization project"
3. Select "Create project" in combobox "Type" (under title) - you can see that form was changed.
4. Select "Template" in combobox "Project Realization"
5. Click save and close window
2. You can see that our new action is in left panel
1. Double click on it - it will be added into actions, that will be called from this worklfow settings.
3. Click on "Save"
So we created workflow, thar reacts on folders change. If folder is swithed into state "Active", new project of type "Project realization" will be created.
And If we have set workflow "Won Sales opurtunity -> change state of folder into In progress", than: If we set project "Sales opurtunity" into state "Won", than folder will be set to "In progress" and new project "Project realization" will be created.
# Sending messages
## Sending Task Notifications
You can select **message template** and type of message (supported types are notice and message in present).
U**sers from contact** is available for email, becauce notice can not be sent to them.
In message template you can use specific merge fields, which are replaced by corresponding content.
Eg. If in content of message is "${DESCRIPTION} " , it can be replaced by comment from task. List of these merge fields is mentioned below:
When message action is evoked from event/task:
Name
Meaning
${NAME}
Event/task title
${DESCRIPTION}
Comment
${LOCATION}
Location
${DURATION}
Duration (used from task)
${USERS}
List of users
${TYPEOFWORK}
Type of work
${STATUS}
Event/task status
${START}
Starting time
${END}
End of event/ Task deadline
${CONTEXT}
Context
# Interactive Workflow Actions
**Notice: this function is currently NOT SUPPORTED. Documentation here is used for future reference.**
Interactive actions are actions, that need user's interaction or user needs to be informated about something.
##### Example 1
After creating project in some clients folder, workflow will ask user if the client is paying monthly, or quarterly. Workflow according to his choice will create 12 or 4 tasks for checking payment.
##### Example 2
After project creation, manager (current user) will need to see the tasks, that were created on project, because he wants to redistribute created tasks or just to check them.
## Interaction types
Only some actions can be interactive. It depends on, what they are doing.
To set interaction, there are 4 options:
- *Don't show* - this action will be processed on background, user will be not asked for any interaction
- *Normal (in list)* - action will be shown in workflow actions list form with blue tooltip icon . User can close this form.
- *High (in list)* - the same as *Normal (in list)*. But they are shown as exclamations in orange circle and user **can not close this window,** until any Hight priority action will be in list.
- *Blocker (blocking window)* - dialog or target will be show directly to user.
Workflow action list form: on this picture are also high-priority actions, so window can not be closed.
##### **Note for super-admins on how to delete interactive workflow actions that confuse users**
```
delete from features_workflow_action_queue_attributes where action in (select id from features_workflow_action_queue where isinteractive = 2);
delete from features_workflow_action_queue where isinteractive = 2;
```
# Workflow Objects Overview
This page contains list of objects, that can be used in workflow as source of actions.
Some objects in system are represented by the same object in workflow like Event and Task.
First level of list is module, second is object, the third is the definition of types (col\_type).
- Scheduler
- Timesheet
- Event / Task
- Project
- Folder
- Project
- Activity
- Contact
- Contact
- Form
- globalform (form.globalform)
- customform (form.customform)
- Access
- User
- Finance
- Invoice / Order
- Messages
- mail
- msgtype
- msgstatus
- msgmailbox: id of mailbox of the recipient
- msgcustomtype: msg\_messages.customtype->msg\_messages\_customtype
# Workflow Actions
**Workflow Action** is main building block of Workflow module, which is part of **Atollon Professional Edition**. There are several Types of Actions that may be executed by Atollon Trolls during workflow process (ie Create Task, Run another Action, Create Activity, etc.). The list of Actions is growing during Workflow development. Please note that this module is still in **experimental** phase and Atollon can not guarantee all possible combinations to be fully tested in working environment. Please **test your Workflows properly** before putting it into production environment.
Below are mentioned main Action types.
## List of Actions
Each Action is filtered based on module & module domain, in which the Action is executed. For example, when Action (Create new Task) is executed during changing Project Status, the Action should be found (and created) in module **Project** > domain **Project**.
[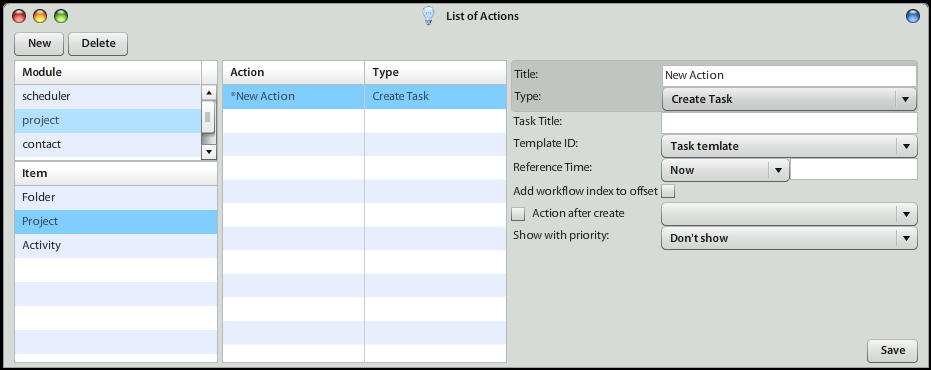](https://help.atollon.com/uploads/images/gallery/2020-03/workflow-list-of-actions.png)
## New Action
By creating New Action you prepare template of system process that will be executed by Atollon Trolls, when good time comes. New Action is created after you select module & module domain, where the Action will be used during Workflow process. Set the Action **Title**, select Action **Type** and fill-in Action attributes based on Action Type, more described below.
## Action Types
### Actions
During Workflow process, you may **run another Action**. Another Action may be executed after the previous is finished or immediately several Actions at the same time, depending on Workflow set-up. In order to run more actions, select Action Type: Action and select other Actions to be executed at the same time. Be aware that you should not try to select Actions to be run in cycles. Cyclic Workflows may brake your system, create excessive data, etc. Even though Atollon Trolls will try to avoid system crash, under some conditions you may encounter system slow-down or too many data created during Workflow process.
### Copy Account's Model Item
This Action Type is used when creating repeating Items to be charged to clients. This one alternative way how to enter recurring billing items during Workflow.
(Requires further explanation).
### Create Activity
When running workflow on Project, you may, during the Workflow process, want to create new Activity automatically. Activity is part of Project's life-cycle. Using Activity you may set-up new Project Phase, which needs to be completed to fulfill pre-set organization procedure.
**Activity Type**: select which Activity Type is created. To create new Activity Type, go to [Context Settings](mks://localhost/en/user-manual/general/Finder/context-settings "en/user-manual/general/Finder/context-settings").
**Activity State**: select which Activity Status is set, when Activity is created during Workflow.
**Title**: set the Activity descriptive Title
### Create Task
You can c**reate Task based on Task Template**. Therefore, before creating new Action that aims to create new Task, you should go to Task Templates and create new.
**Task Title**: set the Title of the newly created Task
**Template ID**: select Task Template, based on which the Task is created
**Reference Time**: when creating the Task, what is the time to count from (used specially when setting start, deadline or Task recurrence)
**Add workflow index to offset**: when creating multiple Tasks, should Reference Time be gathered from Workflow?
(Requires further explanation).
**Show with priority**: this Action may be created either in background or using User Interface (Web client). If there is necessity to achieve interaction with the user, select one of the priorities: Normal / High / Blocker.
### Choose Action
This Action allows you to let users decide on how to continue with Workflow. Users may select one Action that is prepared as set of options.
**Message Title**: what question is raised?
**Message Text**: what description to that question is added?
**Text & Action**: what description to available Action is added and what Actions are available in this particular Workflow step?
### Repeater
This Action executes one selected Action several times. In combination with Create Task, it may, for example, create several Tasks at the same time, or several Actions, Projects, etc. This Action is used for example when creating service plans (create 12x service Activity in the next year), regular Professional Services Activities, eg. Accounting Deadlines to be processed, consulting sessions, etc.
**From number**: 0
**To number**: 12
**Step**: 1
**Repeat Action**: select the action to be repeated
(Requires further explanation).
### Send Message
This Action allows you to send automatically any type of communication during Workflow process. Workflows managed by time also utilize this feature to send auto-respond communication in lead nurturing process, or during stepped evangelization, education or consulting.
**Message Type**: what type of message is going to be sent? (eg. E-mail, Notice, Phone call, SMS, Document, etc.)
**Message Template**: what message is going to be sent? Select the Message Template. Workflow supports **multi-lingual** Message Templates, which allow you to keep one Workflow set-up for several languages at the same time. The language of recipient is gathered in **Preferred Language** attribute on recipient's **Contact**.
**Send to**:
Responsible Users (on Project), all or just primary responsible, without duplications
or External contacts on Project, all or just primary external contacts, without duplications
**Send message individually**: when sending multiple messages at the same time, should only one message be generated, or each recipient should get one (individual) message?
**Ignore Empty Recipients**: (Requires further explanation).
**Message Sender is**: User, who caused action (current user executing the event, on which the Action was based) or particular e-mail address.
**Show with priority**: this Action allows User's interaction. That means, the message (e-mail) can be prepared for user's review before it is actually sent to the recipient.
Please read also additional attributes for[ sending the message](mks://localhost/en/admin/Workflow/Actions/Sending_message "en/admin/Workflow/Actions/Sending message").
### Show Text
Once you want to show any dialog message to the user causing Action to be executed, you can add:
Message Title: what is the subject of the message you want to tell the user?
Message Text: what is the body of the message you want to show?
### Show Project
Open the Project details during the Workflow.
### Simple Choice
Do you want the user to select from few simple answers? Such as Yes/No or OK/Cancel? This Action will help you to prepare simple dialog, executing another Action or doing nothing.
# Workflow Filters
Workflow Filters are used to set-up conditions under which Workflow is executed. One of the methods to filter objects, which need to fulfill specified conditions to be part of Workflow scenario is to match with Workflow filter. Workflow filter is pre-set view on Events or Tasks, Time Sheet records, Projects, Folders (Clients), Activities, Contacts or User database.
You may condition the Workflow to be executed only in connection with specific Type of Project in particular Phase, for example. No matter whether Task, Activity or Message will be created, this Workflow Filter will make sure that the Project will meet the condition.
Workflow Filters are (similar to Workflow Actions) stored in context of module & module dimension.
Once you save Workflow Filter, it may be **used as additional filtering criteria** when defining the core filtering criteria for Workflow.
### View Settings
New View Setting is used primarily to create new online view filter. This filter may be used to restrict objects that will act in workflow.
Once you selected module & area, which you would like to create view for (for example Project > Project will enable you to filter for basic Projects fields), you will get all available fields to be **filtered**. Add one or more criteria into the **Filter** grid. You may use several **Operators**, such as =, does not include, begins with, starts at, ... **based on type of the field** filtered. Enter **Value** that you would like to filter for.
[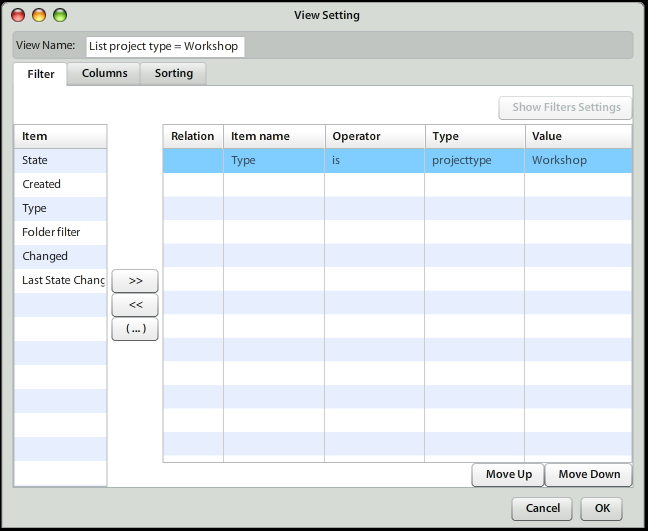](https://help.atollon.com/uploads/images/gallery/2020-03/views-edit.png)
Please note that tabs **Columns** and **Sorting** are **not reflected** in Atollon's interface. Views are used only for setting filters. By the time this article is written, they are used only for filtering criteria for selecting records in Workflow. We expect these filters will be used in online views as well in the near future (for example to enable creating custom views for Contacts, Calendar Events, Tasks, Projects, etc.).
# New Workflow
## New Workflow Properties
**Workflow Title**: give your Workflow some descriptive name.
**Description**: it is useful, don't be lazy to add it here, after some time you will see that it's useful.
**Workflow is Active**: Yes/No
### When is the Workflow Triggered?
#### At Update
The Workflow is automatically started (Actions executed), once the object (Task, Project, Activity, etc.) is updated.
#### After Create
The Workflow is automatically started (Actions executed), once the object (Folder (Client), Sales Opportunity (Project), etc.) is created.
#### Managed by Time
Atollon Trolls poke the box every 15 minutes to see whether some Workflows that are managed by time meet conditions to be executed. Once Trolls find out that there are objects meeting conditions, it will automatically execute them.
## Workflow Conditions
Workflow is executed automatically on all objects that meet one of the Workflow's conditions.
### Filter Before Change
This is one of the crutial conditions, once you don't want to execute Workflow on all objects. You may, for example, set type & status of Project or Tasks that will cause the Workflow to be executed.
You may also add [**Workflow Filters**](mks://localhost/en/user-manual/options-and-tools/list-of-workflow-filters "en/user-manual/options-and-tools/list-of-workflow-filters") that will be additional criteria to those that are directly associated to the object. For example, when executing Workflow on Sales Opportunity (Project Type = "Sales Opportunity"), you may want to execute it only for active clients (set-up Workflow Filter for Folder Type = Client & Status = Active).
### Changed Fields
This condition makes the Workflow appropriate only once one of the selected fields is changed. This condition has sence only on Workflows that are based on object **Update**.
Use this criteria when running Workflow based on (for example) Project Status change.
#### Scenario: Set-up WF leading to request feedback from client on contract
Create Task "Request feedback in 3 days" (Execute Action based on Task Template) when Sales Opportunity status is switched to "Contract Phase" (Project Type = "Sales Opportunity" and Custom Status = "Contract").
### Filter After Change
Once you want to run the Workflow only if specific change happened in Atollon (after object was created or updated), use this filter to identify, what is the resulting state of the object that should trigger Workflow start. The Filter Before Change is applied at the same time, once you want to check what was the state of the object before change.
#### Scenario: Start WF only once project status changed from "C" to "A"
There might be will to execute Workflow only once the project was changed from state A to state B or vice versa. This will require to set-up Filter before change (Project Custom Status = "C") and set-up Filter After Change (Project Custom Status = "A").
## Workflow Actions
Select Actions that should be executed, once Workflow conditions are met. If no Action is selected, Workflow has no sense.
Get more info on how to [Create new Action](mks://localhost/en/user-manual/options-and-tools/list-of-actions "en/user-manual/options-and-tools/list-of-actions").
# Custom Forms
# Custom Forms Designer
The Form Designer is interfaced for management and creating a new form in folders. Atollon has most of the tools and forms ready for use, but in *Form Designer*, you can make other forms, or move with the objects in the forms.
### Working with Form Designer
Most of function in designer is created to drag and drop function.
[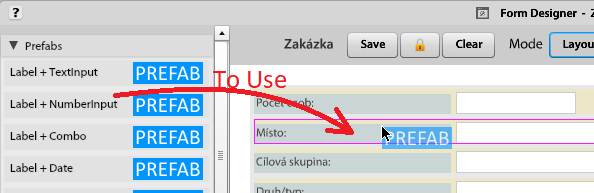](https://help.atollon.com/uploads/images/gallery/2020-03/form-designer.png)
For Delete it use shortcut **SHIFT+DEL**
### Required vs. Not Required components in a FORM
The components of every custom form should be defined even as Required or Not-Required. Every Required component shall be filled before saving, otherwise saving will not be allowed. Every such a field is highlighted (red colour) in order to provide a quick visual reference.
This is how to get a Form from Form Manager
[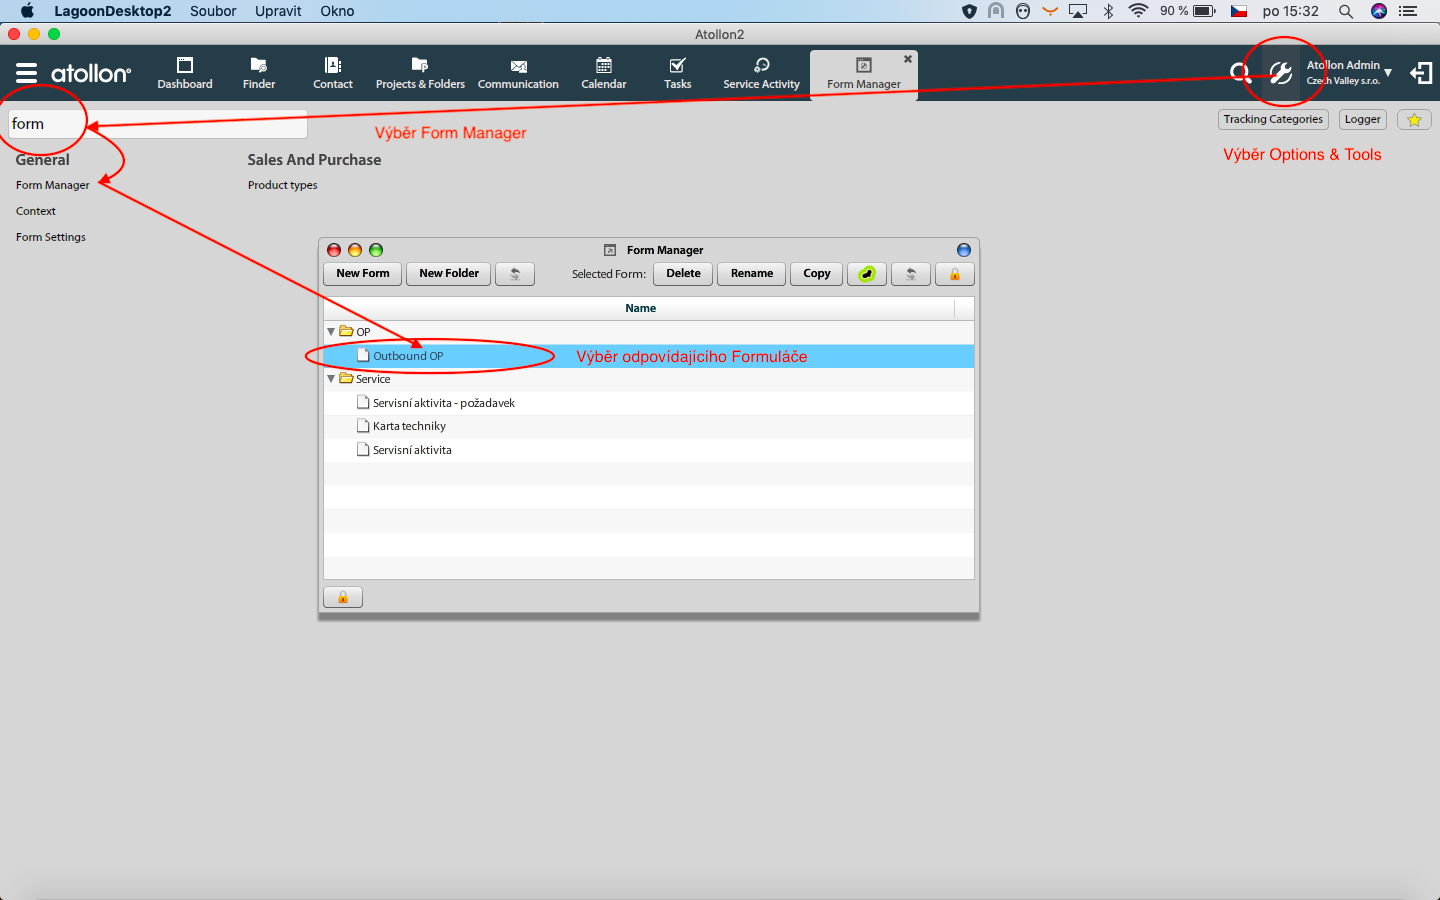](https://help.atollon.com/uploads/images/gallery/2020-11/Options_Tools_Form-Manager.png)
This is how to choose appropriate (collective) setting for **all components** in one Form.
[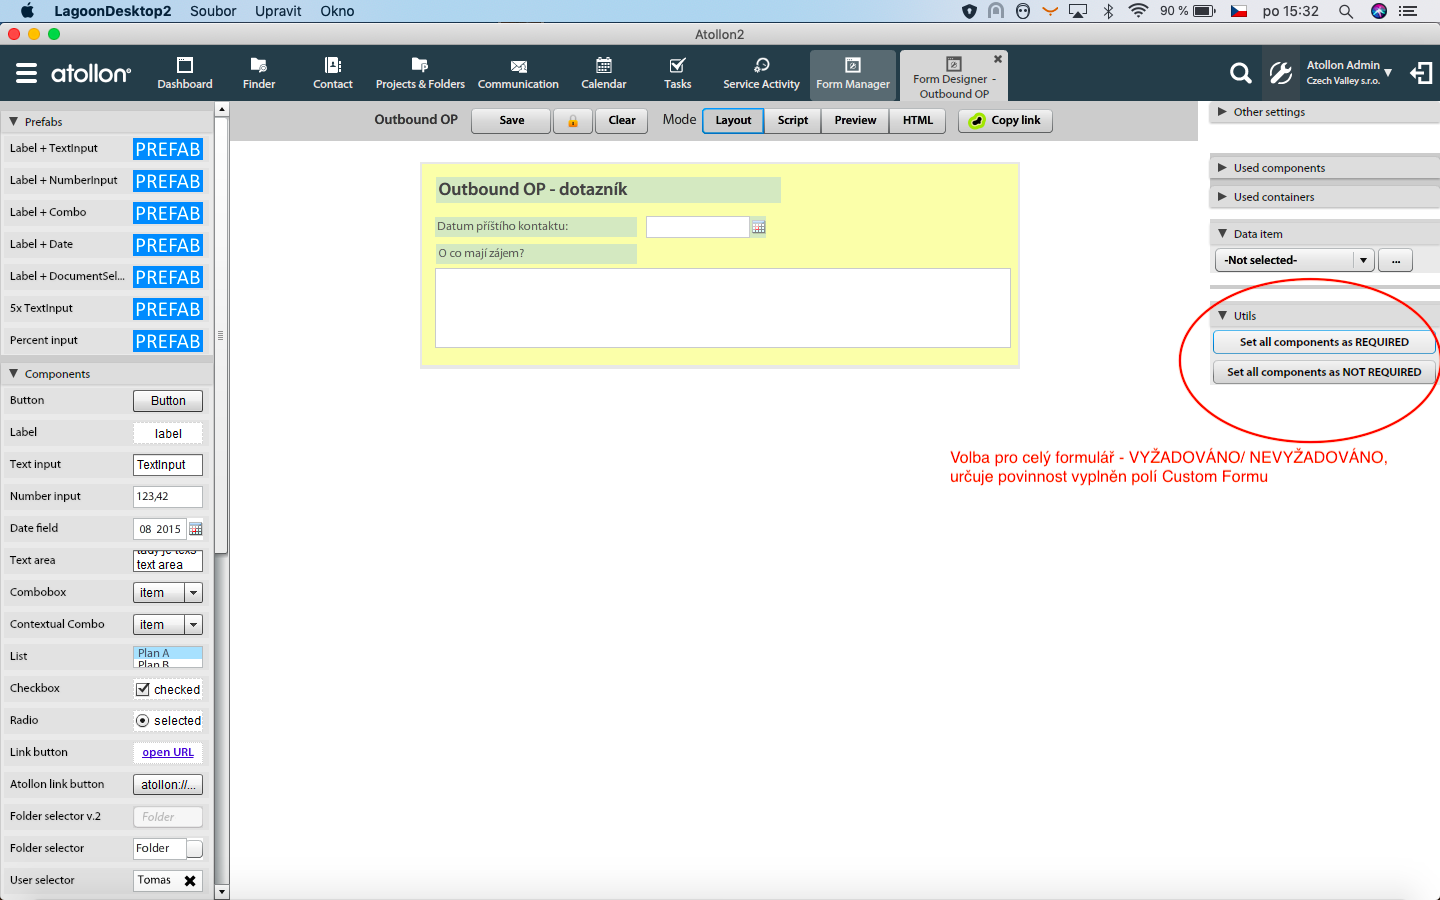](https://help.atollon.com/uploads/images/gallery/2020-11/cely-form.png)
This is how to choose appropriate setting for **one specific component or field** in a Form.
[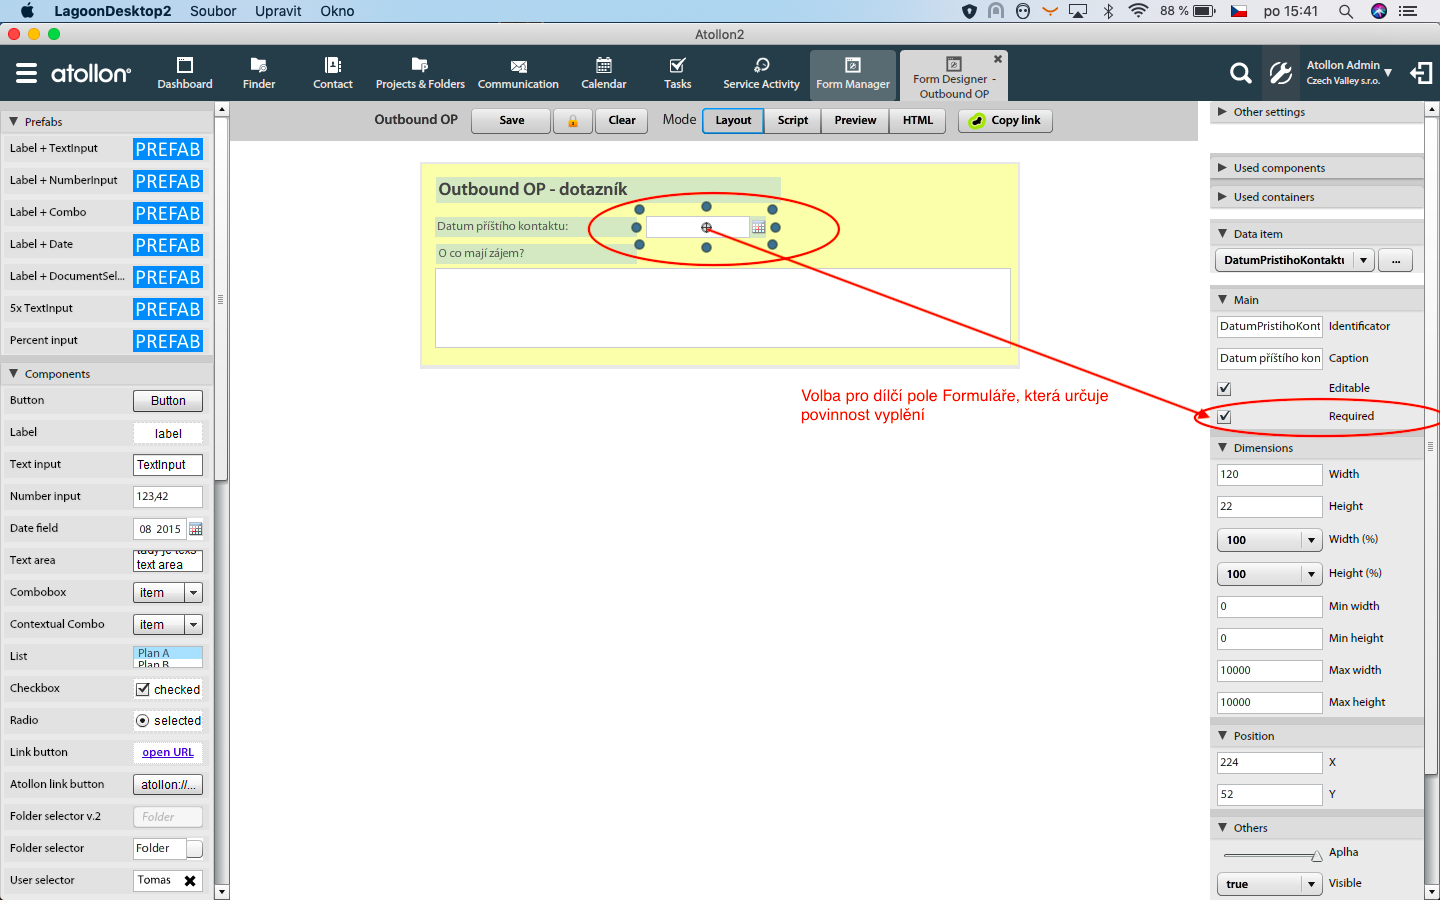](https://help.atollon.com/uploads/images/gallery/2020-11/dilci-pole-formu.png)
# Custom Forms Configuration
### Video Tutorial on Custom Forms
### Use cases
There are 3 basic use cases (and 1 deprecated), how does the bussiness object hold the reference to the data in custom form structure. There is a reason behind the diffenrence and it is important to understand them.
#### A) formvalues id is stored in the object
The main and basic use case is storing the ID of formvalues in the bussiness object, so when some client needs to show form values of the object, it just reads the formvalue id from the object and then call API method ListItemValue forminfo = formvalueid. The field in the object has usually DB constraint to formvalues table. This solution is best when it is essential feature of the object. Typically the formvalues are created and set into the object immidiatelly after its creation.
This way is used in folder, project, activtiy - they all have formvaluesid field, so when you get folder detail, you can ask for form item values by this id.
This is the only way, which is also supported in reporting, also the only way how to get these information into timeline.
#### B) remoteid is used to the object
Another way how to bind form data to an object is to save the ID of the object into remoteid field in formvalues. This allows us storing the reference to the form without actual need for the object moidfication. Sometimes we do not want to modify the structure of the object (it is not worth it) or we can not (pairing form values with external objects, which we can not modify). In such a case, we just set the ID of the object into field remoteid. When doing this, it is also mandatory to fill field remote\_id\_type, so later on we know, what kind of object does the formvalues belong to (tasks for example have com.atollon.task, if I want to pair the form with some external subject - like linkedin profile, structure in external system - we use linkedin.profile etc.).
#### C) combination of context and formid
This is very specific usage and it is used very rarely. The problem which this addresses is, that sometimes you need more customforms on one context. In such a scenario, as unique reference for form values you can use combination of context and formid. See example bellow:
The client needed to save dynamical custom form on the applicant. The form was his accomodation history and for each accomodation they needed to save few basic data. So for this scenario we implemented the custom app, where you configure formID.
So the client creates new form by calling CreateCustomForm with formID and context, and then fills this values with new id from form values. So when displaying the existing forms, client list all formvalues by context + formID and then for each form value render the form as usual (so the form then ask formitemvalues by formvalue id as forminfo).
#### D) forminfo directly contains the id of the object !DEPRECATED!
We used to have 2 types of forms on folder/project/activity. One by template (case A) and one by type. That means that into formitemvalues we used to save directly ID of folder/project/activity. That means that those formitemvalues did not even have a formvalue. We dislike it and it is no longer supported. Theoretically, if we would like to have something like this nowdays, it would be better to use case B. But so far we do not need it and I do not see any usage in the near future.
### Formvalues vs form
This paragraph with focus on why dataset for form (formvalues) is not same as form. todo
Atollon provides Forms functionality that allows Atollon administrators add new custom fields to existing Contact Folders, Simple Folders, Projects or Activities and Milestones.
## Custom Forms Features
### Custom Form Fields
#### Edit Field
You can add new Edit Field into Form to add simple text, date field, inteager or numeric field into Custom Form. Set it in Edit Fields variables: Constraint.
#### Checkbox
This field is used to set Yes/No data.
#### Memo Field
It is possible to add multi-line plain-text notes to Custom Form.
#### Listbox
This it the only multi-select component for fixed values. You can switch whether the Listbox is multi-select or simple-select.
#### Combo
Simple option selector for fixed values.
## How to Create New Custom Form?
### How to Assign Custom Form to Contact Type?
You can assign the Custom Form to Contact Type eithery by assigning it to Contact Folder Type or Contact Folder Template.
### How to Assign Custom Form to Project?
You can assign the Custom Form to Project either by assigning it to Project Type or Project Template. Both Forms may be used at the same time.
## How to Copy Custom Form?
1\. You must create blank destination form (for create ACL)
2\. Go to psql for get ID of used forms
```
select id,form_name from forms;
```
3\. move copyFormIntoFormSql.sh into /tmp (Available down at Attachments)
4\. Start backup-db (what if)
5\. Edit copyFormIntoFormSql for name of target DB
6\. Start Form copy as a asp user
```
sh copyFormIntoFormSql.sh soucre_form_id destination_form_id
```
## Migration values under proper formValues identifier
The new features, like timeline, Context Dashboard component etc. need values to be saved under formValuesId in all cases (in Activity, it used to be directly under the id of Activity). So if we want to enable new features (and generally migrate the data to newer version, since the old way wont be supported anymore), we need to fullfill next steps:
1. Make sure, every Folder, Project and Activity has its own formValues. This is by new function wrote by Zima <wsdl:CreateMissingFormValuesFPA>
<server>$INSTANCE</server>
<session>$SESSION</session>
</wsdl:CreateMissingFormValuesFPA>
But this function will only fix 10 folders, 10 projects and 10 activities (because of the timeout). So we need to call it more times, here is proposal for bash solution:#!/bin/bash
```
#usage: $ SESSION=6C8DB8900FCE6B9E93908A9339C365386D357BA13508 INSTANCE=mbluetest ./fv.sh
for ((i=1;i<=1000;i++));
do
echo $i
cat << EOF | curl --header "Content-Type: text/xml;charset=UTF-8" --header "SOAPAction: atollon#CreateMissingFormValuesFPA" -k --data @- https://`hostname`/soap
"http://schemas.xmlsoap.org/soap/envelope/" xmlns:wsdl="http://atollon.com/enterprise/wsdl">
$INSTANCE$SESSION
EOF
done
```
2. Migrate the values of needed context. We have three different SQL queries for this, one for folder, one for project and one for activity. This one is for folder
```
-- Folder
UPDATE formitemvalues SET forminfo = tmp.s_formvalues
FROM (
SELECT spt.id,
spt.name,
s.id,
s.name,
s.formvalues s_formvalues,
fiv.id fiv_id
FROM subpro_type spt
JOIN subject s ON s.subjecttype = spt.id
JOIN formitemvalues fiv ON fiv.forminfo = s.id
WHERE spt.id = 1360000
) as tmp
WHERE formitemvalues.id = tmp.fiv_id;
-- Project
UPDATE formitemvalues SET forminfo = tmp.p_formvalues
FROM (
SELECT spt.id,
spt.name,
p.id,
p.name,
p.formvalues p_formvalues,
fiv.id fiv_id
FROM subpro_type spt
JOIN project p ON p.projecttype = spt.id
JOIN formitemvalues fiv ON fiv.forminfo = p.id
WHERE spt.id = 4912918000
) as tmp
WHERE formitemvalues.id = tmp.fiv_id;
-- Activity
UPDATE formitemvalues SET forminfo = tmp.a_formvalues
FROM (
SELECT spt.id,
spt.name,
at.id,
at.name,
a.formvalues a_formvalues,
fiv.id fiv_id
FROM subpro_type spt
JOIN activity a ON a.activitytype = spt.id
JOIN tree at ON at.id = a.id
JOIN formitemvalues fiv ON fiv.forminfo = a.id
WHERE spt.id = 948362000 -- ?
) as tmp
WHERE formitemvalues.id = tmp.fiv_id;
```
All of those scripts are migrating values only for a specific folder/project/actiivty type. To change all values, here is a script:
```
UPDATE formitemvalues SET forminfo = tmp.a_formvalues
FROM (
SELECT
a.formvalues a_formvalues,
fiv.id fiv_id
FROM activity a
JOIN formitemvalues fiv ON fiv.forminfo = a.id
) as tmp
WHERE formitemvalues.id = tmp.fiv_id;
```
3. The last part is not necesarry, depends on finder component we are using to present the form. If it is formView, the ID of form is directly in the configuration of component, so we do not need to migrate formId. But in case we are using calssical project detail or folder detail or component, which uses the formId from the folder/project/activity, we need to make sure all formIds are properly configured. That means somehting like:
```
UPDATE activity set formid = X where activitytype = Y -- X is formID, Y is id of ActivityType
```
There was a problem on some data, that the date format is broken (historically) and when we try to proceed the update of formValues, the new constraint on the database prevents us from moving the values. So you also need to convert the dates.
So when during UPDATE formitemvalues SET forminfo -- type 102 fails on "formitemvalues.value format check failed", we need to convert formitemvalues.value date to format YYYY-MM-DD 00:00:00
```
begin;
UPDATE formitemvalues SET value = value::timestamp::date::text || ' 00:00:00'
FROM (
SELECT fiv.id
FROM formitemvalues fiv
LEFT JOIN formitems fi ON fi.id = fiv.formitem
WHERE NOT(CASE
WHEN fi.typ = 101 THEN fiv.value ~ E'^-?\\d*\\.?\\d+$'
WHEN fi.typ = 102 THEN fiv.value ~ E'^(?:[1-9]\\d{3}-(?:(?:0[1-9]|1[0-2])-(?:0[1-9]|1\\d|2[0-8])|(?:0[13-9]|1[0-2])-(?:29|30)|(?:0[13578]|1[02])-31)|(?:[1-9]\\d(?:0[48]|[2468][048]|[13579][26])|(?:[2468][048]|[13579][26])00)-02-29)[ T]00:00:00$'
ELSE TRUE
END)
AND fi.typ = 102
) as tmp
WHERE formitemvalues.id = tmp.id;
SELECT fiv.value, fi.typ, fi.id
FROM formitemvalues fiv
LEFT JOIN formitems fi ON fi.id = fiv.formitem
WHERE NOT(CASE
WHEN fi.typ = 101 THEN fiv.value ~ E'^-?\\d*\\.?\\d+$'
WHEN fi.typ = 102 THEN fiv.value ~ E'^(?:[1-9]\\d{3}-(?:(?:0[1-9]|1[0-2])-(?:0[1-9]|1\\d|2[0-8])|(?:0[13-9]|1[0-2])-(?:29|30)|(?:0[13578]|1[02])-31)|(?:[1-9]\\d(?:0[48]|[2468][048]|[13579][26])|(?:[2468][048]|[13579][26])00)-02-29)[ T]00:00:00$'
ELSE TRUE
END);
rollback;
--commit;
```
## Troubleshooting
### Some records ain't displaying in report results
It may happen due data inconsistency when someone change form on folder.
#### How do I know?
This returns non-zero result
```
select formvalues.id, formitems.formid, formvalues.form from formitemvalues left join formitems on formitemvalues.formitem = formitems.id left join formvalues on formitemvalues.forminfo = formvalues.id where formitems.formid != formvalues.form group by formvalues.id, formitems.formid, formvalues.form;
```
#### How do I fix?
With this hopefully
```
update formvalues set form = smt.formid from (select formvalues.id, formitems.formid, formvalues.form from formitemvalues left join formitems on formitemvalues.formitem = formitems.id left join formvalues on formitemvalues.forminfo = formvalues.id where formitems.formid != formvalues.form group by formvalues.id, formitems.formid, formvalues.form) as smt where formvalues.id = smt.id;
```
### Initialise a newly added form field for old objects created before
```
oknostudio=# select * from formitems where name like 'Zpln%';;
-[ RECORD 1 ]--------+-----------------
id | 517877101
name | ZplnomocnenValue
idinform | 666
caption |
mandatory | 0
readonly | 0
taborder | 0
defaultvalue |
pos_left | 0
pos_top | 0
width | 0
height | 0
editmask |
parent | 0
typ | 5
valuesfrommodule | 0
valuesfrommoduleid |
valuesfrommoduleacl |
valuesfrommodulename |
modulename |
modulefunc |
modulerowname |
listboxvalues |
buttontype | 0
listmultiselect | 0
componentname |
formid | 511358101
fontcolor |
componentcolor |
font |
savevalue | 1
restriction | 0
componentproperty |
dataprovider |
dataprovidertype |
treehandle | 131021101
```
```SQL
oknostudio=# select * from subpro_type where name like 'Smlouva OKN';
-[ RECORD 1 ]---+-----------------
id | 405077101
aclh | PROJ000000067072
treenode | 131025101
name | Smlouva OKN
comment |
itype | 3
masterproject | f
guiaction |
defaulttemplate |
onlytypes |
subjectlinktype | 1
masterrequired | f
formid |
numbering | 377875101
copyform | 0
copyitem | 0
dimension | 0
fixtype | 0
require_refid | f
systemtype | 7000
categories | {}
```
```SQL
oknostudio=# select * from formitemvalues where formitem = 517877101;;
id | formitem | forminfo | value
------------+-----------+------------+----------------------
1041368101 | 517877101 | 1024718101 |
1041358101 | 517877101 | 1027547101 |
1041287101 | 517877101 | 1041274101 |
1040659101 | 517877101 | 1040609101 |
1040094101 | 517877101 | 1040052101 |
1039934101 | 517877101 | 1039879101 |
1036331101 | 517877101 | 1032946101 | p.Karel Dupal
1036090101 | 517877101 | 1032978101 | p. Karel Dupal
1035348101 | 517877101 | 1008257101 |
1035018101 | 517877101 | 903811101 | sdfksdjflksdjklfjdsk
545489101 | 517877101 | 517579101 | Petr Novák
553356101 | 517877101 | 553333101 |
(12 rows)
```
# List Cross-form Values
#### **1. Create Setup Custom Form**
**1a.** Create your Setup form:
[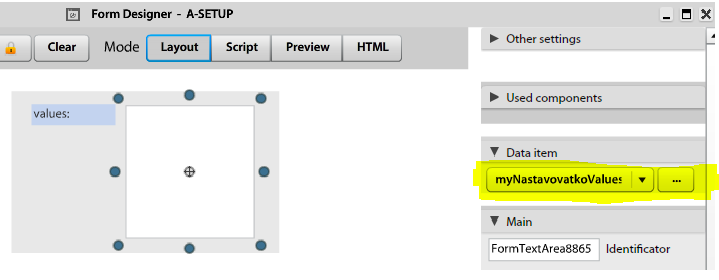](https://help.atollon.com/uploads/images/gallery/2020-03/custom-form-cross-1.png)
Note: use **TextArea** component as editor!
**1b.** Create and copy Data item to clipboard (i.e. myNastavovatkoValuesArea in this case)
#### **2. Set Setup Custom Form**
**2a.** Open ActivityPanel's Layout designer on your context, add **FormView** application and select our Setup form from *step 1*
[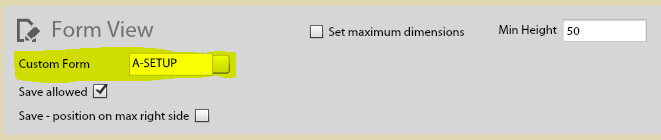](https://help.atollon.com/uploads/images/gallery/2020-03/custom-form-cross-2.png)
**2b.** Open your context and set some values (test case)
[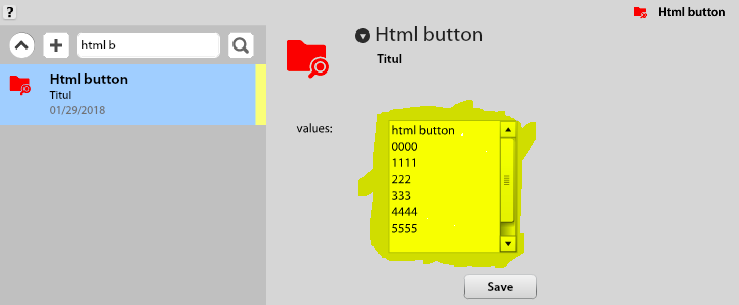](https://help.atollon.com/uploads/images/gallery/2020-03/custom-form-cross-3.png)
#### **3. Create View Custom Form**
**WARNING**: use **ContextualCombo** instead of basic Combobox! and Folder selector as Context selector
[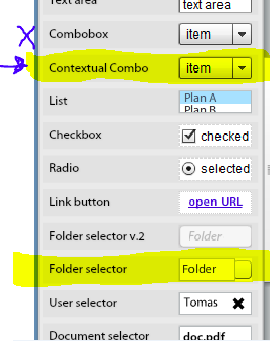](https://help.atollon.com/uploads/images/gallery/2020-03/custom-form-cross-4.png)
**3a.** Create your View form
FYI: *ComboBoxContextual* get values from *context* (selected by Folder selector) by selected *FormItemName*.
Make pair Folder selector <-> ComboBoxContextual
*Folder selector* setup: (**Identificator** required!)
[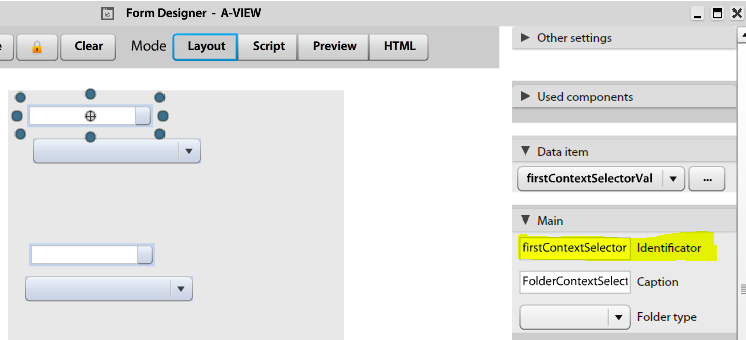](https://help.atollon.com/uploads/images/gallery/2020-03/custom-form-cross-5.png)
*ComboBoxContextual* setup: (**Identificator** and **FormItemName** required!)
[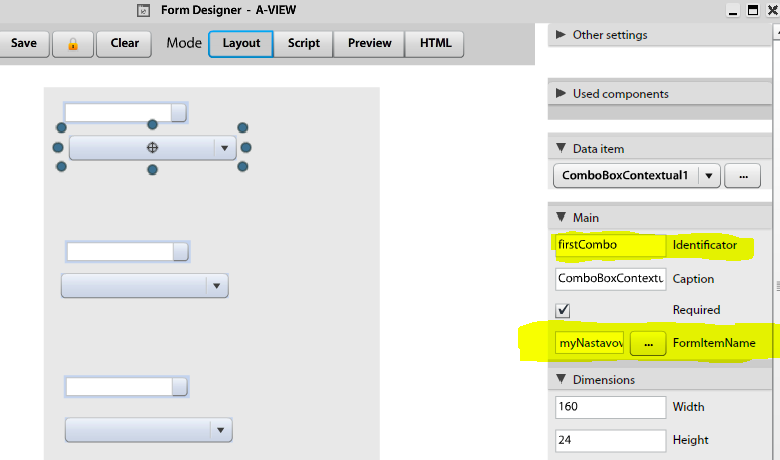](https://help.atollon.com/uploads/images/gallery/2020-03/custom-form-cross-6.png)
**3b.** Select **FormItemName** created in step 1b:
[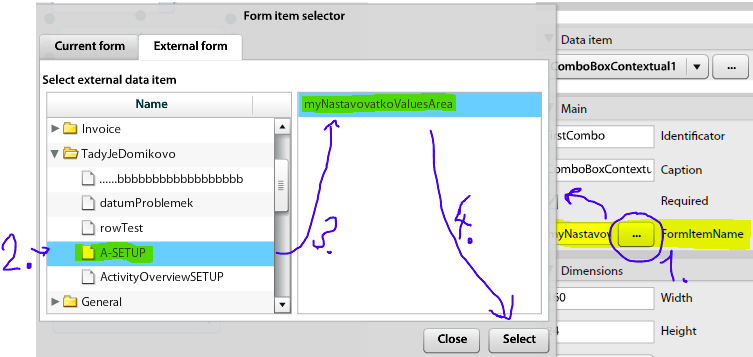](https://help.atollon.com/uploads/images/gallery/2020-03/custom-form-cross-7.png)
**3c.** Script setup (make combo-context pair)
Note: You can use one of **Ready-to-use Scripts** - check **attachments** (3context-3combo.txt in this case)
[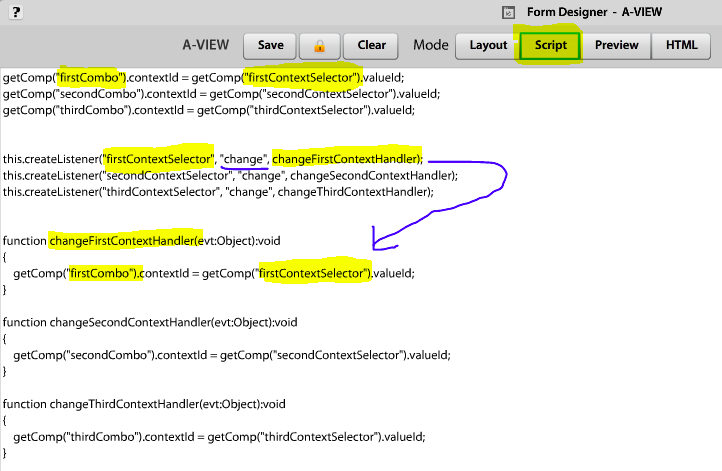](https://help.atollon.com/uploads/images/gallery/2020-03/custom-form-cross-8.png)
**3d.** Validate your script
[](https://help.atollon.com/uploads/images/gallery/2020-03/custom-form-cross-9.png)
#### **4. Set View Custom Form**
**4a.** Open ActivityPanel's Layout designer on your context, add **FormView** application and select our View form from *step 3*
[](https://help.atollon.com/uploads/images/gallery/2020-03/custom-form-cross-10.png)
**4b.** Open your context:
(1) Select any context
(2) Select value from another form
[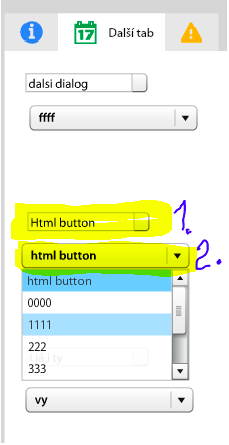](https://help.atollon.com/uploads/images/gallery/2020-03/custom-form-cross-11.png)
Done, **good job.**
- ##### One context selector with one combobox
```
getComp("myCombo").contextId = getComp("contextSelector").valueId;
this.createListener("contextSelector", "change", changeContextHandler);
function changeContextHandler(evt:Object):void
{
getComp("myCombo").contextId = getComp("contextSelector").valueId;
}
```
- ##### One context selector with three comboboxes
```
getComp("firstCombo").contextId = getComp("contextSelector").valueId;
getComp("secondCombo").contextId = getComp("contextSelector").valueId;
getComp("thirdCombo").contextId = getComp("contextSelector").valueId;
this.createListener("contextSelector", "change", changeContextHandler);
function changeContextHandler(evt:Object):void
{
var contextId:String = String(getComp("contextSelector").valueId);
getComp("firstCombo").contextId = contextId;
getComp("secondCombo").contextId = contextId;
getComp("thirdCombo").contextId = contextId;
}
```
- ##### Three context selectors with three comboboxes
```
getComp("firstCombo").contextId = getComp("firstContextSelector").valueId;
getComp("secondCombo").contextId = getComp("secondContextSelector").valueId;
getComp("thirdCombo").contextId = getComp("thirdContextSelector").valueId;
this.createListener("firstContextSelector", "change", changeFirstContextHandler);
this.createListener("secondContextSelector", "change", changeSecondContextHandler);
this.createListener("thirdContextSelector", "change", changeThirdContextHandler);
function changeFirstContextHandler(evt:Object):void
{
getComp("firstCombo").contextId = getComp("firstContextSelector").valueId;
}
function changeSecondContextHandler(evt:Object):void
{
getComp("secondCombo").contextId = getComp("secondContextSelector").valueId;
}
function changeThirdContextHandler(evt:Object):void
{
getComp("thirdCombo").contextId = getComp("thirdContextSelector").valueId;
}
```
# Forms - executeOnLoad and loading/saving properties
- Pokud něco ve scriptu spadne, tak by jste to měli vidět v atolloním loggeru.
- Můžete nechat spustit script při načtení formu - executeOnLoad
- Změny ve formu se ukládájí/načítají, pokud je pro zápis hodnoty ve scriptu použito changeCompStyle pro úpravu stylu (třeba barvy), či changeCompProperty pro změnu vlastosti (třeba visible)
### Příklady
**Příklad na executeOnLoad:**
Do scriptu napište
executeOnLoad(onMyComboChange, \[null\]);
kde onMyComboChange je metoda/script co se má spustit. a \[\] jsou parametry.
V příkladu je jeden parametr a to null, který říká, že hodnota prvního parametru je prázdná.
[.png)](https://help.atollon.com/uploads/images/gallery/2021-09/obrazek-(1).png)
**Příklad na changeCompProperty/changeCompStyle:**
Vlastnosti neměnte napřímo ale přes naše nové funkce.
changeCompStyle("lblOdp", "color", 0xFF00AA);
changeCompProperty("myInput", "visible", true);
[.png)](https://help.atollon.com/uploads/images/gallery/2021-09/obrazek-(2).png)
Srovnaní starého (přímého) a nového zápisu:
[.png)](https://help.atollon.com/uploads/images/gallery/2021-09/obrazek-(3).png)
Aby se vám změny ve formu ukládaly je nutné používat nový systém zápisu a to pouze na nové verzi FE!
Pro správné fungování je nutné uložení formu s novou verzí FE, protože dojde k vytvoření formItemu jménem \_CUSTOM\_FORM\_LOCAL\_CHANGES\_ do kterého se pak všechny změny ukládají
### Co je co:
**changeCompProperty("myInput", "visible", false);**
**myInput - unikátní id komponenty**
**visible - přesný název vlastnosti**
**false - hodnota**
Příklad najdete na cruiser/pioneer
atollon://form/openFormDesigner/?id=665956101
Ještě porovnání starého a nového zápisu pro nastavení stylů:
[.png)](https://help.atollon.com/uploads/images/gallery/2021-09/obrazek-(4).png)
**FormItem** má požadavek na **unikátní name** nejen v rámci formu (kde to smysl dává), ale i v rámci instance.
A name použitý pro lokální změny ve formu (\_CUSTOM\_FORM\_LOCAL\_CHANGES\_) tak nelze použít v jiných formech než v tom prvním,...
Pro vás to obecně je asi větší problém. Pokud si ve formuA vytvoříte input s id *myInputek* a ve formuB taky *myInputek*, tak při uložení druhého formu vám selže uložení jeho datové položky.
Protože by default se datová položka jmenuje podle: id komponenty + Value
Tj. pro myInputek vznikne myInputekValue.
# User Interface
# Applications and Toolbar Settings
Atollon allows you to set-up what applications users will see in the Application **Launcher** & what favourite applications would appear in the **Toolbar**.
See below how to adjust the visibility of apps & set favourite apps.
#### Run Application Settings
Using bottom combo field "Apply" you may select what users will be affected by **Application Settings**.
The options are:
- **Only For Me** - no other user than me will be affected
- **For Entire Organization** - all users from the organization will be affected (only once they don't have either personal or profile-based settings)
- **For Profile** (Internal, External, Manager, Consultant, etc.)- users belonging to the selected **User Profile** will use this setting of Applications visibility & Toolbar icons (only once they don't have their own personal settings)
#### Select Applications visible in Application Launcher
Simply by **Drag & Drop** select applications that will become **disabled** and what applications will stay **enabled**.
#### Select favourite Applications to place on Toolbar
Check which applications should be always displayed in application **Toolbar** ...
# Configure Application Forms
**Form Settings** tool allows you to configure what **fields** are used (visible) on **New contact** form(s), both Company & Person or **Invoice Issued**.
System administrators (users that are "admins") with the appropriate access rights may configure the visibility & obligation of the user(s) to fill-in the form fields. This is especially useful when the default setting do not fit your needs.
You can find **Form Settings** in **Options & Tools** or on New contact form.
[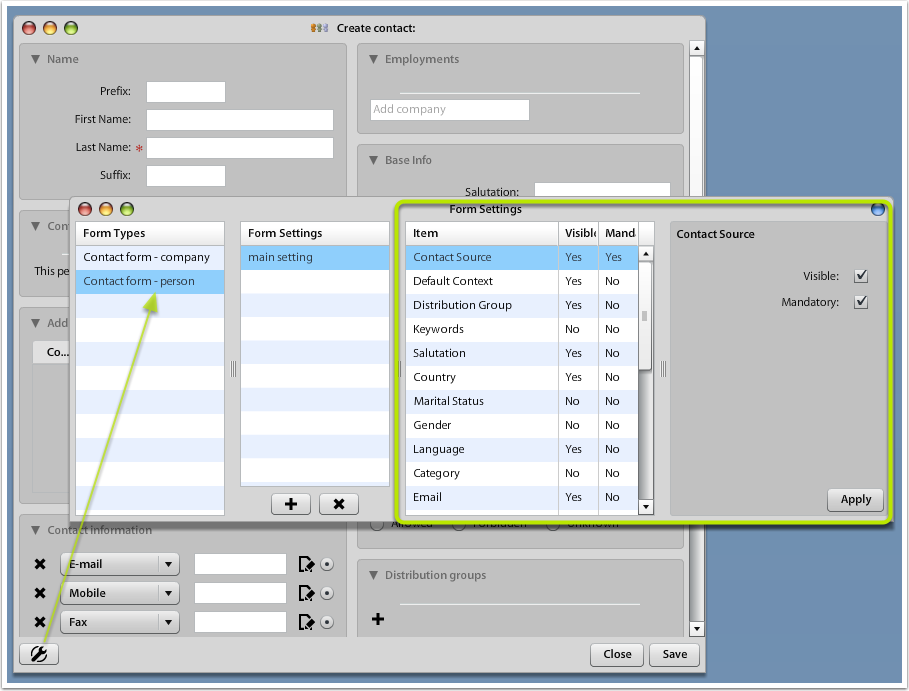](https://help.atollon.com/uploads/images/gallery/2020-03/form-settings-contacts.png)
# System Registers
System registers is a feature available to developers to save System / Organization / Profile or User settings. When the user gathers any saved configuration of module layout or other settings, she gets the registry information, which is the closest to her **Registry Level**.
#### Registry Level
- 0 Any
- 10 System
- 20 Organization
- 30 Profile
- 40 User
Example
if Application Toolbar (icons at top) are configured per User level, the Organization settings will NOT be applied.
#### Registry App
Using Registers you should be able to set default dimension for Finder's Folder, store it to Application Preset & match to User's Profile. This way Atollon should automatically assign the Dimension1 to Folder based on user's Profile.
#### Organization Level Registers
This type of registers can be reached by all users of organization.
Set register syntax;
```
SessionUserSettings.defaultInstance.organizationSettings.setString(domainName, key, value);
//for example
SessionUserSettings.defaultInstance.organizationSettings.setString("com.atollon.finance.invoice", "invoiceId", "2015469875");
```
Getting the register;
```
SessionUserSettings.defaultInstance.organizationSettings.getString(domainName, key);
//for example
SessionUserSettings.defaultInstance.organizationSettings.getString("com.atollon.finance.invoice", "invoiceId");
```
# Print and document templates
Chapter describes features helping you generate and distribute documents from Atollon.
# Print and document generation
## Print tool for users
From users perspective, print dialog allows generating and distributing documents from Atollon using e-mail or internal communication, or just storing into the context or generating for printout.
### Print any context data
This function allows you printout detail of your client folder, deal / contract / project detail or service / other activity detail.
Generic printouts contain basic context information (name, description, contacts, etc.) It is possible to prepare custom template that will printout whatever you need that is available on context.
[](https://help.atollon.com/uploads/images/gallery/2021-08/atollon-print-context.png)
The Print button shows last used function (Print, Send or Save to context). This print generates default document, which can be either system default (Atollon's own) printout or your custom document.
Using (...) button you may see more options ...
[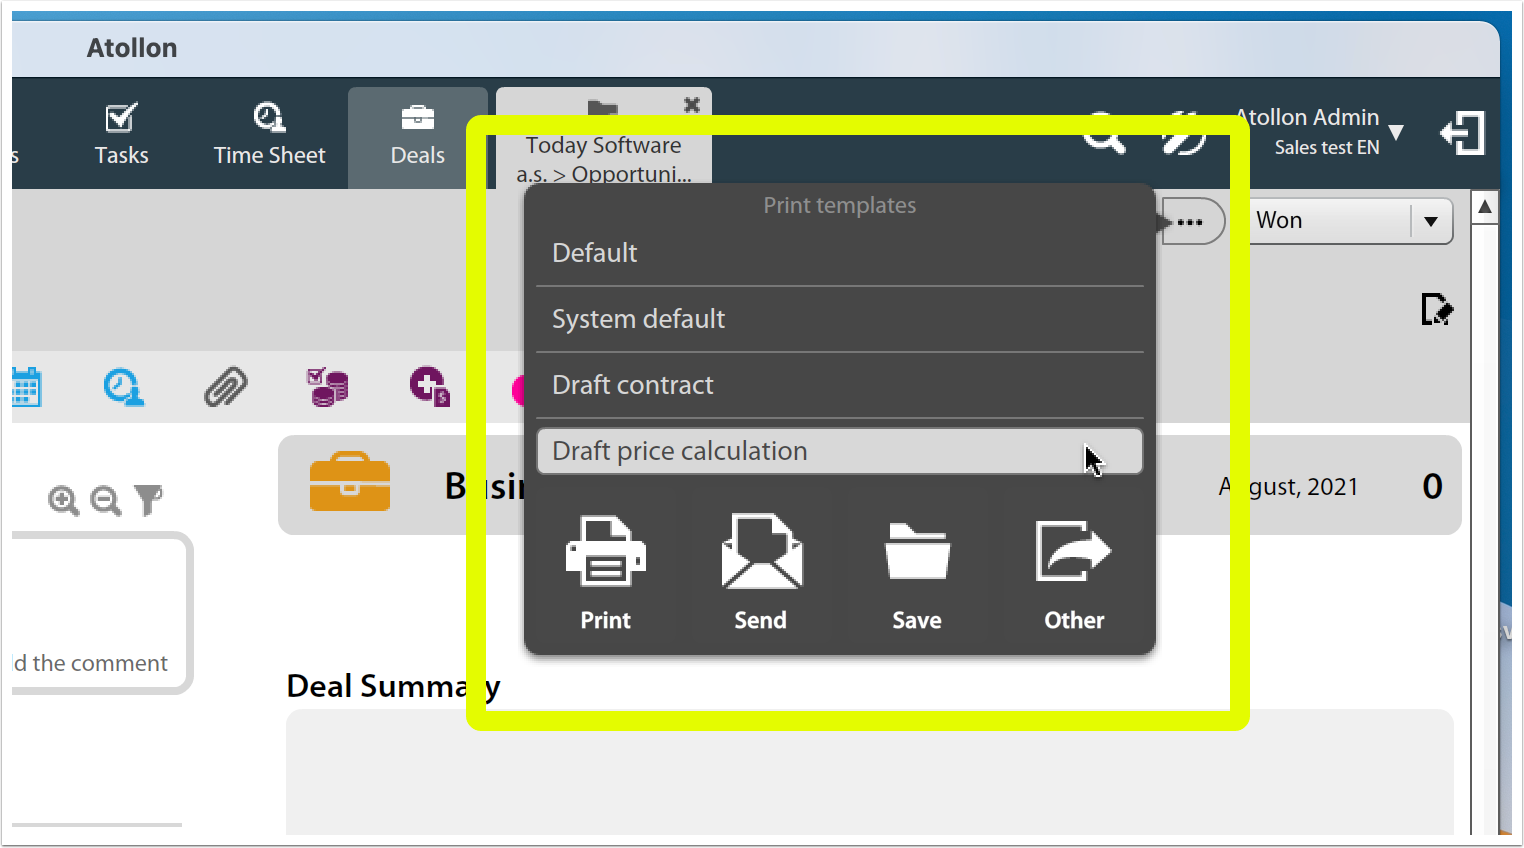](https://help.atollon.com/uploads/images/gallery/2021-08/atollon-print-context-options.png)
Print templates options allow you to select which document you want to generate and/or send. E-mail template may be attached to the document template or the whole print dialog may only present the E-mail template (without document). That will help you speed-up next steps when dealing with clients, deals or any other activities ...
### Print invoice-based documents
Similar print/e-mail dialog may be found on your estimates, orders or invoices.
#### Example: print from Estimates overview
[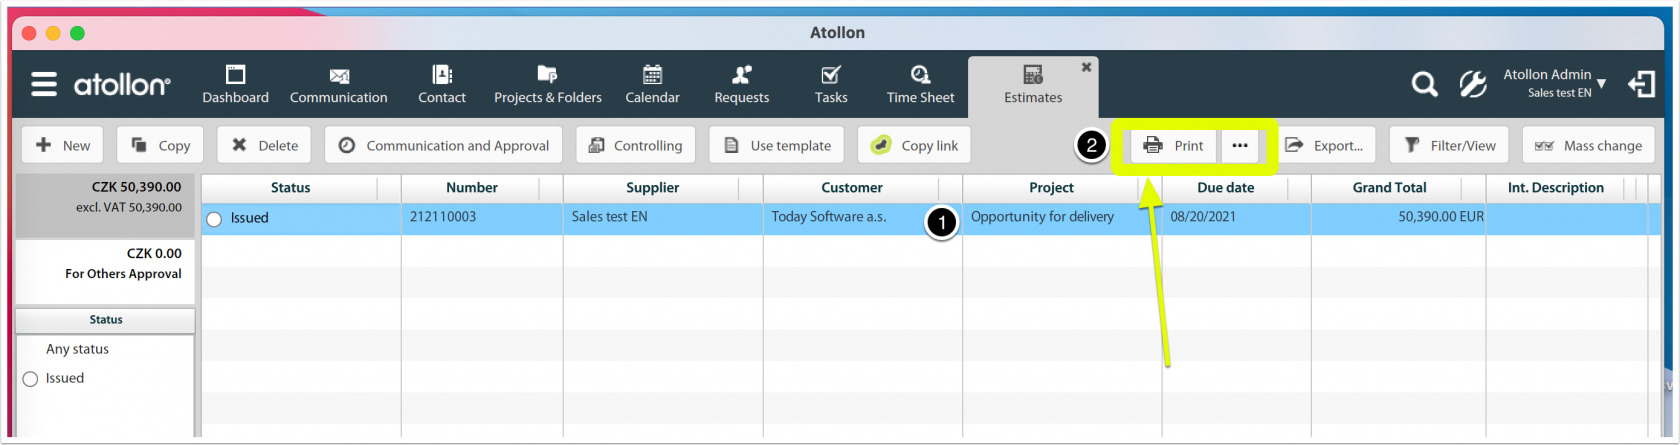](https://help.atollon.com/uploads/images/gallery/2021-08/atollon-print-inv-estimate-grid.png)
#### Example: print Estimate detail
[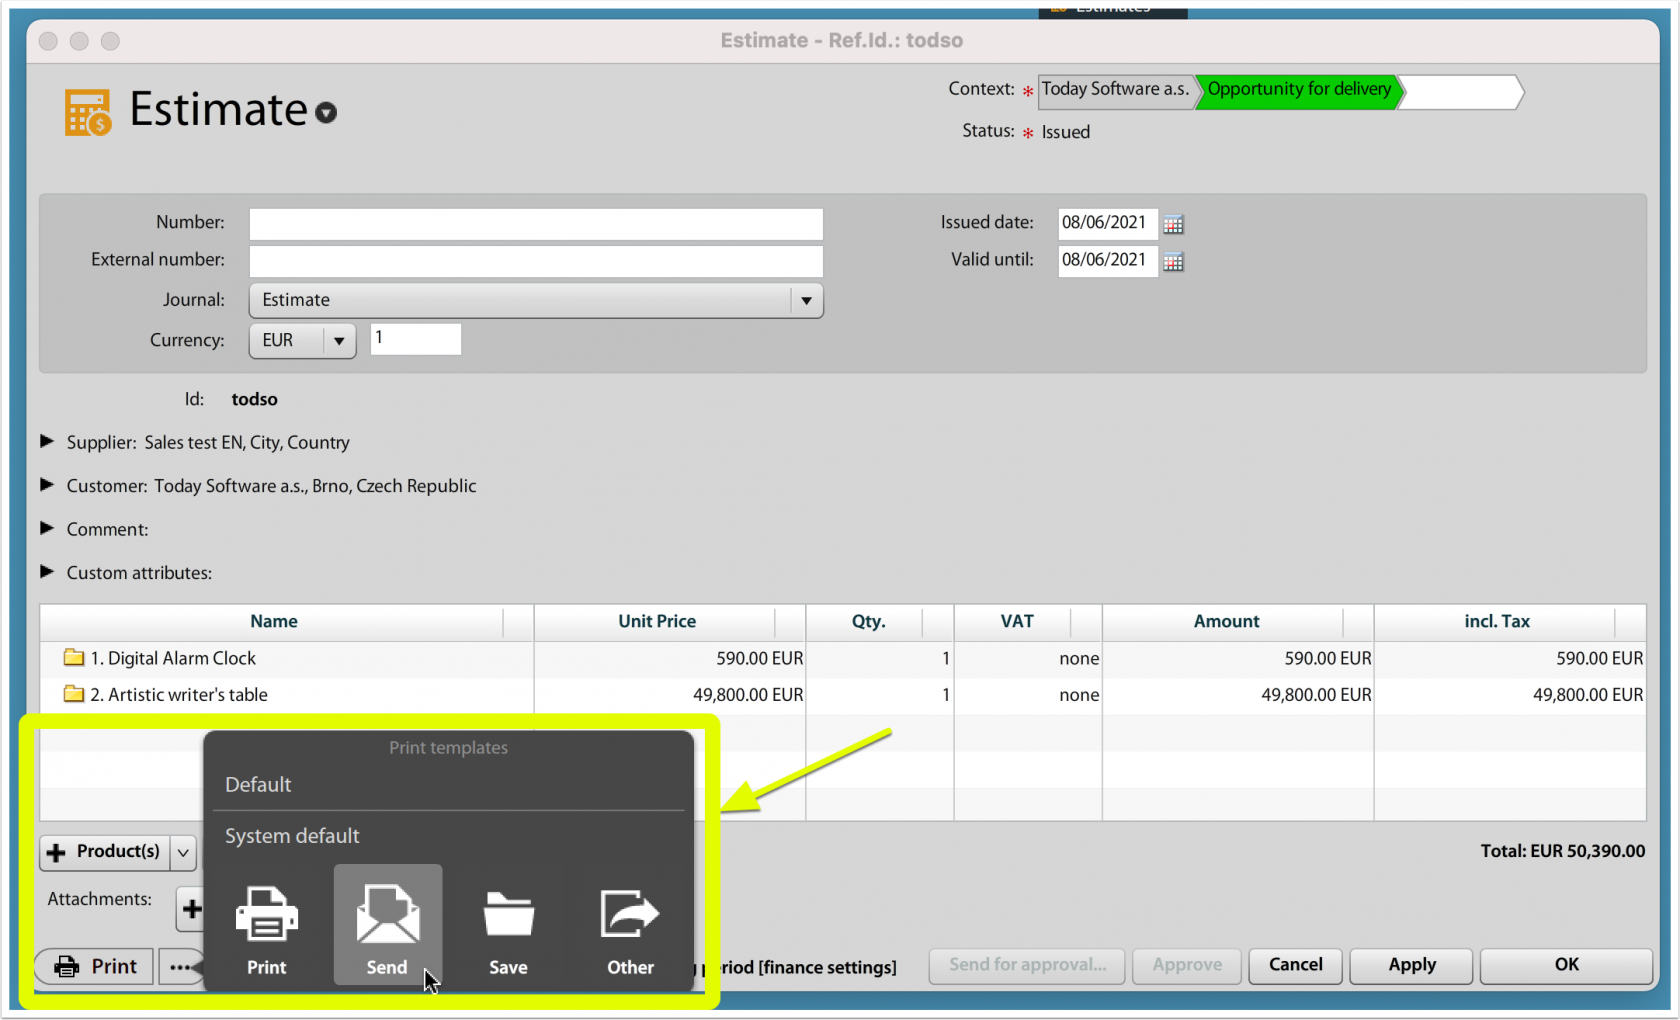](https://help.atollon.com/uploads/images/gallery/2021-08/atollon-print-inv-estimate.png)
## Print tool Configuration
### Context-based prints
Example: set-up document / print templates for **Deal** detail. The screen below shows example on how to setup document / print / e-mail templates for Deal detail - these may include draft price calculation (from Deal items & value) or any administrative Deal document - such as draft contact.
[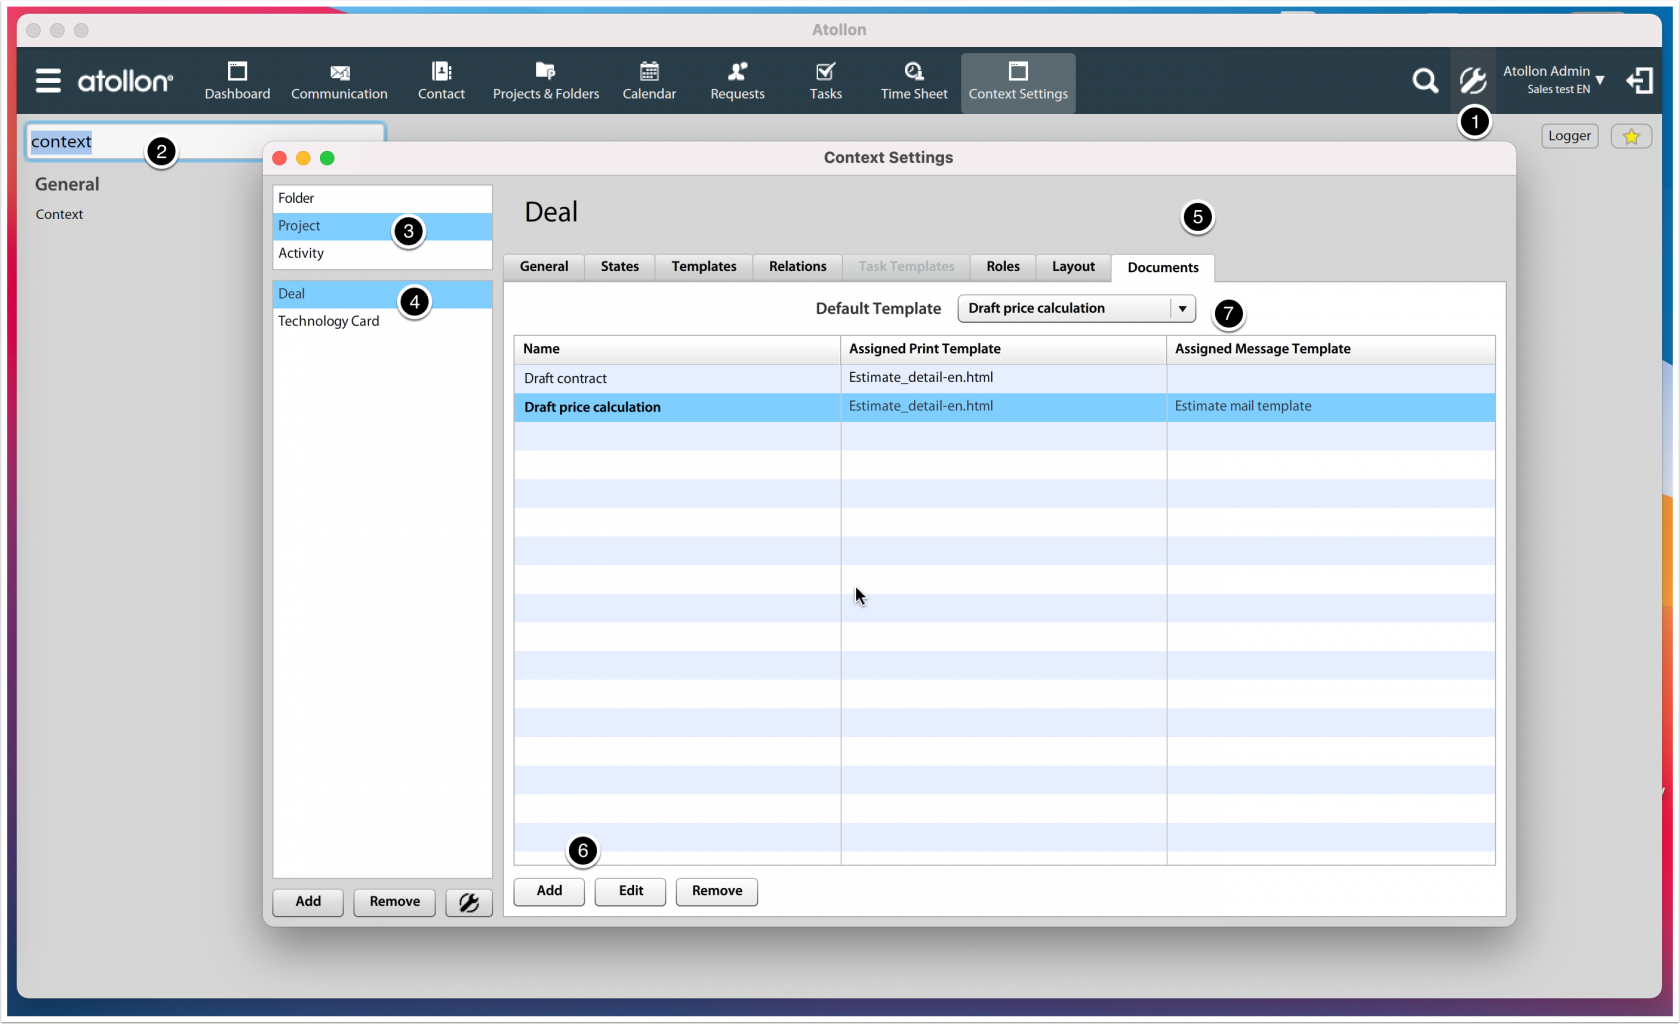](https://help.atollon.com/uploads/images/gallery/2021-08/atollon-print-context-settings.png)
1. Open **Options & Tools**
2. Find **context**
3. Select **Project** (configuration)
4. Select project type (ie **Deal**)
5. Select **Documents** tab // here you may add/remove document/print/e-mail templates for selected project type
6. Add new document template (such as your MS Word template that will generate draft contract)
7. Select which document will be default // default document is the one you would generate when you press on **Print** / **E-mail** or **Save** button (other templates may be selected by (...) option
### Invoice-based prints
Example: set-up new templates for sending Estimates to your clients.
[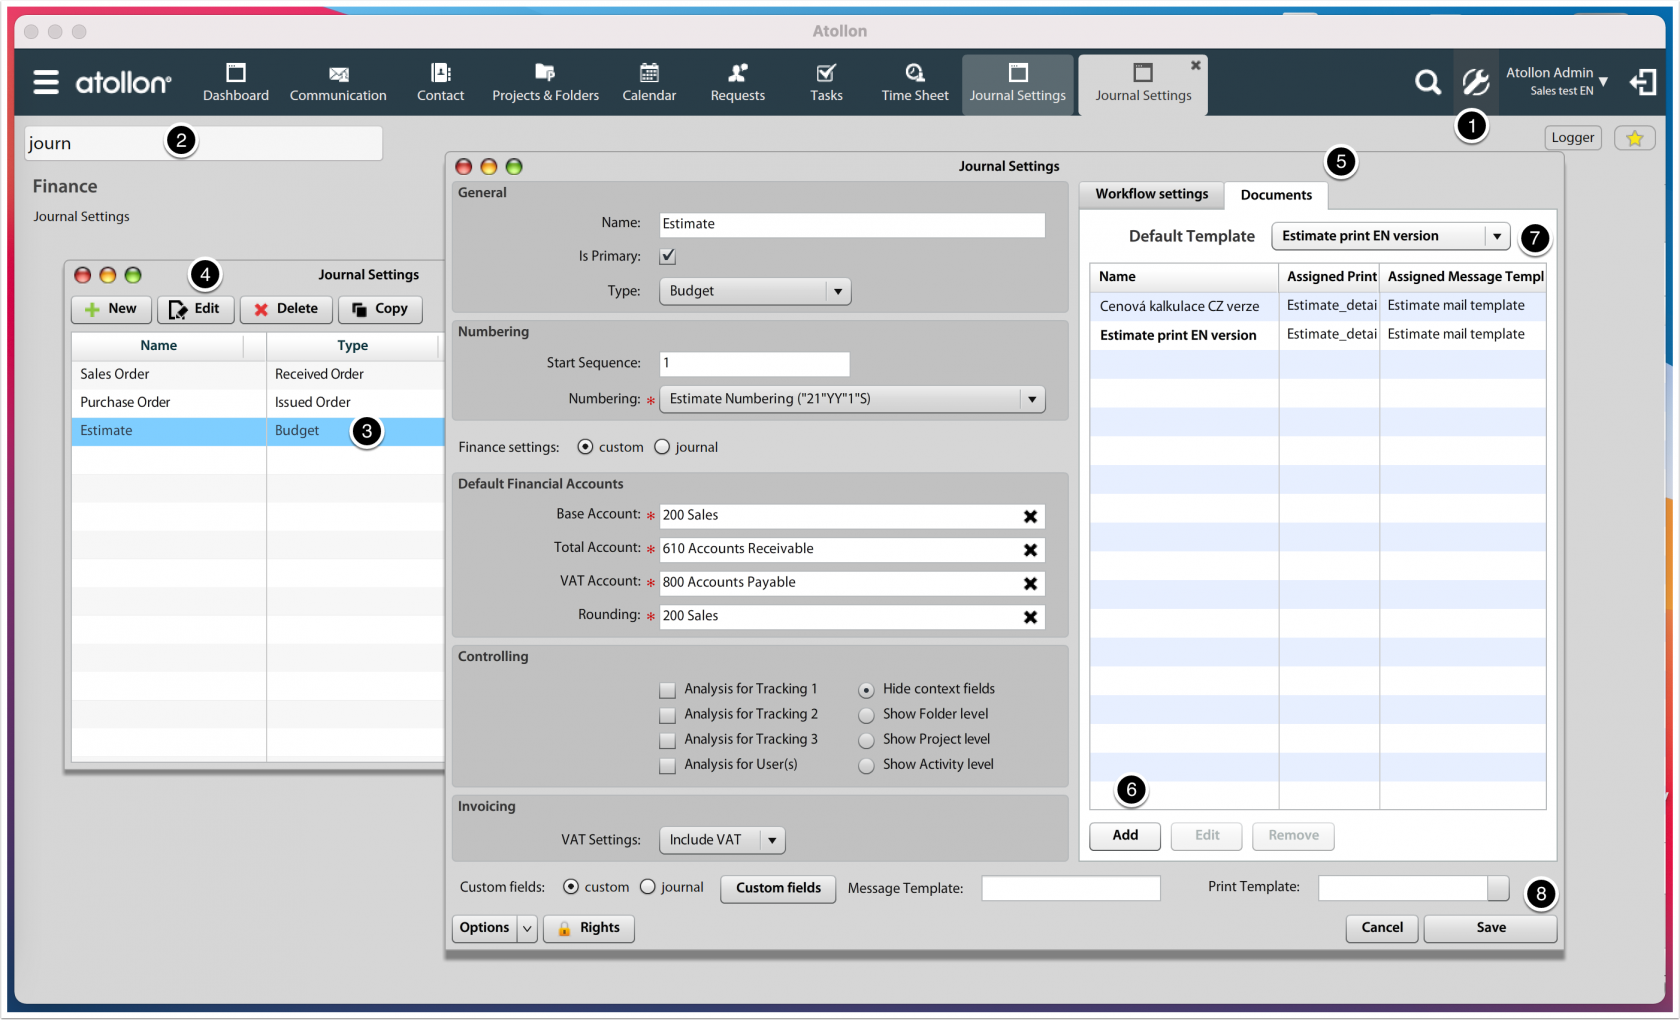](https://help.atollon.com/uploads/images/gallery/2021-08/atollon-print-invoice-settings.png)
1. Open Options & Tools
2. Find journal
3. Select which journal you want to configure (ie Estimate)
4. Press Edit button
5. Select Documents tab
6. Add new template (such as any XHTML Django-based file that will get PDF output or MS Word, MS Excel template)
7. Set default document (the one used directly when printing / sending / storing) using the Print dialog (described in user section above)
## Supported document templates
### PDF output
In order to generate PDF output, you need sample XHTML template. These may be gathered from Atollon consultant or designed by your HTML web coder.
Templates are using Django-based syntax to add data from Atollon.
### MS Word
Any MS Word document template (docx) may be used. Please consult with your Atollon consultant to provide you with a samle for your needs.
### MS Excel
Any MS Excel file (xlsx) may be used as template for document generation. Samples are available only for Estimates / Invoices.