Modules Configuration
- Contacts Configuration
- Custom Forms Scripting
- Finance Settings
- Invoice Administration
- Document Library Configuration
Contacts Configuration
Basic Contacts Configuration
Most of the contacts lists are configurable, you can add/remove particular records of the following system fields:
- Language (Preferred communication language)
- Category (Any record, without special meaning)
- Contact Source (Where you got contact from?)
- Contact Address Type (Several base types supported: Invoicing, Delivery, Permanent, Temporary, etc.)
- Contact Type (Contact's relations to organization)
- Contact Information Type (E-mail, phone, mobile, web, LinkedIn, Facebook, Twitter, etc.)
- Groups (Newsletter, etc.)
- Company / Company Relation Types (Mother/Division, Partner/Partner, etc.)
- Company / Person: Department (What department does the person work in?)
- Company / Person: Position (What position does the person work in?)
- Person / Person Relation Types (Parent/Child, Superior/Subordinate, Partner/Partner, Friend/Friend)
- Company Industry (What industries is the company part of?)
- Company Legal Form (What is the company legal form, ie Ltd., SA, Branch Office, etc.)
You can amend most of these lists in MS Windows administration: Settings > Contacts > Configuration, where you can select one of the lists in top left combo selector and add/remove individual records. Please note that it is possible to remove these records only once they were not used previously.
Contact Groups are amended separately in accordeon directly in contacts application (add new Contact Group). In MS Windows client they are referred as Distribution Groups.
Contact Types are configured as Finder's Folder Types, see the Contact Types section below.
Contact Types / Accounts
Contact Type is role of the contact in relation to the organization. There are applicable several Contact Types, ie Client, Partner, Employee, etc. In another SW solutions they are called Accounts.
If Atollon user does not set any Contact Type to the contact, the contact remains in the system only for purpose of storing basic contact information (ie Address, Contact Details, Categorization, etc.). Once the contact becomes organization's Client, Partner, Supplier, etc. - that means the contact (person or company) has some relation to the organization, you should set it's Contact Type.
Set Contact Type
To set Contact Type, you can either open the contact detail and at Contact Type section mark one of the Contact Types or you can drag & drop selected contact(s) into the Contact Type item withing contacts database.
Understanding Contacts & Finder
In order to get contact into Finder - that means to create Finder folder for the contact (in another words create "Account"), you need to set the contact's Contact Type.
Once you set the contact's Contact Type, there is automatically new Account (Finder's Contact Folder) created. There is always one Contact Folder / Account created for each of the Contact Types.
How to configure new Contact Type?
Go to Context Settings and create new Folder Type (base type: Contact Folder). To the date this manual was written, it is not possible to change the Base Type of new Folder Type in web client, it is possible to change it only in MS Win client. You should also create at least one Folder Template and set the initial status to the Folder Template. See Finder Configuration for more details.
Additional Account Attributes
Each Contact Folder / Account has the following additional attributes:
Account Status
Status indicating whether Client, Partner, Supplier, etc. is currently Potential, Active, Hot, Lost or Not Interested, etc.
Account Responsible User
Each Partner, Client, Supplier, etc. may have one or more Responsible Users (sometimes called as Key Accounts as well). The Responsible User is organization's internal responsible person for taking care about the Account (Client, Partner, etc.) Each Responsible User may have different Role in relation to the Account (eg. Mr. "Smith" might be "Sales Manager" with company "Acme").
Account Custom Form
If you want to add one or more custom fields to extend information tracked in relation to Account, you may set-up two custom Forms in relation to either Contact Folder Type or Contact Folder Template. General folder (available for all Accounts of the same type) should be set to Contact Folder Type. See more information at Finder Configuration on how to add Form to Folder Type.
Example
You want to prepare your contact database to segment your customers database with additional details that are not standard part of Atollon set-up.
You might want to add:
- Special product categories (Form: List Field)
- Date fields indicating important deadlines (Form: Edit Field with Date constraint)
- Importance of the client (Form: Combo Field)
- Client's yearly turnover (Form: Edit Field with Numeric constraint)
- Indication that client signed contract (Form: Checkbox)
- Indication of date when client signed contract (Form: Edit Field with Date constraint)
- Clients interests (Form: Memo Field)
Contacts & Users
It is possible to create new contact with new user account as well. In order to do this, you need to have the following entities prepared:
- User Template
- Finder's Folder Type
- Finder's Folder Template
New user account is ussualy a person contact. There is one person contact with user account creation pre-configured in basic template. It is called "Employee". Once you create new Employee, new Contact + User + Contact Folder (Employee) is created.
Once you create new User Template, Finder's Folder Type & Folder Template, edit Folder Template settings in MS Windows client and select User Template for the Folder Template (called Subject Template in MS Win client under Account & Project Settings).
You can create new User Template in MS Windows client: Settings > Access > User Template.
Custom Forms Scripting
Since web version of form designer, custom forms bring custom scripting, which is pretty powerfull feature. It is evolving part of application, based on needs of our clients, so there is no definite state of this feature. Scripting is pretty straitforward and selfexplanatory (you just write an ActionScript to it), but you need to know some basic principles, like accessing the form elements, accessing the selected context value or interaction with the application itself. Those features are providet by scripting API - set of functions which enables these features.
Accessing component in form
If you want to acces some component in form, you ahve to set the identifier for this component. Then you can access it by method getComp. Then you can work this the component as you wish, access its methods and properties.
The following example will sum values from components textInputA and textinputB into component textfieldC:
var valueA:Number = Number(getComp("textInputA").value);
var valueB:Number = Number(getComp("textInputB").value);

getComp("textfieldC").text = valueA + valueB;
You can find component properties on Adobe documentation, for example Textfield:
http://help.adobe.com/cs_CZ/FlashPlatform/reference/actionscript/3/flash/text/TextField.html
Accesing information from application
The script is running in isolated enviroment, but there is a way how to recieve some information from the system. It is exspecially usefull in cooperation with workflow scripts or other web applications, where you can call them and add contextId, session, server and other information as a parameter.
Method getKeyValue has list of predefined values, which can be used in scripting. Here is the list of keys:
keyValuesDictionary["contextId"] = context;
keyValuesDictionary["formId"] = formId;
keyValuesDictionary["formValuesId"] = formValuesId;
keyValuesDictionary["instanceName"] = SessionApplication.instance.instanceName; //not working
keyValuesDictionary["serverName"] = SessionApplication.instance.serverName; //not working
keyValuesDictionary["baseUrl"] = SessionApplication.instance.baseUrl;
keyValuesDictionary["endpointUrl"] = SessionApplication.instance.endpointUrl;
keyValuesDictionary["rootDomain"] = SessionApplication.instance.getFullRootDomain();
keyValuesDictionary["wsdlFolderUrl"] = SessionApplication.instance.wsdlFolderUrl;
keyValuesDictionary["username"] = SessionApplication.instance.serviceManager.session.userName;
keyValuesDictionary["userId"] = SessionApplication.instance.serviceManager.session.userId;
keyValuesDictionary["organizationId"] = SessionApplication.instance.serviceManager.session.organizationId;
keyValuesDictionary["session"] = SessionApplication.instance.serviceManager.session.session;
keyValuesDictionary["server"] = SessionApplication.instance.serviceManager.session.server;
Here you can see usage of such a key:
trace(getKeyValue("server"));      //traces pioneer
trace(getKeyValue("username"));    //traves admin@pioneer

var text:String = "";
text += "\n" + "contextId " + getKeyValue("contextId");
text += "\n" + "formId " + getKeyValue("formId");
text += "\n" + "formValuesId " + getKeyValue("formValuesId");
text += "\n" + "instanceName " + getKeyValue("instanceName");
text += "\n" + "serverName " + getKeyValue("serverName");
text += "\n" + "baseUrl " + getKeyValue("baseUrl");
text += "\n" + "endpointUrl " + getKeyValue("endpointUrl");
text += "\n" + "rootDomain " + getKeyValue("rootDomain");
text += "\n" + "wsdlFolderUrl " + getKeyValue("wsdlFolderUrl");
text += "\n" + "loggedUser ID " + getKeyValue("loggedUser");
text += "\n" + "username " + getKeyValue("username");
text += "\n" + "userId " + getKeyValue("userId");
text += "\n" + "organizationId " + getKeyValue("organizationId");
text += "\n" + "session " + getKeyValue("session");
text += "\n" + "server " + getKeyValue("server");
getComp("textArea").text = text;
Triggering events
When you know how to work with components, next step is define, when to run the event. The events are solved method createListener which takes 3 parameters - name of object where we listen, name of event and function to be triggered.
Following function will show you how to trigger the functionality from previous example on change of bot inputs - textInputA and textInputB.
this.createListener("textInputA", "change", sumInputs);
this.createListener("textInputB", "change", sumInputs);

function sumInputs(evt:Object):void
{
    var valueA:Number = Number(getComp("textInputA").value);
    var valueB:Number = Number(getComp("textInputB").value);
    getComp("textfieldC").text = valueA + valueB;
}
You can find events on objects using classical ActionsScript reference, for example button events like click, mouseDown, mouseUp, rollOver, mouseOut and so can be found on link:
http://help.adobe.com/en_US/FlashPlatform/reference/actionscript/3/fl/controls/Button.html
Alert window
Sometimes we need to tell user that some other action is needed or so. Alert is typical way how to do so, so we can use prepared method showAlert. It encapsulates classical MessagePopUp with the same
* @param type - type of icon - ERROR, WARNING or INFO
* @param message
* @param description
* @param buttons
* @param closeHandler
function showAlert(type:String, message:String, description:String, buttons:Array = null, closeHandler:Function = null):void;
Here is an example how to show alert and react on the close.
this.createListener("btn", "click", btnHandler);

function btnHandler(evt:Object):void
{
    showAlert("ERROR", "ALERT!","Wow cool text", ["OK",  "Cancel", "I do not know"], closeHandler);
}

function closeHandler(btnIndex:Number):void
{
    getComp("btn").label = btnIndex;
}
Opening URL
Since the function navigateToUrl is not working becuase of security reasons, we have to use our own function for url opening. See example bellow:
this.createListener("button", "click", btnHandler);

function btnHandler(evt:Object):void
{
    openUrl("https://google.com");
}
Calling external URL
Sometimes you need to call external URL and load something (without opening new browser window). That can be solved by method callUrl.
* @param url
* @param resultHandler
* @param failHandler
function callUrl(url:String, resultHandler:Function = null, failHandler:Function = null):void;
callUrl("https://fangtooth.atollon.com/external.js", loadComplete, loadFailed);

function loadComplete(data:Object):void
{
    getComp("textArea").text = data;
}

function loadFailed(evt:Object):void
{
    getComp("textArea").text = evt;
}
Escape URL parameters
Since URL does not support symbols like " ", "/", ":", "=" or unsuported ascii characters in URL parametes, it is important to excape all of the parameters, so you prevent problems with some specific strings and other data. This is solved by URLVariables, see method createUrlParams in example bellow:
this.createListener("Lic_proc_button", "click", btnHandler);

function btnHandler(evt:Object):void
{
	var urlParams:String = createUrlParams();
	var scriptLocation:String = getKeyValue("rootDomain") + "/fo/imp-exp";
	var fullUrl:String = scriptLocation + "?" + urlParams;

	getComp("Lic_proc_link").text = fullUrl;
	openUrl(fullUrl);
}

function createUrlParams():String
{
        // creation of URLVariables
	var urlVariables:URLVariables = new URLVariables();

	// fill URL variables
	urlVariables["company"] = "REAL TRADE PRAHA a.s.";
	urlVariables["ico"] = "25642740";
	urlVariables["street"] = "náměstí 14. října";
	urlVariables["city"] = "Praha 5 - Smíchov";
	urlVariables["street_no"] = "1307/2";
	urlVariables["pemr"] = getComp("Lic_proc_authnumber").text;
	urlVariables["zip"] = "15000";
	urlVariables["id"] = getKeyValue("formValuesId");
	urlVariables["endpoint"] = getKeyValue("endpointUrl");
	urlVariables["instance"] = getKeyValue("server");
	urlVariables["session"] = getKeyValue("session");

        // toString method of URLVariables returns escaped string
        // so for example Praha 5 - Smíchov looks like:
        // city=Praha%205%20%2D%20Sm%C3%ADchov
	return urlVariables.toString();
}
Debugging code
Sometimes it is complicated to find a problem in the script. Usually typo in the name of component, sometimes it is somehting different. To make the debugging as easy as possible, we added function log(message) into the scripting. There are different ways how is hte log shown. The log message will appear in the log view under the script when debugging in formDesigner or as popUp Alert when the form presented when displayng form in the finder.
An example how this works in OSSPO
this.createListener("SmlouvaNaDobu", "change", updateSmlouvaNaDobu);
this.createListener("SmlouvaNaDobu2", "change", updateSmlouvaNaDobu);
this.createListener("SmlouvaNaDobu3", "change", updateSmlouvaNaDobu);
this.createListener("DatumUzavreniSmlouvy", "change", updateSmlouvaNaDobu);
this.createListener("DatumUzavreniSmlouvy2", "change", updateSmlouvaNaDobu);
this.createListener("DatumUzavreniSmlouvy3", "change", updateSmlouvaNaDobu);
this.createListener("SmlouvaNaDobuCelkem", "change", updateSmlouvaNaDobu);
function updateSmlouvaNaDobu(evt:Object):void
{
if(getComp("DatumUzavreniSmlouvy").text != "")
{
getComp("SmlouvaNaDobuCelkem").text = getComp("SmlouvaNaDobu").text;
}
if(getComp("DatumUzavreniSmlouvy2").text != "")
{
getComp("SmlouvaNaDobuCelkem").text = getComp("SmlouvaNaDobu2").text;
}
if(getComp("DatumUzavreniSmlouvy3").text != "")
{
getComp("SmlouvaNaDobuCelkem").text = getComp("SmlouvaNaDobu3").text;
}
}
Finance Settings
It is necessary to set-up Finance Settings, once you want to use Estimates, Invoices or Orders.
Set-up Journals
Options & Tools > Finance > Journals
Add all journals that are necessary, minimal supported set is:
- Issued Invoice
- Received Order
- Received Invoice
- Issued Order
- Estimate
Set-up Invoice States
It is necessary to set-up at least one state per the Invoice Document.
Estimate States
For Estimates, set-up at least:
- Issued
- For Approval
- Approved
- Dispproval
- Billed
- Approved by client
Set properly Status priorities 0 .. 100 to sort workflow order of states.
After Estimate has been converted into Project Budget, the status is automatically switched to fixed status Billed.
Invoice States
For invoices, set-up at least the following states:
- Issued
- For Approval
- Approved
- Paid
- Partially Paid
- Cancelled
Please note that Cancelled state does not have any effect in system's calculations of total invoicing. Should be considered for future development.
Finance Settings
- Set home currency.
- Set-up Billing period.
Go to Options & Tools > Finance > Settings
Set-up Exchange Rates
If you use foreign currencies, it is necessary to set-up Exchange rates at least once at the beginning of the period. Exchange rates are used, when calculating foreign-currency sales opportunity items & billing items for Financial Reporting purpose.
Check provider information
See if all information you need (provider's name, address, registration number, VAT number, bank account, etc.) is entered at provider's contact. This information is necessary to properly issue new invoice / estimate.
Set-Up Items/Products
You should be able to create new products/items. Check that you can define Item Type (ie Product, Service, ...) and that you can create new item. If not, then you should check product/item settings in Win client.
Access Rights on Invoices
Access rights on invoices (separately for received, issued), orders (sales and purchase), estimates (received and sent) are calculated from from 4 sources:
- Invoice itself (one particular invoice may have it's own list of users / groups
- Invoice Received treenode (administration node for each of the types of invoices / orders / estimates)
- Journal (numbered list of documents)
- Context (clients, projects, folders, etc.)
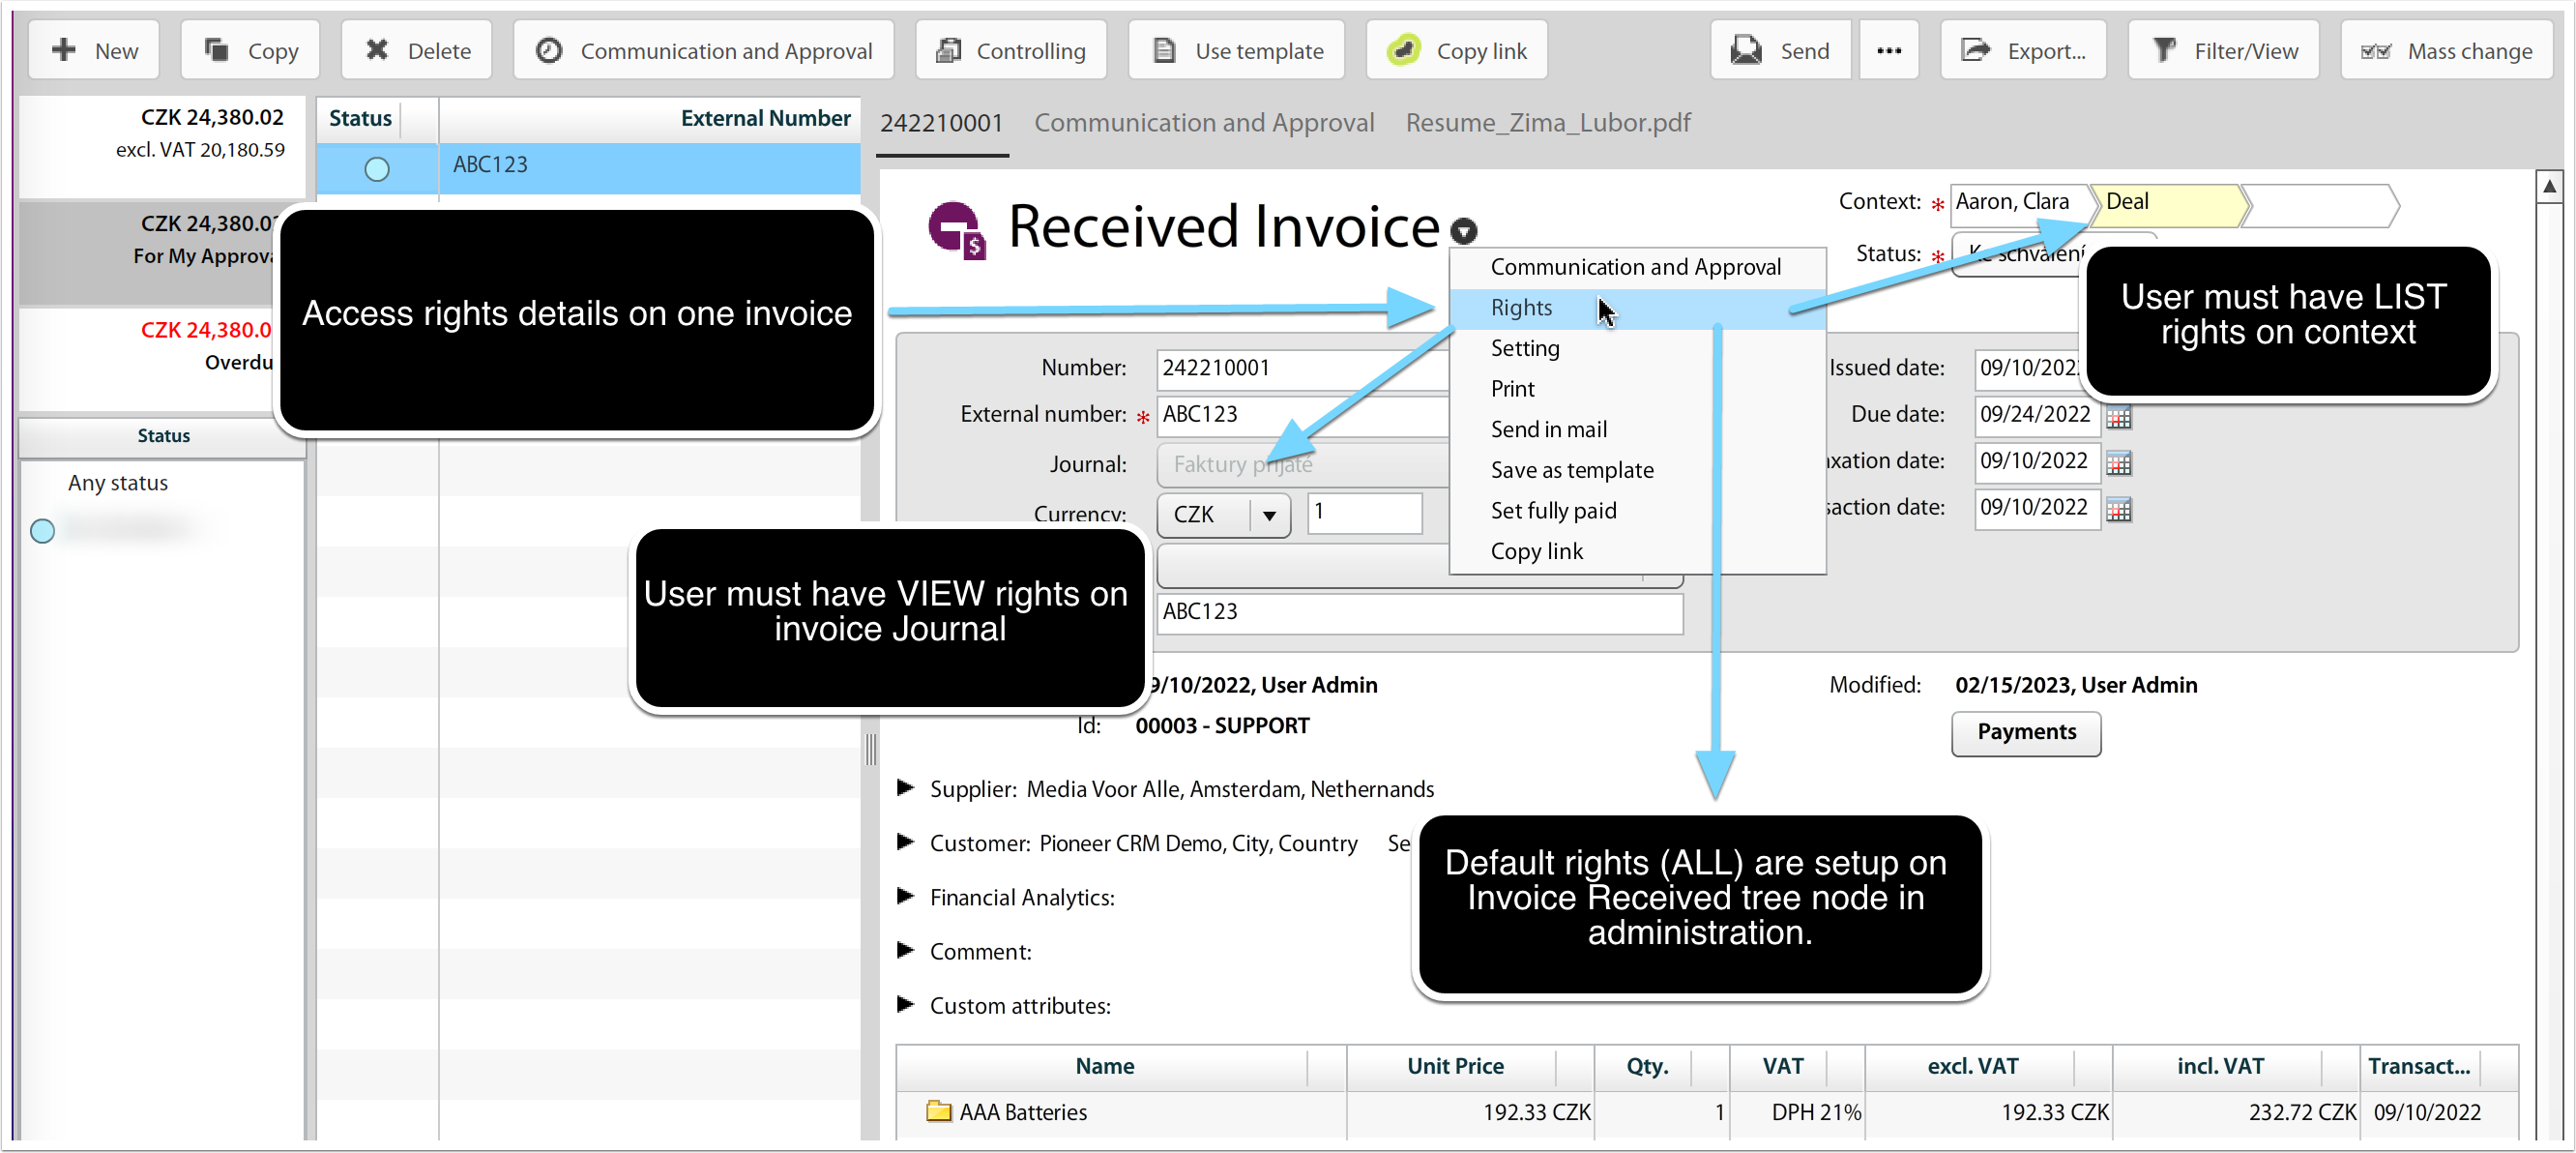
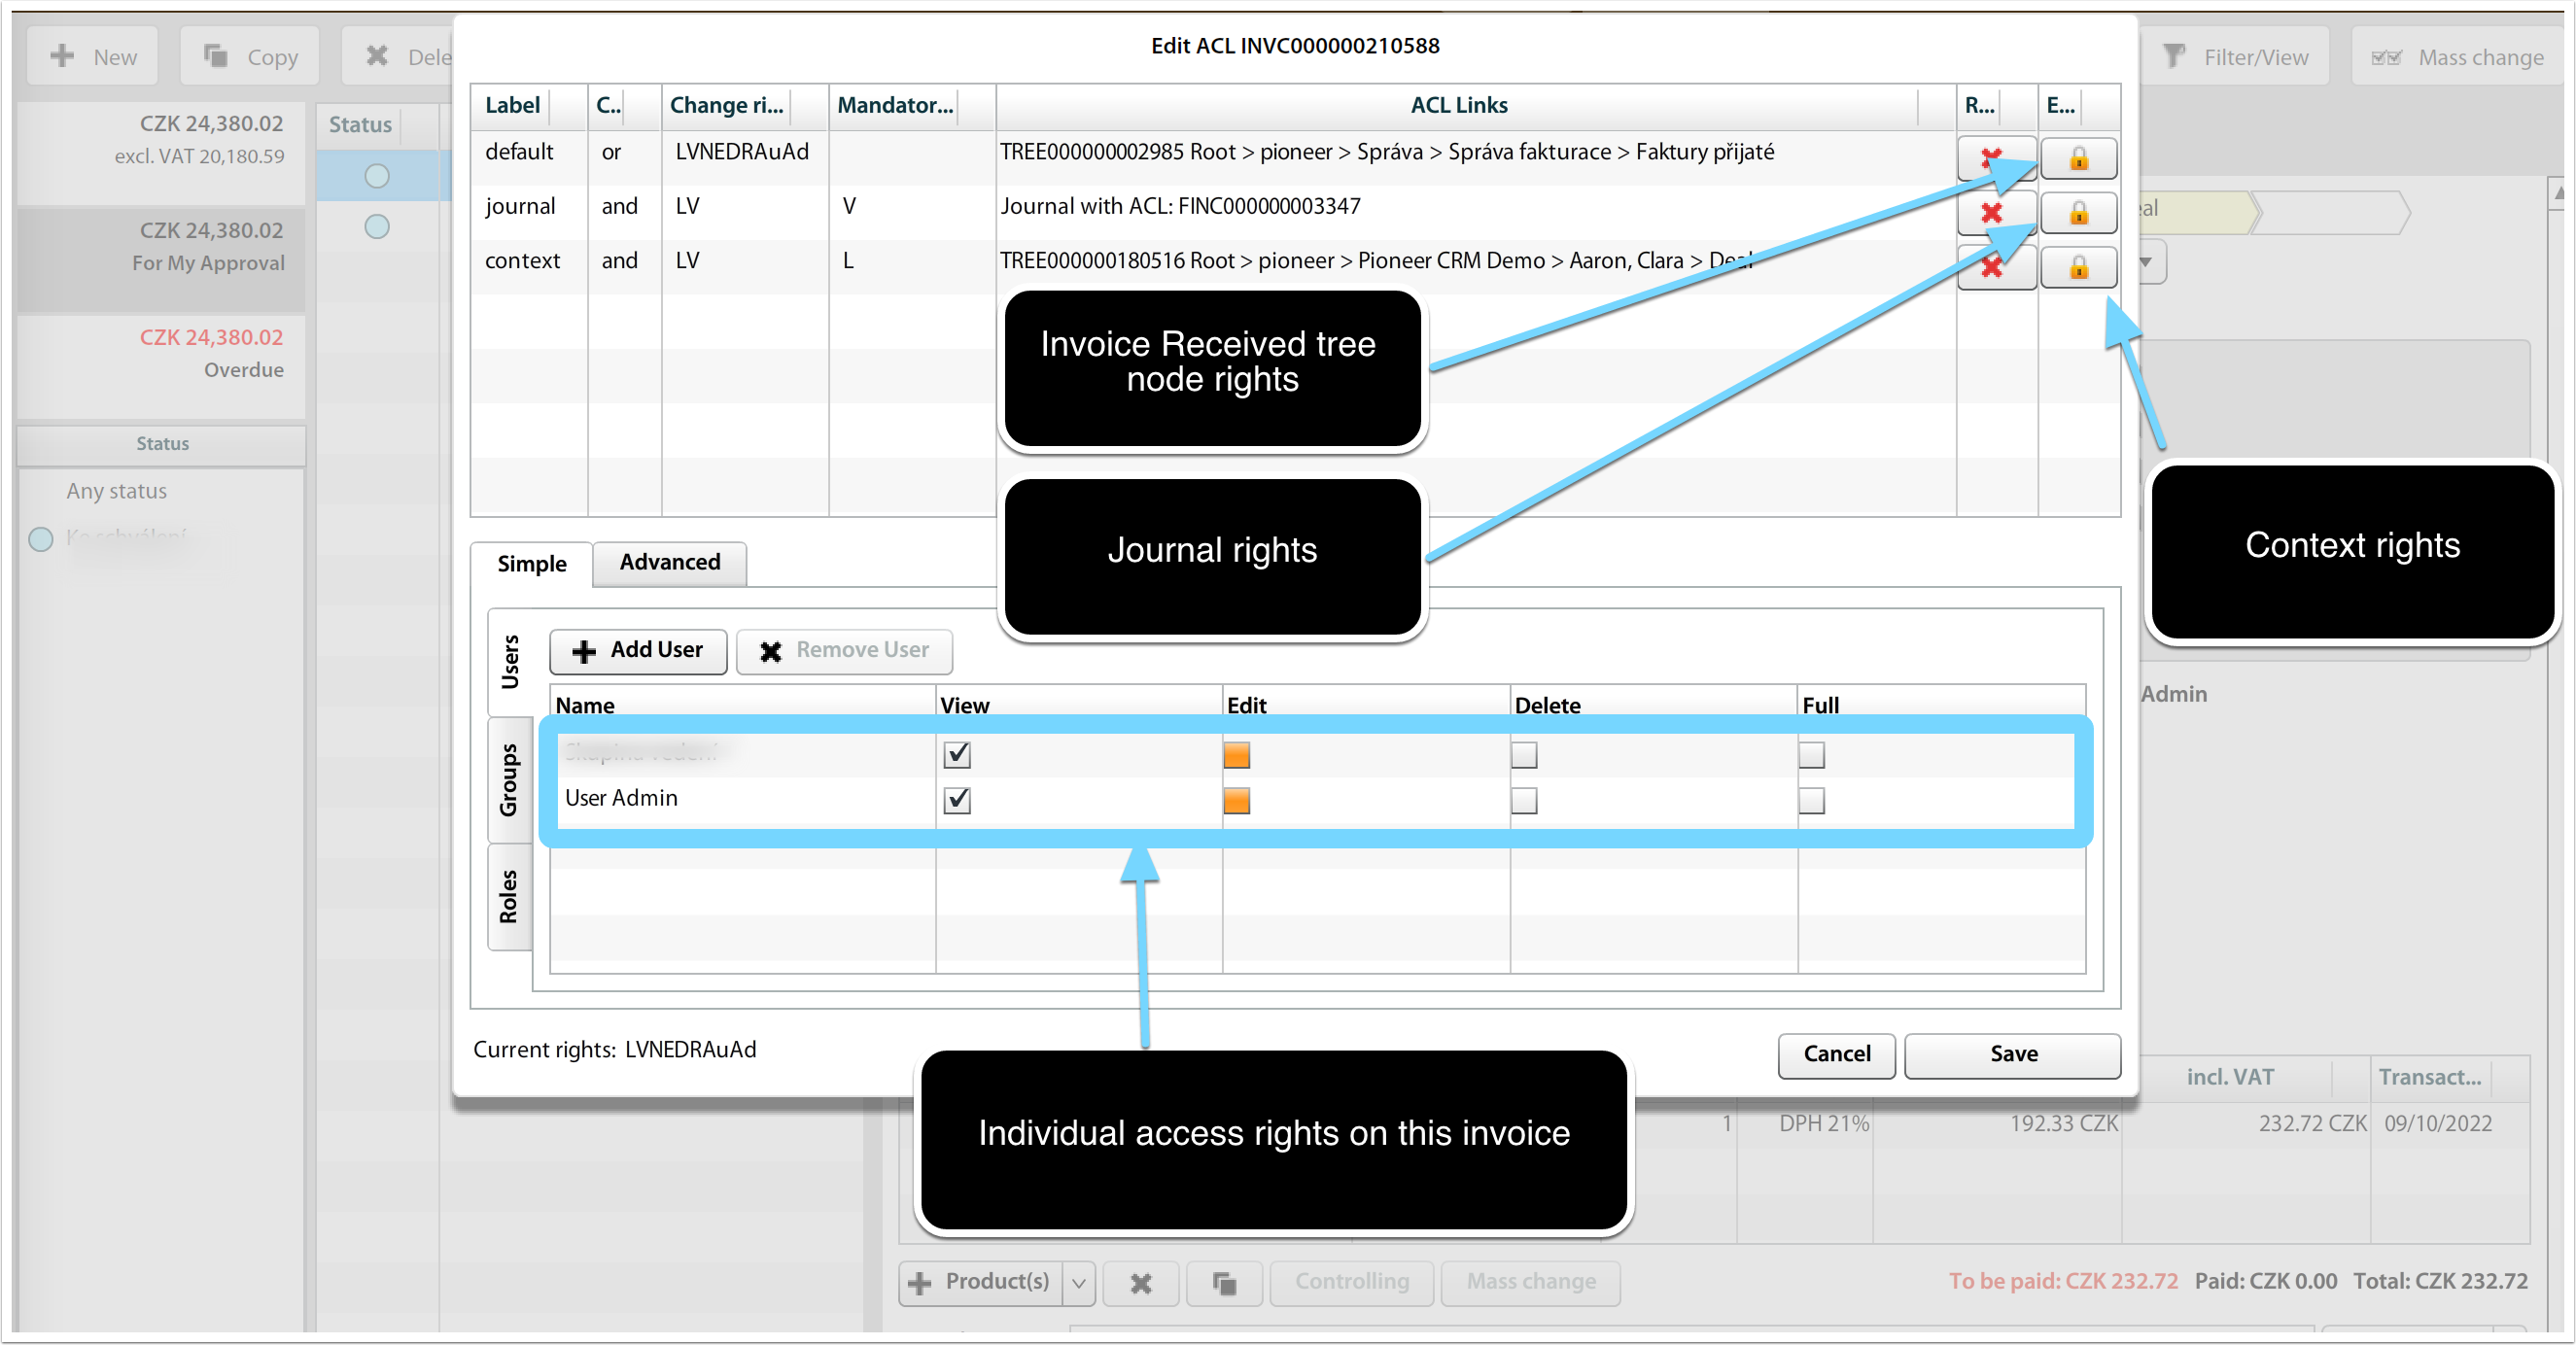
Customize access rights on invoices
See who has access to one particular invoice
You can see each invoice's ACL (Access Control List) and see who has access to the document. You will also see what are your rights on the document. This link to see Rights is available only to users with RIGHTS on the invoice.
Rights are inherited, you need to research the tree structure to find out where the rights are taken.
Customize access to document type (ie Received Invoices)
If you want to limit access of users (or preferably user groups) on the whole set of all received invoices (or issued invoices or sales orders, etc.), you should customize Invoice Received treenode.
You can see the treenode access rights clicking on particular path (lock) button (ie Root > workspace > Administration > Invoice Received Administration).
You will get window like this:
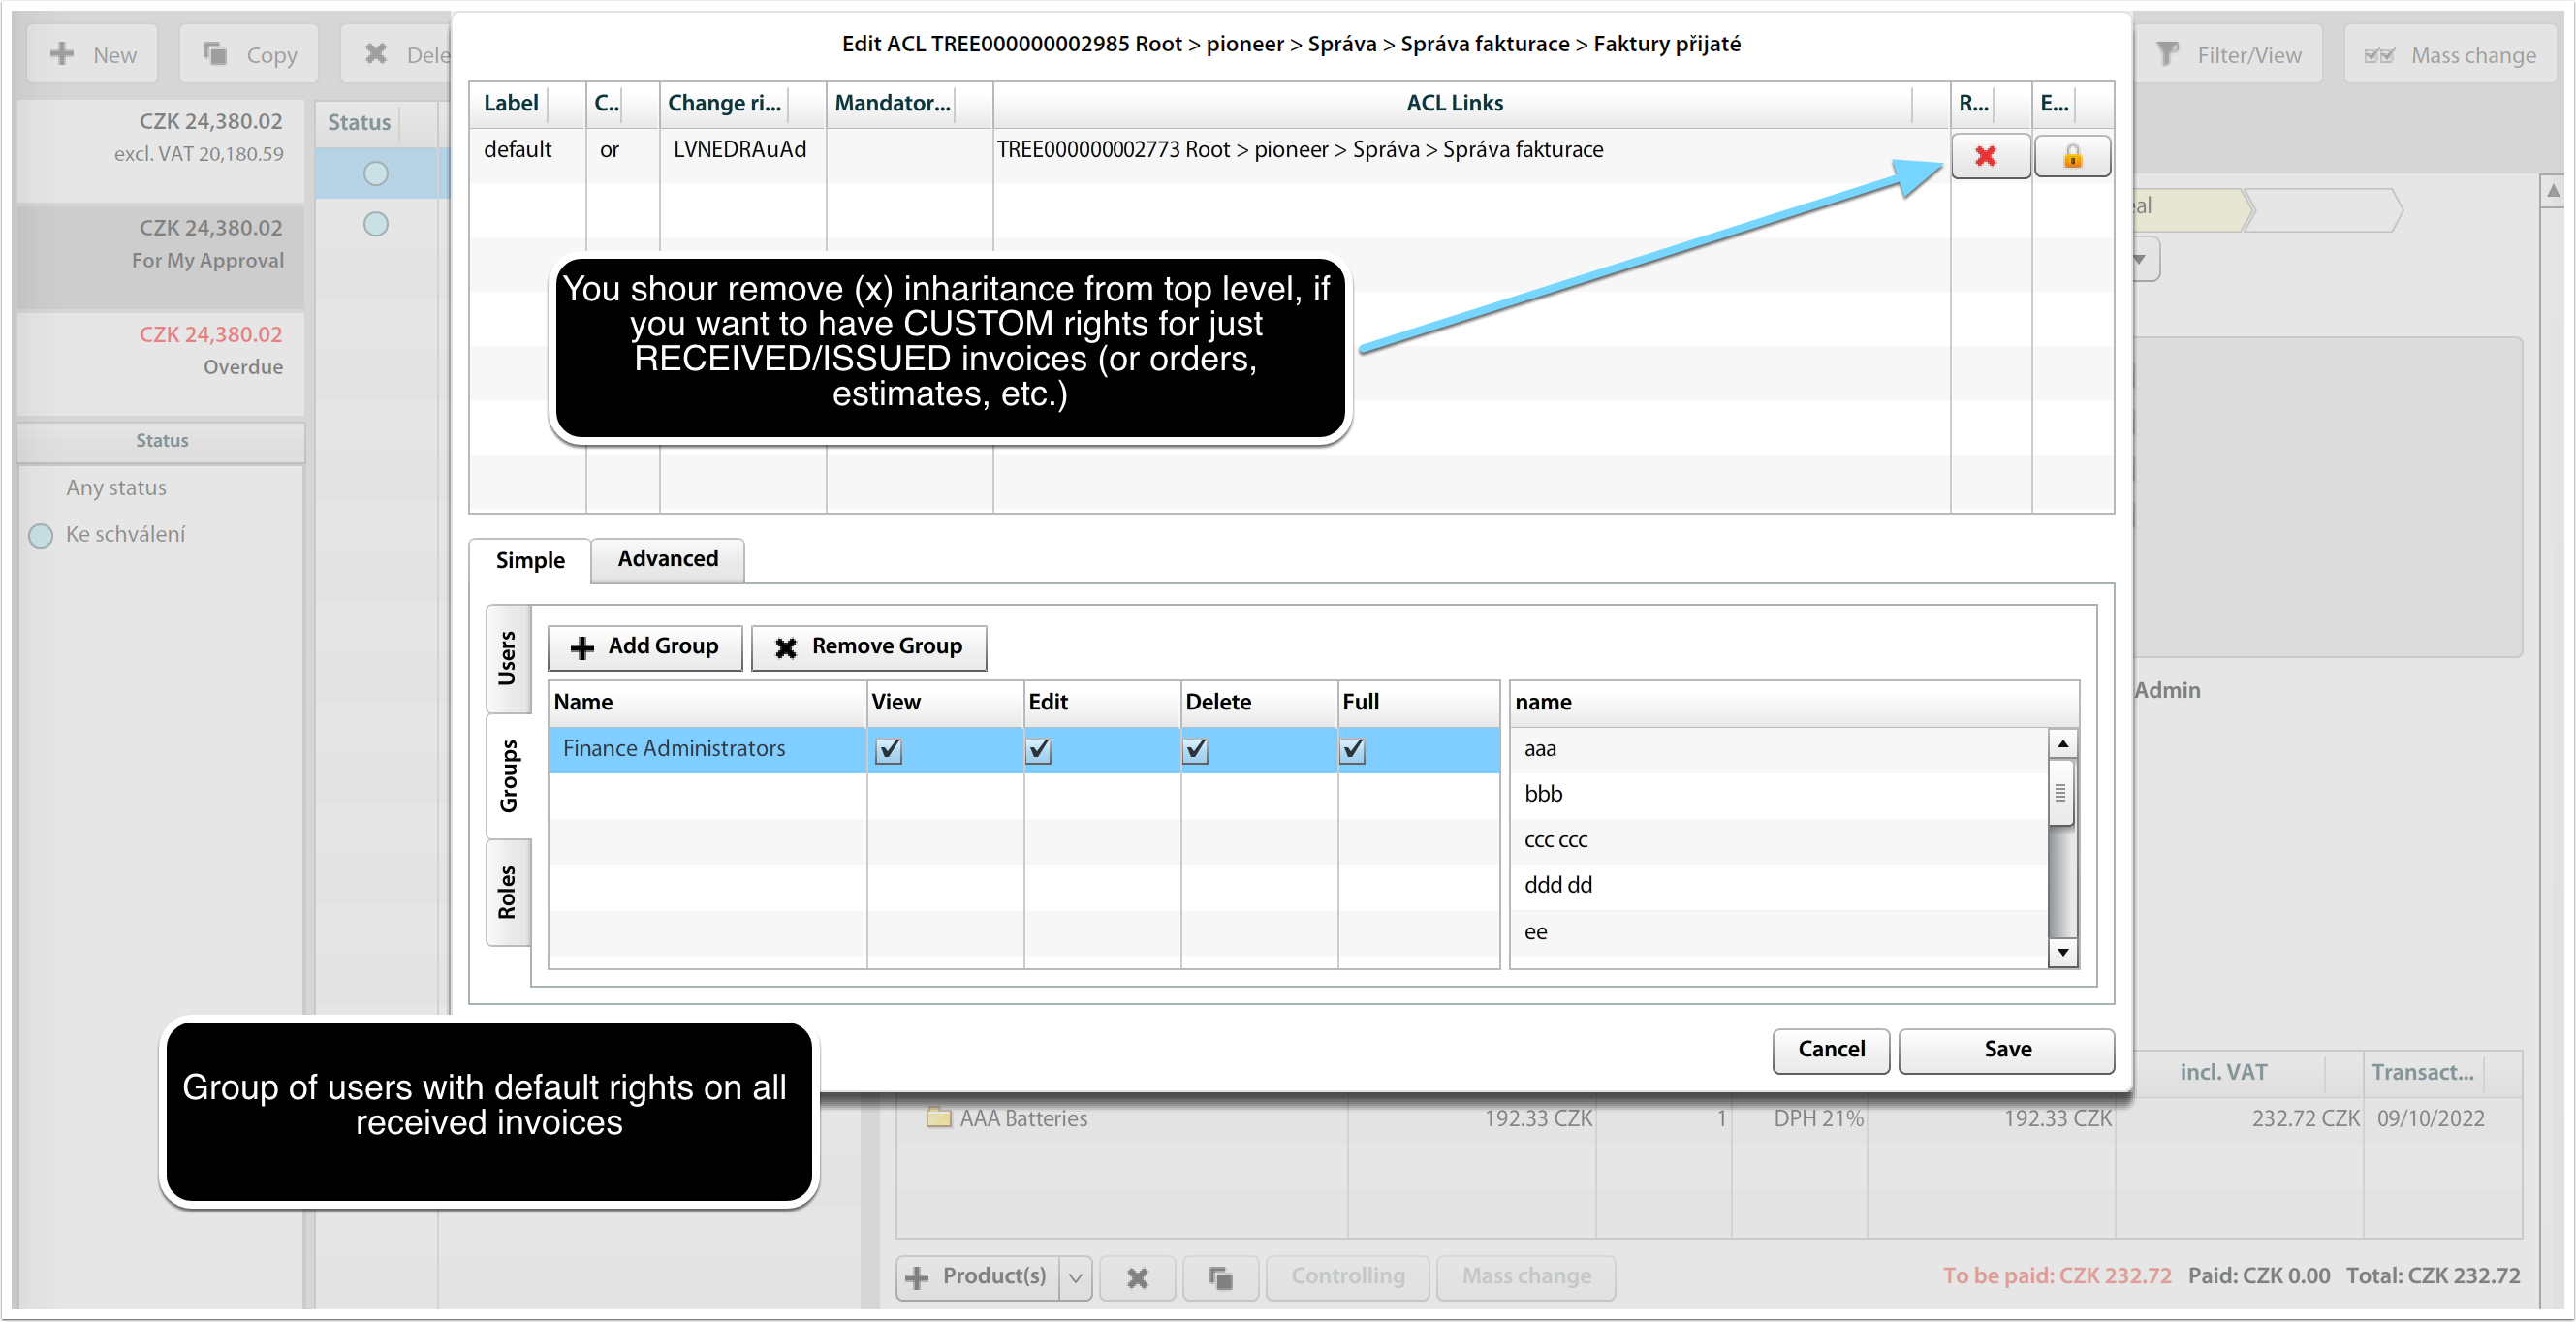
Here you modify rights in Groups section (you may add / remove groups, create special group for "Invoices Received" and add this group desired rights, ie. View & Edit). To avoid inheritance of rights from top level, you can remove the inheritance by clicking on delete (x) button in top section of ACL edit window.
After saving, only users in "Invoices Received" group will get the View & Edit rights to received invoices.
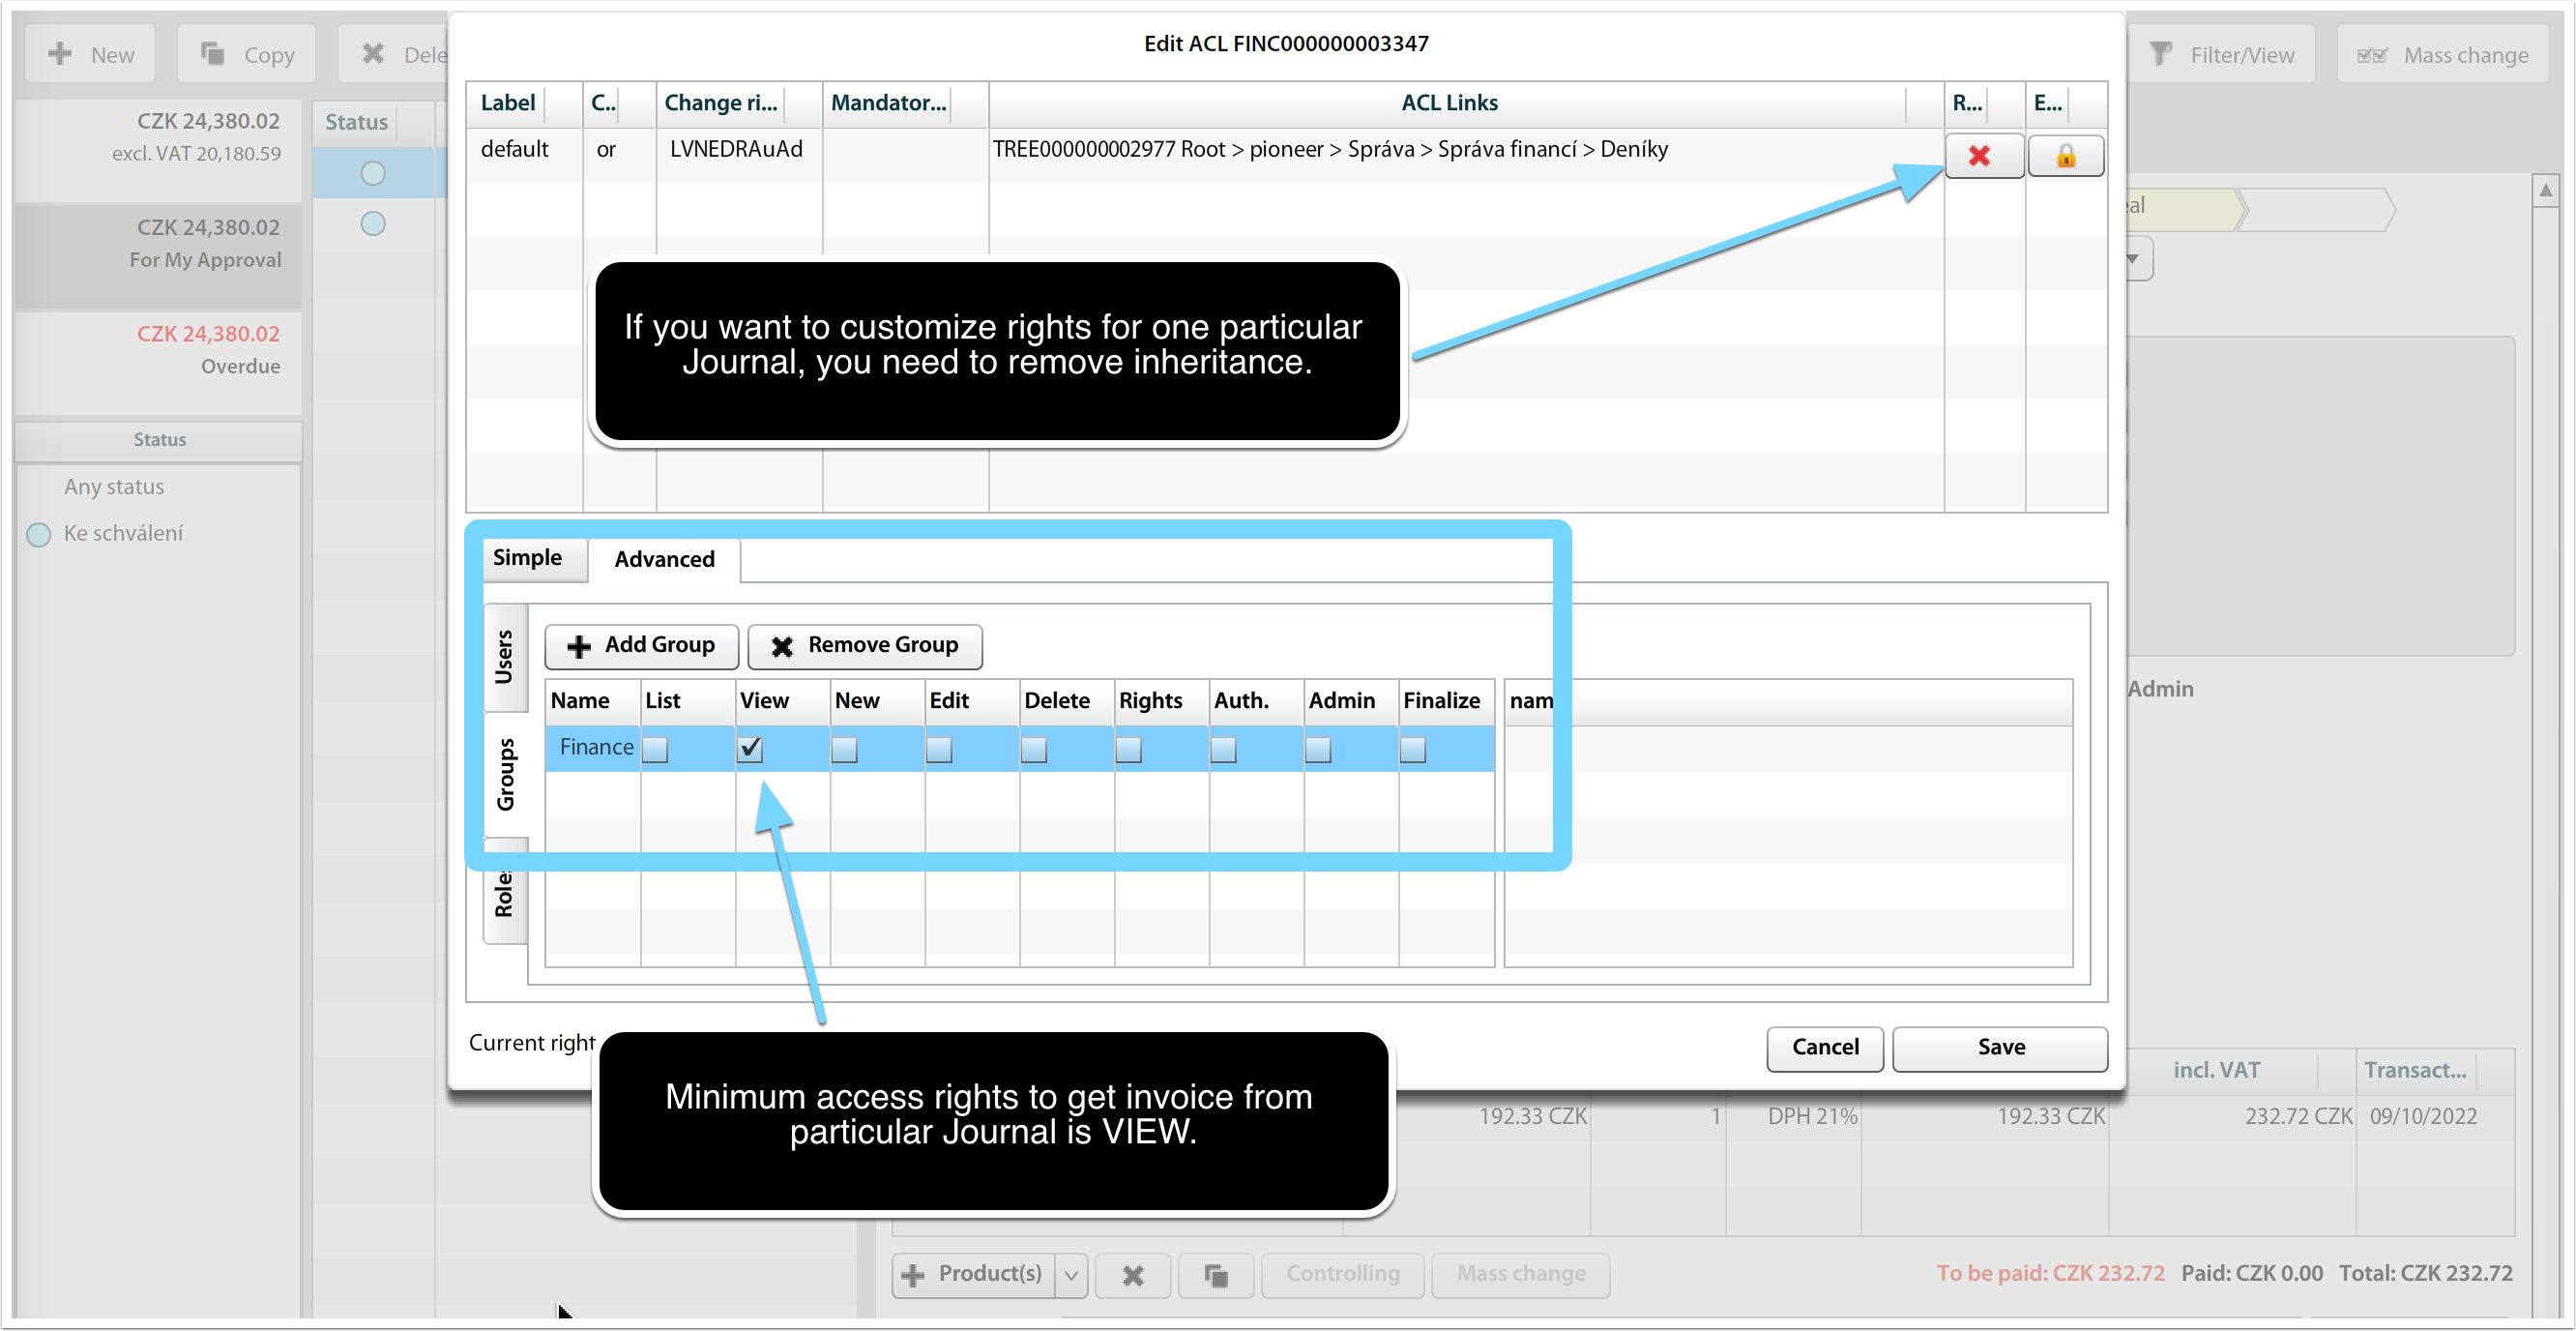
Customize rights for one particular Journal (ie Internal Received Invoices)
If you want to limit access to only selected set of invoices, you can adjust access rights to selected Journal. Journal represents set of invoices with particular controlling and approval workflow and may contain sensitive information, such as remuneration of company partners. In such case it's probably good to limit rights only to narrow group of (for instance) "Invoice Received - HR".
The procedure is similar, only users with View rights (you need to switch to Advanced tab in ACL settings) may see the invoice from respective Journal.
Estimate Templates Access Rights
User must have full rights on INVOICERECEIVEDNODE (see Options & Tools > Tree > Invoice Administration).
Invoice Administration
Invoices allow you to administer several settings / features of Invoice document. If your company uses payment transactions, it is possible to add Payment journal and allow Payment button visibility on Invoice detail.
The systemId com.atollon.core.admin.finance.journal.payment must be associated to the Payment journal.
Document Library Configuration
Document Categories
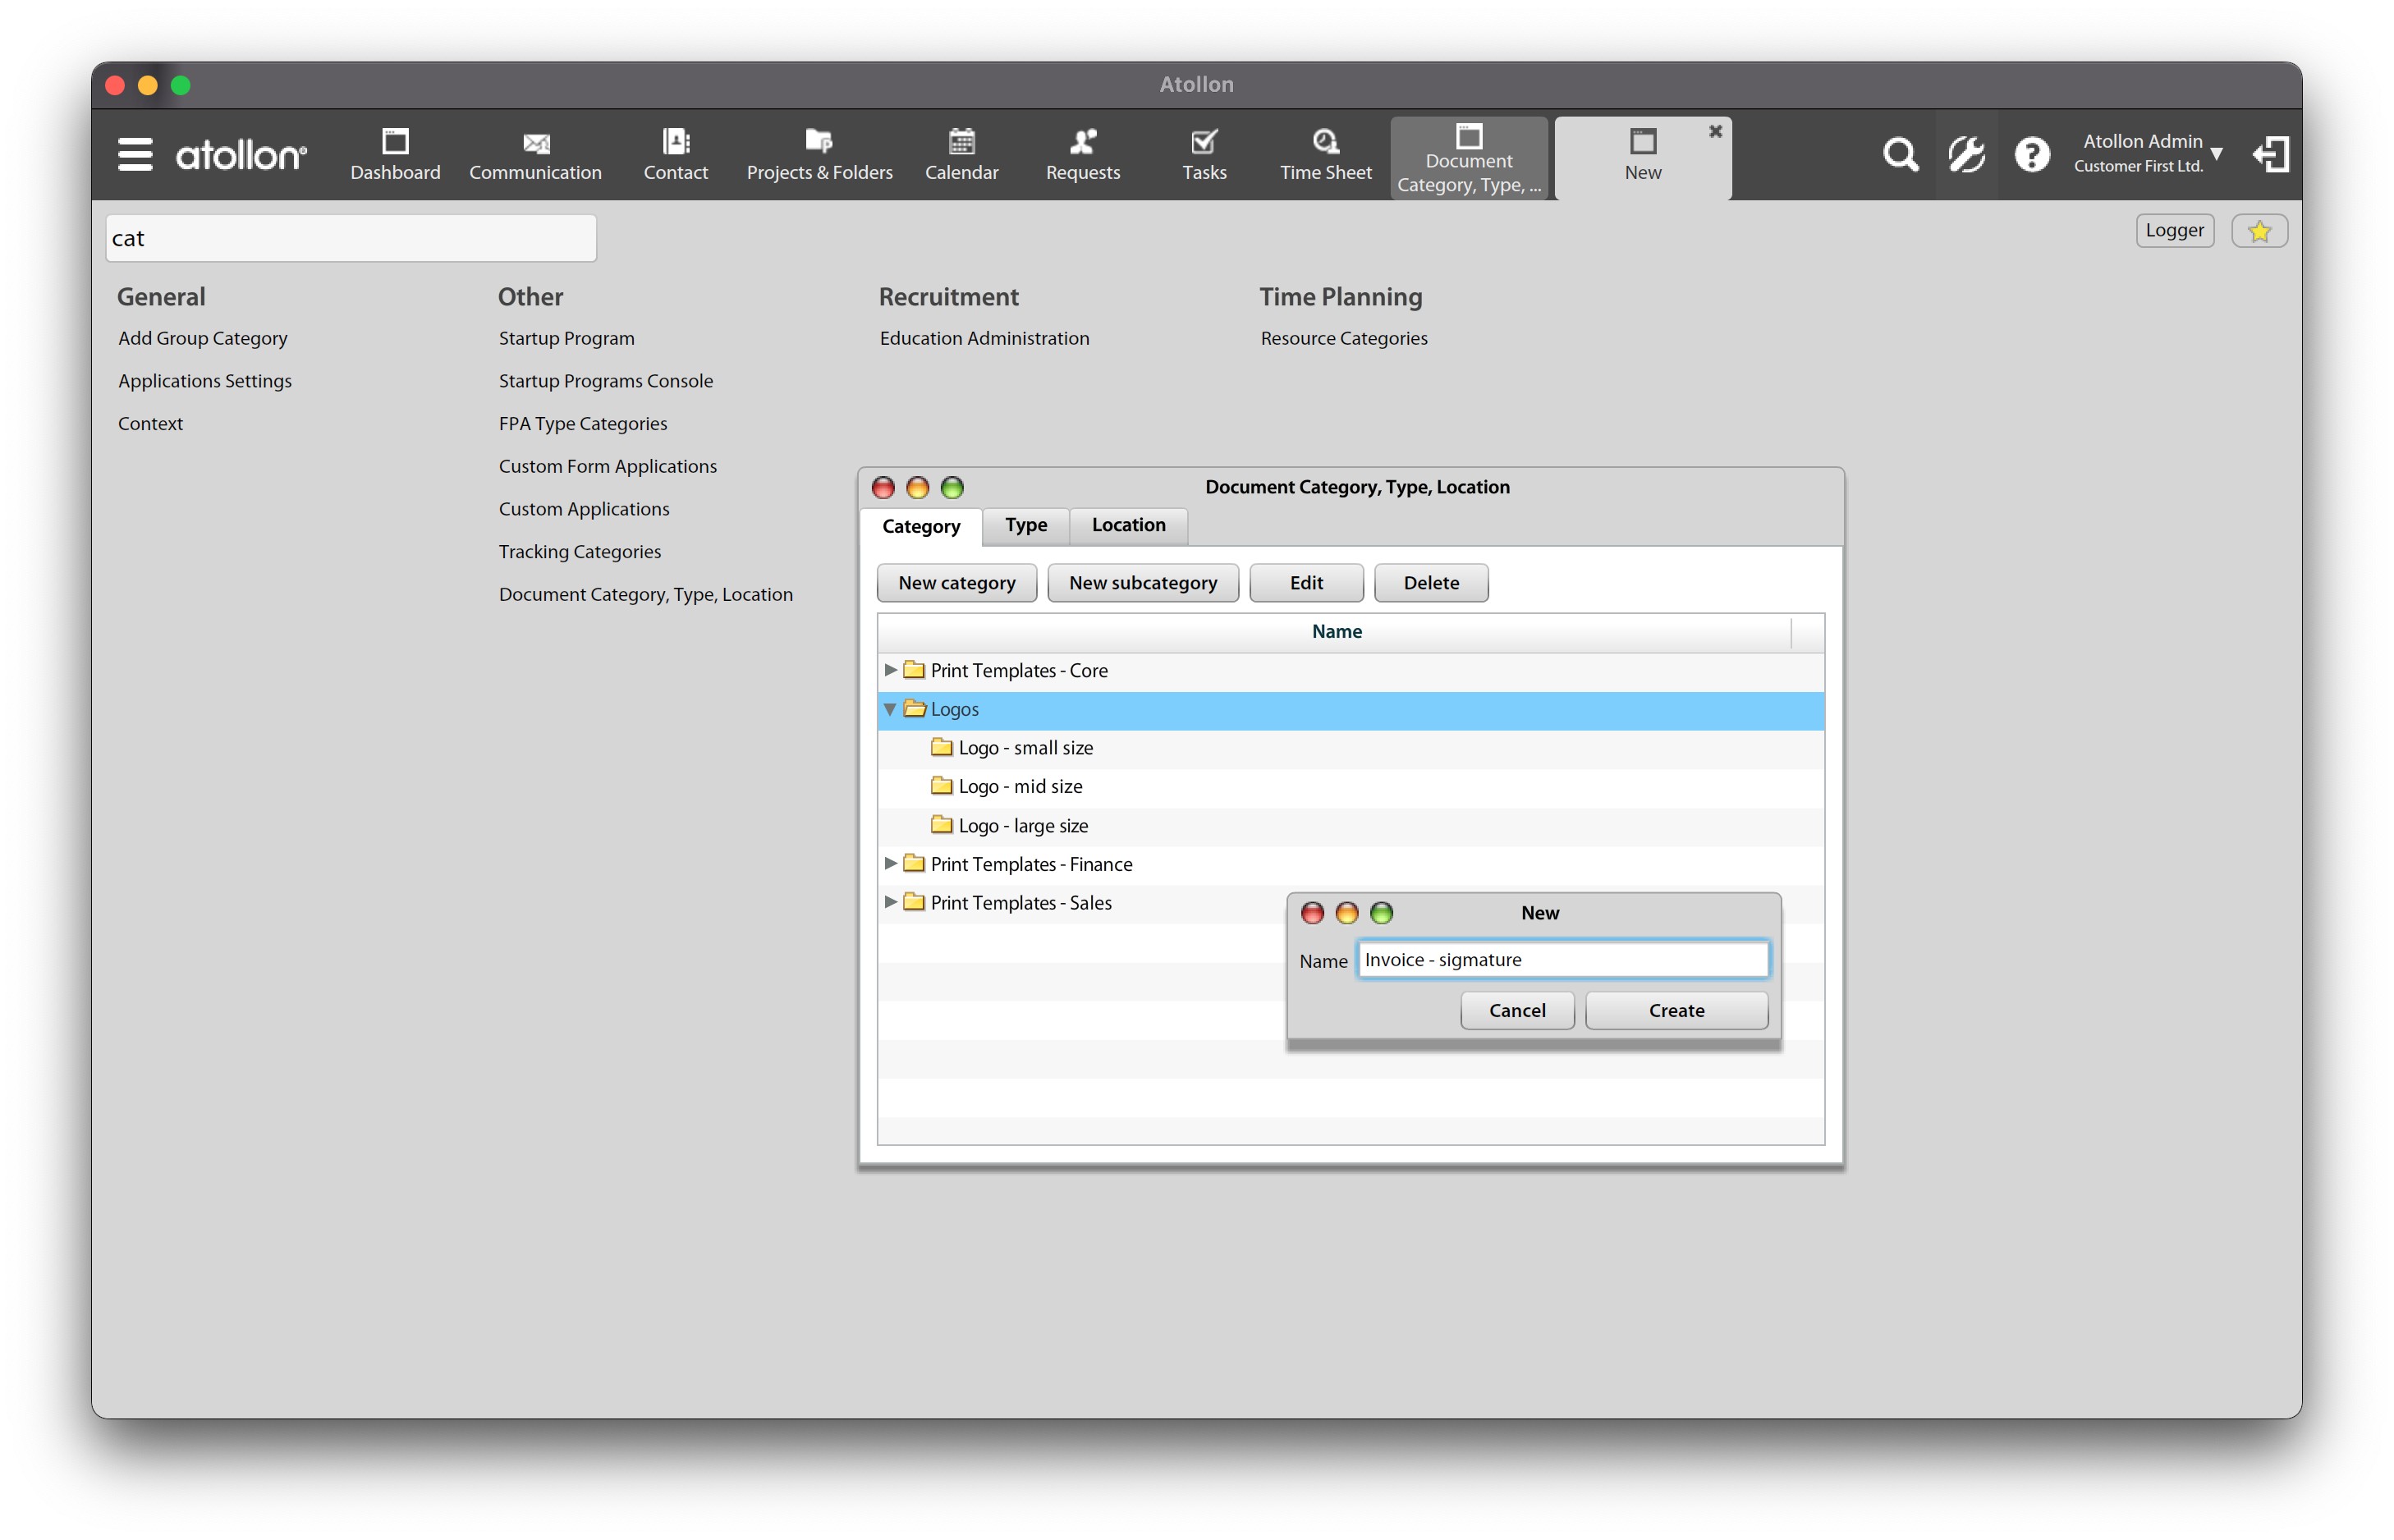
To create new document category, go to Options & Tools > Document Category, Type, Location.
Document categories for creators of print templates
Some document categories are used to label particular documents/images for technical purposes, such as you can use document category to label company logo for invoice print.
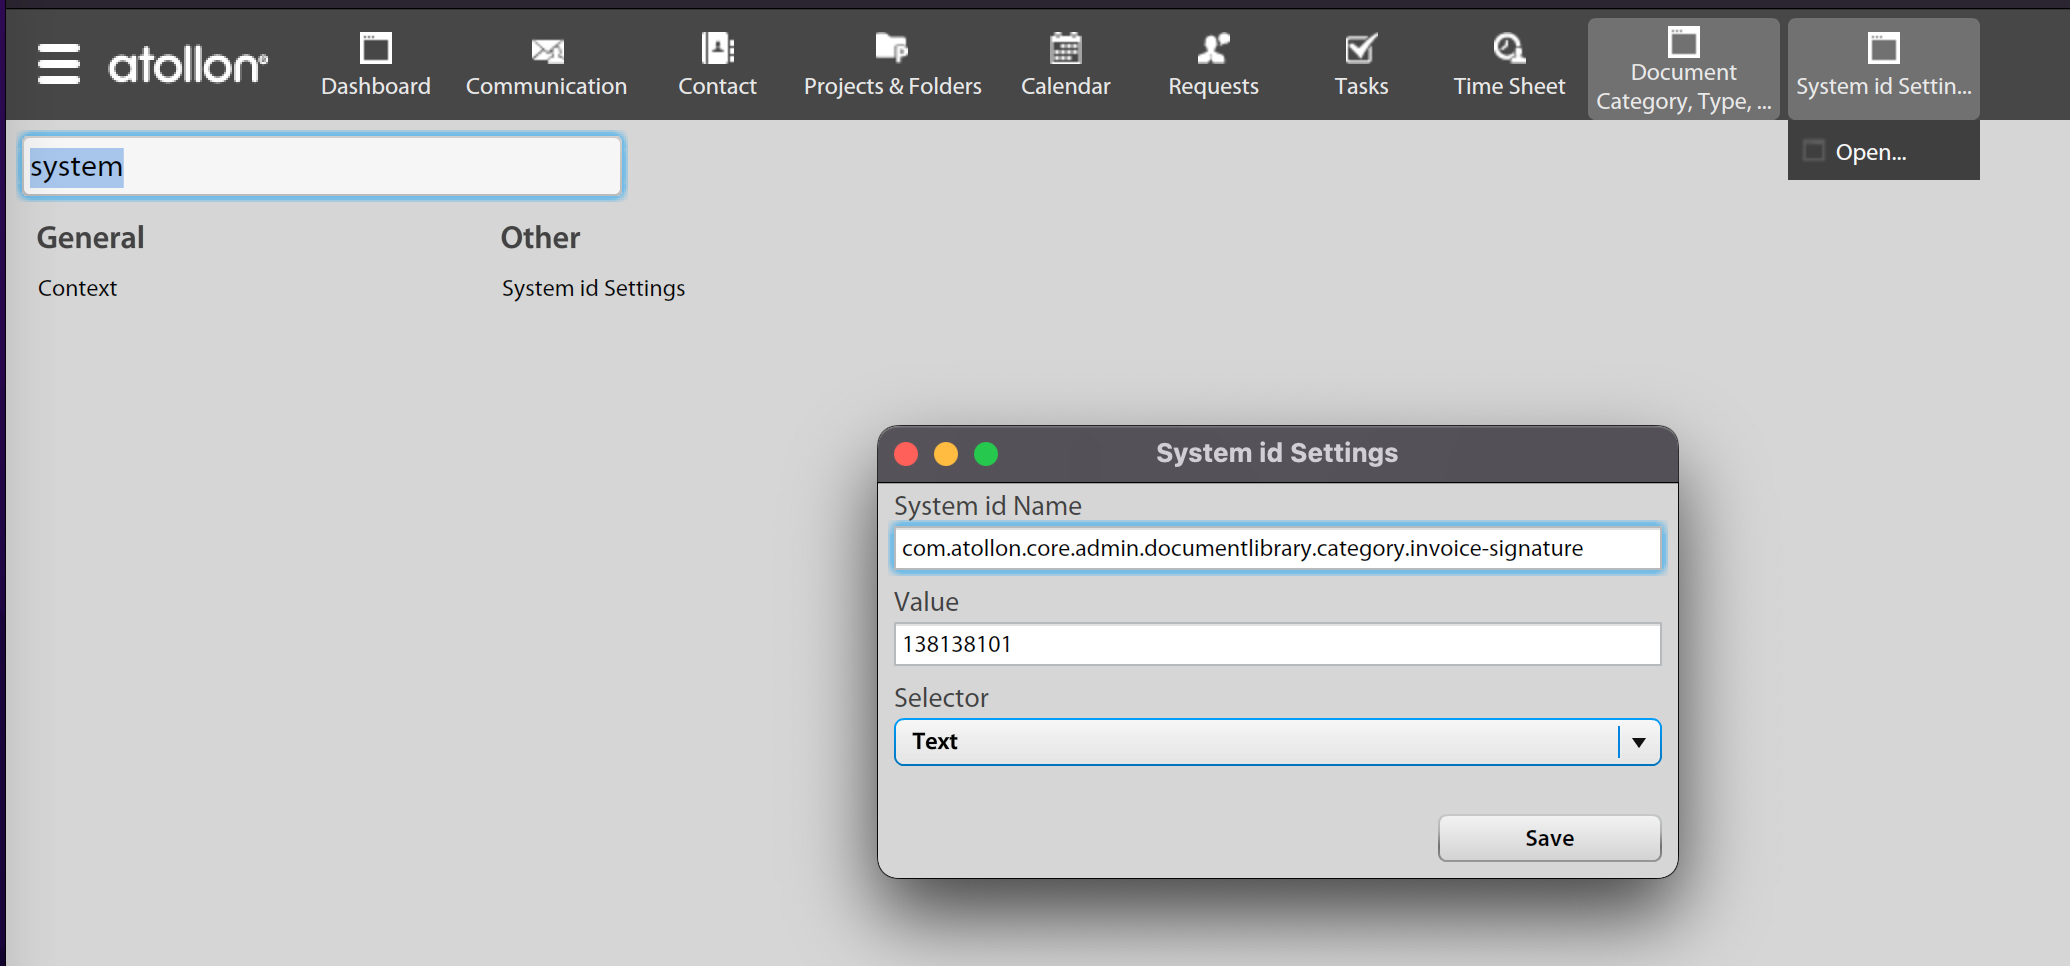
The category itself is not sufficient, print tool finds the proper document category (and corresponding document) not by document category name, but by systemId setting. SystemId setting maps fixed term (ie identifier of the document category) to internal Id (document category Id).
Some examples
| systemId | Used for | Uploaded document location |
| com.atollon.core.admin.documentlibrary.category.logo-mid | In case you want to show logo on print templates, upload the logo to Our Organization's default folder (or the folder associated with the issued invoice Supplier) and label the logo (image) with the document category associated with this systemId. | Folder of the organization or invoice supplier's folder, when used on Issued invoice |
| com.atollon.core.admin.documentlibrary.category.invoice-signature | In case you want to place signature image that is dependent on invoice supplier (usually one of our organizations). Place the image into Supplier's folder and set document category associated to this systemId. | Folder of the organization or invoice supplier's folder, when used on Issued invoice |
How to get document category ID
Before saving the category (when creating or updating), open Logger application to find out ID of created document category record in Create / UpdateDocumentCategory function.
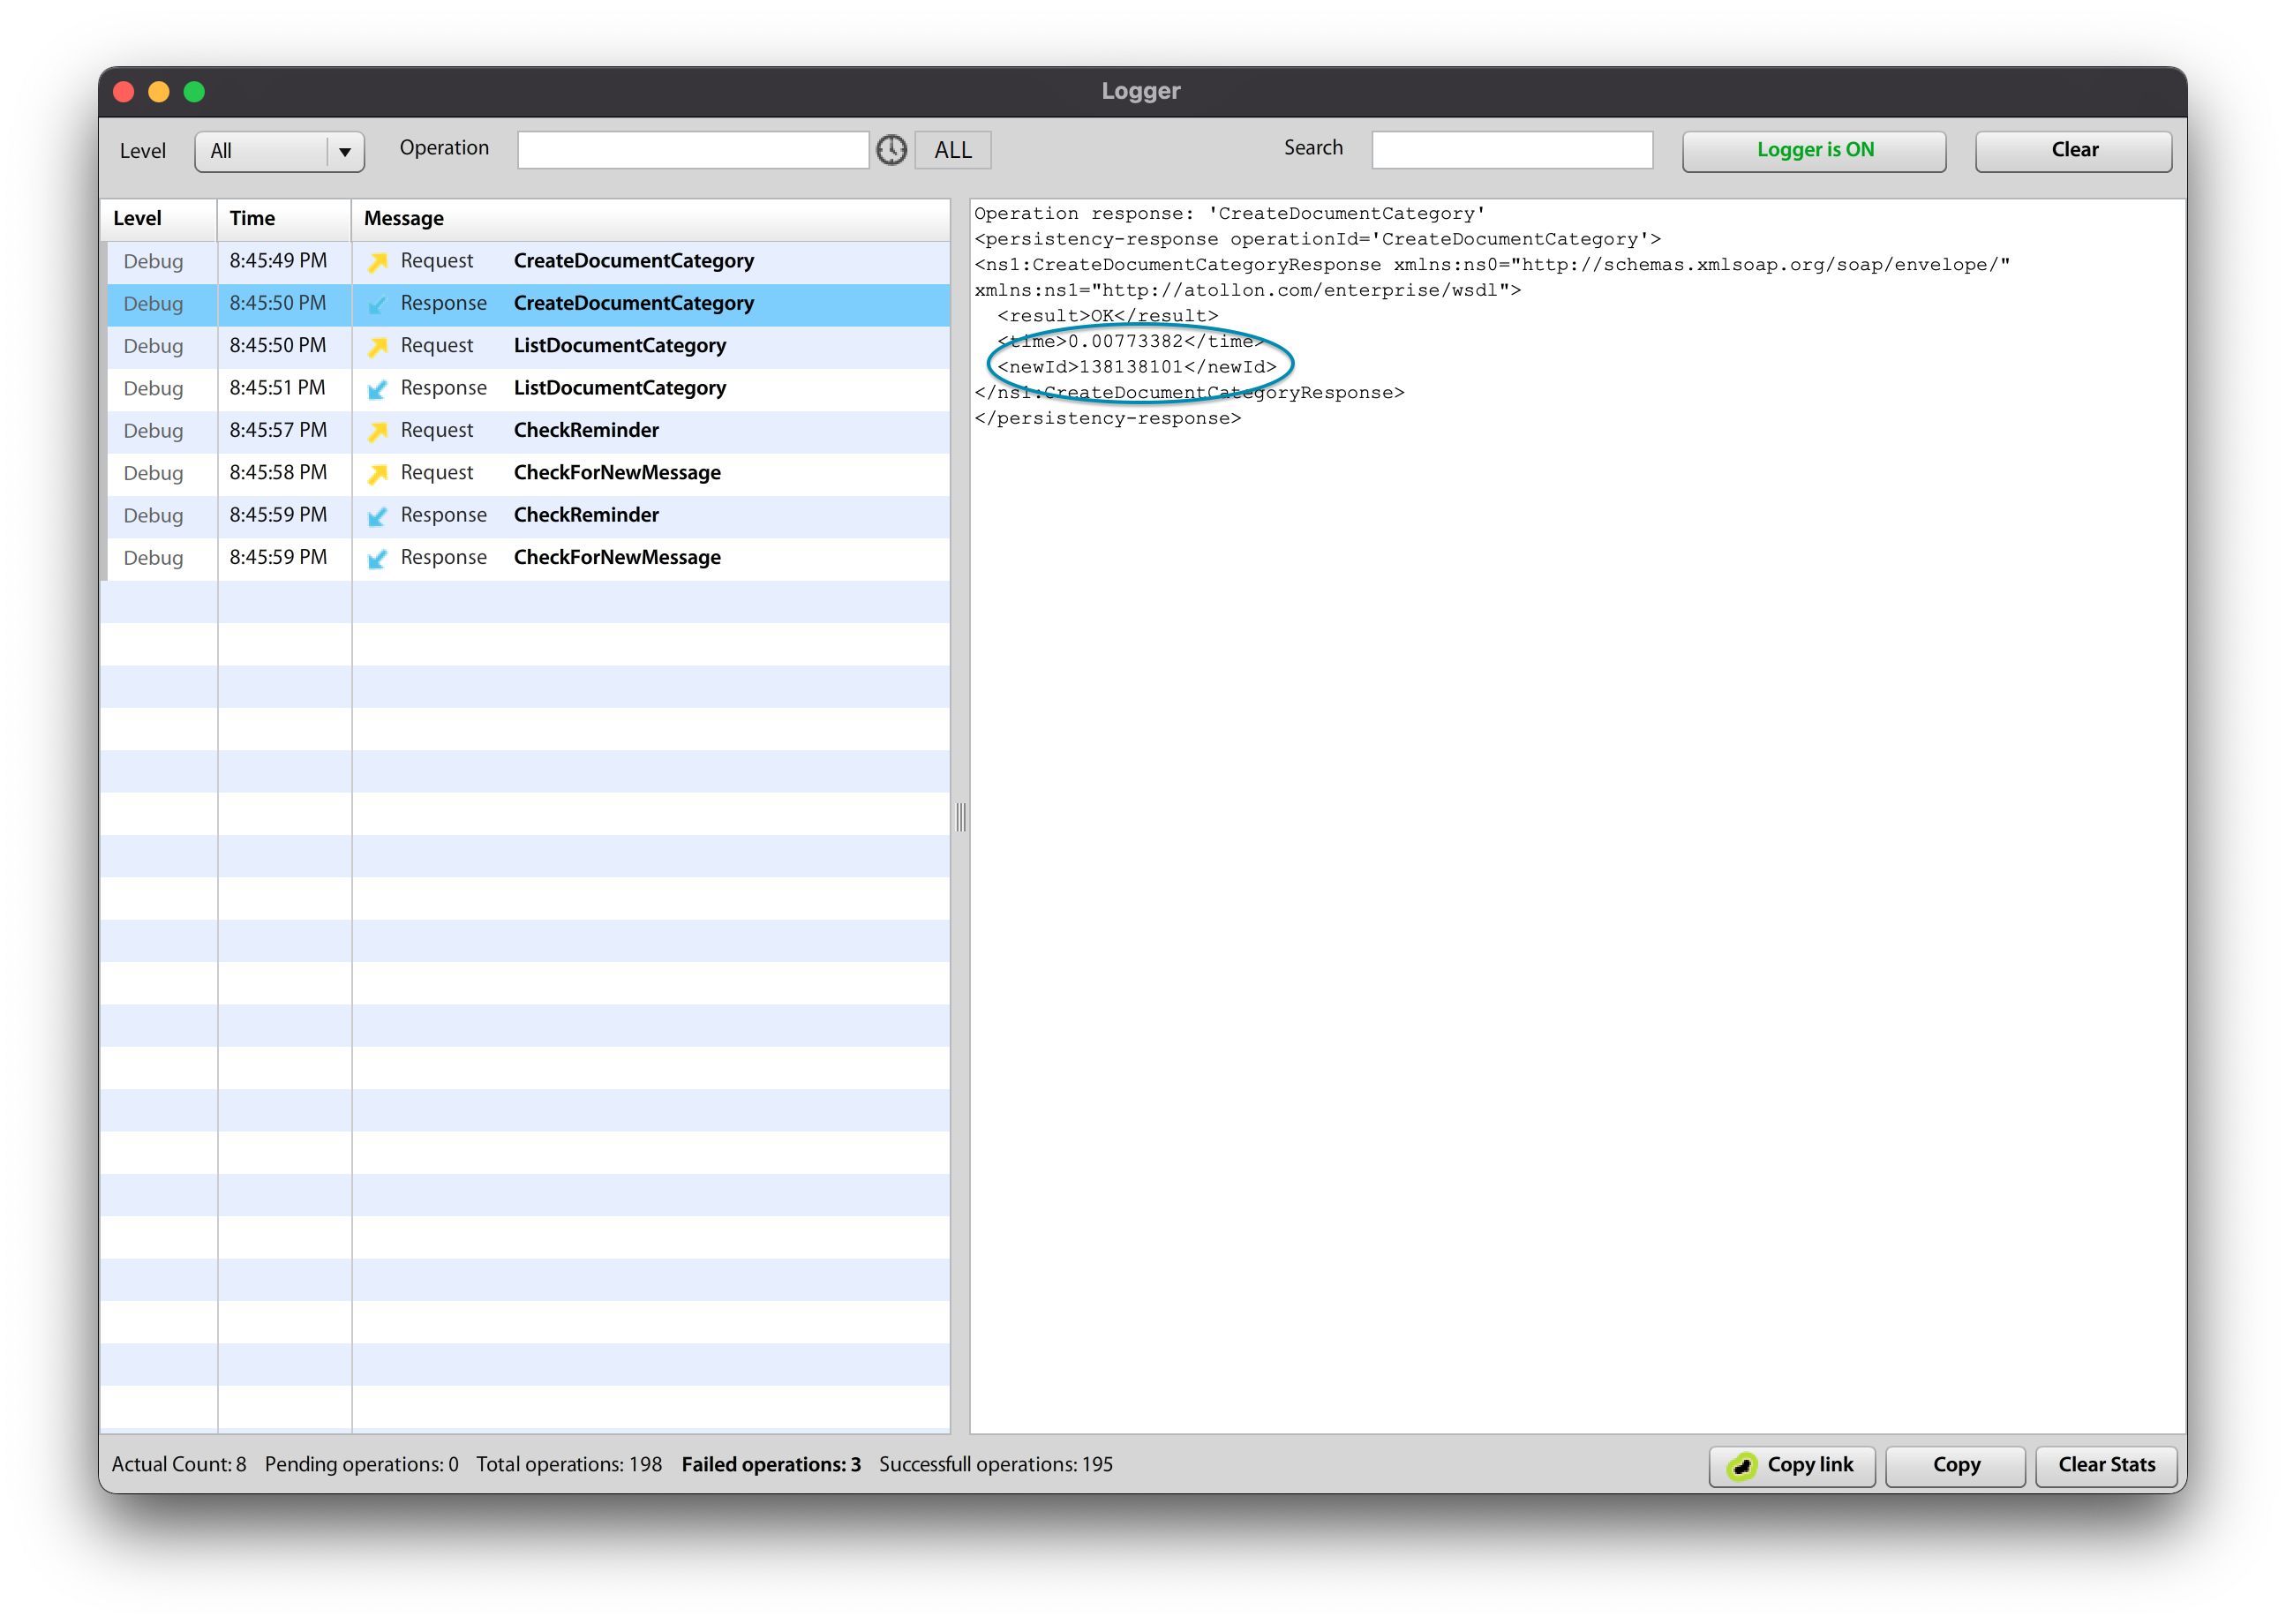
How to set the systemId
Once you get the ID of the new document category, save it in relation to systemId text string.
Upload the document
Upload the image to organisation's (or supplier's) folder and choose the proper category on the document/image for company invoice logo or signature.