Mails
- Mail Set-Up
- Mass Mail
- Redirect existing mail address
- Email Settings
- Set-Up Mailbox
- Message Configuration
Mail Set-Up
Mail Set-Up Options
There are two basic options to set-up mail in Atollon, the differences are described below:
| Atollon as Primary Mail Server | Atollon as Secondary Mail Server |
|---|---|
| Atollon may act as your primary mail server (our preferred option). That means that all your e-mail communication will be managed with Atollon use. We will take care about spam filtering, the benefit of using Atollon as primary e-mail system is it's tight connection to other Atollon's components and easier access rights. Disadvantage may be that it is possible to get mail only using integrated Atollon's e-mail client. If you therefore prefer using other e-mail clients, select the second option. | You can decide to use Atollon only as archive tool for e-mails or occasional e-mail solution. In this case, server will be set as secondary mail server. This option requires primary e-mail server managed by different mail services provider. In order to get e-mails into Atollon, you may need to set-up mail forwarding of selected (or all) mailboxes to addresses configured when setting-up Atollon mail. |
Below mentioned guides will follow you in mail set-up. If you need assistance, do not hesitate to ask your Atollon Consultant.
Set-Up Mailbox
Set-Up Domain MX Records
Mass Mail
If you are willing to use mass mail function which is available in Atollon, you should probably follow next steps before you starts.
Introduction - how does it work?
First of all you need a distribution group. This can be done by following examples
- create report and use send mass mail button,
- create your own distribution group within Contact module and drag&drop contact you would like to have in this group,
-
use some nifty sql functions to create your distribution group :).
Wanna language-based sending?
This feature is actually not working in mass mailing so the nifty sql's are needed to create language-based distribution groups. Then you of course can send emails which speak the same language recipient does.
Just to show you how you might do that:
- Create empty distribution group in contacts.
- Find out it's id using SELECT id from contact_distributiongroups where name like 'name-of-your-group';
- Insert all contact which belongs to your organization and speak Czech:
insert into contact_bind_distrgroup(dgroup, contact)
select $YOUR-DISTRIBUTION-GROUP-ID, occ.contact from organization_contact_context occ
left join
contact_personinfo cpi on occ.contact = cpi.contact
where
occ.organization = 1085000 and
cpi.preferedlang = 2607000
;
If you are done with distribution group creation process you can switch to real sending. But wait. We should speak more about what's behind it. Sooo
Default folder aka organization_contact_context table
I would say you probably don't know what do I speak about. Let me just explain you. Every contact has its own default folder. As you probably know, every contact can have more than one folder. In this case - who knows which one is the default one? The answer is default folder. And also, you probably don't want to create folder for every person you have in your system. In this case Default folder is your very big friend again.
If you don't want to create Folder for every person in the system (what you probably really don't want to) you can easily update Default Folder using person's relationship with employer. This is pretty great because if you update Default Folder for the people you are willing to send your newsletter to, this message will actually stay on the person's employer's Folder.
What's the organization_contact_context table structure
That's quite simple. Table takes in consideration the contact might have different Default Folder accross organizations which are implemented in the system. So for that you can see following columns within it:
- organization
- contact
- subject
- project
- activity
Updating default folder
But first of all you have to update Primary Employer. In order to do that there is already (working) function within the Atollon. Just open up windows client and go to Settings -> Contacts -> Contacts maintainance -> Setup default main contact. Run it and make yourself a cup of coffee.
Output of the following command is delete/insert sql function list. You can use \o /tmp/your-update-scrip.sql directly within psql so the output of the select is sent to the update script on your drive and you can import it after using psql -d $YOUR-DATABASE -f /tmp/your-update-scrip.sql. The command includes two values you should find and replace before you'll go to use it.
- $ORGANIZATION-ID - is id of your organization, of course,
- $ORGANIZATION-SUJBECT - is subject id of the organization.
SELECT 'delete from organization_contact_context where contact = '||cm.id||'; insert into organization_contact_context(organization, contact, subject, project) values($ORGANIZATION-ID, '||cm.id||', '||ss.id||', NULL);' from contact_main cm
left join (
    select distinct on (cpc.contact) s.id, cpc.contact as contact from subject s
        inner join contact_personcompany cpc on s.contact = cpc.company
        where
            cpc.isprimary = true
        order by contact
    ) ss on cm.id = ss.contact

where
    ss.id > 0 and

    cm.id in (
        select contact from contact_personcompany where company in (
            SELECT contact from subject where organization = $ORGANIZATION-ID group by contact
            )
        ) and
    cm.id not in (
        select contact from organization_contact_context where subject <> $ORGANIZATION-SUJBECT
    )
order by
    cm.id
;
The command itself might be a bit more updated because:
- company can have two Folders and we are selecting just first one (but how we can know which is the correct one?),
- person can have only one Primary Employer but he might also be excluded (he got fired) from that company and then validTo timestamp should be considered in that select too.
Done with distribution groups, ready for mass mailing
If you did update default folder, created your distribution group and are happy what you have you can switch to the real mass mail sending.
Bugging
What if something went bad ...
Flash player crashed by mass mailing
Well ... that's great question. I was checking contact_mmlist_temp table for some changes and experienced some status changes but are those messages being still send or not?
Small hint - use following command where $MASS-MAIL-ISSUE-ID is id of your last sending (you might find it by selecting over all issues and trying to remember for how many contact did you send that mass mail) and check for changes.
SELECT status, count(status) from cONTACT_MMLIST_TEMP where issue = $MASS-MAIL-ISSUE-ID group by status;
Can not create mass mail list on the server side
This means your temporary mass mail list couldn't be created. This might be probably really bad bug. In my case the problem was in the insert of the distributiongroupid and contactid in the contact_mmlist_temp. I found out which insert was the wrong one and tried to apply it manually within plsql where I didn't experience any problem.
Redirect existing mail address
In windows client
1. Setting -> Mail -> Mail boxes -> doubleclick user to be redirected -> set combobox Active to No.
2. Scribe down (to notepad or piece of paper) users mail (just the name - part before @) and its aliases.
3. Setting -> Mail -> Mail boxes -> doubleclick user to redirect to -> push "+" button in Aliases section -> fill up user aliases which you were scribbing down
Email Settings
Atollon Mail operates as an independent email server. There are two basic ways to configure email reception in Atollon:
Atollon as the Primary Email Server
This option is the default system setting, where all email communication is directed to Atollon servers.
Domain Settings at the Registrar
The customer must configure their domain's MX records to point to Atollon servers. Add the following MX records to your domain's DNS:
| 1 | 10 mx1.atollon.com |
Domain settings in the system
Into the system, enter a second-level domain (e.g., company.com), under which individual email accounts will be created.
Sending messages
The sender's identity is the same as the specific email account, e.g., mailbox@company.com.
Nastavení SPF
It is necessary to add the following TXT record to the DNS records of the domain "company.com":
Recommended SPF setting:
| 1 | v=spf1 mx include: spf.atollon.com -all |
If you also send emails from other servers, they must be included in the SPF rules as well.
Example of what the record might look like when using multiple mail providers:
| 1 | v=spf1 mx include: spf.google.com include:_spf.mailprovider.sk include:spf.atollon.com -all |
Atollon as a secondary email server
This option is suitable if Atollon is intended to serve purely as a mail archiving tool (not as the primary email server), or if the goal is for Atollon to manage only a specific portion of the email communication (selected mailboxes).
Domain settings in the system
Into the system, you enter the settings for a third-level email domain (e.g., INSTANCENAME.atollon.com), for which only selected email mailboxes are created. On the primary email server (at the current email service provider), email forwarding is then set up for individual mailboxes from mailbox@company.com to mailbox@company.atollon.com.
Sending messages
After creating the mailboxes, it is advisable to change the sender's identity within the Atollon system. Instead of mailbox@company.atollon.com, it is recommended to set it to mailbox@company.com. For this to function correctly, the DNS records for the domain "company.com" must be updated—specifically, the SPF rule must be supplemented—see below.
SPF Settings
Just as when using Atollon as your primary email server, you must add the following TXT record to the DNS records of the "company.com" domain:
Recommended SPF settings:
Just as when using Atollon as your primary email server, you must add the following TXT record to the DNS records of the "company.com" domain:
Recommended SPF settings:
| 1 | v=spf1 mx include:spf.atollon.com -all |
If you also send mail from other servers, these must also be included in the SPF rules.
Example of what the record might look like when multiple mail providers are involved:
| 1 | v=spf1 mx include:spf.google.com include:_spf.mailprovider.sk include:spf.atollon.com -all |
How to set up forwarding of your email to Atollon
Office 365 Configuration Example
In the case of using Atollon as a secondary email server while utilizing Microsoft 365, it is necessary to enable forwarding to an external email address; a link to the instructions can be found (here). In the Admin Center, select Security. Then expand the Outbound spam filter policy (always ON) menu and click the Edit policy button. Here, you need to change the setting from the default "Automatic – system-controlled" to On – forwarding is enabled and Save the changes.
Forwarding at the Email System Level
At the email system settings level, it is necessary to set up automatic forwarding (auto-forward) for each mailbox whose messages are to be delivered to Atollon – for example, from the address thomas@company.com to thomas@company.atollon.com.
Set-Up Mailbox
The following guide will show you how to add or edit Atollon Mailbox.
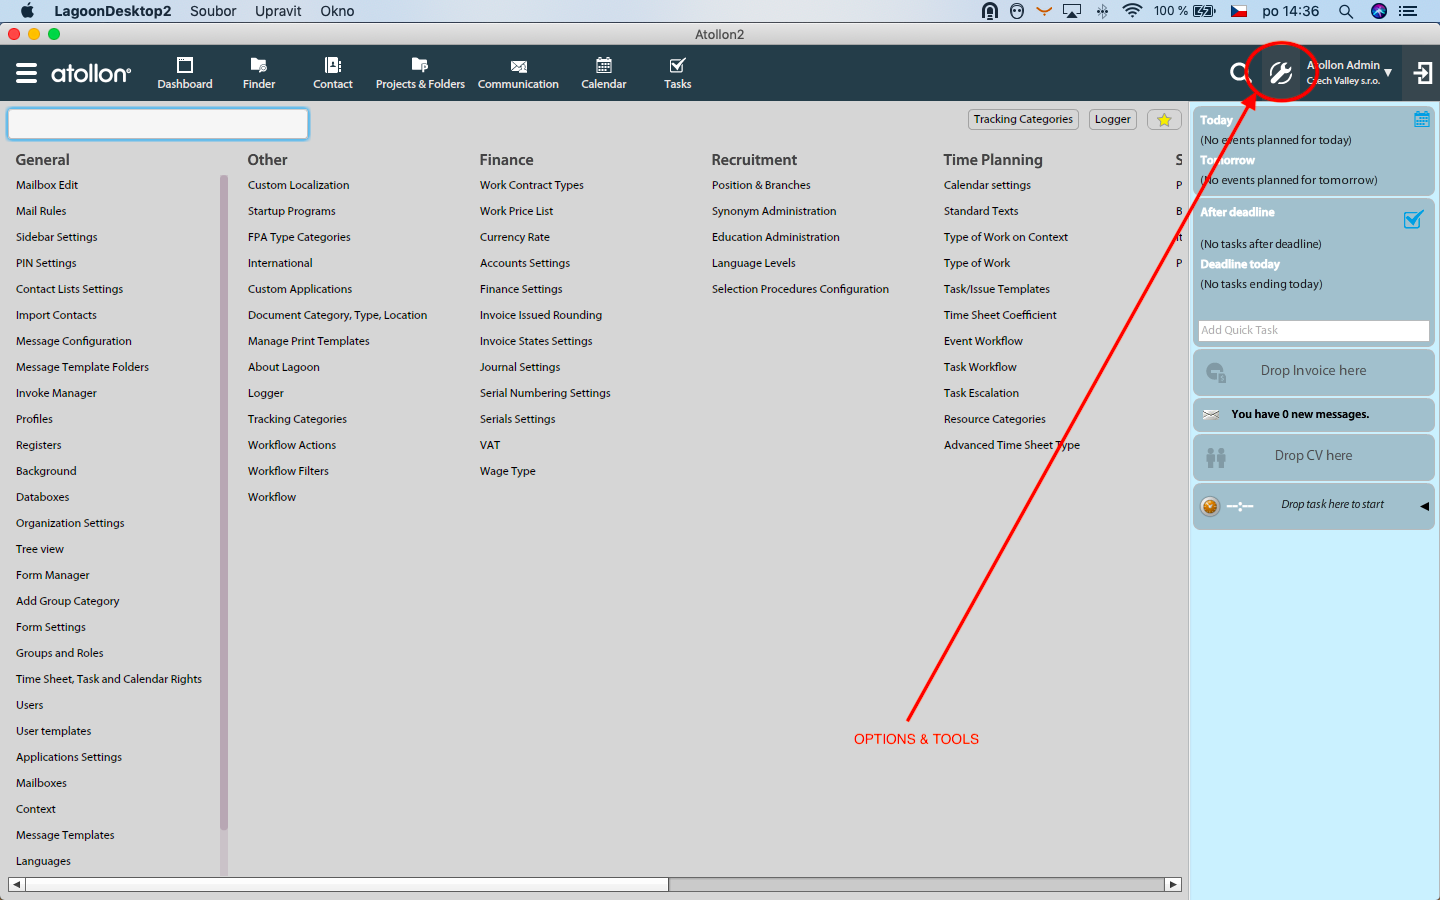
Open Mailbox Settings
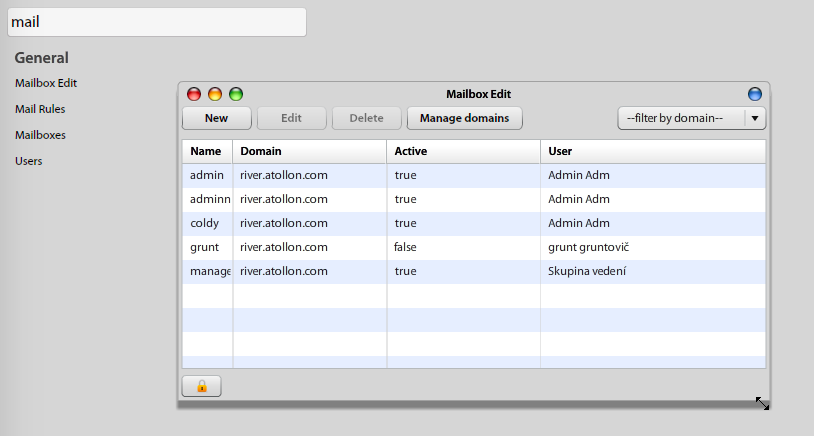
Open Options & Tools > and search for Mailbox Edit tool.
Create New Mailbox
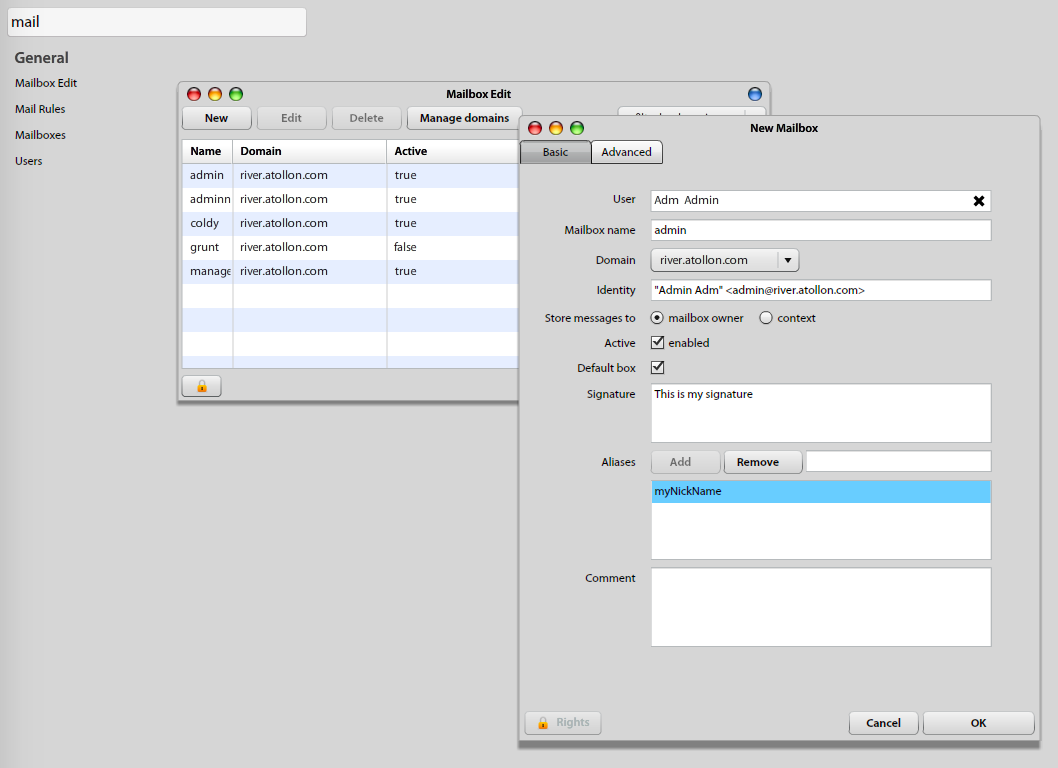
Edit Mailbox Settings
- E-mail name is the identification of Mailbox in the system and primary Mailbox name in the same time. This is the part that will be before "@".
- Domain is the mail server identification. This is the part that will be after"@".
- Identity is the default Mailbox owner's identity, when sending e-mails. Be careful, when changing this field and keep suggested syntax emailName@domain.
- Store messages to: you have option either to distribute new e-mail to user's individual message folder (To Do) or select any folder or project from contexts.
- Active (Yes/No): indicates whether Atollon receives mail on this address or not.
- Default box (Yes/No): indicates, whether this Mailbox is used first when sending new E-mail by the owner.
- Signature: fill-in owner's signature.
- Aliases: you can add more names to this Mailbox. Please note that Alias must not have the same name as some other existing Mailbox. Aliases are used only for receiving emails. You need to create new mailbox if you want to send mails with some other name. Aliases are always in same domain as the mailbox they are specified in. Do not write "@domain" part here.
Mailbox Advanced Options
- Auto - respond settings = it allows you to enable and set up automatic response when out-of office or unavailable
- Forward settings = it allows you to enable automatic forwarding of incoming e-mails (Allow forwarding), where you can choose Save forwarded option (all incoming messages will by saved in your mailbox, otherwise forwarded only); finally you can set up/ manage forward e-mail addresses.
Mailbox Access Rights
In Mailbox detail: Bottom left you may find access rights to each individual mailbox. Each user must have View & Edit rights to their mailbox in order to be able to:
- Use the mailbox
- Edit own signature in Mailbox Settings.
To set up user rights just push the Add User button and select the name of mailbox owner from the list, select appropriate user rights and commit changes by pushing Save button.
After you are ready, press Ok to save your mailbox settings. If Domain MX records are properly set, you should soon be able to receive new Mail.
Next Step:
If you have not done so, set-up your Domain MX records.
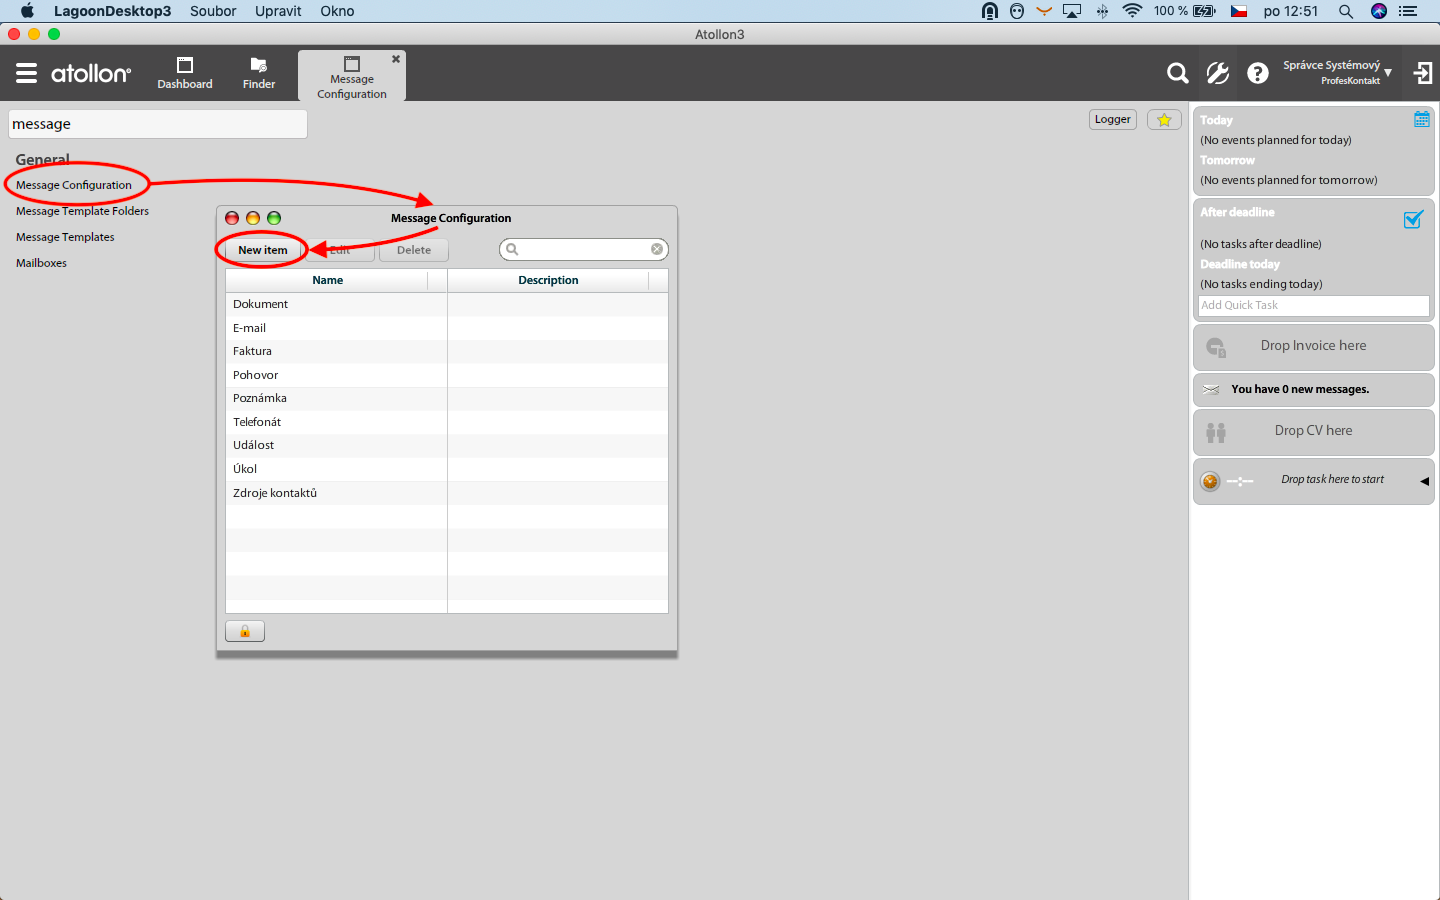
Message Configuration
Message Configuration options allows you to configure different message types as per your requirements.
1. Go to Options & Tools
2. Type "message" into the text field there, the application will filter only those settings relating to messaging
3. Choose Message Configuration option, in order to call for appropriate dialog
- create new item (new message type)
- edit existing item
- delete exiting item