Billing
- Billing Rules
- Billing Requests
- Draft Invoices
- Time Billing
- Project Budgeting
- Project Billing
- Work Pricing
Billing Rules
See the scheme below to find out how the Billing Rules convert billing sources (Time Sheet & Billing Items) into Draft Invoice.
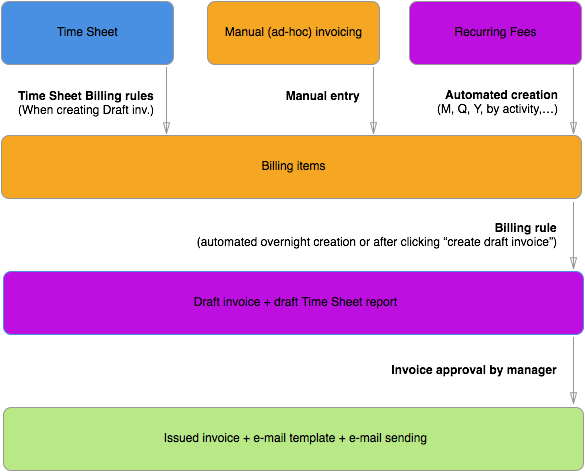
Each Billing Rule is a definition for one or more draft invoices to be created.
Billing Sources
Billing Items
The Draft Invoice is created automatically created from any Billing Items that are in For Approval or Approved status (Pending or Posponed/Canceled items are excluded).
Time Sheet Records
Any Time Sheet records that are in For Approval (Confirmed) or Approved states and are Chargeable at the same time are used for billing.
Free Quantity set-up in the same billing period & context (using Biling Items) is used as compensation and is deducted on fair rate principle from billed Time Sheet records.
Recurring Fees
Recurring Fees are created periodically based on the template set-up in Billing Options on client folder. You can set-up Daily, Weekly, Monthly, Quarterly or Yearly recurring fees to be automatically created when the period occurs.
Fees may also be automatically created, when new Activity is created. Activites may be created manually (when order for the service happens) or (using module Workflow) you can create Activity on the Project automatically (every month, quarter, etc.).
Billing Rule Priorities
Billing Rules are executed based on prioritization of the order of Billing Rules.
Custom Rules (on client's folder detail) are always considered higher priority than general Billing Rules, set-up for the whole organization.
You can set individual Billing Rule priority. Use arrows (>) or (<) to set order of the Billing Rule execution.
Billing Period
Draft Invoices are prepared automatically based on billing sources for last 2 years.
Any period
The Draft Invoice is created whenever there is something to be invoiced. Only one invoice is created for the whole period (automatically last 2 years of billing sources).
Weekly, Monthly, Quarterly, Yearly
The Draft Invoice is created in any of the above periods, one invoice for each period. The transaction (tax) date is always set to the end of the period.
Quarterly 2, Quarterly 3
The quarter is calculated starting 2nd month in the calendar quarter or 3rd month. Ie for Quarterly 2, the II. Q. starts May and ends July.
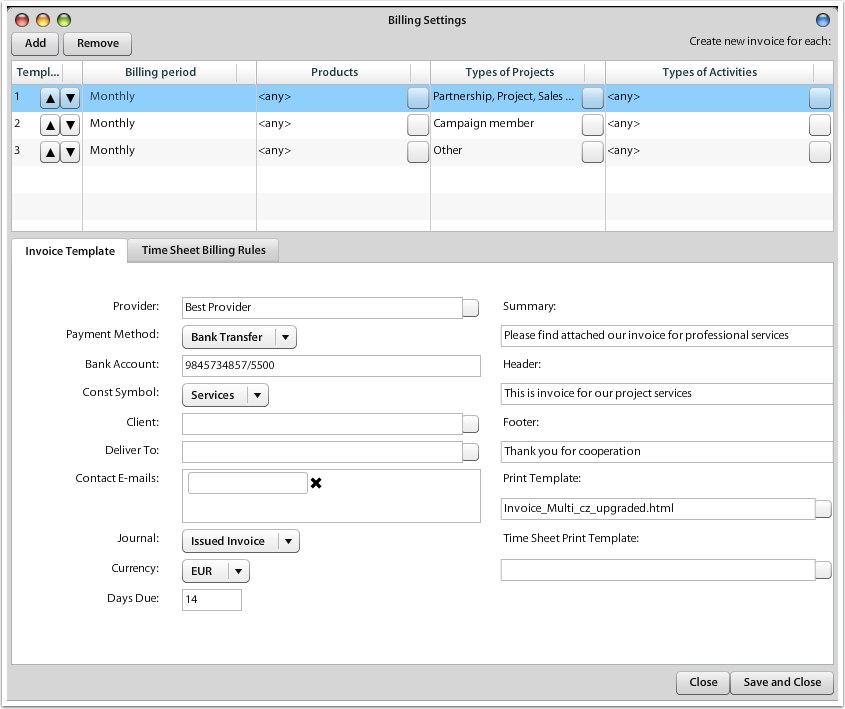
Billing Context
Billing Context rule for grouping Billing Sources into one or more invoices.
| Column | Options |
|---|---|
| Template Number | Move priority of the Billing rule using buttons (up,down). 1st row is executed first. |
| Billing Period | Yearly, Quarterly, Quarterly 2, Quarterly 3, Monthly, Weekly, Any Period |
|
Projects (not in Default Billing Rules) |
Any project |
|
Activities (not in Default Billing Rules) |
Any activity Selection of multiple activities Each activity |
| Products | Any product Selection of multiple products |
| Type of project | Any type of project Selection of multiple types of projects Each type of project |
| Type of activity | Any type of activity Selection of multiple types of activities Each type of activity |
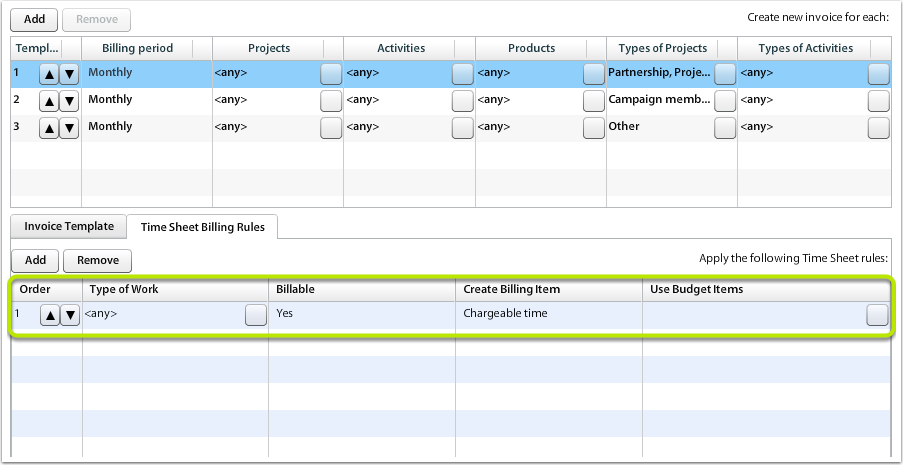
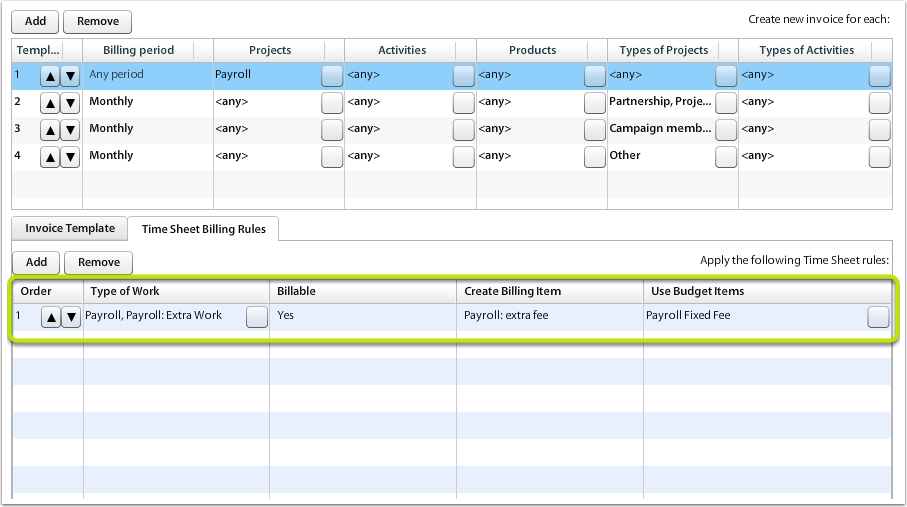
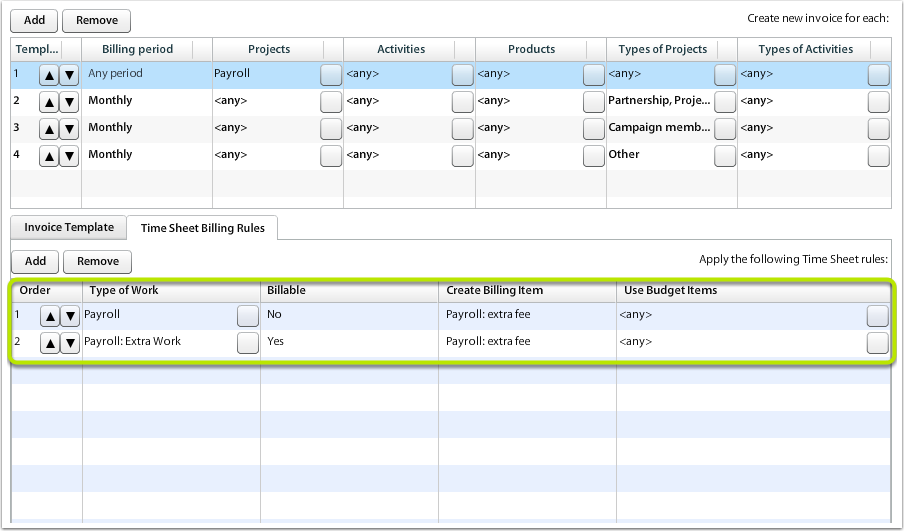
Time Sheet Billing Rules
Rules for grouping Time Sheet records into Billing Items, identifying also whether the work performed under selected Type of Work should be billed at all. You can also define whether any agreement on "Free Hours" compensation should apply.
- Order - defines order of rule execution. Column order contains two buttons with arrows Up and Down, which increases or decreases the order value
- Type Of Work - select Types of Work that are grouped together to create Billing Item
- Billable - Yes / No - set whether the Time Sheet will be billed or not. In case the recores are set to Billable = No, but at the same time the work is set to Chargeable (on Time Sheet record), the work time is compensated with any Free Hours agreed.
- Create Billing Item - mandatory field that sets Product (or Service) that should be entered into new invoice when charging Time Sheet.
- Use Budget Items - select where we should look for Free Hours. Free Hours is any "Free Quantity" set in the same Billing Context. Because there might be more different Billing Items (Products or Services) that contain Free Quantity, you have an option to select just the corresponding Product or Services (in such case compensation for Free Quantity in other Billing Items defined in the same Billing Context is avoided)
Budget items are any Billing Items that contain "Free Qty" value (and Status is not 0, Postponed, Canceled).
Free Hours Compensation
If you select the option to Use Budget Items to <any> or you select some Products that should the system use when looking for Free Quantity available (in Billing Items), the process of calculating billable time takes available free quantity in consideration.
If there are more rates (Unit Prices) in Time Sheet records used, the system calculates fair value of the rate & consumes No. of hours accordingly. The fair value is calculated as weighted average of rates.
Calculating total free hours
Based on each time sheet billing rule, calculate free quantity available. That means sum all free quantity value of Billing Items for period & context defined by the Billing Rules (avoid using 0, canceled or postponed status items) and deduct any free quantity that has been used already during the process of allocating free quantity to Time Sheet records.
During allocating free hours, note the quantity that has been used already, so the max. total free quantity allocated to time sheet records does not exceed the total free quantity available.
Fair-based allocation of free hours to time sheet
Time Sheet Billing Scenarios / Examples
General Scenario
General scenario, how the billing item is created from time sheet is:
- User enters Time Sheet, that is in confirmed state (Pending Time Sheets are not entered into Billing Items). This Time Sheet can be chargeable or non/chargeable
- Cost / Revenue rates are entered automatically into Time Sheet records using Work Price List
- All Confirmed or Approved Time Sheet records that are Chargeable will be entered into Billing Items
- Created Billing Items entered into Draft Invoice, which after approval converts to new invoice automatically.
There can be usually few situations, which you want to set. They are described in the following text, where you can find the situation, the setting of Time Sheet Billing Rules and the result description.
All work is billable
Put all chargeable time sheet into invoicing (no matter whether there is any remaining budget).
| Rule | Value |
|---|---|
| Type of work | All |
| Billable | Yes |
| Create Billing Item | Use default billing item settings |
| Use Budget Items | (none) |
Result
Any time sheet will be invoiced => Billing Item will be created, based on Type of Work to Billing item settings.
No work is billable
The company has budget limit, which can not be exceeded. No work that is entered into time sheet is billed (no matter what is the "chargeability" status).
| Rule | Value |
|---|---|
| Type of work | All |
| Billable | No |
| Create Billing Item | Use default billing item settings |
| Use Budget Items | Any |
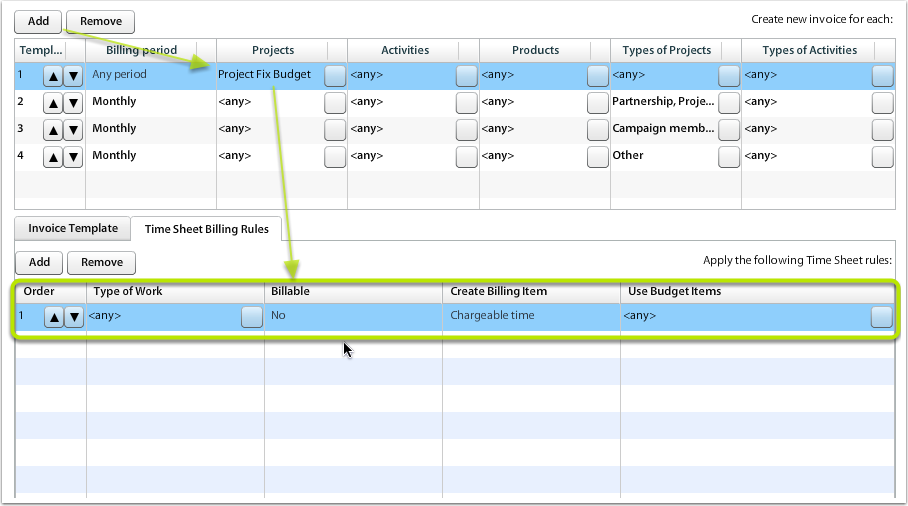
Result
Any time sheet will be entered into billing items, but witout charging any value (that is the resulting Billing item Unit Price = 0). Any free quantity from billing items will be used to pay for the time sheet hours, but if there is any remaining hours to be charged, they won't be charged (but the Billing Item with Qty = X will be created, where X is the remaining calculated hours after deducting Free qty).
Part of the work is covered by budget
Some types of work are not billable, some are billable, but the budget of Free Quantity is used.
| Rule | Value |
|---|---|
| Type of work | Multiple ToW selected |
| Billable | Yes |
| Create Billing Item | Use particular item: "Extra work: payroll" |
| Use Budget Items | Use budget item(s): Payroll Services, Payroll Fixed Fees |
Result
Any time sheet that belongs to selected ToW is entered into Billing Items, with compensation by existing Free Quantity in Billing Items: Payroll Services or Payroll Fixed Fees. New item is created as "Extra work: Payroll".
Part of the work is not billable
Some types of work can not be charged to clients.
| Rule | Value |
|---|---|
| Type of work | Multiple ToW selected |
| Billable | No |
| Create Billing Item | Use default billing item settings |
| Use Budget Items | Any |
Result
Type of work that is set as not billable can not be invoiced, but may (or may not: based on settings) consume any Free qty that is available.
Some work that is always billable
Some types of work will be billed, not compensating any availble budget. This work is usualy out of agreement, so it could be billed as extre work.
| Rule | Value |
|---|---|
| Type of work | Multiple ToW selected |
| Billable | Yes |
| Create Billing Item | Use "Extra work" billing item |
| Use Budget Items | (none) |
Result
Type of work will be billed separately from other time sheet records. Will not compensate any budget available. Selected billing item will be used.
Billing Requests
Main source of data for billing are Billing Items. They represent any service or product to be charged in period of Billing Date to the client.
Billing Items are used to charge mainly the following products / services:
- Any budgeted items (items converted from Estimates approved by clients)
- Recurring Fees (fixed charges that are generated by Recurring Fee template)
- Ad-hoc product or service billing (manually added Billing Item record)
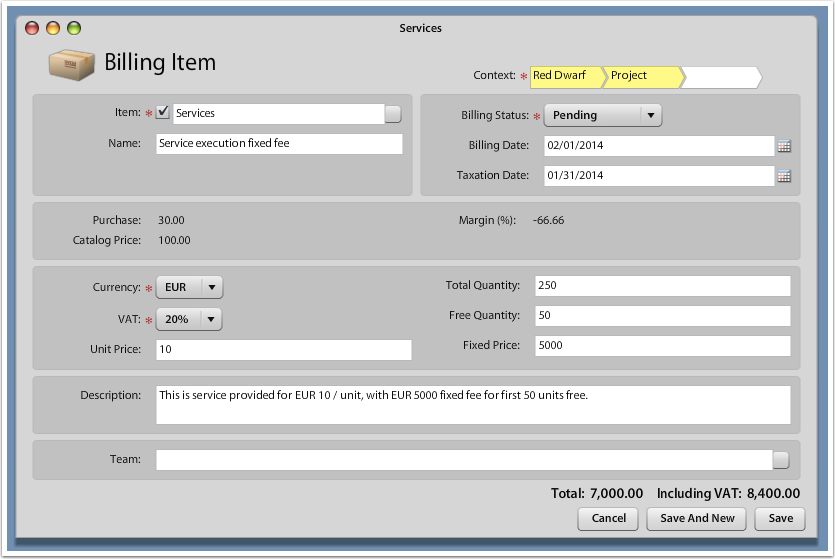
Billing Item fields description
| Field | Description |
| Item | Any Product or Service. You may add or edit their properties in application "Products" |
| Name | More specific summary of the product or service provided (by default it's the name of the product or service) |
| Context | Client or project, where the billing item belongs to |
| Billing Status |
If Pending then it's NOT automatically entered into Draft Invoice If For Approval then it is automatically entered into Draft Invoice For Posponed & Canceled, the Billing Item won't be charged |
| Billing Date | Defines Billing Period, in which the Billing Item should be entered into Draft Invoice |
| Taxation Date | Any date, which should appear on Invoice as Transaction / Tax Date |
| Currency | Currency, in which the Unit Price and Fixed Price are set. The Draft Invoice will be created in target currency that is defined in Billing Rules. If currencies are not equal, last valied Exchange Rates will be used to calculate the value of Billing Item in target currency. |
| VAT / Tax | Tax rate to be added on top of the price. |
| Unit Price | Any rate for each of the units that are paid. Paid units are excess of Total minus Free Units. |
| Total Quantity | Actual number of units that were provided to client. |
| Free Quantity | Any number of units that are provided for free or they are included in Fixed Price. |
| Fixed Price | Any value that is charged no matter how many Units were provided to client. |
| Description | The text that will be entered into the transaction on Invoice. |
| Catalog Price | Product Unit price coming from Product default price settings. Usually Catalog Price - Unit Price is provided discount. |
| Tracking Categories (Team, Org. Unit,...) | Default assignment of the revenue for the Billing Item to the tracking category (may be overriden by controlling allocation scheme in management accounting). |
Recurring Fees
Recurring fees may be entered as template for creating Billing Items regularly.
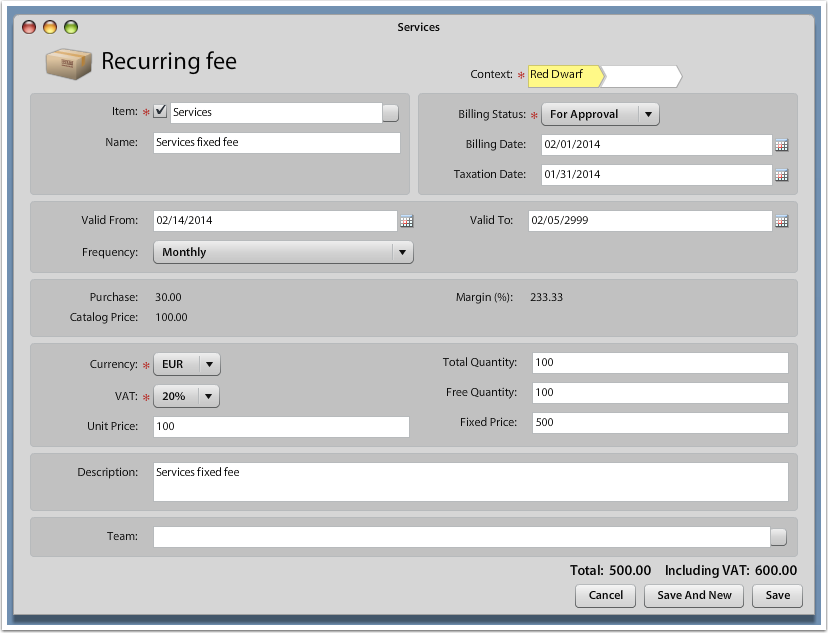
There are the following intervals, in which Billing Items are created based on the Recurring Fees set-up:
- Daily
- Weekly
- Monthly
- Quarterly
- Yearly
- On activity create
The Billing Item is created in any interval from Valid From or Billing Date fields based on frequency or once during creation of the Activity.
The Tax Date is set in relative distance to the Billing Date. So if you want the Tax date being previous month to the Billing Date, set it accordingly.
Please note that selecting Project in Context field is required.
In case you want the Billing Item created based on Recurring Fee to enter Draft Invoice immediately, set it to either For Approval or Approved Billing Status.
Draft Invoices
Draft Invoices Approvals
Draft invoices are generated automatically (overnight) to help you get idea about your current invoicing to be sent to your clients.
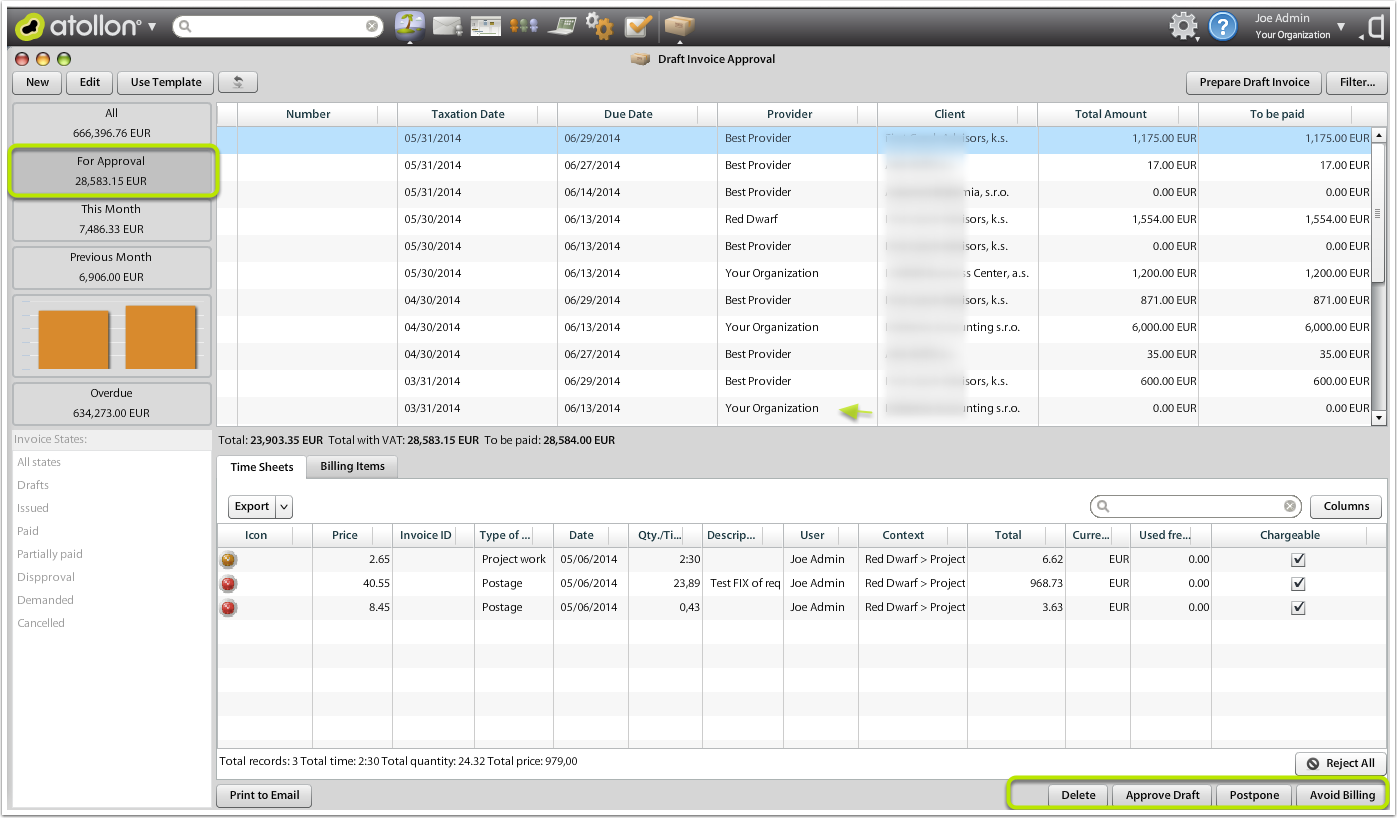
Using quick filter "For Approval" you can display only invoices that need your attention. These invoices are still pending to be approve & sent to your clients.
Print to Email
This function will take all Billing Settings and prepare new E-mail with 2 attachments: Invoice (or Draft Invoice) printed to PDF + Time Sheet attachment in case the Invoice is partially built using Time Sheet entries. You have option to send the invoice as Draft or you can approve & send the invoice immediately.
Delete
You can delete any Draft invoice without any worry that you would get lost some of the entries. Billing entries (such as Billing Items or Time Sheet / Expenses) are not deleted. After deleting the Draft Invoice, you can press on button "Prepare Draft Invoices" and the invoice will be created again based on new Billing entries.
Approve Draft
When approving the Draft Invoice, all Billing entries get locked and Draft Invoice will convert to regular Invoice & get Invoice Number. Invoice numbers are reused in case you delete some of the (unwanted) invoices.
Postpone
The Draft Invoice in this case is deleted and all Billing entries change status to Postponed. Once you want to use Billing entries again, you'll need to filter for postponed Billing Items or Time Sheet records and change their status back to For Approval or Approved. In this case they'll be used to create new Draft Invoice.
Avoid Billing
The Draft Invoice in this case is deleted and all Billing entries change status to Avoid Billing or Canceled. These Billing entries will not be used to generate another Draft Invoice.
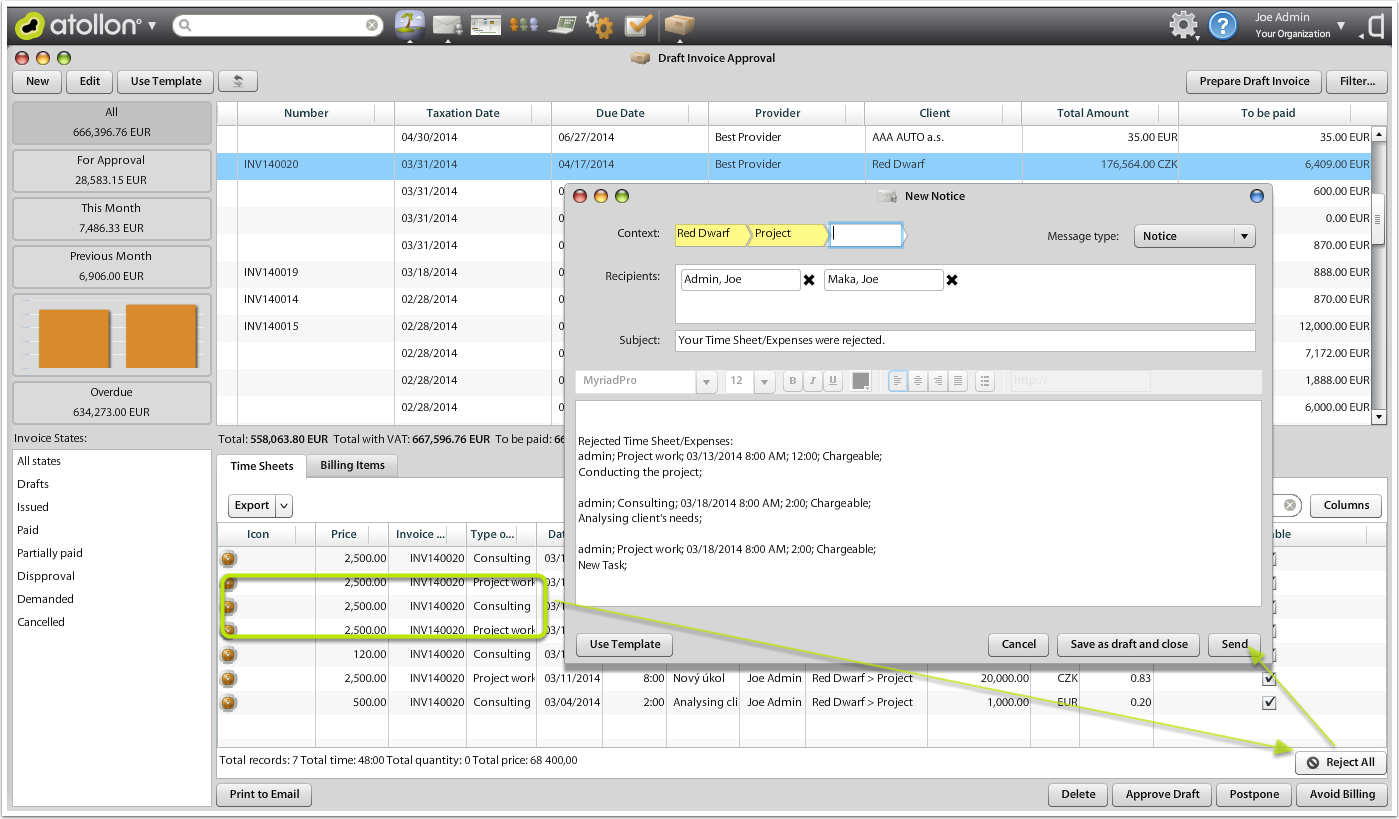
Time Sheet Approvals
When approving Draft Invoice, all Time Sheet entries that come with the Draft Invoice are approved immediately as well.
Reject Time Sheet Entries
You can individually Reject Time Sheet entries from the Draft Invoice. Simply open the Draft Invoice approval window (or Draft Invoices tab on client's Folder), then select some of the Draft Invoices that have been created using Time Sheet entries. Select the Time Sheet entries you want to revise & click on Reject button bottom right to the Time Sheet records list.
The application will open New notice message, where you may want to write reason for refusing the Time Sheet entries. Users may find the Time Sheet entries by filtering their Time Sheet for status Pending.
Time Billing
Work Contracts
Work contracts are used to set several financial, management accounting & time sheet valuation criteria for user's employment / work relationship with the Organization.
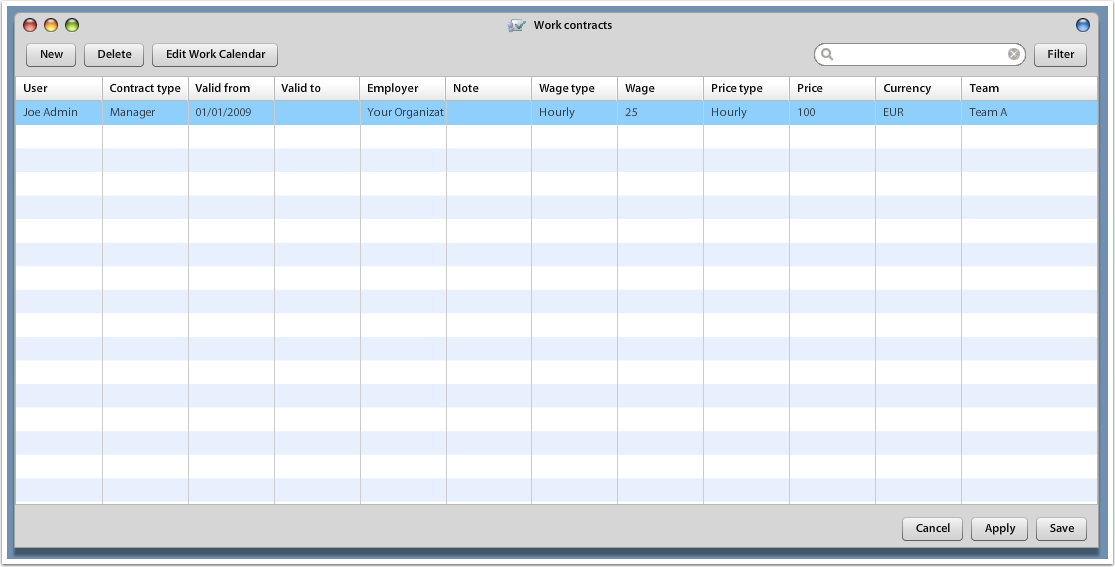
Each worker (user) should have VALID work contract in case you want Time Sheet Valuation & Capacity Planning to work properly.
Time Sheet Valuation
It is necessary to set-up Work Contract in case you want to add rates to User's Time Sheet records automatically. Please note that Work Price List set-up on Project or Folder (Client) level for either wage (internal rate) or price (external rate) has higher priority than the Work Contract.
Please do not forget to enter all values, specifically:
| User | Select the worker (must be system user, even without access to system) |
| Contract Type | Select the role for pricing (seniority or formal relationship with the worker) |
| Valid from | When is the contract valid from (required criteria) |
| Employer | Select who's the worker's contractor. If the worker is self-employed, just keep the Organization name. |
| Wage type | Select the type of internal costs. In case you want to use this criteria for estimation of labour costs, keep it Hourly rate. |
| Wage | Add the value of (hourly) rate |
| Price type | Set what's the type of rate (usually hourly would be used, it does not have direct effect on billing in case the contract with client is set-up differently than time-based billing) |
| Price | Add the value of (hourly) rate |
| Tracking Category 1, 2, 3 |
Other columns may represent your system settings of Tracking Categories, ie Cost Centre, Organization Unit, etc. This value is automatically entered to User's Time Sheet record. |
Create Work Calendar
This feature is required only once you want to use Resource Management / Capacity Planning application.
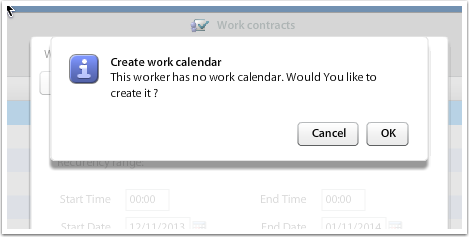
Click on user's work contract & press Edit Work Calendar button. In case no previous calendar was created, application will offer you creation of the new work schedule.
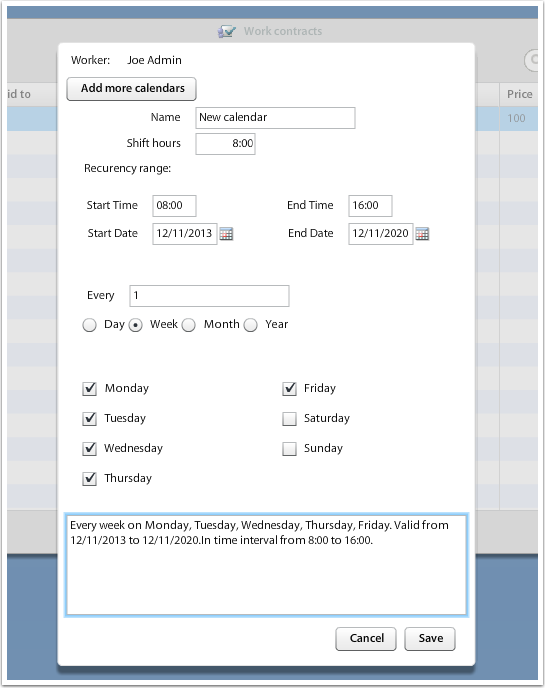
You can add more calendars (as many as you need) in case the worker has more difficult work schedule.
Project Budgeting
There are two ways project budget may be assigned:
1.) Ad-hoc (ie coming from contractual agreement)
2.) From approved Estimate
We are going to discuss both options below.
Open or create Project

There are many ways you can create new or open existing project. Some of the options are:
1.) Finder (browse Folder type > Folder > Project
2.) Projects & Folders application (Lagoon > Projects & Folders)
3.) Report results (open / run any report, in report results you should be able to open the project)
4.) Projects overview on client detail (select any client > show Projects & Subfolders Tab)
To create new project, you may use Finder (for instance) or client's detail on tab Projects and subfolders (as shown above).
Add new Billing Item
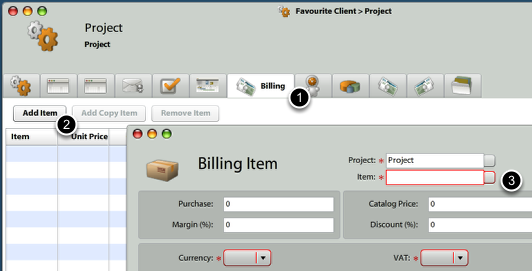
When creating project budget ad-hoc, you start adding your budget on project Billing tab.
By adding new Item in project Billing, you create project budget.
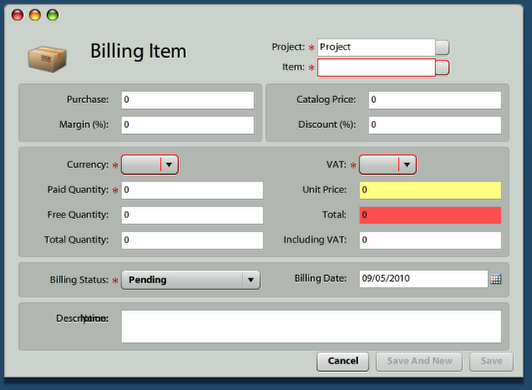
Enter the Billing Item details
The Item is selected from your items database. Your items might be regular ware, material or other goods, or you may add services like consulting, design or support.
Top part of the Billing Item is used to calculate resulting item price. There are two options;
a) Calculate price from Purchase Price, adding a margin
or
b) Calculate price from Catalog Price, using discount
In both ways, the resulting item price goes to Unit Price field.
The mid part of the form is used to add details for the Billing Item, eg. Total Quantity minus Free Quantity = Paid Quantity.
Paid Quantity * Unit Price = Total.
Total * VAT = Including VAT
The bottom part of the form is used to set Billing Status & Date. Use these fields, once you want to directly add this item for billing to client. If not, use the Billing Date to set the date, in which the item is expected to be billed.
Add the budget from Estimate
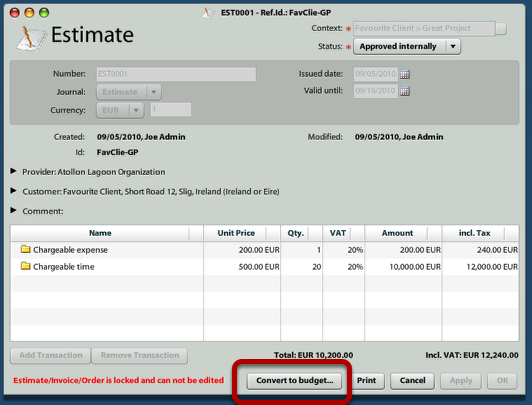
First open the Estimate, which is the winning proposal to your client. Go to Lagoon > Estimates > open any Estimate.
The Estimate must be approved, once it should be converted to budget. To approve Estimate, open it and press Approve button.
Once the Estimate is approved, you can press Convert to budget... button to select the project, on which budget (coming from Estimate) should be assigned.
Assign the Estimate to proper project(s)
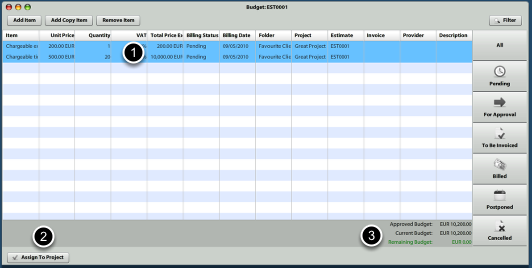
Once you press Convert to budget... button, the above mentioned form for assigning the items coming from Estimate to project(s) is displayed.
1.) Select any item(s)
2.) press Assign To Project button below to change the allocation of items to project(s)
3.) The overview below displayes, whether the whole Estimate value has been assigned to project(s).
Please note that only Estimate rows, which were selected from Items database, are converted to Budget. Billing Item is created only once Item is selected. If your Estimate contains rows, where Item was not selected, you can add any new Billing Item in the overview above manually.
Review assigned budget
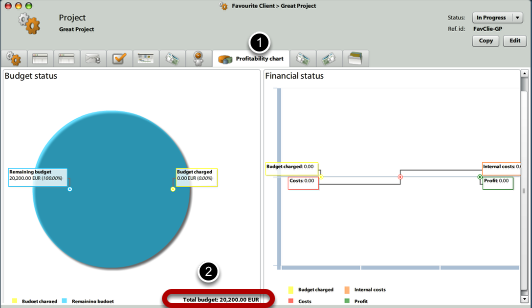
In order to get quick overview about project budget, open any project and show the Profitability Chart tab.
The first chart displays the Total Budget overview with indication, how much % was already billed.
Project Billing
In order to send invoices to your clients, you may collect source data for invoicing from Atollon Octopus Billing tool.
Billing tools allows Project Managers revise what Billing Items are ready to be billed and send them for billing.
Select what project Billing Items should be invoiced
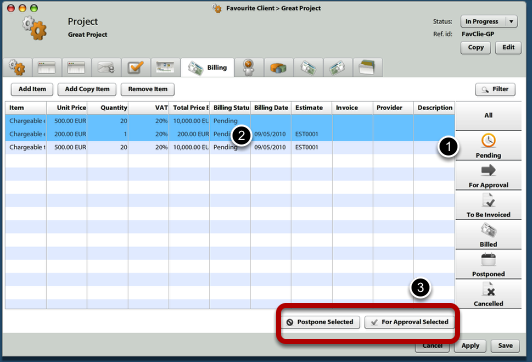
Once Project Manager finds out that some of the Billing Items should be invoiced, he/she should open the project, and:
1.) Select what Billing Items are Pending
2.) Select what Billing Items should be invoiced (or sent for Approval)
3.) Click on For Approval Selected (All) button
Approve Billing Items for invoicing
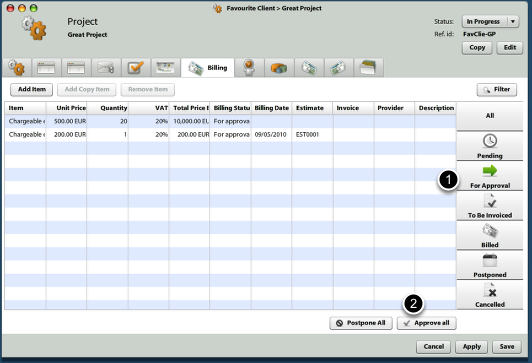
Revise whether project Billing Items are ok for invoicing. If they are, submit them to be invoiced.
1.) Select For Approval items
2.) Click on Approve all (selected) button
Invoice approved Billing Items: Open Billing
First open Billing application.
Billing application is used to revise and invoice Billing Items.
Invoice approved Billing Items: Select client / project
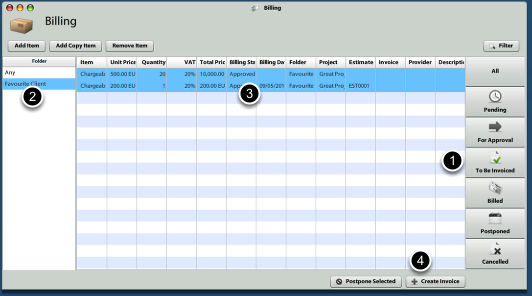
In order to select Billing Items for invoicing:
1.) Select To Be Invoiced button
2.) Select which client (folder) you would like to be invoiced
3.) Select all items you would like to invoice
4.) Press Create Invoice button
Revise & Submit the created Invoice
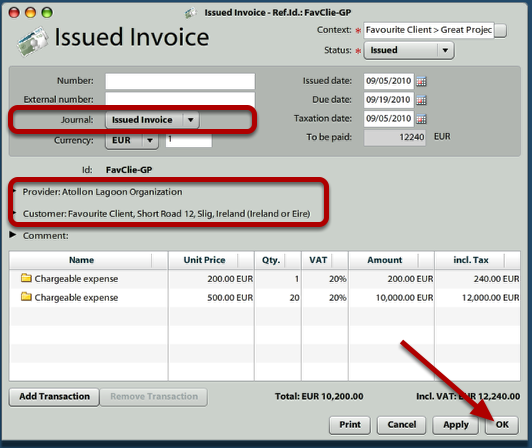
Once you clicked on Create Invoice button in previous step, new Issued Invoice is generated. You should revise all information pre-generated by the Billing tool.
Information such as invoice Journal, Provider and Customer may be automatically pre-filled differently based on Invoice Settings on project. Please see the step below to change these project Invoice Settings.
Once you click on Ok, the invoice is generated.
If you want to directly send / print the Invoice, press Print button.
Adjust project Invoice Settings
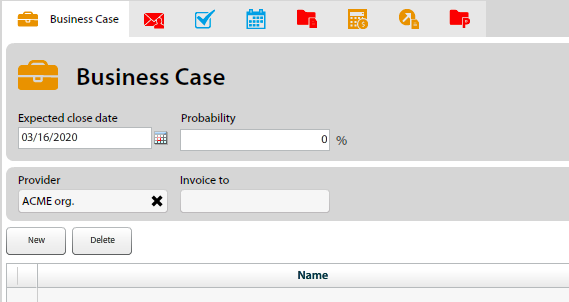
If you want to adjust Invoice Settings on particular project, open the "Deal" tab project and adjust Provider / Invoice to contacts. These are optionally allowed / disallowed in Layout settings of Project (in Context Settings).
Please note that these values may be also adjusted in Project Template settings to make creating & setting new projects easier.
Work Pricing
Work Price List
Work Price List is used to assign price or cost to Time Sheet records that represent work performed by Islander on given project or client.
Work Price List Details
Price List Validity
Each Work Price List may have different prices defined for given time period. You can (for example) create price list for this year and pre-set different prices for the next year. The advantage is that you do not need to change price list applied for all clients.
Work Price List is applied to project only once it's assigned to the project or it's parent folder (client).
Wage / Price
Wage is actual direct cost of work performed by Islander.
Price is agreed rate, in which the work performed by Islander is charged to clients.
Both Wage & Price are evaluated separately (in different circles). That means that if you do not set Wage on project (which is ussual), Trolls look for the Islander's cost at his/her Work Contract).
Wage Units
- Hourly
- Shift (fixed rate for one Time Sheet record)
- Weekly (only once per week)
- Monthly (only once per month)
- Yearly (only once per year)
Price Units
- Hourly
- Shift (fixed rate for one Time Sheet record)
- Weekly
- Monthly
- Yearly
- Percentage (Percentage * Wage * Cost Coefficient = Unit Price)
- Fixed margin (= Wage * Cost Coefficient + Fixed margin = Unit Price)
Work / Expense Price List
Price list may be used to enter prices for Time Sheet & Expenses. Each Type of Expense may have it's own unit price (per Unit / per Total / percentage added to cost).
Price List Types
Standard Price List
Standard price list if used as default price for project or client. Any change in Standard Price List affects new evaluation of Time Sheet records of projects based on this price list.
Custom Price List
Custom Price List may be entered individually on any project or client. When creating Custom work prices, you may use Standard Price List as default. For instance after opening tab Pricing on project, you may select Standard Price List and then switch to Custom Prices > this procedure will copy prices from Standard Price List and save them into project custom prices.
Time Sheet Valuation Procedure
Time Sheet record price is automatically filled-in once the Time Sheet is confirmed by the user or once there is Evaluation routine executed.
Valuation Constraints
There is certain procedure, in which Atollon Trolls find out what price should be applied for each individual Time Sheet record. Atollon Trolls are looking for first price that matches the following conditions:
- Is there valid price list available? (Price list has it's validity - Date From - To)
- Is the price list assigned to Project or Client? (The Work Price List must be assigned to either the project or client. If there is no price list for Project selected, price list for Client is used instead)
- Does Islander (who is the Time Sheet record owner) have a valid Work Contract? (User must have a Work Contract)
- Is there a price for Islander's Work Contract Type entered in the above Price List? (You must enter at least one row in the price list with Work Contract Type as required parameter)
- Optionally, is there a price for Work Contract Type + Type of Work entered? (If there is no specific price for Type of Work entered, the price for Work Contract Type is used)
If there is no price found, Atollon Trolls look at Islander's Work Contract whether there is chance finding the price / cost there. This is the last chance. If there is no price set-up in Islander's Work Contract, no price is automatically entered into Time Sheet.
Run Time Sheet valuation
Go to Time Sheet > select what records you would like to Evaluate (or Re-Evaluate) > Press the Evaluate or Re-Evaluate buttons below.