# Atollon Core
# Quick Start Guide
This is your quick start guide to Atollon. Explore. Do not get scared by deep forest :-)
#### Login to Atollon: Switch Language
Before the actual login, you may switch application language. Once you switch to your desired language of Atollon, you may refresh the browser (F5 under Windows) and actually login to Atollon.
If you want to change the language after login, you may use Options & Tools and search for "international":
[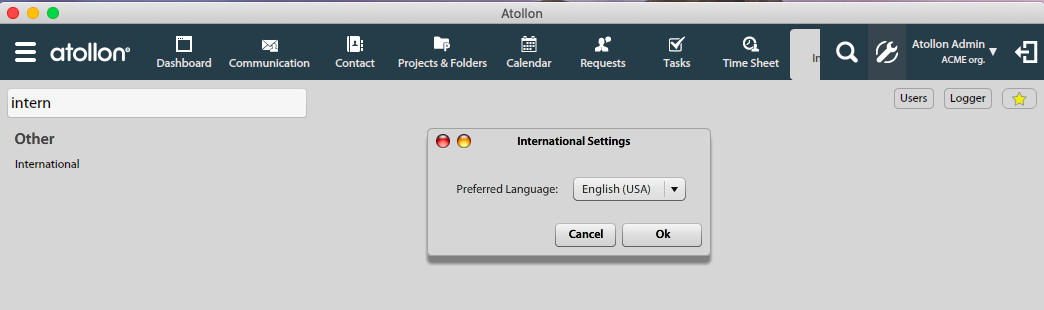](https://help.atollon.com/uploads/images/gallery/2020-03/quick-start-1-international.png)
#### Login to Atollon
[](https://help.atollon.com/uploads/images/gallery/2020-03/quick-start-2-login.png)
[](https://help.atollon.com/uploads/images/gallery/2020-03/quick-start-3-toolbar.png)
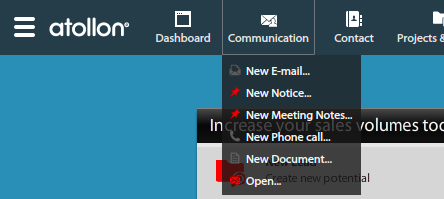
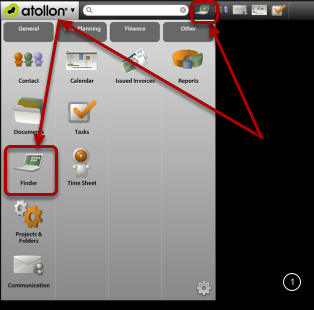
1. Atollon main application launcher is used to run other applications. Just hover your mouse over the button to see other applications.
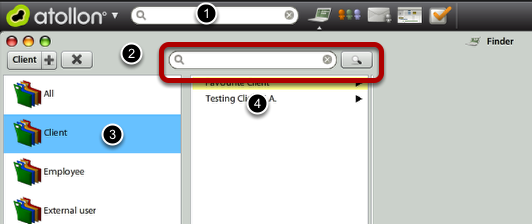
2. Atollon search bar looks for your existing folders (clients, partners, etc.) in Atollon.
3. Favourite applications help you quickly launch your most used applications and functions.
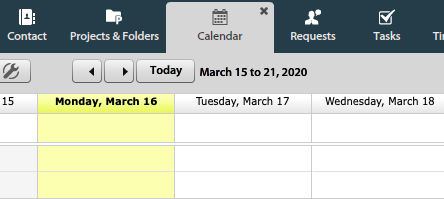
4. Opened applications provide you with access to currently running applications and opened windows.
5. Options & Tools menu provides you with access to administration of your Atollon.
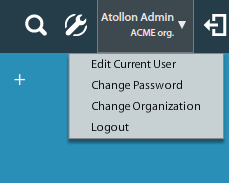
6. Your name & name of your organization, allowing you to logout/login or switch organization (in multi-org Atollon set-up).
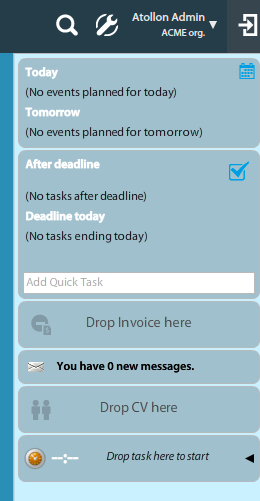
7. Sidebar open/close button.
#### Application Launcher
[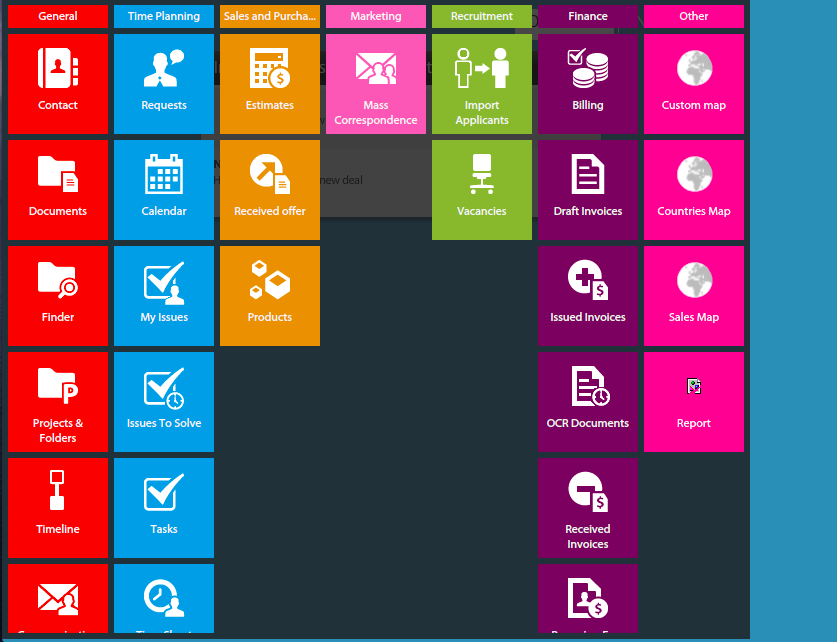](https://help.atollon.com/uploads/images/gallery/2020-03/quick-start-4-app-launcher.png)
[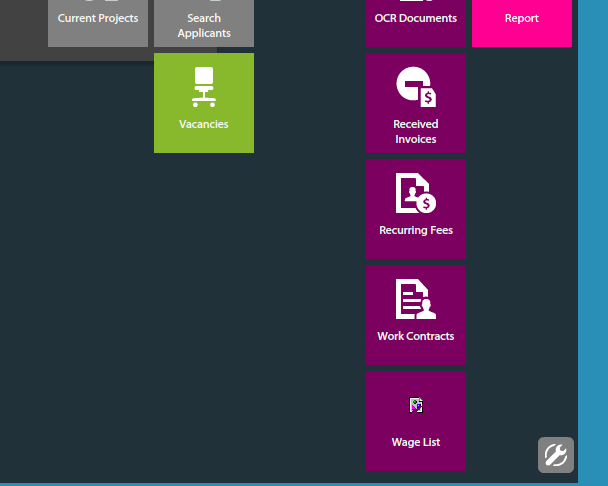](https://help.atollon.com/uploads/images/gallery/2020-03/quick-start-5-app-launcher-options.png)
[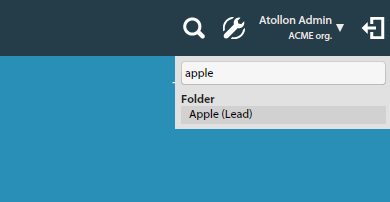](https://help.atollon.com/uploads/images/gallery/2020-03/quick-start-6-search.png)
[](https://help.atollon.com/uploads/images/gallery/2020-03/quick-start-7-favourites.png)
[](https://help.atollon.com/uploads/images/gallery/2020-03/quick-start-8-open-app.png)
[](https://help.atollon.com/uploads/images/gallery/2020-03/quick-start-9-personal-options-menu.png)
[](https://help.atollon.com/uploads/images/gallery/2020-03/quick-start-10-sidebar.png)
[](https://help.atollon.com/uploads/images/gallery/2020-03/project-new-1.png)
[](https://help.atollon.com/uploads/images/gallery/2020-03/project-new-2.png)
[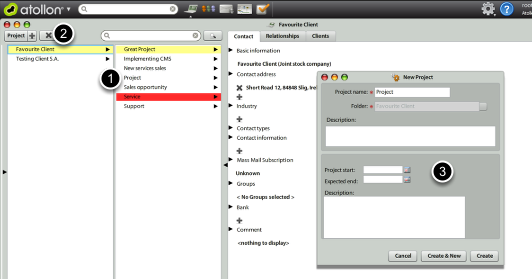](https://help.atollon.com/uploads/images/gallery/2020-03/project-new-3.png)
[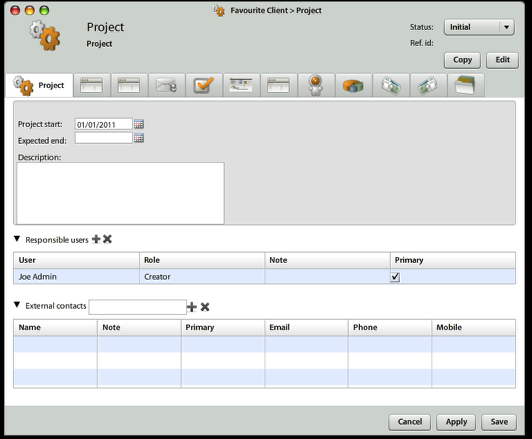](https://help.atollon.com/uploads/images/gallery/2020-03/project-new-4.png)
[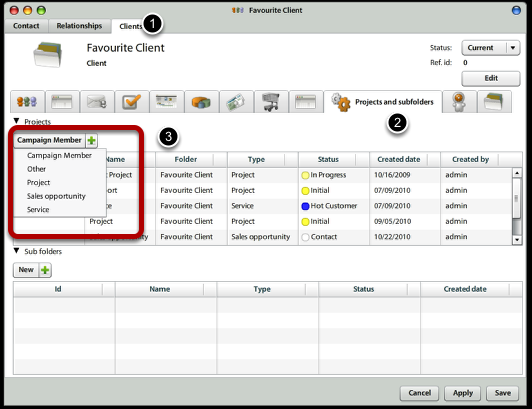](https://help.atollon.com/uploads/images/gallery/2020-03/project-new-5.png)
[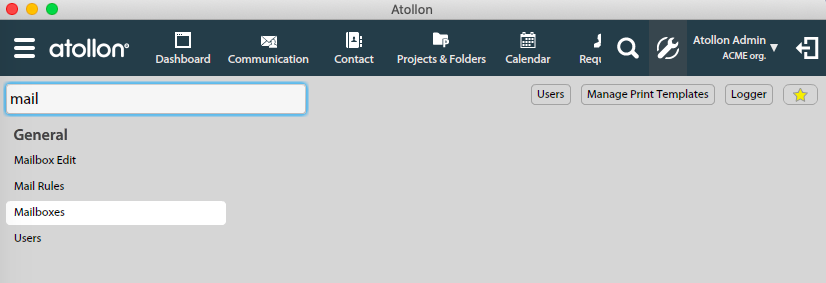](https://help.atollon.com/uploads/images/gallery/2020-03/mailbox-edit.png)
#### Allow Auto-response
[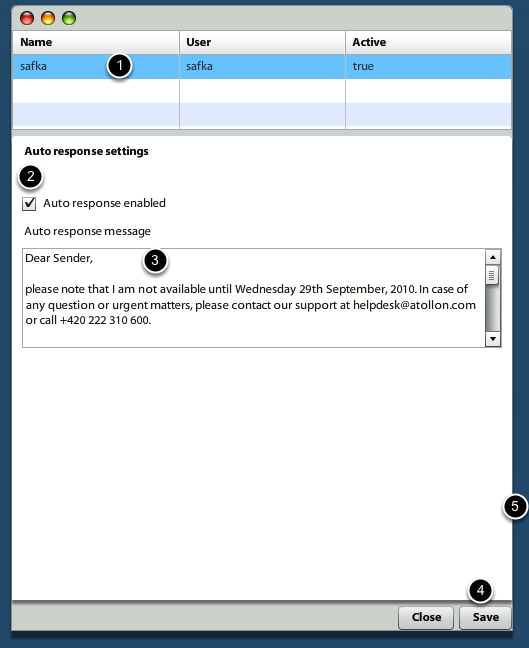](https://help.atollon.com/uploads/images/gallery/2020-03/mailbox-edit-autoresponse.png)
| SystemId | Description |
| com.atollon.messaging.issudedinvoicemail | template with message for mail with issuded invoice |
| com.atollon.messaging.invoicereceivedmail | template with message for mail with recieved invoice |
| com.atollon.messaging.orderissuedmail | template with message for mail with issuded order |
| com.atollon.messaging.orderreceivedmail | template with message for mail with recieved order |
| com.atollon.messaging.estimatemail | template with message for mail with estimate |
# Contacts
# Contacts Overview
## Contacts Main Window
Contacts are split to company and person within Atollon. You can create them separately, but it is possible to link person with company using contact relationships.
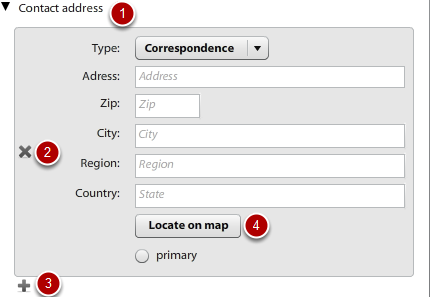
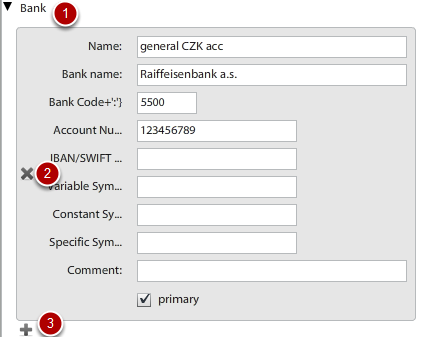
Contacts database is used to store primary contact information (e-mails, phone, mobile, social URLs, etc.), contact addresses (various types), bank account information and several other fields.
## Contact Types
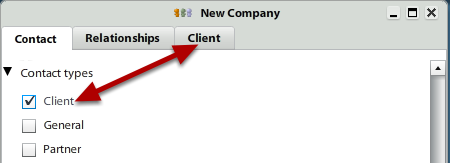
Once you set **Contact Type** information (client, partner, employee, etc.), new Contact Folder is created automatically in Finder. Contact Folder may contain additional information & functions based on Folder Type, for instance Form (with various custom fields), Messaging Tab, Calendar, Tasks, Projects & Folders, Time Sheet, Orders, Invoices and much more.
### Set Contact Type
Open any existing contact or create new, see the Contact Type section and select the appropriate contact type, such as:
- Client
- Partner
- Employee
- Supplier
- ...
You can also set Contact Type for multiple contacts at the same time using Drag & Drop function. Simply select more contacts and Drag & Drop them on displayed Contact Type (left panel in Contacts application).
### Un-set Contact Type
It is possible to un-set contact's Contact Type only by removing particular Contact Folder from Finder.
### Create new/Adjust Contact Type
It is possible to create / remove Contact Types using [Finder configuration](mks://localhost/en/user-manual/general/Finder/context-settings "en/user-manual/general/Finder/context-settings"). Simply remove or add Folder type in Context Settings.
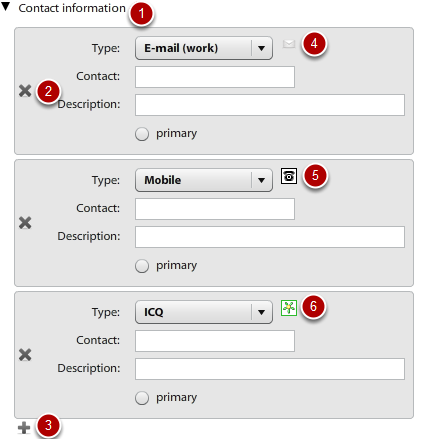
## Contact Information
Contact information is the basic e-mail, phone, mobile, Facebook account, Twitter account or LinkedIn account stored in connection with the contact (person or company).
It is possible to add more contact information records to each contact.
If there are more contact information records, one of them may be set as primary (for instance phone (work) from set of all phone numbers).
One primary contact channel (e-mail (work) for instance) may be selected for all contact information records.
### Contact Information Types Customization
It is possible to add/remove Contact Information from Atollon and in this way customize list of Contact Information, such as e-mail (home), e-mail (work), e-mail (other) for some other values.
Go to Windows Admin client > Settings > Contacts > Settings and select appropriate configuration list.
## Contact Groups
It is possible to add each contact (person or company) into one or more Contact Groups.
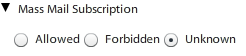
### Contact Groups & Mass Mail
The membership of the contact in Contact Group is used mainly to use Mass Mail functions. You can double-click the Contact Group in Contacts application and more details of the Contact Group may appear. It is also possible to allow/disallow sending the contact mass mail using the selected Contact Group this way.
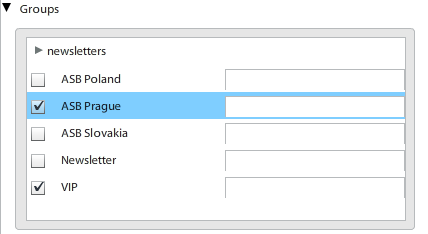
### Add Contact to Contact Group
There are more ways to do this task. One of them is simply drag & drop selected contacts into group displayed in accordeon on left panel in contacts database. Another is to open each contact individually and select appropriate checkbox in Contact Groups fields. Description may be added that associates contact with the Contact Group.
## Contact Relations
It is possible to link contacts together. There are the following relations available:
- person x company relations - indicates employer / employee relationship
- company x company relations - indicates two types of relations: equal level (partners) or master/slave level (mother / division)
- person x person relations - indicates two types of relations: equal level (friends) or master/slave level (superior / subordinate)
Person x company relations may have additional attributes, such as Position in company and Department, incl. some notes.
Contact relations are displayed in tree and you can browse contacts relationship tree into almost indefinite level, which helps to understand influence to your sales opportunities or clients and may help you build your referral business.
# Contact Groups
### Add Group Category
**Group Category** is container for storing several contacts (distribution) groups. It is particularly useful once you have too many contact groups.
#### Advanced
##### Access Rights
Only authorized users may add new Group Category. The rights are defined in Atollon Directory, where you can find the default Access Rights Node at: Root > Organization Folders > Contacts Controller > Distribution Group Category.
# New Contact in Detail
#### Person vs Company
## [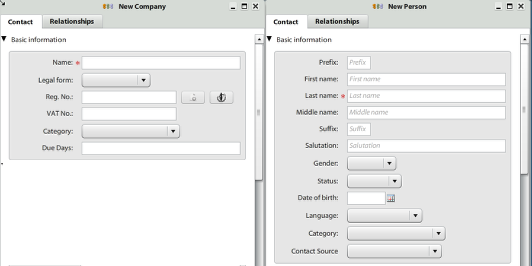](https://help.atollon.com/uploads/images/gallery/2020-03/contact-new-1.png)
##### New company
**Legal form** - eg. Inc., s.r.o., a.s. ...,
**Reg. No.** - it's company registration number,
**VAT No.** - it's company VAT number,
**Category** - most simplest categorisation,
**Due Days** - it's number of days when the invoices are in due.
##### New person
**Prefix**
**Fist name**
**Last name**
**Middle name**
**Suffix**
**Salutation** - this field will be transfered on e-mails while using the ${SALUTATION} tag in e-mail template. See the section ${wiki:EmailTemplating}
**Gender**
**Status**
**Date of birth**
**Language**
**Category** - most simplest categorisation,
**Contact Source** - where we get this contact (should be modified) - eg. web, newspaper, friend, competitor ...
#### Industry (only for new company)
[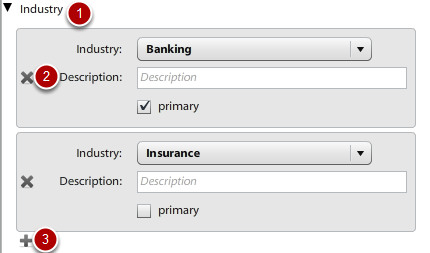](https://help.atollon.com/uploads/images/gallery/2020-03/contact-new-2.png)
[](https://help.atollon.com/uploads/images/gallery/2020-03/contact-new-3.png)
[](https://help.atollon.com/uploads/images/gallery/2020-03/contact-new-4.png)
[](https://help.atollon.com/uploads/images/gallery/2020-03/contact-new-5.png)
[](https://help.atollon.com/uploads/images/gallery/2020-03/contact-new-6.png)
[](https://help.atollon.com/uploads/images/gallery/2020-03/contact-new-7.png)
[](https://help.atollon.com/uploads/images/gallery/2020-03/contact-new-8.png)
[](https://help.atollon.com/uploads/images/gallery/2020-03/contact-new-9.png)
[](https://help.atollon.com/uploads/images/gallery/2020-03/contact-person-employments.png)
[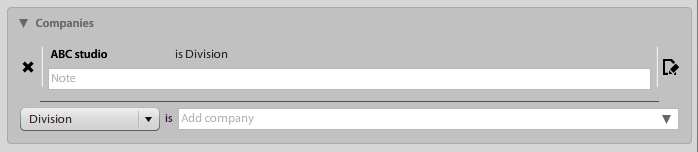](https://help.atollon.com/uploads/images/gallery/2020-03/contact-company-related.png)
[](https://help.atollon.com/uploads/images/gallery/2020-03/contact-new-10.png)
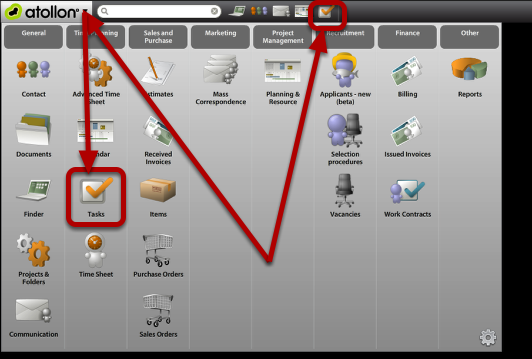
[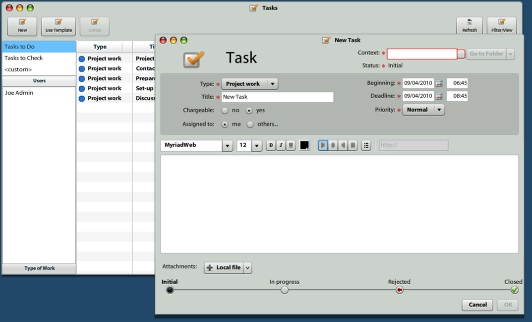](https://help.atollon.com/uploads/images/gallery/2020-03/task-new-1.png)
[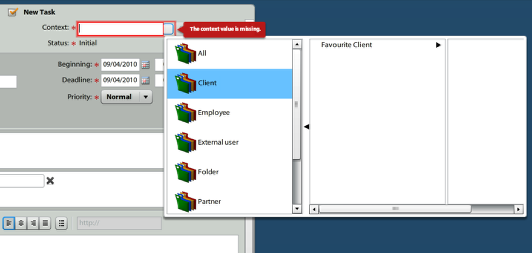](https://help.atollon.com/uploads/images/gallery/2020-03/task-new-2.png)
[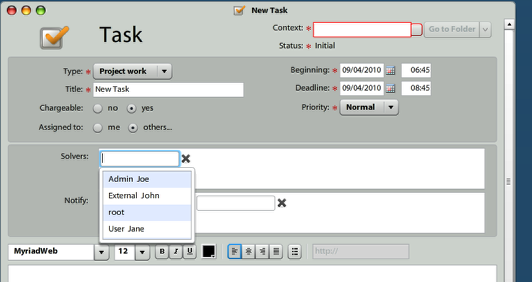](https://help.atollon.com/uploads/images/gallery/2020-03/task-new-3.png)
[](https://help.atollon.com/uploads/images/gallery/2020-03/task-new-4.png)
[](https://help.atollon.com/uploads/images/gallery/2020-03/task-new-5.png)
[](https://help.atollon.com/uploads/images/gallery/2020-03/task-new-6.png)
[](https://help.atollon.com/uploads/images/gallery/2020-03/task-new-7.png)
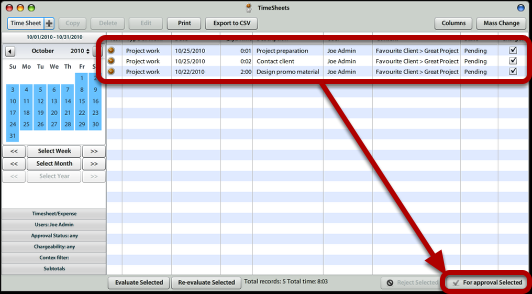
[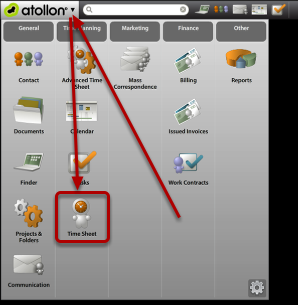](https://help.atollon.com/uploads/images/gallery/2020-03/time-sheet-new-1.png)
[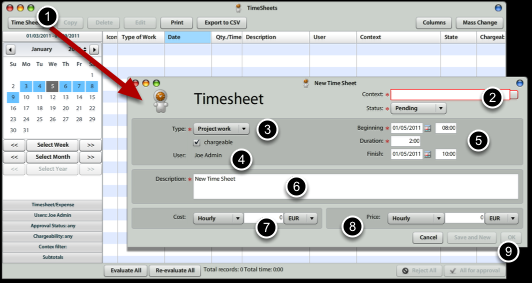](https://help.atollon.com/uploads/images/gallery/2020-03/time-sheet-new-2.png)
[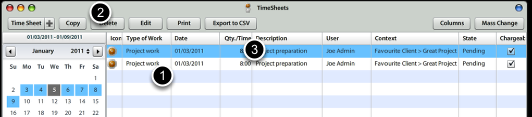](https://help.atollon.com/uploads/images/gallery/2020-03/time-sheet-new-3.png)
[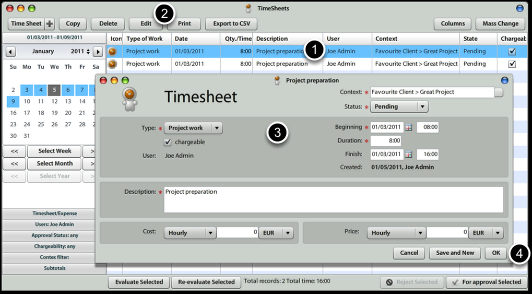](https://help.atollon.com/uploads/images/gallery/2020-03/time-sheet-new-4.png)
[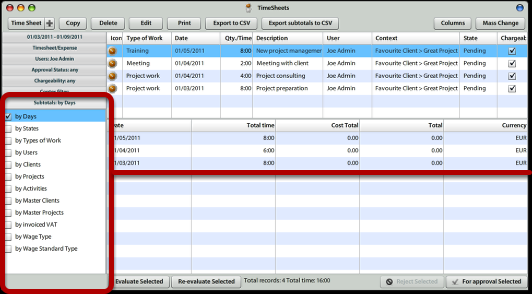](https://help.atollon.com/uploads/images/gallery/2020-03/time-sheet-new-5.png)
[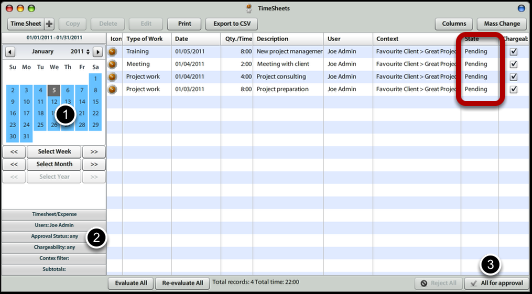](https://help.atollon.com/uploads/images/gallery/2020-03/time-sheet-new-6.png)
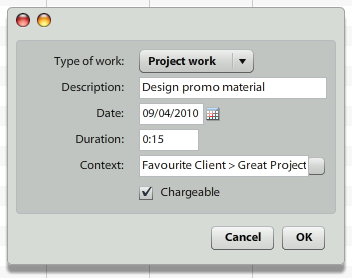
[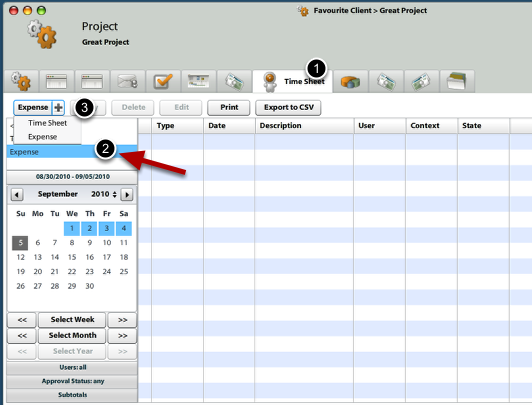](https://help.atollon.com/uploads/images/gallery/2020-03/expenses-project-1.png)
[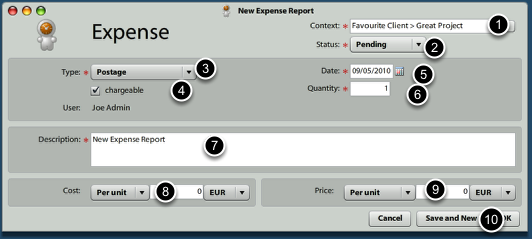](https://help.atollon.com/uploads/images/gallery/2020-03/expenses-project-2.png)
[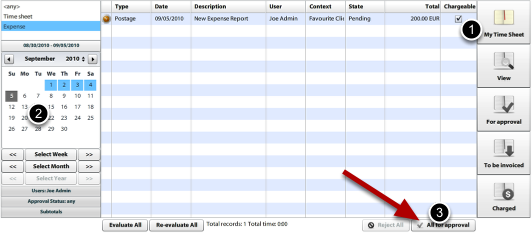](https://help.atollon.com/uploads/images/gallery/2020-03/expenses-project-3.png)
[](https://help.atollon.com/uploads/images/gallery/2020-03/expenses-project-4.png)
[](https://help.atollon.com/uploads/images/gallery/2020-03/expenses-project-5.png)
[](https://help.atollon.com/uploads/images/gallery/2020-03/time-tracker-1.png)
[](https://help.atollon.com/uploads/images/gallery/2020-03/time-tracker-2.png)
[](https://help.atollon.com/uploads/images/gallery/2020-03/time-tracker-3.png)
[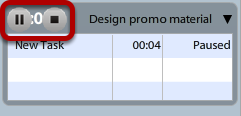](https://help.atollon.com/uploads/images/gallery/2020-03/time-tracker-4.png)
[](https://help.atollon.com/uploads/images/gallery/2020-03/time-tracker-5.png)
[](https://help.atollon.com/uploads/images/gallery/2020-03/time-tracker-6.png)
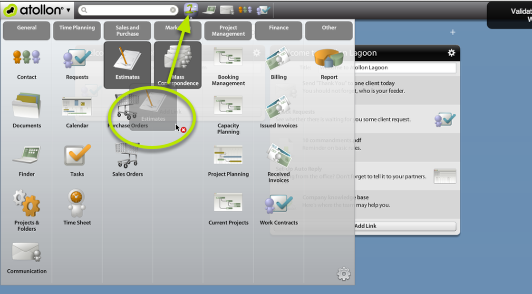
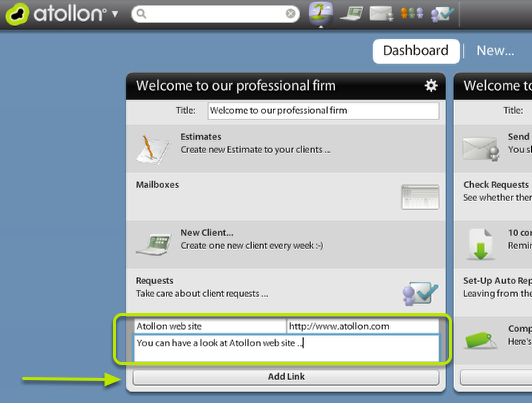
- shortcut to Atollon Lagoon application
- shortcut to application's function
- shortcut to any Atollon Lagoon settings
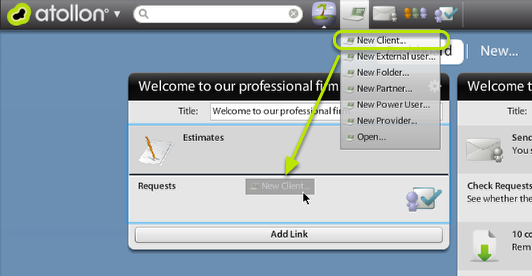
- link to external URL
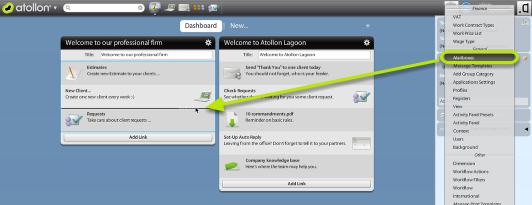
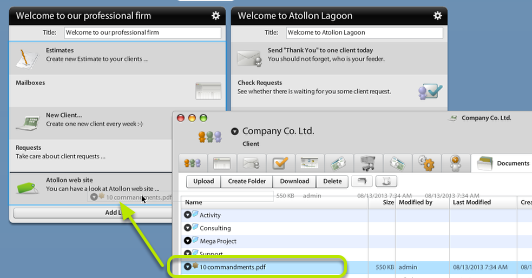
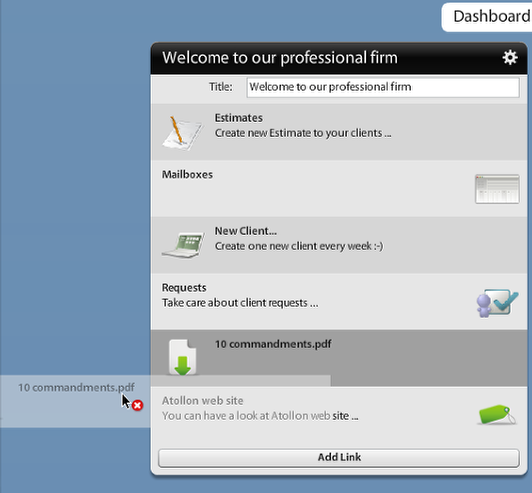
- shortcut to download/open internal document
#### Add Welcome widget to Dashboard (select for whom)
In case you need to set-up Dashboard for **other user profiles** (eg. Sales, Consultants, Programmers, Accountants, Finance, Lawyers, etc.), you need to switch your own user profile in **User Settings** (Setting > Users > edit). Afterwards you will be able to amend any other User Profile.
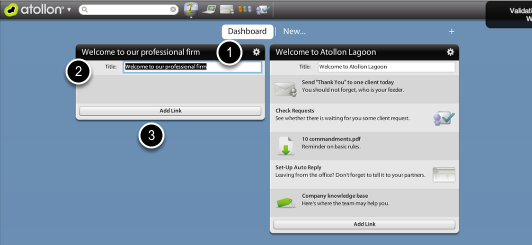
#### Add Welcome widget to Dashboard
[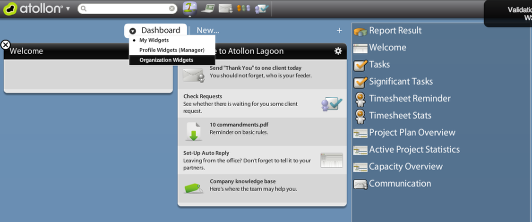](https://help.atollon.com/uploads/images/gallery/2020-03/dashboard-welcome-2.png)
[](https://help.atollon.com/uploads/images/gallery/2020-03/dashboard-welcome-3.png)
1. Click on **Settings** button in the widget header.
2. Change the **widget title**
[](https://help.atollon.com/uploads/images/gallery/2020-03/dashboard-welcome-4.png)
[](https://help.atollon.com/uploads/images/gallery/2020-03/dashboard-welcome-5.png)
[](https://help.atollon.com/uploads/images/gallery/2020-03/dashboard-welcome-6.png)
[](https://help.atollon.com/uploads/images/gallery/2020-03/dashboard-welcome-7.png)
```
public static const SESSION:String = "${SESSION}";
public static const SERVER:String = "${SERVER}";
public static const ORGANIZATION:String = "${ORGANIZATION}";
public static const USER_ID:String = "${USER_ID}";
public static const USERNAME:String = "${USERNAME}";
public static const WSDL_FOLDER:String = "${WSDL}";
public static const DOMAIN_ROOT:String = "${DOMAIN}";
public static const ENDPOINT:String = "${ENDPOINT}";
public static const BASE_URL:String = "${BASE_URL}";
```
[](https://help.atollon.com/uploads/images/gallery/2020-03/dashboard-welcome-8.png)
[](https://help.atollon.com/uploads/images/gallery/2020-03/dashboard-welcome-9.png)