Atollon Core
- Quick Start Guide
- Contexts
- Communication
- Contacts
- Documents
- Tasks
- Time Sheet & Expenses
- Dashboard
- Calendar
- Calendar Overview
- Atollon CalDAV Settings
- Atollon Calendar in iPhone
- Atollon Calendar in Mac OS X
- Atollon Calendar in Android
- Atollon Dictionary
Quick Start Guide
This is your quick start guide to Atollon. Explore. Do not get scared by deep forest :-)
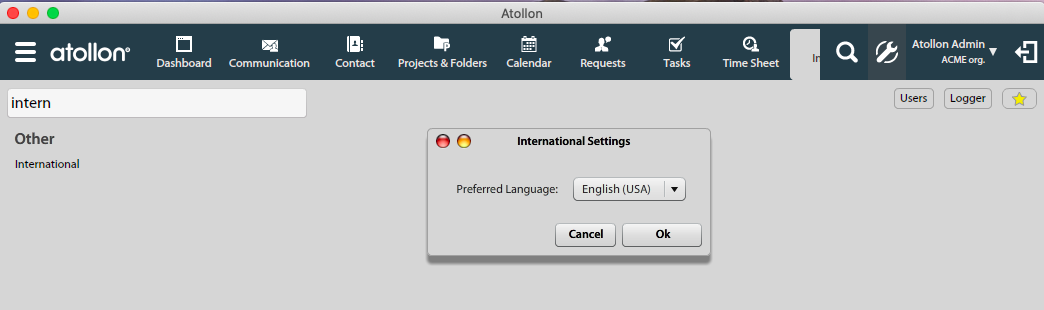
Login to Atollon: Switch Language
Before the actual login, you may switch application language. Once you switch to your desired language of Atollon, you may refresh the browser (F5 under Windows) and actually login to Atollon.
If you want to change the language after login, you may use Options & Tools and search for "international":
Login to Atollon

Yes, you can. Now login to Atollon. You should fill-in your Login (user name), Password and Server. This information should be provided to you by your admin or when registering.
Atollon Toolbar

Atollon Toolbar is used to run Atollon applications & gain quick access to frequently used functions.
- Atollon main application launcher is used to run other applications. Just hover your mouse over the button to see other applications.
- Atollon search bar looks for your existing folders (clients, partners, etc.) in Atollon.
- Favourite applications help you quickly launch your most used applications and functions.
- Opened applications provide you with access to currently running applications and opened windows.
- Options & Tools menu provides you with access to administration of your Atollon.
- Your name & name of your organization, allowing you to logout/login or switch organization (in multi-org Atollon set-up).
- Sidebar open/close button.
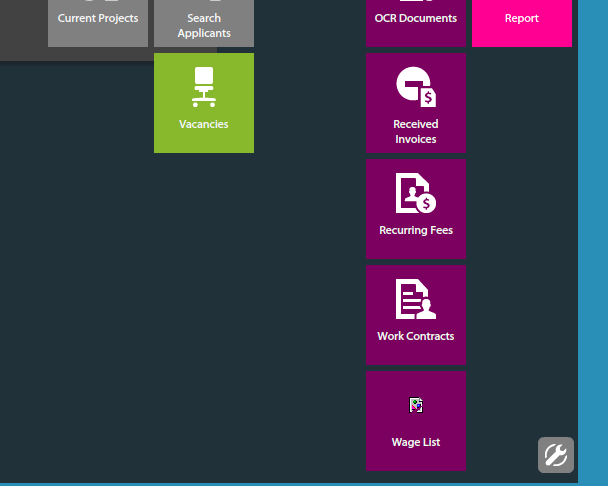
Application Launcher
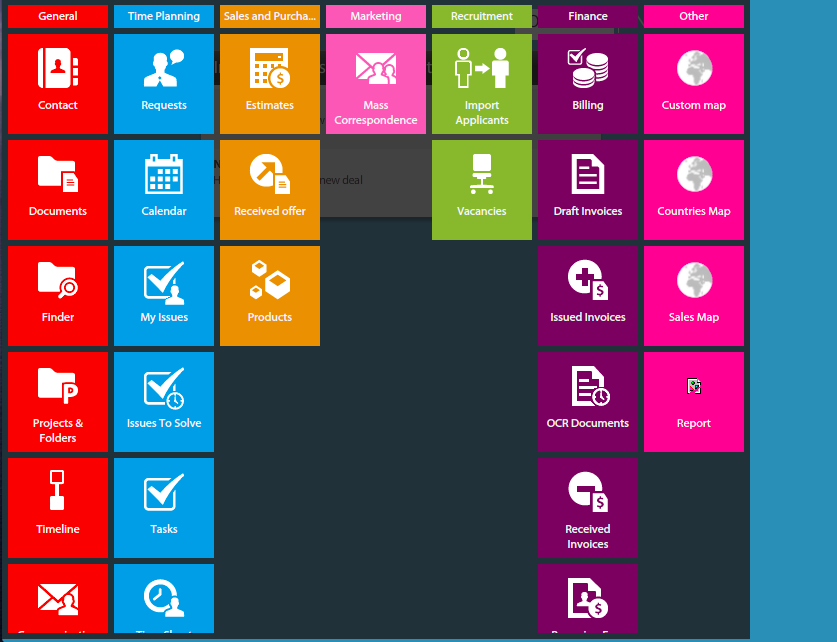
Using Application Launcher, you may open other applications (not available in Favourite Applications toolbar).
Customize Application Launcher
You may customize the list of displayed applications, just click on bottom-right cogwheel button, select what application should be hidden / shown and click to he button again to confirm.
Search Bar
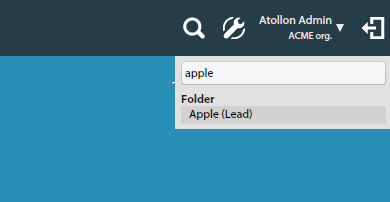
Search Bar is looking for folders in Atollon Finder. Once you found any folder, just click on it to display more information related to the folder.
Favourite Applications
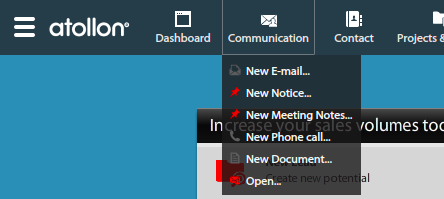
You can click on one of your favourite application icons to open it. Once you just hover over the application icon with your mouse, you may run selected quick functions (to create new client, person or company contact, e-mail, notice, calendar event, task, time sheet record, etc.).
Running Applications & Opened Windows
Running applications in Atollon are indicated by small arrow below the application icon.
Each application may have also several windows opened. This is indicated below each application's own menu of opened windows.
Personal Options Menu
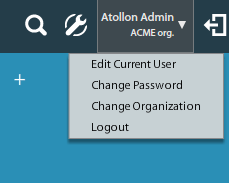
In the personal options menu, you can change your password, change organization (only in multi-org Atollon set-up), and Logout from Atollon.
Atollon Sidebar

Using the last (top-right) Atollon toolbar icon you can hide or show Atollon Sidebar. When the Sidebar is hidden, you can show it only temporarily, once you hover with your mouse over the icon. If you click on the icon, the Sidebar will remain opened.
Contexts
Contexts Overview
Introduction
Atollon Finder is the main content navigator in Atollon. Atollon stores all data in context that is visible through Finder.
Finder Video Tutorial

Finder Main Window
First column in Finder displays filter for Folder Types, which are stored in Organization's root. You can directly search for all folders by selecting "All" option or you can select one particular Folder Types only (for instance "Clients").
Finder Structure
The basic context structure contains the following Folders:
Contact Folder > Project Folder > Milestone Folder
See the illustration below for more details:

Creating New Folders
New Folders in Finder are created using Folder Templates.
Creating New Folder
In Finder's root level can be created only General Folders, incl. Simple Folders and Contact Folders (Clients, Partners). New General Folder may be created under any other General Folder, therefore you can create the whole tree of folders.
Create folder to contact
Existing contact (company or person) may have a folder in ATOLLON, which is core for any CRM functionality. Easily drag & drop contact to chosen contact type (Client, Supplier, Partner, etc.)
Creating New Project Folder
Project Folder must be created under any General Folder (based on Folder relations settings).
Creating New Activity/Milestone
Activity/Milestone Folder may be created only under Project Folder.
Searching in Finder
You can search in Finder only in one particular (selected) level. Finder displays all Folder Types in each level together. You can differentiate Folder Types by using different colors (applied for each Folder Status differently).
Main Atollon search bar (top Toolbar) searches immediately in Finder's root level. It is useful therefore to find appropriate Client first, before looking into Client's projects.
Once you select any Folder in Finder, you can search another levels as well.
Finder Filtering
You can filter Finder for:
- Folder Base Status (Intital, Active & Closed)
- Responsible User (user responsible for Client, Partner, Simple Folder, etc.)
- Organization Dimensions (Organizational Units, Departments, etc. - which must be set-up during implementation)
Folder Status
Each Finder Folder may have various States. These States are customizable for each Folder Type. For instance Clients in the database may have states indicating their relationship with the company, such as Lead, Prospect, Potential, Current, Hot, Lost). Each status has also Base Status, which is Initial, Active & Closed.
Finder displays by default automatically only Folders in Initial & Active States. By changing Finder's filter, you can display all States (incl. Closed Folders).
Finder Access Rights
Access Rights for Finder's Folders are based on Folder Templates. Each Folder Template may define how to set access rights for each individual new Folder. New Folder's access rights may be taken from (inherited from) Organization's root, parent Folder or any other folder defined by Administrator.
Access to Finder Folders may be extended by adding Users into Roles or by customizing each individual Folder's Access Rights.
Because Access Rights are usually inherited (tree-based), there may be Folders in finder that are not visible by everyone.
Finder Tabs Customization
It is possible to customize each Folder's detail using Activity Panel Settings. The detail may vary for each Folder Type and User Profile. Therefore each Islander may display different Tabs based on their User Profile, for instance administrative staff may display different Tabs in comparison to management or end users.
Master/Slave Project Structure (Campaigns)
Project Folders may be bound in Master/Slave structure. See the illustration below:
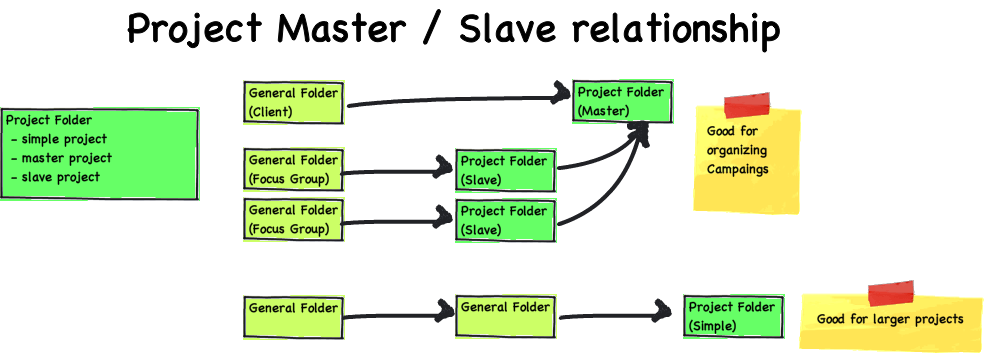
Example
Project Master/Slave relationships are used to track mainly campaigns, where Master Project is Campaign, Slave Project is Campaign Member. Campaign Member project has relation to it's Master Campaign.
Campaign Overview
Messaging
It is possible to display all messages sent/stored in connection to Campaign Memberships in one central location, which is the Campaign. This allows Islanders to get overview about all campaign communications.
Billing
It is possible to get overview about billing status of any item of Campaign Memberships. This way you can easily get financial status of paid trainings, seminars, conferences, etc.
Finder Configuration
See Context Settings documentation for more information.
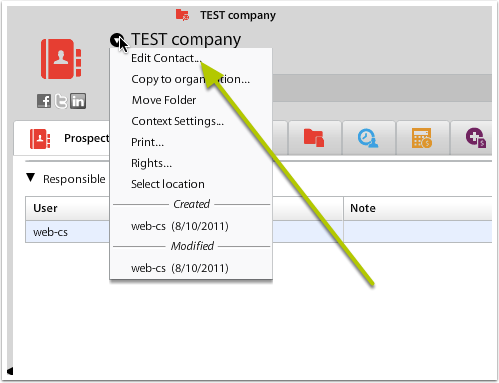
Folder Options
Go to the Folder detail and open Edit XYZ (where XYZ is the Folder Type)
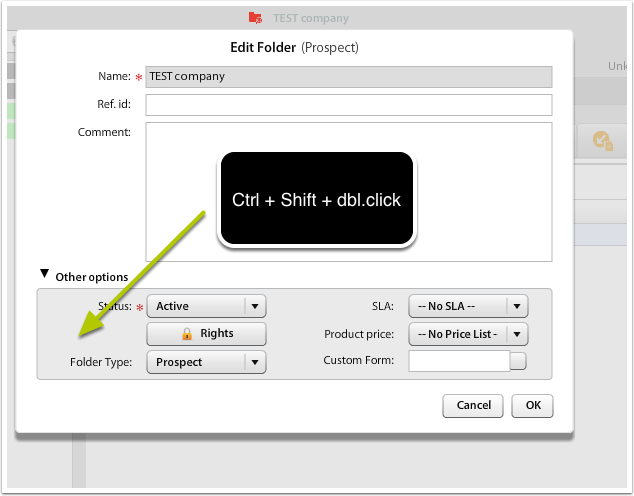
Folder Advanced Options
Change Folder Type
In case you want to change Folder Type, you can go to view Other options and use "secret" :-) key stroke: Ctrl + Shift + dbl. click to unhide options: Folder Type and Custom Form.
Please note that changing Folder Type this way may be dangerous and can cause inconsistencies. Ie when changing Folder Type, you have to be careful to adjust access rights of the folder or custom form.
Projects & Folders Application
Application Projects & Folders is used to quickly report on main Finder's Folders, including General Folder, Project Folder & Activity Folder.
You can easily show your potential clients, your Sales Opportunities in Presentation phase, your service contracts or Cases in In Progress phase, etc.
Using the Application
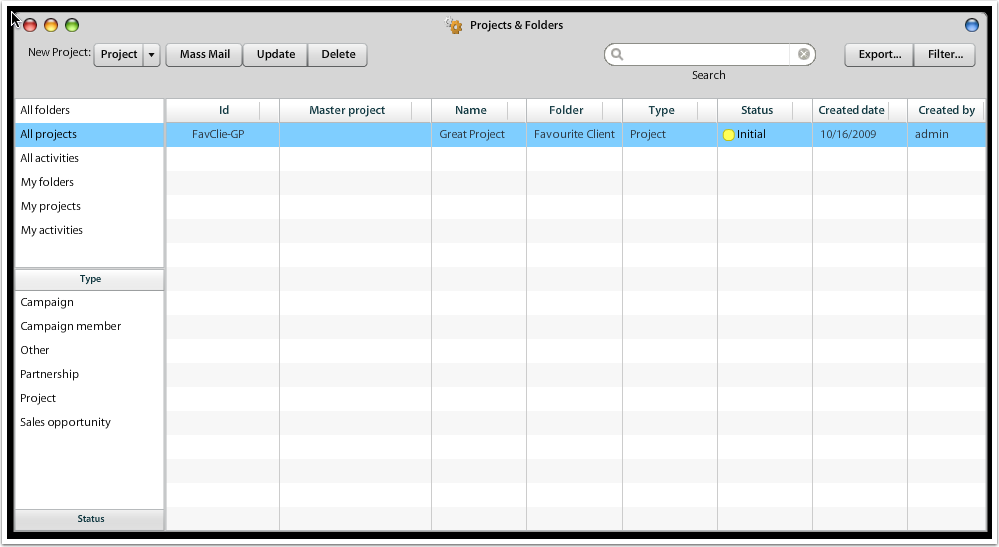
The left side bar (views) are used to filter Folders, Projects & Activities, either your own or all where you are allowed to access (list).
You can filter folders, projects & activities from top down & decide:
- Show My / All Folders/Projects/Activities
- Show only one type of folder (project, activity)
- Show only one status of folder (project, activity)
Examples
There are several scenarios, how to use this application:
Show my potential/active/lost clients
Go to left side bar, select:
- My folders
- Below list of types of folders is displayed, select "Client"
- Below list of Client's states is displayed, select "Potential"
Now you show only potential clients.
Show Active Cases/Projects
If your company tracks service cases, they are usually treated as specific project type. Therefore, if you want to display all active Cases, you can select:
- All projects
- Select project Type: "Case"
- Select desired status in bottom part of the accordeon
Using quick Mass Mail on projects
If you want to send all your External contacts on projects some announcement, this tool is quite suitable. You can also use general Reporting for the same task.
You can filter projects that you would like to send message to:
- Select All projects option
- Select the Type of the project
- Select the Status of the project (if necessary)
You can now optionally select only particular projects, or you can press Mass Mail button on top of the application.
In Mass Mail contacts selector, you may check option Send mass mail to "External contacts on project". Continue by pressing Mass Mail Wizard.
Delete Project
You may delete any project that has no financial data or documents stored. Also some other data stored project may cause no possibility to delete the project. In case you know what data prevent you from deleting the project, you may first clear them and later on try to delete the project.

Folders
Cloning folders to other organization
To clone folder into another organisation, there is a context menu item (in Finder), for executing this function.
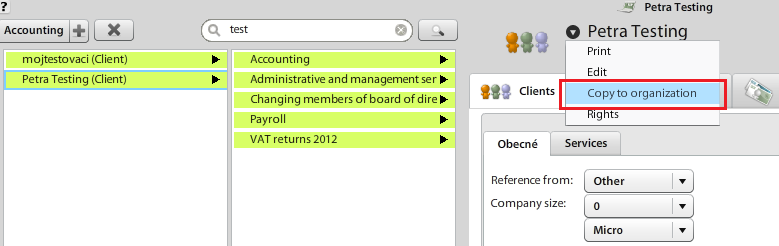

There are the following actions executed
- Check, if settings in both organizations are the same: it will be checked by organization_default settings. If nodes for folder type, project type, activity type, folder states and so on, are different in current and destination organization, the server resutrn error about it. Otherwise it runs next steps:
- Get folder save the copy in destination organization and run next sub-steps
- The folder copy will have clear reference id
- Copy global and custom form values
- Copy messages only. These messages are assigned only current folder (not projects)
- For each projects, assigned to source folder, do:
- Copy project to destination folder (in destination organization)
- Copy global and custom form values
- Copy messages assigned only to current project (not from activites)
- For each activity from source project do
- Copy activity to destination project
- Copy global form values (custom form on activity does not exist)
- Copy messages, only from current activites
- Recursively copy activites
Projects
New Project
This lesson shows how to create new project for your client in simple Client > Project Finder structure.
Open Finder to locate your client

You can open Finder either clicking Finder icon in Atollon Toolbar or using Application Launcher.
Look-up for your client

There are multiple ways of opening your client's folder in Atollon.
1.) You can directly search for it's name in Atollon's search bar
2.) You can search for it's name after opening Finder
3.) You can click on Clients in Finder and then 4.) browse for the client
After you have found your client, you should select it in Finder. (Alternatively, you can open Client's details by double-clicking on the record).
Create new project from Finder
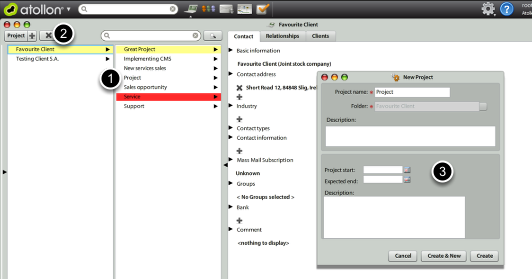
After you selected your client in Finder, you can select which Type of Project (based on Project Template) you would like to create. Select the project in top-left corner of the Finder and New Project window appears.
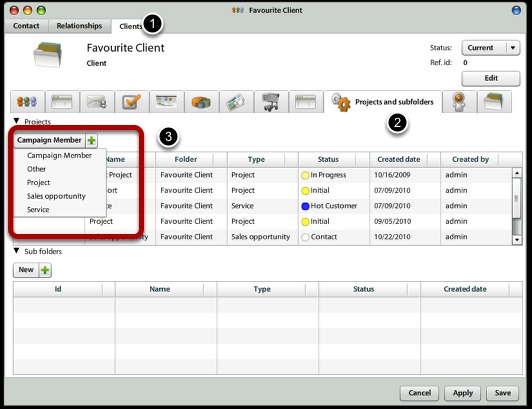
Create new project from Client detail
If you opened Client detail (from Finder, Contacts, Report results, etc.), you can create new project from Projects and subfolders tab. Just select the Project Template in top left corner of projects overview.
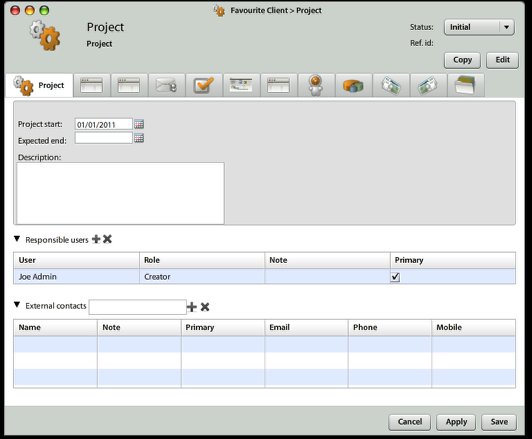
Adjust project after it was created
After creating a project, you would probably want to assign Responsible users (when assigned to project role, this would give them access rights to the project). In case you want to time by time inform your external contacts on project by mass mail, you should attach the external contact to project as well.
New Project (Job) Number is assigned to project automatically, once it is set-up in Numbering Administration.
Communication
Communication Overview
Communication Channels
Currently supported communication channels in Atollon are: e-mail, sms, phone call, event, task, document & internal notice. These communication channels will be extended in the future releases of Atollon.
E-mail is sent and received by Atollon using Atollon Mail Server. Atollon may handle e-mail communication for unlimited number of domains (ie domain.com) and mailboxes (ie mailbox@domain.com).
For internal Atollon communication, Notices should be used instead to not duplicate message communication using e-mail forwarding and replying.
Notice
Internal message sent from one Islander to another. Notice should be placed in context (on some Folder).
SMS
Atollon uses own SMS gateway, utilizing Web Services connectors of various telecommunication providers. Contact Atollon Consultant once you want to set-up your access to SMS gateway.
Phone Call
Atollon may simply dial phone call using Skype. No PBX integration is supported yet, but it is expected we will integrate more telephony solutions in near future.
Event / Task
This is just special type of notice, indicating that the user was invited to calendar event or some task was assigned to him/her.
Document
Internal notification to a copy of document stored in Atollon Documents.
Main Communication Folders
To Do
Why is this folder called ToDo, instead of Inbox (as in other mail clients?). While it contains both incoming & outgoing correspondence. And because most of the correspondence should be corporate messages, you should make sure you completely empty/solve this ToDo message container. You can move messages (to personal or organization's folders) or delete them. Ideally, it should contain only few unresolved e-mails. Avoid keeping hunderts or thousands of messages here.
This folder contains all messages (e-mails, sms, notices, meeting notes, phone calls) that are to be solved in the following manner:
They are either references to incoming messages (e-mails, internal notices) that were placed by Atollon Trolls in context (Finder's folders, projects, activites). These can be deleted after they are solved from your side. Once you delete reference to message, you do not delete original message. Original message remains stored in history of any Folder, Project or Activity.
They are also original e-mails received (and not recognized by Trolls) placed to ToDo and notes taken by you. Because your Trolls did not do their job, you should move these messages to context or personal message folders yourself. Or you can delete them, if they are not needed any more.
They are also outgoing messages created by you, which were not placed by you to any context. You should move them to some context, to your personal message folders or delete them.
My Messages
This is view displaying all messages you received or sent using Atollon. There are all messages, both ToDo & already placed, in company (shared) folders, projects or activities or in personal message folders.
Outgoing
This is view displaying all messages you created, no matter where they are located.
Drafts
Here you can find saved messages, which you have not sent yet.
Once you disconnected from system during writing new message, you can find here auto-saved messages as well.
Trash
Here are all messages you deleted, no matter where they were originally located. Once you undelete message from Trash, the message restores to the original location.
Corporate Messages
Here you can find overview of all messages your organization received into Atollon, no matter where they were located. Only messages which you can view based on your access rights can be displayed here.
Personal Message Folders
You can create personal message folder, where you may file any message that should NOT be shared with the team/company.
Atollon Trolls taking care about your incoming e-mails
Reply to e-mail
Once you send any e-mail outside of Atollon, the e-mail reference ID is placed to the bottom of each individual e-mail. Once the recipient sends reply to the e-mail and keeps the reference ID of the e-mail within the body of e-mail, the e-mail recognized by Trolls and placed to Atollon as reply to your original message. Trolls will also send you reference message to your ToDo, so that you are informed about new incoming e-mail. You may simply delete this reference after you solve/read the incoming e-mail.
Project/Folder Messages
If sender of e-mail adds project Reference ID (Job Number) after "-" sign into message subject, like: "New proposal - REFERENCEID", Atollon Trolls will do the work for you and place this e-mail under project with the same Reference ID. Trolls apply the same rule to any Folder and Folder's Reference ID in Finder.
Set-up auto-response
Do you want to send your partners information that you are not available now?
Go to Options & Tools > Mailboxes
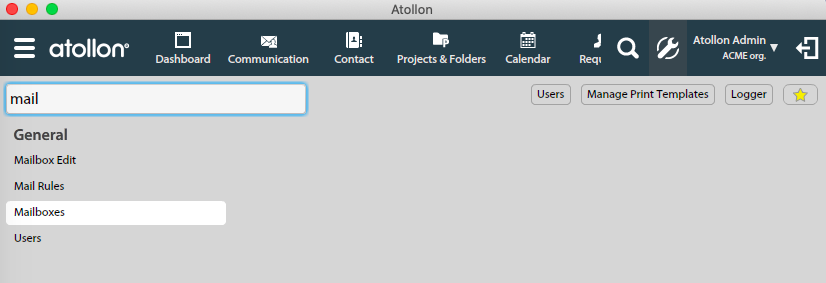
Allow Auto-response
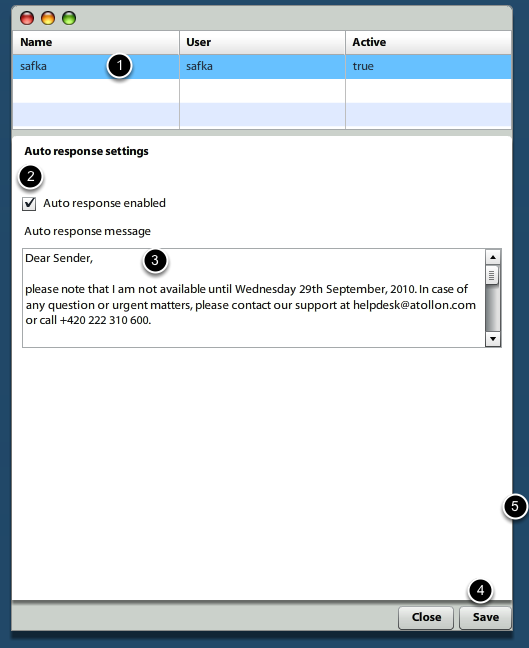
First select mailbox (yes, you can have more mailboxes), then allow Auto response and write your message. In the end, do not forget to Save.
Now once someone sends you e-mail (message), he/she gets the notification automatically.
Message Templates
Message templates are used mainly in connection with sending e-mails to your clients, prospects or partners.
Message template may be used when sending individual e-mail correspondence. Message template is required when sending Mass Mail. Message template is heavily used when automating processes using Atollon Troll (Workflow) module.
Message Templates Overview
The overview of message templates provides list of Message Template Containers. Click on one of the containers to add / view / edit / delete one of the message templates on right.
You can filter only for Message Templates in specific language by selecting one of the languages in the list of languages.
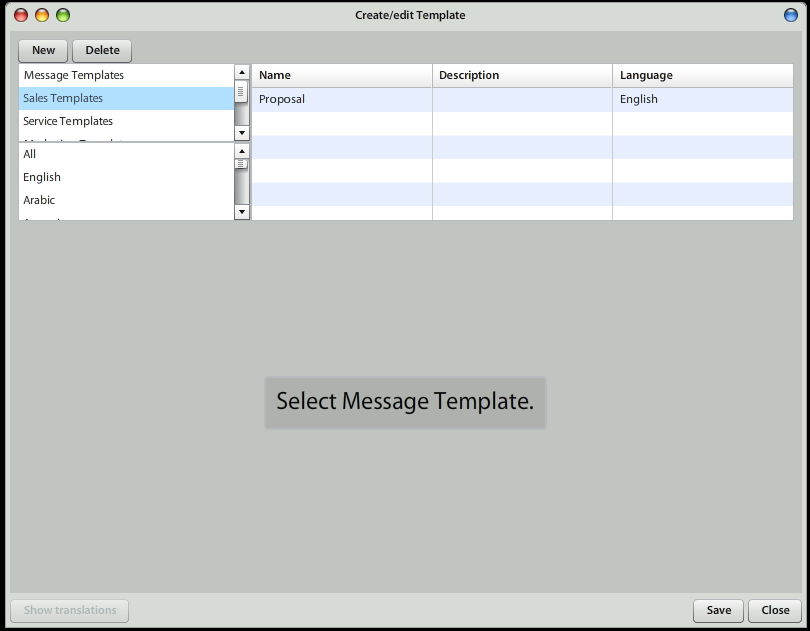
Edit Message Template
To edit the Message Template, double click on one of the items in grid.
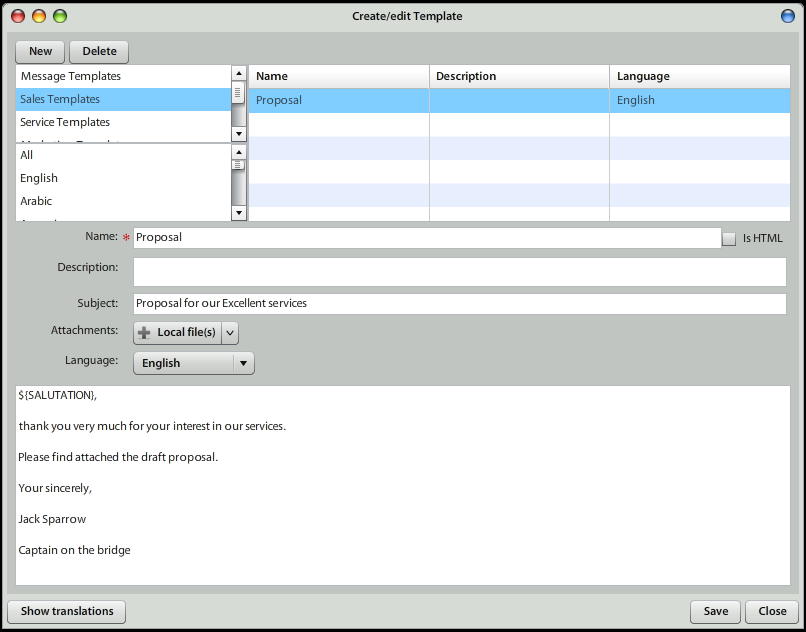
Once you make any changes, do not forget to press on "Save", please.
You can attach one or more files or documents to each Message Template.
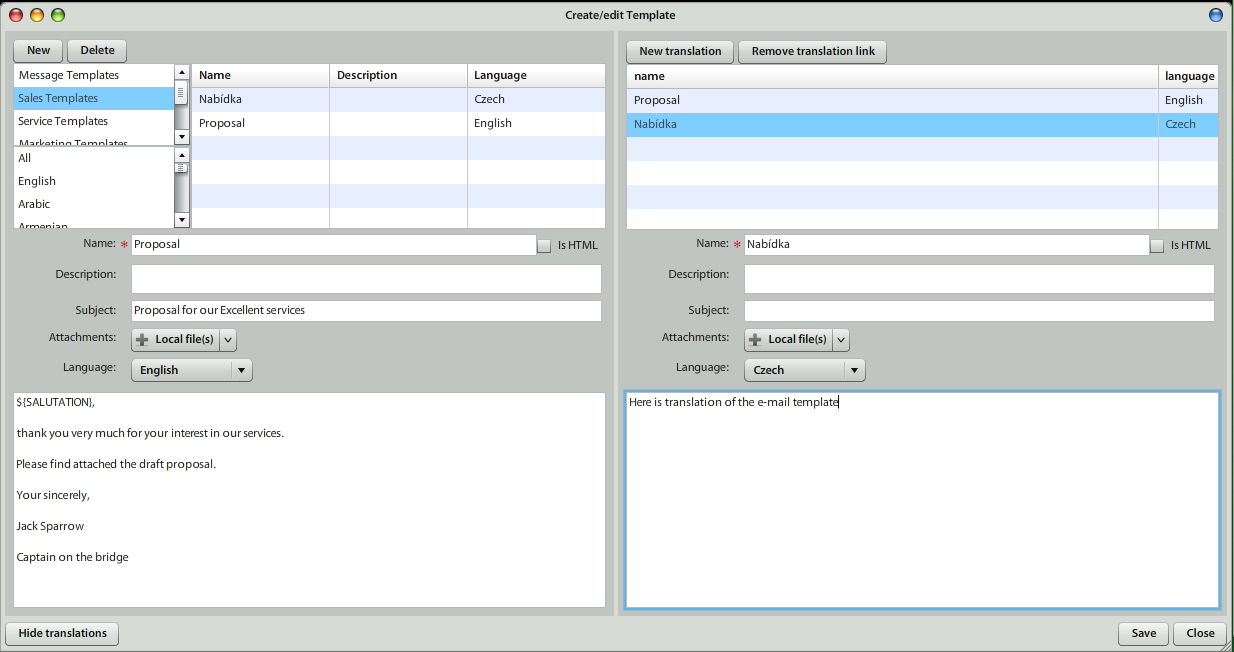
Message Template Languages
Each message template may have indicated language, in which the template is prepared. This is particularly useful when automating workflow actions on multi-lingual web sites, etc.
Mail Merge Fields
Basic rule for using merge fields:
- ${CAPITAL-LETTERS} - may be used on both client & server side
- ${small-letters} - may be used on client side only
General
${SALUTATION} | Enters the string that is found in recipient contact's Salutation field.
${SIGNATURE} | Enters user's mailbox identity signature.Calendar / Tasks Notifications
Main tags
${NAME} | Task / Event name
${DESCRIPTION} | Task / Event description
${STATUS} | Task / Event status
${START} | Task / Event start date/time
${END} | Task / Event deadline / end date/time
${CONTEXT} | Task / Event context
${TYPEOFWORK} | Task / Event context
Other tags
${LOCATION} | Event location
${PRIORITY} | Task priority
${DURATION} | Event duration
${REMAINING} | Event duration
${USERS} | Event participants / Task solver
${GARANTS} | Resource garants
${RESOURCES} | Resources
Service Level Notifications
${REQUESTSUBJECT} | request subject
${REQUESTDESC} | request description
${REQUESTIDENT} | request id
${REQUESTSENDER} | request sender
${REQUESTPROJECTNAME} | project & subject (if is known)
${REQUESTDATETIME} | request date/timeMessage Context Dependent Fields
${ACTIVITYNAME}
${ACTIVITYREFID}
${PROJECTNAME}
${PROJECTREFID}
${MASTERPROJECTNAME}
${MASTERPROJECTREFID}
${FOLDERNAME}
${FOLDERREFID}
${CONTEXTREFID}
Recipient Dependent Fields
${RECIPIENT-ID}
${RECIPIENT-EMAIL}
${RECIPIENT-FIRSTNAME}
${RECIPIENT-MIDDLENAME}
${RECIPIENT-LASTNAME}
Invoice Fields
${doc_number}
${doc_descr}
${doc_total_amount}
${doc_due_date}
Same naming conventions are for all following items (${word before :}
doc_number:"invoiceNumber",
doc_descr:"transactionsName",
doc_total_amount:"totalWithVAT",
doc_due_date:"dueDate",
doc_ccy:"currency",
doc_ccy_rate:"currencyRate",
doc_bank_code:"bankCode",
doc_bank_account:"bankAccount",
doc_iban:"bankIBAN",
doc_description:"description",
doc_header_text:"headerText",
doc_footer_text:"footerText",
doc_summary_text:"summaryText",
doc_period_from:"periodFrom",
doc_period_to:"periodTo",
doc_trans_name:"transactionsName" Custom Form
${generatedLink}Campaign Planner / Event
${eventFrom}
${eventTo}
${eventLocation}
${eventUserName}
${eventDescription}Folder / Project / Activity (Context items)
${contextName} -> name
${contextReferenceId} -> referenceId
${contextComment} -> comment
${contextCreated} -> created
${contextCreatedBy} -> createdByName
${contextModified} -> modified
${contextModifiedBy} -> modifiedByNameSystem IDs for message templates in system
| SystemId | Description |
| com.atollon.messaging.issudedinvoicemail | template with message for mail with issuded invoice |
| com.atollon.messaging.invoicereceivedmail | template with message for mail with recieved invoice |
| com.atollon.messaging.orderissuedmail | template with message for mail with issuded order |
| com.atollon.messaging.orderreceivedmail | template with message for mail with recieved order |
| com.atollon.messaging.estimatemail | template with message for mail with estimate |
Contacts
Contacts Overview
Contacts Main Window
Contacts are split to company and person within Atollon. You can create them separately, but it is possible to link person with company using contact relationships.
Contacts database is used to store primary contact information (e-mails, phone, mobile, social URLs, etc.), contact addresses (various types), bank account information and several other fields.
Contact Types
Once you set Contact Type information (client, partner, employee, etc.), new Contact Folder is created automatically in Finder. Contact Folder may contain additional information & functions based on Folder Type, for instance Form (with various custom fields), Messaging Tab, Calendar, Tasks, Projects & Folders, Time Sheet, Orders, Invoices and much more.
Set Contact Type
Open any existing contact or create new, see the Contact Type section and select the appropriate contact type, such as:
- Client
- Partner
- Employee
- Supplier
- ...
You can also set Contact Type for multiple contacts at the same time using Drag & Drop function. Simply select more contacts and Drag & Drop them on displayed Contact Type (left panel in Contacts application).
Un-set Contact Type
It is possible to un-set contact's Contact Type only by removing particular Contact Folder from Finder.
Create new/Adjust Contact Type
It is possible to create / remove Contact Types using Finder configuration. Simply remove or add Folder type in Context Settings.
Contact Information
Contact information is the basic e-mail, phone, mobile, Facebook account, Twitter account or LinkedIn account stored in connection with the contact (person or company).
It is possible to add more contact information records to each contact.
If there are more contact information records, one of them may be set as primary (for instance phone (work) from set of all phone numbers).
One primary contact channel (e-mail (work) for instance) may be selected for all contact information records.
Contact Information Types Customization
It is possible to add/remove Contact Information from Atollon and in this way customize list of Contact Information, such as e-mail (home), e-mail (work), e-mail (other) for some other values.
Go to Windows Admin client > Settings > Contacts > Settings and select appropriate configuration list.
Contact Groups
It is possible to add each contact (person or company) into one or more Contact Groups.
Contact Groups & Mass Mail
The membership of the contact in Contact Group is used mainly to use Mass Mail functions. You can double-click the Contact Group in Contacts application and more details of the Contact Group may appear. It is also possible to allow/disallow sending the contact mass mail using the selected Contact Group this way.
Add Contact to Contact Group
There are more ways to do this task. One of them is simply drag & drop selected contacts into group displayed in accordeon on left panel in contacts database. Another is to open each contact individually and select appropriate checkbox in Contact Groups fields. Description may be added that associates contact with the Contact Group.
Contact Relations
It is possible to link contacts together. There are the following relations available:
- person x company relations - indicates employer / employee relationship
- company x company relations - indicates two types of relations: equal level (partners) or master/slave level (mother / division)
- person x person relations - indicates two types of relations: equal level (friends) or master/slave level (superior / subordinate)
Person x company relations may have additional attributes, such as Position in company and Department, incl. some notes.
Contact relations are displayed in tree and you can browse contacts relationship tree into almost indefinite level, which helps to understand influence to your sales opportunities or clients and may help you build your referral business.
Contact Groups
Add Group Category
Group Category is container for storing several contacts (distribution) groups. It is particularly useful once you have too many contact groups.
Advanced
Access Rights
New Contact in Detail
Person vs Company
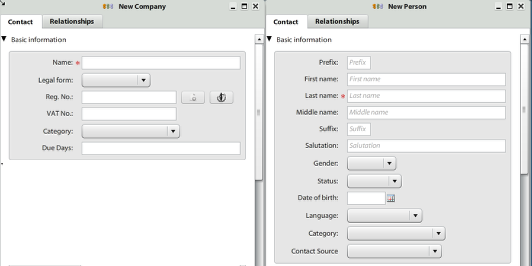
New company
Legal form - eg. Inc., s.r.o., a.s. ...,
Reg. No. - it's company registration number,
VAT No. - it's company VAT number,
Category - most simplest categorisation,
Due Days - it's number of days when the invoices are in due.
New person
Prefix
Fist name
Last name
Middle name
Suffix
Salutation - this field will be transfered on e-mails while using the ${SALUTATION} tag in e-mail template. See the section ${wiki:EmailTemplating}
Gender
Status
Date of birth
Language
Category - most simplest categorisation,
Contact Source - where we get this contact (should be modified) - eg. web, newspaper, friend, competitor ...
Industry (only for new company)
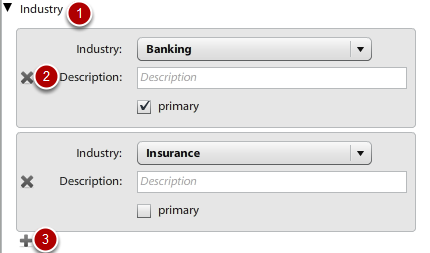
Fields:
Industry - for selecting company industry.
Description - for additional description of that industry for specific company.
Primary - check box for selecting which industry is the primary one.
Functions:
1. Collapse/expand section - by clicking text with black arrow.
2. Remove industry from contact - by clicking the cross (which is red when going your mouse cursor over).
3. Add new industry to contact - by clicking the plus (which is green when going your mouse cursor over).
Contact address
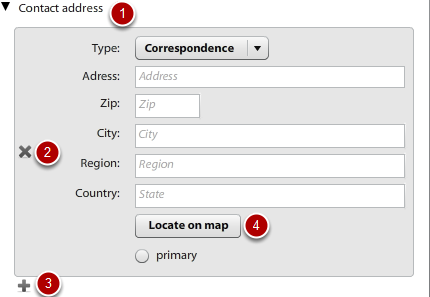
Fields:
Type - user-definable type of address (eg. Correspondece, Invoicing, Delivery, ...)
Address
Zip
City
Region
Country
Primary
Functions:
1. Collapse/expand section - by clicking text with black arrow.
2. Remove contact address from contact - by clicking the cross (which is red when going your mouse cursor over).
3. Add new contact address to contact - by clicking the plus (which is green when going your mouse cursor over).
4. Locate address on map - by clicking the Locate on map button (this will open new window with google maps).
Contact types
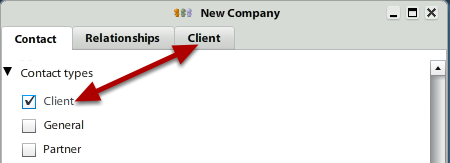
Fields:
Depends on implementation. There might be ten or no one.
Functions:
By selecting one or many check boxes there will appear one or many new tab with same name. With this we are saying that "this new contact is Client and we want to see it in Finder (see the section ${wiki:Finder} under the folder called Client".
Contact information
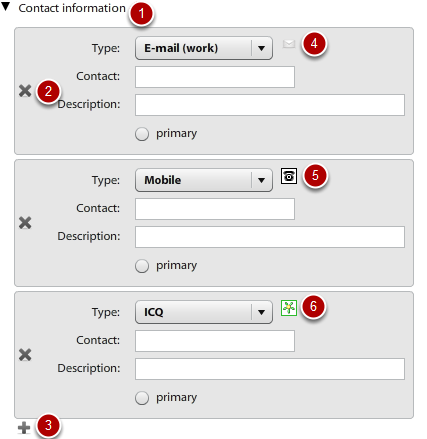
Fields:
Type - various types of contact (eg. E-mail, Skype, ICQ, Facebook, Linked-in, Cell phone, ...)
Contact - field for filling up the phone number, ICQ number, e-mail address ...
Description
Functions:
1. Collapse/expand section - by clicking text with black arrow.
2. Remove contact information from contact - by clicking the cross (which is red when going your mouse cursor over).
3. Add new contact information to contact - by clicking the plus (which is green when going your mouse cursor over).
4., 5., 6. Contact information-specific icon and function. By clicking this icon you may:
a. write new e-mail with prefilled recipient,
b. call cell phone/land line (with using Skype),
c. add ICQ number to your account,
d. visit facebook/linked-in account,
e. etc.
Mass Mail Subscription

This is usefull section when you are using mass mailing system function (see the section ${wiki:Mass mail}
Functions:
- By selecting one of the field you tell to system if this contact allowed you to send mass mails (newsletters, promotions, ...) to it.
Groups
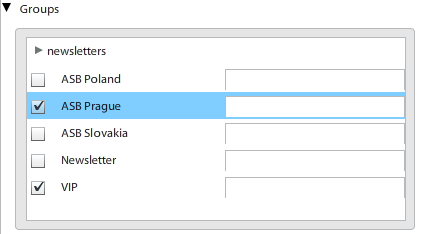
The Groups name means distribution groups which are use to send mass mails to it (see the section ${wiki:Mass mail}.
All that fields are variable.
Fields:
newsletters - the field with arrow before is category. In the Groups you may categorise your distribution groups.
ASB Poland/Slovakia/Prague, Newsletter, VIP - this is distribution groups as client wants it. By selecting it we are telling taht "this contact will appear in this group and if we are sending mass mail to ASB Prague or VIP we wants its to recieve that message".
Functions:
Confused with how to add or remove distribution group?
- For adding new group see the section ${wiki:Description/Contact Window}.
- For removing group contact our support or use windows client.
Bank
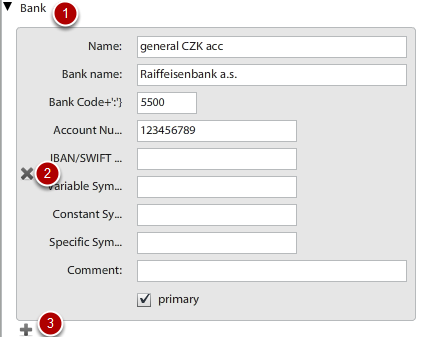
Add new bank account eg. for invoicing informations.
Fields:
Name
Bank name
Bank Code
Account Number
IBAN/SWIFT
Variable Symbol
Constant Symbol
Specific Symbol
Comment
Primary
Functions:
1. Collapse/expand section - by clicking text with black arrow.
2. Remove Bank from contact - by clicking the cross (which is red when going your mouse cursor over).
3. Add new Bank to contact - by clicking the plus (which is green when going your mouse cursor over).
Comment
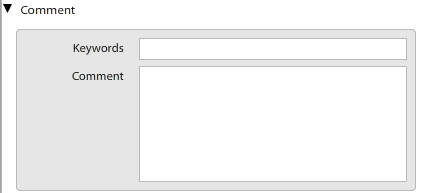
This section is just for your comments and keywors. It is not too much visible in system and it is not used often.
Contact relations
Contact relationship section is divided to two sub sections.
Employees section is for persons related with this company. It might be direct employees or persons which are rented by company. The relation is definded by columns Position, Department, Valid from, Valid to.
Companies section is for related comapanies. The relation is defined by columnt Relation.
Employees/Employments
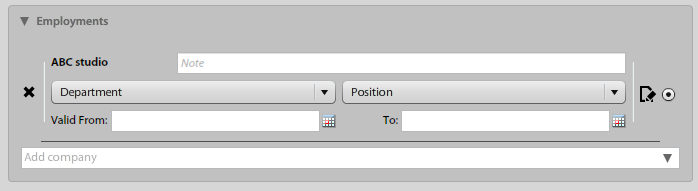
Fields:
Name - if you are adding new person to that company, you may start writting to this field and the contact will be found.
Position - variable field. Just select if you want to specify person position in selected company
Department - variable field. Just select if you want to specify person department. There might be value External for those person which are rent by this company.
Valid from - time from the person is working in the company.
Valid to - time to the person is working in the company.
Note
Primary
Person 1:1 relations
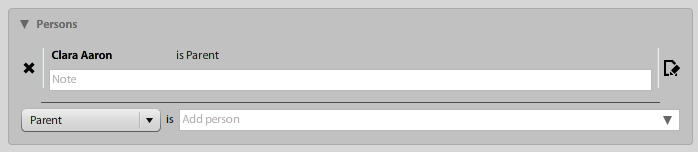
Functions:
1. Add new related person - by clicking the plus icon.
2. Remove related person - by clicking the cross icon.
3. Create new person - if the person you want to add is no currently in the system you may use this button to create it at fist.
4. Edit selected person - click on the one row in table and select person you want to edit. Then click this button to do that.
Companies Relations
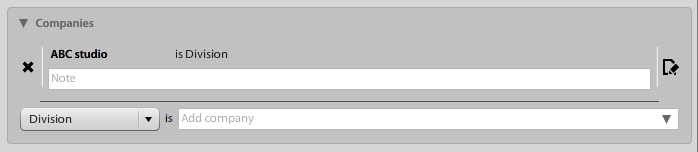
Fields:
Name - if you want to add new related company, you may start writting to this field and the contact will be found.
Relation - variable field with Parent<-->Child structure. This mean that you may select Controlling company or Division. So in the collapset section you may see the Controlling company in one way and Divison from the opposite look. See the Contact relationships - section collapsed to learn about this kind of structure.
Note
Footer - no additional information

Functions:
1. Cancel - to close this window without saving.
2. Next - to process to next window (which is the fist one you created in the step ${wiki:Description/New CompanyPerson Window/Contact Types)
3. Save - to save all changes and close this window.
Contact duplicity checking
System checks for the contact duplicity.
Company
- The name is similar to already created one => Similar contact.
- The company registration number is same as the one already created => Same contact.
- If the registration number is not entered, the VAT number is checked and must be unique
Person
- The first name and the last name is similar to already created one => Similar contact
- Persons e-mail address or cell phone is same as the one already created => Same contact.
Documents
Documents Overview
Documents are used to store and share revisions of files in Atollon folders.
Document Listing
It is possible to browse documents using Documents application in tree or list view.
Document Details
Each document may have description, Type, Category or Location.
Document Versions
Once you upload new document with the same name into Atollon's folder, new document revision is automatically created.
Multiple Documents Upload
It is possible to upload several documents at the same time.
Document Content Search
It is possible to search for any document, incl. content of the file, which has been recognized by Atollon. Atollon recognizes all major office documents, such as MS Word, MS Excel, MS PowerPoint, Open Office document formats, RTF, TXT, HTML or even PDF. Document's contents is indexed in database for faster search.
Sending Document
Document may be sent using right-click (contextual pop-up) on each document. If Finder Folder (or project) is recognized, it is automatically pre-filled. By default, the document is sent internally, but it is possible to easily switch the message type to E-mail and send it outside Atollon.
Document Folders
Documents are stored in Finder Folders as well as special document folders, which may be used only for the purpose of storing documents. Document folders may be created even under any Project.
Document Access Rights
Access rights of particular documents may be customized indivudially. Their default access rights are taken from the folder, in which they are stored. For instance if document is stored under Project, project's access rights are applied, etc.
Print Templates
Uploading New Print Templates
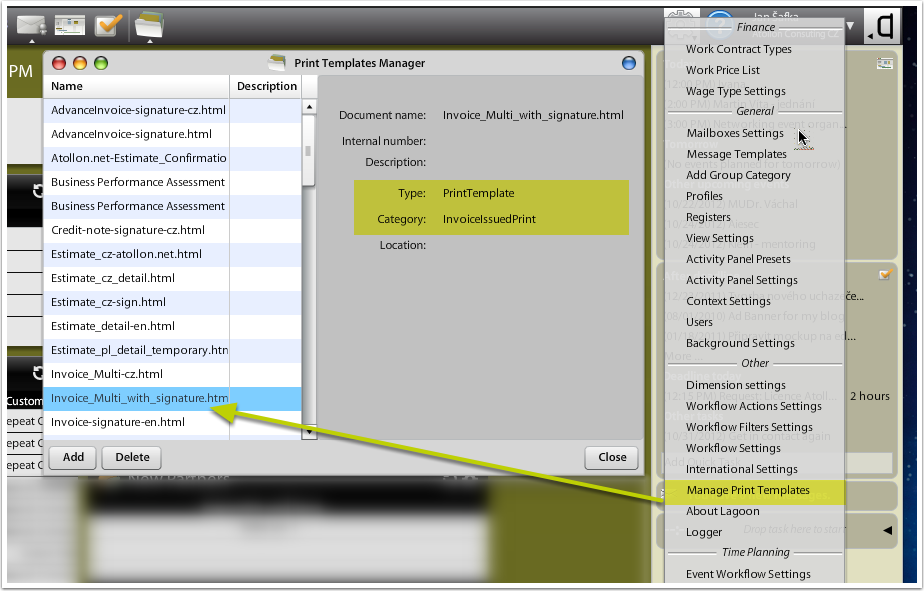
To open the Manage Print Templates dialog, go to Options & Tools > Manage Print Templates.
Using this tool you may upload 2 types of templates:
a) XHTML print template
These templates are designed for the purpose of printing and converting to PDF. It can be simple XHTML-compliant document, but may also incorporate data gathered from Atollon.
b) XLS template
Atollon supports generating MS Excel output from Atollon data.
Document Type
When uploading the Print Template, it must be set (by default) to "PrintTemplate" Document Type.
Document Category
The Print Template document must be assigned to appropriate Document Category. Print dialogues in Atollon filter Print Templates based on Print Categories. For example in order to print Estimate, you must upload template into EstimatePrint it's Document Category.
In order to get list of print categories, go to Print Template Categories page.
Print Templates Design
To learn more about Print Template Design, read Mooring Templating Guide. Using Atollon Logger application, you may get PrintJob data available to the Print Template. All data that are available in PrintJob may be used in output.
To learn more about exporting into Excel, read Excel Templating Guide.
Download Sample Print Templates
You may be provided with public sample print templates for free. For that please contact atollon or your implementation partner.
Tasks
Create & Assign Task
This tutorial shows you how to create new task, assign it to solver & show the solver how to accept or reject the task.
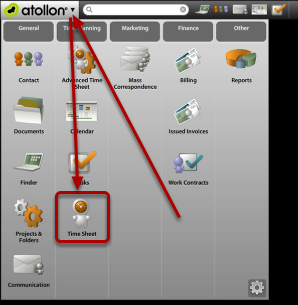
Open Tasks Application
First go to Atollon Applications menu & open Tasks. Optionally, only move mouse over Tasks icon in toolbar & select New Task.
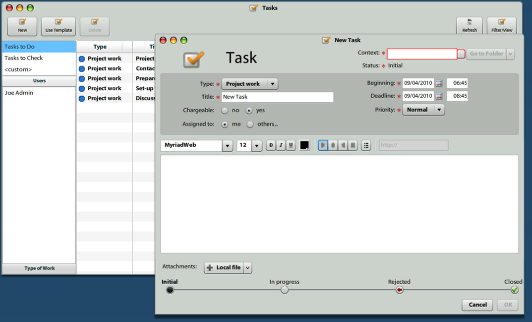
Create New Task
On tasks overview, click on "New" button, the "New Task" form will open.
Select the Type of work, write Task Title, indicate Task Beginning & Deadline, set Priority & Chargeability of the task.
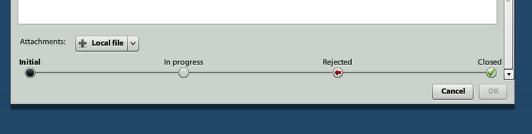
You can also attach Local file (from local file system) or Document (from Atollon). Once the Task is sent, the file is uploaded to Atollon on selected folder / project automatically.
Assign Task to someone else
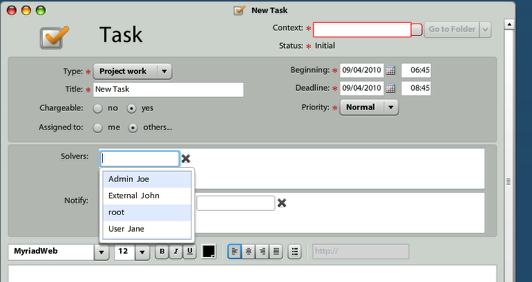
Click on Assigned to: others... to select whom you would like to assign the Task in Solvers section. Simply start writing user's name to search for desired Solver.
In Notify: field you may select users, which will get notification about the Task. For intance, once the Task is not closed within the Deadline, the Notify user gets information in his/her Inbox.
After assigning Solver to Task, the user gets notification about new Task. Notifications may be adjusted to organization needs in message templates.
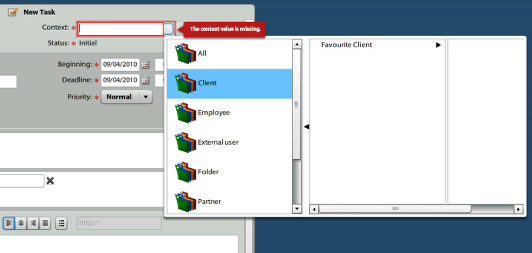
Select Task Context
Task may be stored at Folder, Project or Activity levels. For project management purpose it is necessary to select task's Project.
Simply start typing Contact / Simple Folder name to search for folder & then select Project (just double-click on selected item).
Send Task

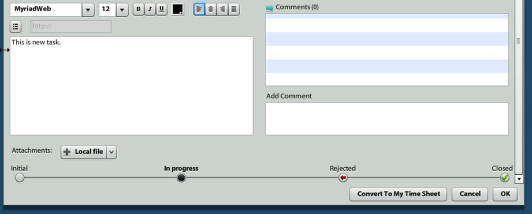
Add Task description, if needed and click on Ok to send the task. Ok button is greyed once required fields are missing. Please fill-in required fields to enable saving the task.
New Task Received
The task Solver gets notification to Communication To Do about new task.
Accept/Reject Task

Accept Task
Once you opened task, indicate you are going to work on the task or reject the task with some reason. Click on In progress (or similar) task status & press Ok.
Reject Task
Add Comment always when rejecting task. Click on Rejected task status & press Ok. The task Solver will be changed to user, who assigned the task.
Rights
Creating task
User can create task to and asign it to himself/other user, if user has right NEW on his own/other user's task acl.
Update Task
Task can be rejected by solver in any case.
Task can be changed by user, only if user has right on head user of edited task.
Time Sheet & Expenses
Time Sheet Overview
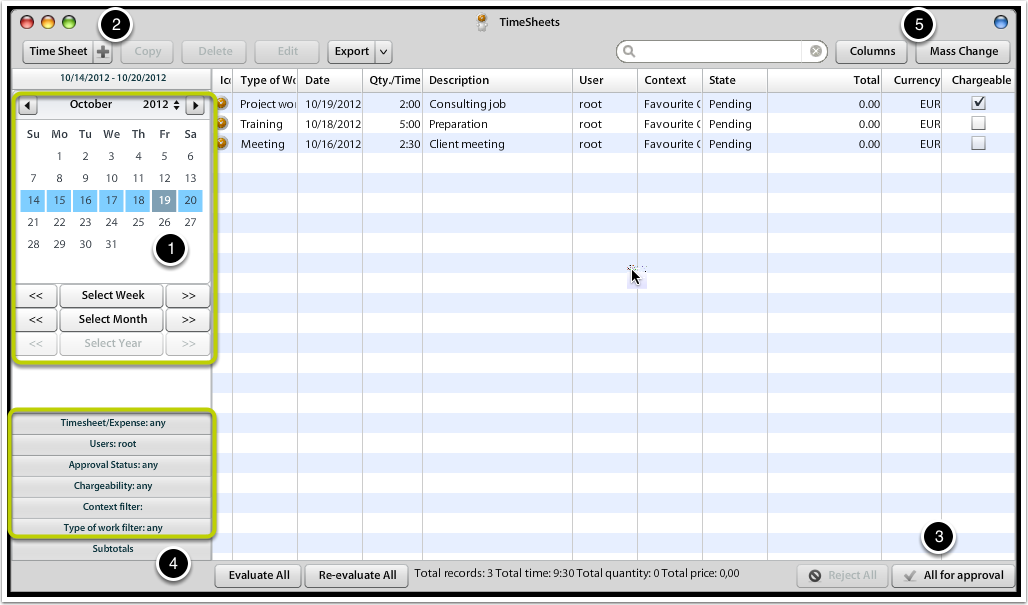
The Time Sheet application allows users to:
- add new ad-hoc Time Sheet records
- get overview about existing records
- confirm Time Sheet records
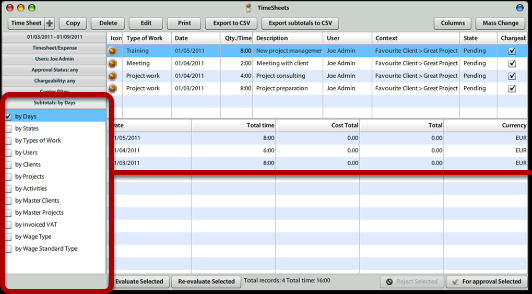
The above screenshot illustrates several features of Time Sheet application:
- Select period, for which you want to review your Time Sheets
- Select whether you want to create Time Sheet or Expense record(s)
- Confirm your Time Sheet records by sending them For Approval
- Verify your filter settings
- Adjust the Time Sheet view settings (collumns) & use mass-change features
Time Sheet Online Reporting
Users & managers that want to get quick overview about the usage of their time may use quick reporting tool directly integrated into Time Sheet application.
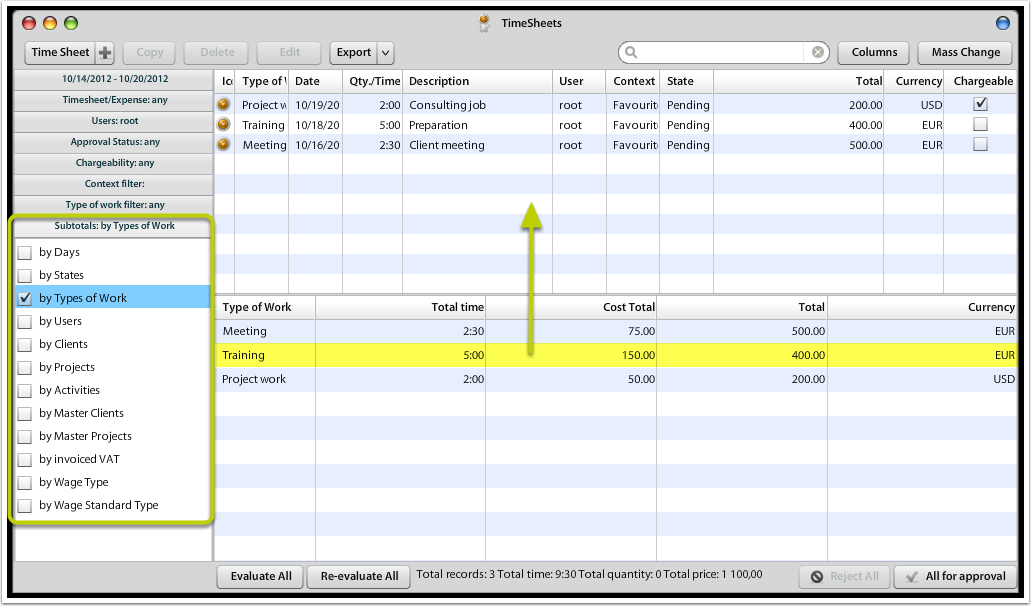
Open the Subtotals section of left accordeon. You may select various criteria upon which you can group Time Sheet record. You can even select one grouped record (in screenshot marked yellow) & above records will get filtered (it's function called record drill-down).
This online view is particularly helpful if you want to approve Time Sheet records. You may group them by projects or users to approve the time consumed.
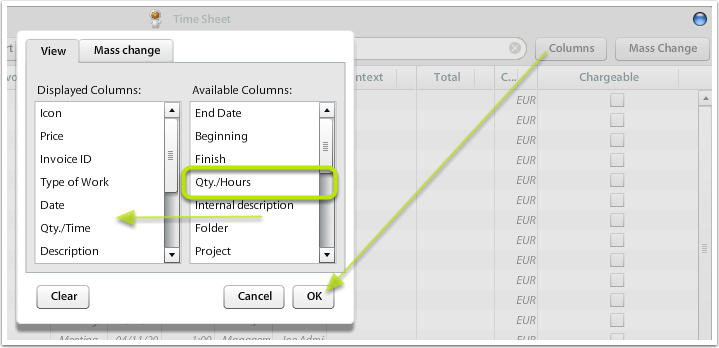
Adjust Displayed Columns
You may want to see some additional information about Time Sheet records, such as (for instance) Qty calculated in minutes (that is useful for exporting & further calculations in Excel) or you may want to add Tracking Categories visibility to see the Cost Centres, etc.
See the attached screenshot below to see how you can add more columns to Time Sheet records:
Time Sheet Adjustments
You can change multiple records by using Mass-change tool.
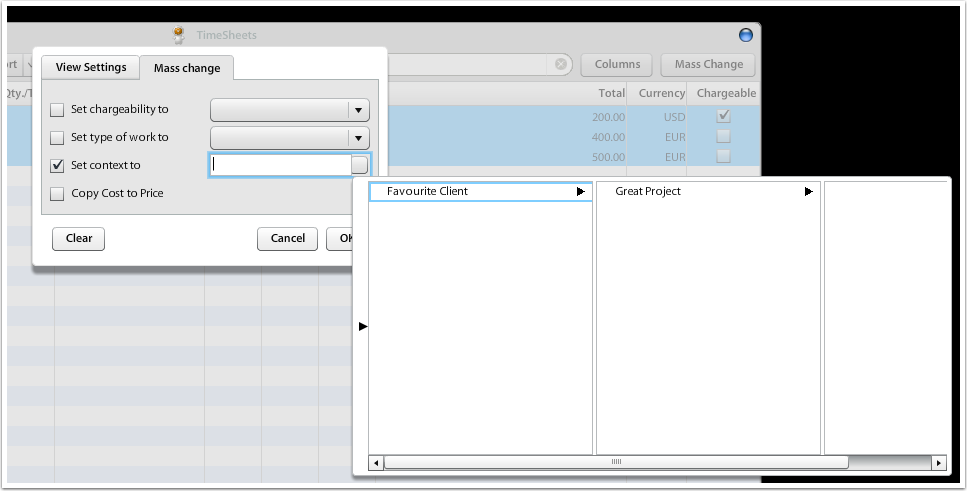
You can change multiple records's attributes:
- Set chargeability to yes/no
- Change Type of Work
- Change context (project) of Time Sheet record
- Copy Cost to Price (useful when Expenses are re-charged to clients 1:1)
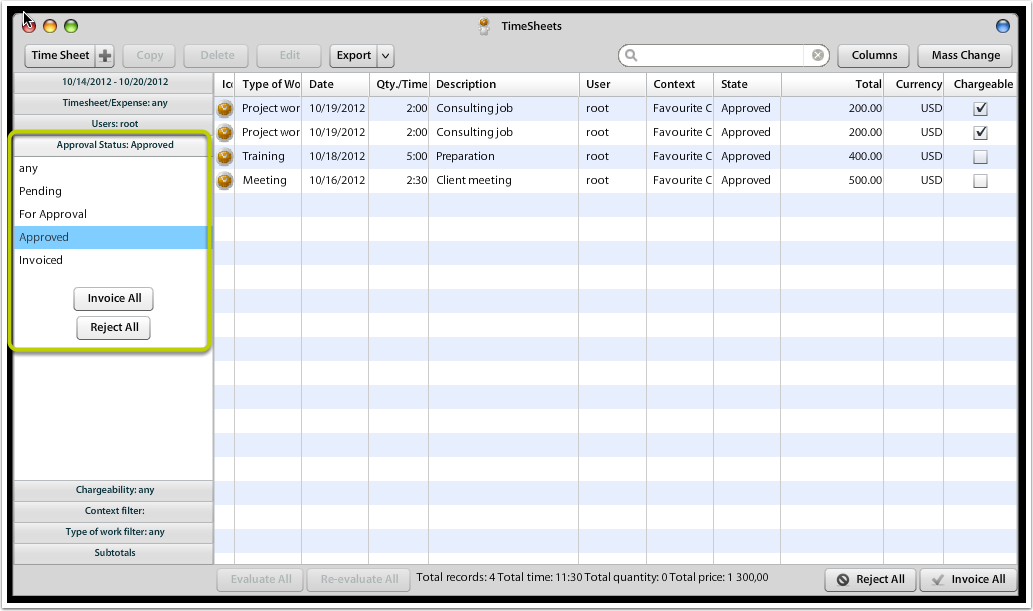
Time Sheet Approvals
To approve Time Sheets, you may filter for users (or show all users), set grouping criteria in Subtotals section and filter only for records that are For Approval (in Approval Status accordeon):
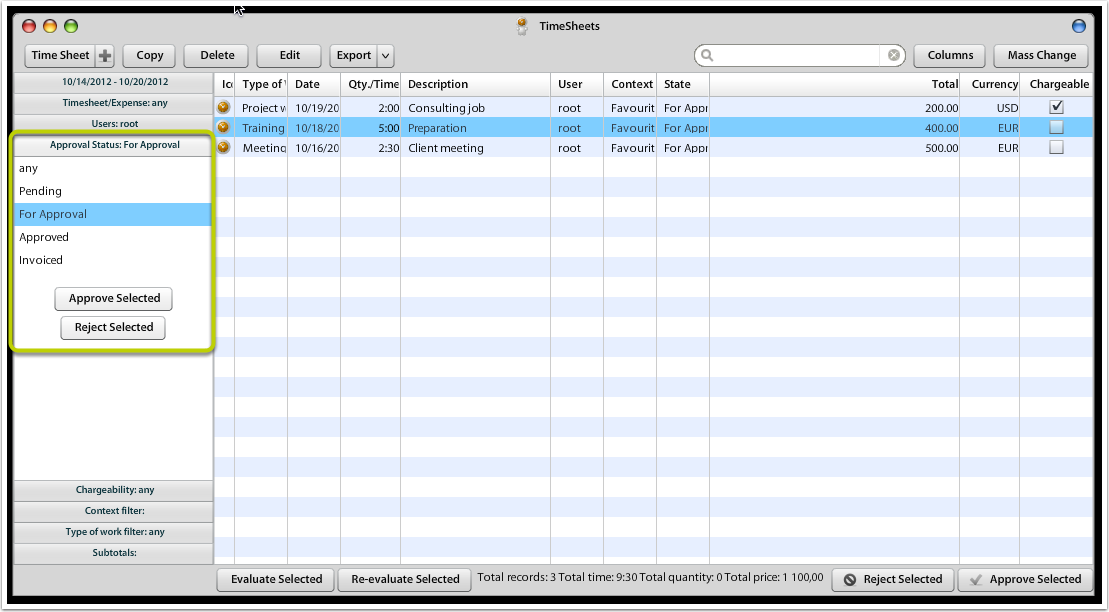
After selecting records for approval, you may click Approve Selected / (or All) records.
After Time Sheet records are approved, they may be sent to Billing for invoicing.
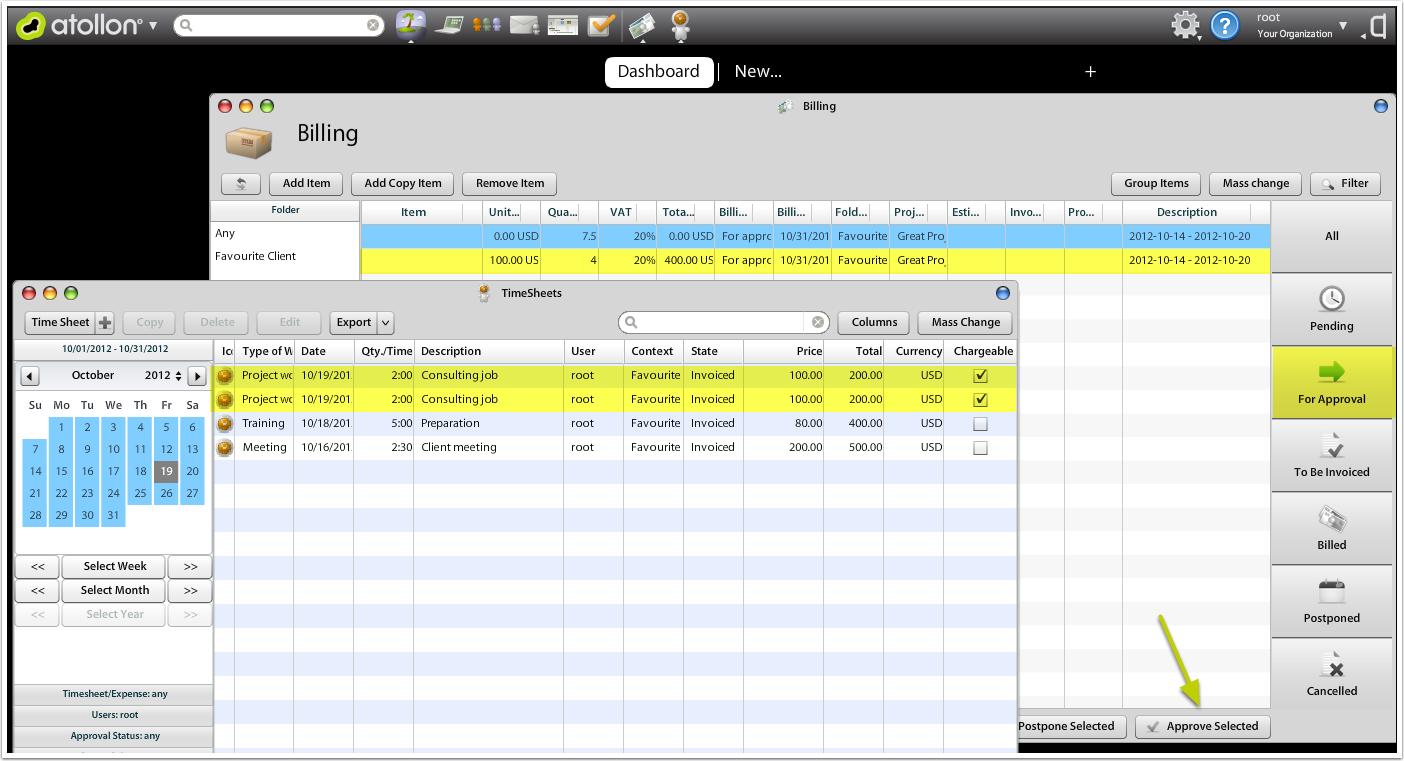
Time Sheet Invoicing
After Time Sheet records are approved, they can be sent to Billing for invoicing process.
Sending Time Sheets to Billing
When invoicing Time Sheet, Time Sheet records are merged into Billing items. Each Billing Item will be created with associated Product based on Item Settings. In Item Settings (only in MS Win admin interface) each Type of Work may be associated with different Product.
During Time Sheet invoicing process, it is possible to adjust Billing details, add some fixed fees & adjust how many hours were covered by the fixed fee amount. In Billing, you can also add some other Products / Services to be charged, which allows it to you to add Time & other products & services into one invoice.
Approving Billing
Create Invoice from Billing Items
After Billing Items are approved in Billing application, they can be invoiced.
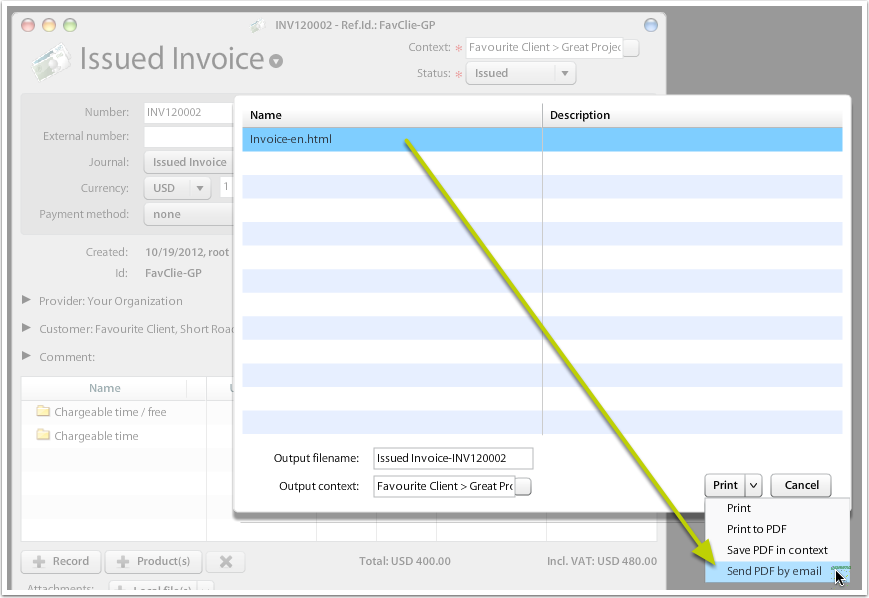
Print & send invoice
In invoice's context menu, select Print.
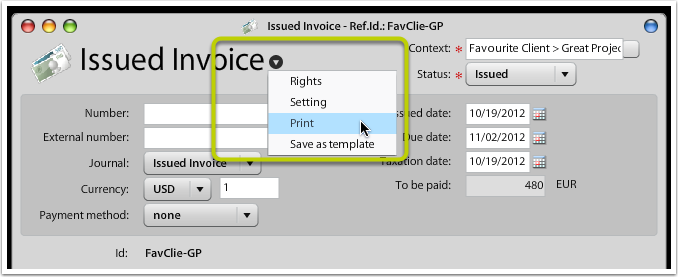
You have option to directly create PDF & attach it to your new e-mail. Before sending the e-mail you may select e-mail template & send the e-mail.
Time Sheet Valuation
The Time Sheet rates for wage (internal rate) or price (external rate) may be entered by system automatically, if you fulfill several conditions:
- You set-up valid Work Contract for the user
- In case you have customized price/rates for the Folder (Client), you select either standard or individual Work Price List at Folder/Client Billing Settings.
- In case you have customized price/rates for the Project, you select either standard or individual Work Price List at Project Billing Settings.
The valuation is done by the system automatically after user confirms the Time Sheet records. Manually entered Time Sheet records should be confirmed automatically by system (work-in-progress), automatically entered Time Sheet records should be confirmed by either user or manager.
The Time Sheet Valuation Procedure
The system tries to find available rates for the Time Sheet in the following order, individually for each of the rates (wage / price):
- Project's Work Price List
- if not found, then continue to Folder's Work Price List
- if not found, then continue to Work Contract
Example:
- You may set individual Project price (external rate) EUR 99 / hour for the "Consultant" Type of contract. No wage (internal rate) is set-up at Project level.
- The user has "Consultant" Type of Contract set at her Work Contract settings, with EUR 25 / hour wage (internal rate).
- The Time sheet entered by User on Project will be valued: EUR 25 / hour wage (internal rate) & EUR 99 / hour price (external rate)
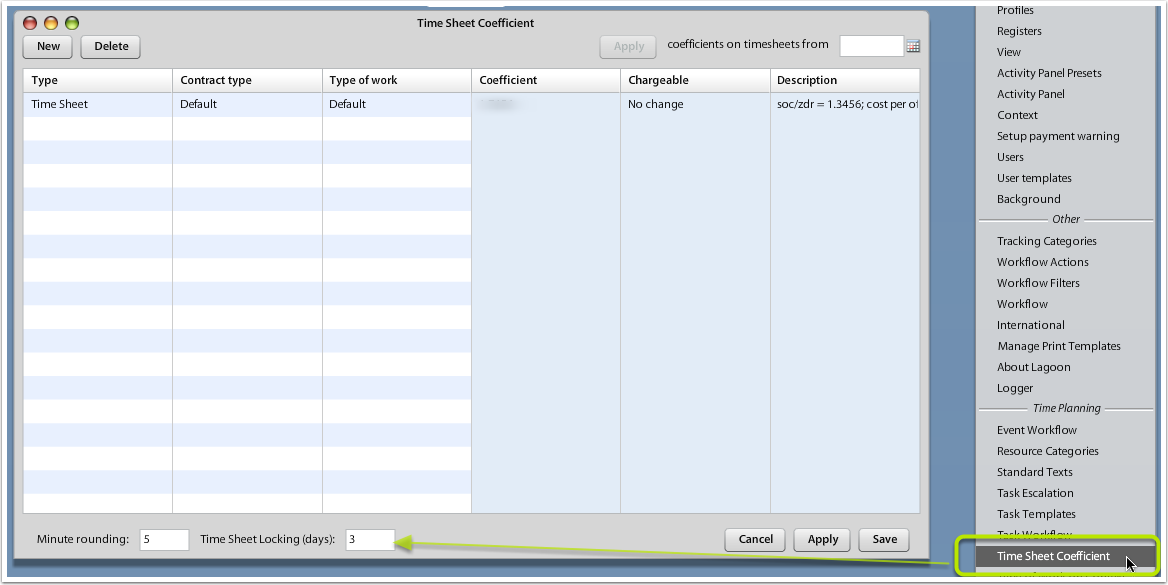
Time Sheet Settings
Time Sheet Locking
It is possible to set-up auto-lock Time Sheet entering for X number of (working) days. Working days are setup from Monday to Friday.
In Time Sheet Coefficient Settings screen, set-up the number of working days, after which users will not be able to enter any new or amend existing Time Sheet records. In order to enable updating older records, this lock has to be removed (clean the field & apply).
Enter Time Sheet
This lesson's aim is to provide easy help to end users to enter their Time Sheet in Atollon.
Open Time Sheet Application from Atollon menu
Enter new Time Sheet record
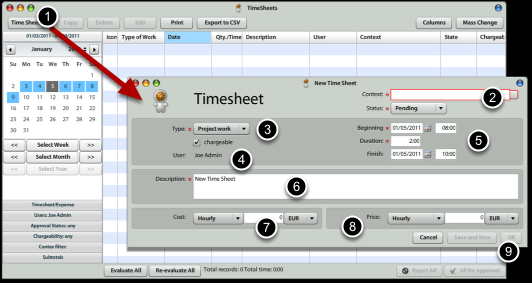
In order to enter new Time Sheet record, you should:
1.) Press on the Time Sheet button (top left) in Time Sheet application.
2.) Select Context: Client > Project > Activity (Milestone) for new Time Sheet record (it is customizable, which level is required)
3.) Select Type of Work
4.) Set whether the Time Sheet is chargeable to client or not
5.) Select Start Date & Duration (HH:MM), optionally also End Date & Time
6.) Write work description
7, 8) Cost & Price Information
You do not need to write Cost or Price, if you subscribed to Octopus Billing Automation solution. This information is not available to users, who do not have rights to view Work Contracts (in case of Cost) or Price Lists (in case of Price).
9.) Press Ok or Save & New, if you want to continue on the same project.
Copy existing Time Sheet records
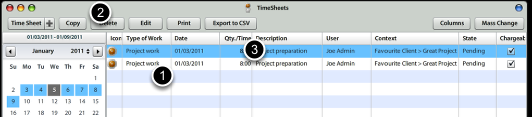
Once you want to create similar record, you can select existing record in Time Sheet grid and press Copy. The new record is displayed in grid and highlighted.
Edit existing Time Sheet record

To edit existing Time Sheet record, just select one & press Edit button.
You can make any changes to the record & press Ok button.
If you change any criteria that will make your record disappear (for instance you change the date range outside of filter), you should be notified.
Revise Time Sheet records before they are sent for approval
Before confirming your Time Sheet records, you should check whether everything you wanted was entered. You can open quick Time Sheet report, available at Subtotals section (bottom left). By selecting one of the grouping criteria, you will get summary below your Time Sheet. By clicking on any of the summary rows, you get detail above.
Send Time Sheet for approval

You can send one or more Time Sheet records for approval. Only items in Pending state are sent for approval.
1.) Select correct time period (month, week, day)
2.) Make sure you selected all pending items (Approval Status is Any or Pending)
3.) Click on button All (Selected) for Approval
Project Expenses
This tutorial shows the way how to enter regular project expenses.
Project expenses may be entered using Time Sheet / Expense Sheet application or using Received Invoices.
Add new project Expense
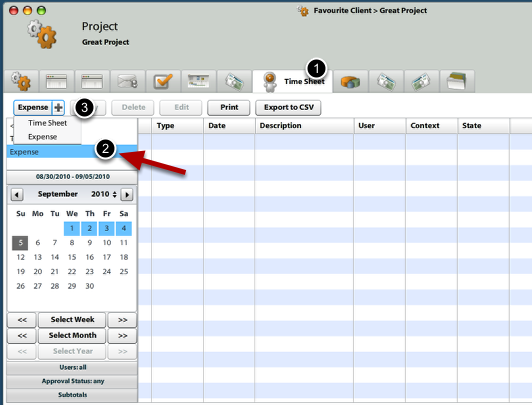
Open the project, where you would like to enter new expenses.
1.) On Time Sheet tab, you may entere new expenses.
2.) You can filter for only expense records (this will hide Time Sheet records) by clicking on Expense filter top left.
3.) Press on (+) on the button to select New expense record creation
Enter Expense details
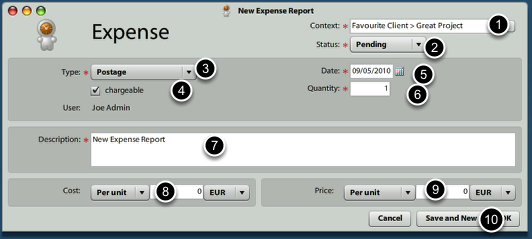
1.) Current project has been entered automatically, but you can change it
2.) Status may be changed later, once you have all expenses entered
3.) Select Type of Expense
4.) Set whether the Expense should be entered into Billing
5.) Set when the Expense incurred
6.) Set the quantity
7.) Write some notes, for instance who (from client side) ordered this expense
8.) What was the item / total cost of Expense?
9.) What are we going to charge to clients?
10.) Submit
Send expenses for billing approval

After you entered all expenses, you should send the for billing approval. It is necessary to confirm expenses entered into the system to avoid errors and inform your colleagues that you would like these expenses be billed.
1.) Select My Time Sheet
2.) Select period, for wich you are confirming your expense records
3.) Send All (selected) for approval
Approve expenses for billing
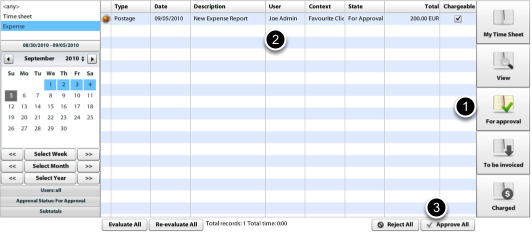
Person responsible for approving Time Sheet and/or Expenses should approve expenses before they are entered to billing.
1.) Open Time Sheet / Expense Sheet and click on For approval button
2.) Revise the expenses
3.) Approve all (selected) expenses
Send approved expenses to billing
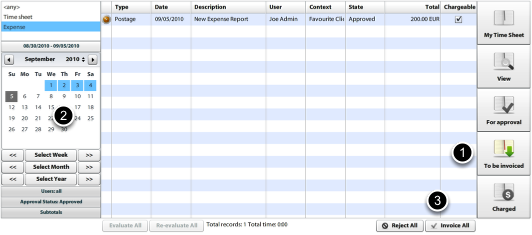
Approved expenses may be billed using Atollon Octopus Billing Manager tool. In order to send approved expenses to billing, do the following:
1.) On Time Sheet / Expense Sheet tab / application select To be invoiced button
2.) Set time period, which you wan to be billed
3.) Click on Invoice All (selected) button
This procedure will create new Billing Item in Billing tool.
Time Tracker
This lesson shows how to track time based on tasks assigned to Solvers.
Atollon Time Tracker is used to measure time spent on solving tasks. Time measured by Time Tracker is entered into Time Sheet. It is adviced to confirm the resulting every day using Time Sheet confirmation tool.
Display Time Tracker & Tasks at the same time
Display tasks & Time Tracker on the same screen. Time Tracker is placed as widget on Atollon's side bar.
Drag & Drop Task to Time Tracker
Select the task using mouse & move it on top of the Time Tracker widget.
Time Tracker starts counting time spend on solving the task.
Interrupt current Task
You can interrupt the task either by starting to solve other task or by pausing current task. To pause current task, just hover over Time Tracker counter to pause it. In order to switch to another task, just drag & drop another task on the Time Tracker. The previous task remains halted in Time Tracker Queue.
In order to open Time Tracker queue, click on the arrow on the rights side of the Time Tracker.
Stop the Time Tracker
Once you finish your work on the task, just hover with your mouse over Time Tracker counter & press stop button.
Adjust time & save to Time Sheet
Revise whether time measured by Time Tracker is in order & save it to your Time Sheet.
Confirm your Time Sheet
By the end of the day (week/month), revise the time saved in your Time Sheet and send it for approval.
Just open your Time Sheet (Atollon > Time Sheet), select the time period (left), see whether all records are properly entered, add new lines, if needed & send all Time Sheet records for approval by pressing All (selected) for approval.
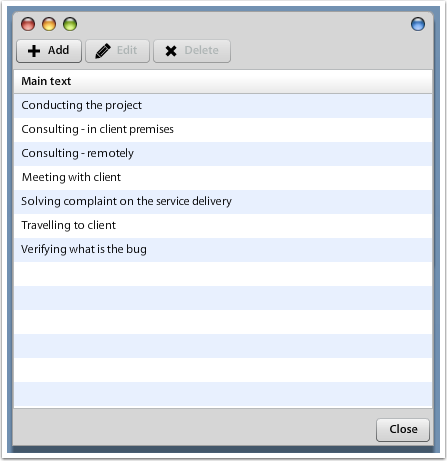
Standard Texts
Usually checking Time Sheet entries by managers when preparing work reports for clients is time consuming due to checking contents of the reports (their texts).
Standard texts are used to speed-up & improve quality of Time Sheet records data entry. When users enter Time Sheet records, they get option to select one or more "standard texts" & adjust it to their needs.
Standard texts not only allow adding description to client & internal description, they also help users preset Type of Work (which is important management controlling variable).
Open Options & Tools > Time & Planning > Standard Texts to enter the texts you need.
Dashboard
Set-up Dashboard
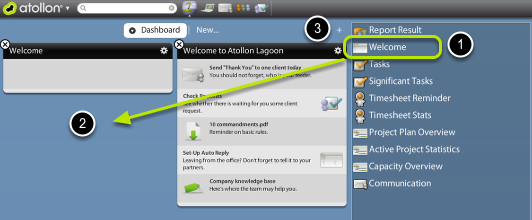
How to Add/Remove Dashboard Widgets?
It is quite easy! Follow this manual:
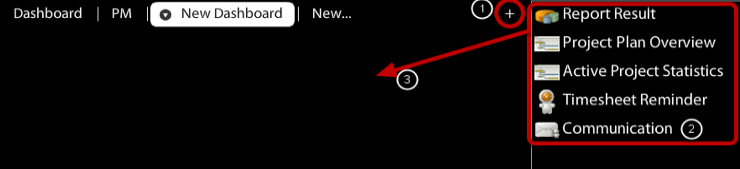
- After you click on plus (1) you'll get widget menu on right side (2). Choose widgets you would like to have on your dashboard, drag&drop them into Dashboard (3).
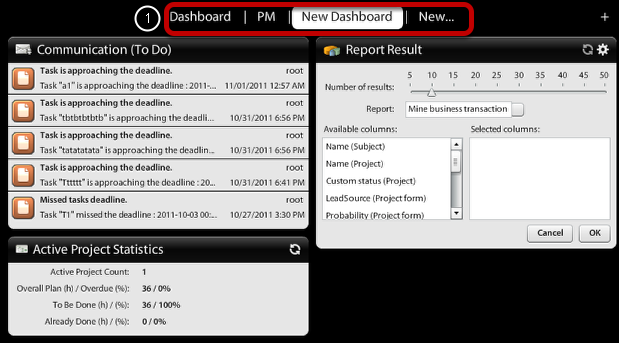
How to Adjust Report Widget?
- You can even create more dashboards for different needs (f.e.marketing dashboards, sales, project planning, etc.)
- You can swith them by using top menu (1)
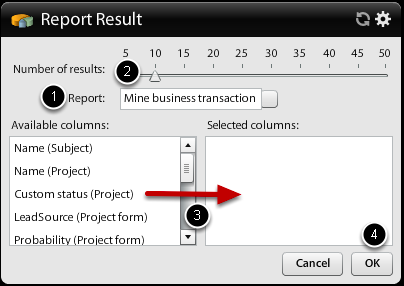
- Setup Report Results
- choose report (create special ones)
- setup how many results you want to see
- drag&drop colomns you want to see
- click on OK
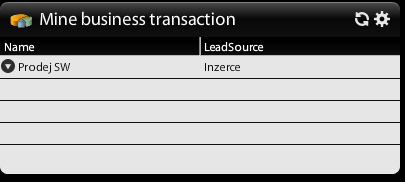
- You can see all your widgets including report results on your dashboar
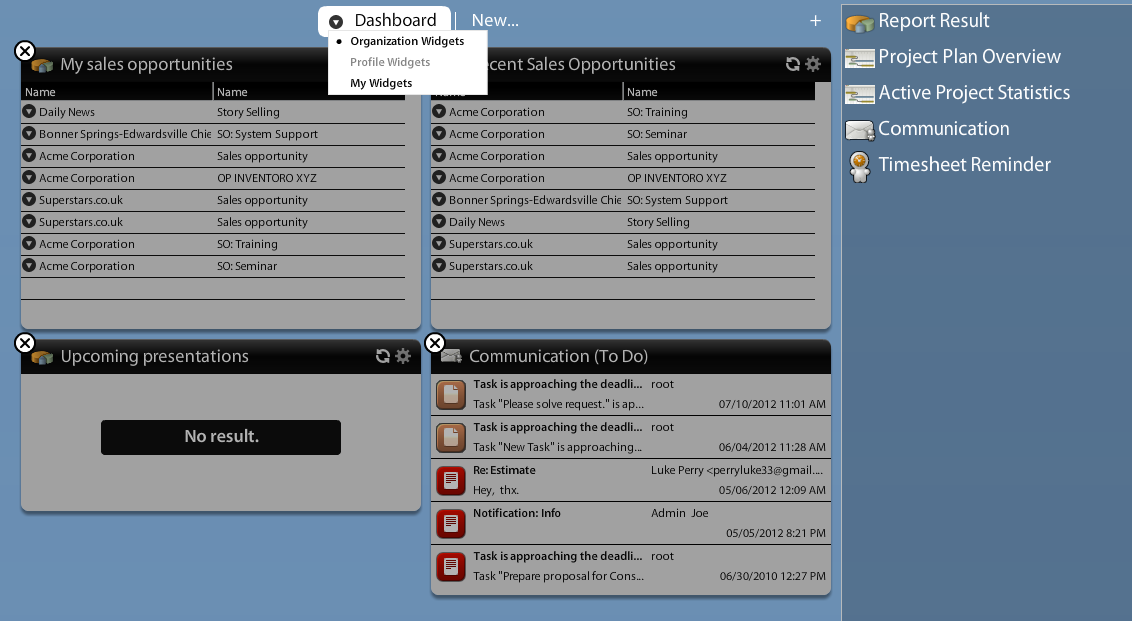
How to adjust Dashboard for the whole organization?
Users that are authorized to update Organization settings (usually Admins or Power Users) can set-up home screen of Dashboard for the whole company. Using dashboard switch on home page you can show settings of Organization Widgets & update them (Add/Remove Dashboard widgets for the whole Organization).
1.) Click on (+) icon on Dashboard top menu
2.) Click on (>) drop-down icon next to Dashboard top menu & switch to Organization Widgets
3.) Adjust any widgets (add/remove) that are displayed for the whole organization
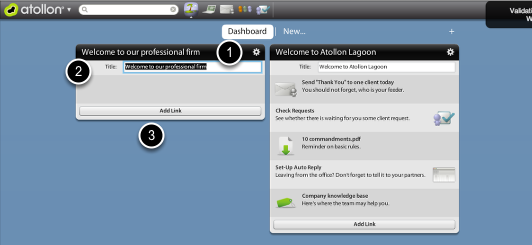
Welcome Widget
Create intranet for your employees in minutes. Atollon Lagoon Welcome widget helps you help your employees & other users focus on the most important activities.
Atollon Lagoon Welcome Widget allows you to:
Add any link(s) on the user's dashboard:
- shortcut to Atollon Lagoon application
- shortcut to application's function
- shortcut to any Atollon Lagoon settings
- link to external URL
- shortcut to download/open internal document
Add Welcome widget to Dashboard (select for whom)
- Click on (+) button on top of Atollon Lagoon Dashboard
- On black arrow (>) option select who's Dashboard is configured (you can select ether My Widgets used for personal needs, Profile Widgets (used for all users having the same profile), Organization Widgets (for users in the same Organization)
In case you need to set-up Dashboard for other user profiles (eg. Sales, Consultants, Programmers, Accountants, Finance, Lawyers, etc.), you need to switch your own user profile in User Settings (Setting > Users > edit). Afterwards you will be able to amend any other User Profile.
Add Welcome widget to Dashboard

Drag & drop the Welcome widget on the empty space
You can add several Welcome widgets on any of the dashboard panels.
After adding the Welcome widget, close the editation of widgets by pressing (+) button again.
Edit Welcome widget contents
- Click on Settings button in the widget header.
- Change the widget title
The widget is now in EDIT mode. You can add it's components (rows) - links, shortcuts, etc.
Add shortcut to Atollon Lagoon application
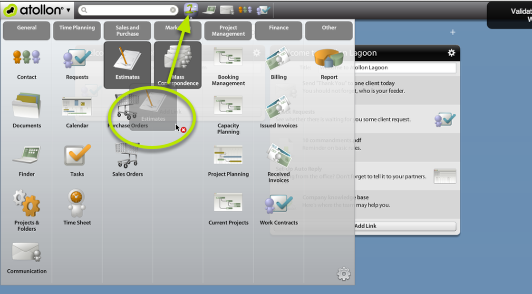
You can simply Drag & Drop any application to Dashboard & place on top of the Welcome widget to create shortcut to the application.
After you place the application shorcut on Welcome widget, you can rename it and add some description.
Add shortcut to Atollon Lagoon application's function
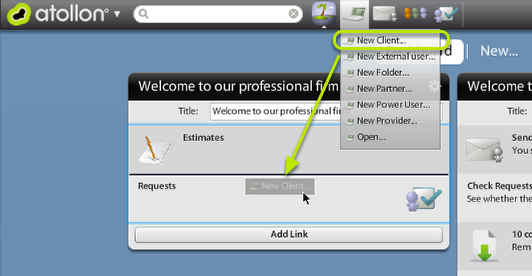
You can Drag & Drop any function from application's drop-down menu and put it on top of the Welcome widget. This will create a shortcut to the function. You need (at least temporarily) add the application on the Application task bar. You can do it in Settings > Application Settings.
Add shortcut to any Atollon Lagoon settings
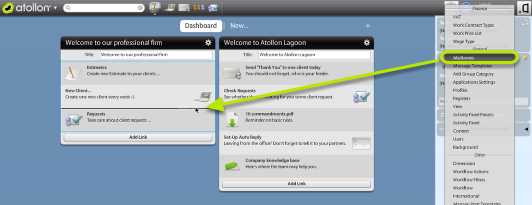
You can Drag & Drop any item(s) from Settings onto the Welcome widget. For example Mailbox settings allow users to set-up Auto-reply when unavailable ...
Add link to external URL
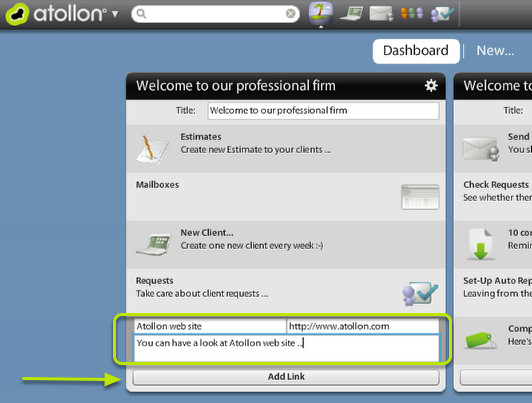
You can add any number of external links. When copying/adding the links, please make sure you add also http:// or https:// (for secure access) in front of the web page address (URL).
Dynamic URL parameters
If you want to pass some dynamic parameters in url (like username, session etc.), there is a list of keywords, which will be replaced with actual value. Here it goes:
public static const SESSION:String = "${SESSION}";
public static const SERVER:String = "${SERVER}";
public static const ORGANIZATION:String = "${ORGANIZATION}";
public static const USER_ID:String = "${USER_ID}";
public static const USERNAME:String = "${USERNAME}";
public static const WSDL_FOLDER:String = "${WSDL}";
public static const DOMAIN_ROOT:String = "${DOMAIN}";
public static const ENDPOINT:String = "${ENDPOINT}";
public static const BASE_URL:String = "${BASE_URL}";
Example: https://lifehacker.com/?username=${USERNAME} will be translated to https://lifehacker.com/?username=johny@atollon
Atollon URL
It is also possible to use "Atollon URL" - that is LINK you get by copying object that has "Share" button available. For example atollon://finder/openDetail/?id=133457101&type=project may be link to open some project...
Add shortcut to open document
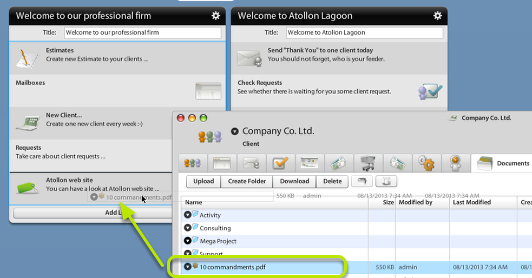
You can open any folder / project with document(s) and Drag & Drop the document on top of the Dashboard. After adding the shortcut to open document, you may rename it & add description.
Remove item from Welcome widget
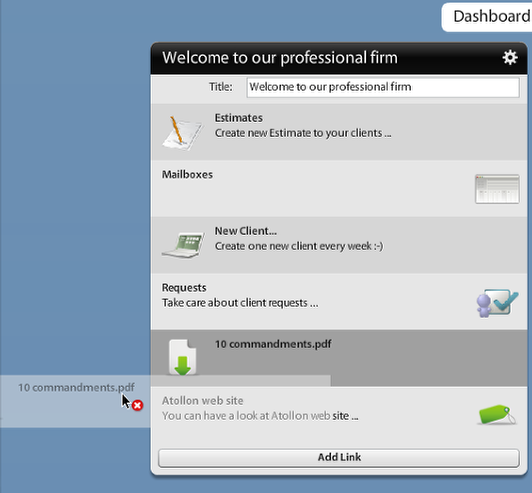
Removing the item is quite simple. Just take one of the items and Drag & Drop it outside the widget -> on desktop of Atollon Lagoon.
After you have done all your edits, you can save them by pressing the Settings button in the widget title again.
Now the widget is in VIEW mode again.
Calendar
Calendar Overview
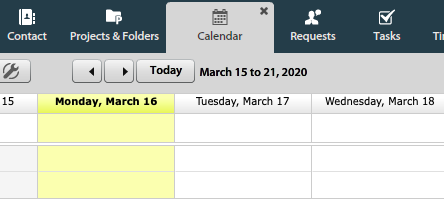
Atollon Calendar is really simple to use feature, see the bacis view below.
Advantage of using Atollon Calendar is the fact that it's part of your sales or service delivery process. Calendar events may be tracked in relation to your clients, deals, projects, etc.
Atollon calendar is also integrated to your time tracking, resource management, etc.
Events have different colors - header color according to user, body is set by type of event
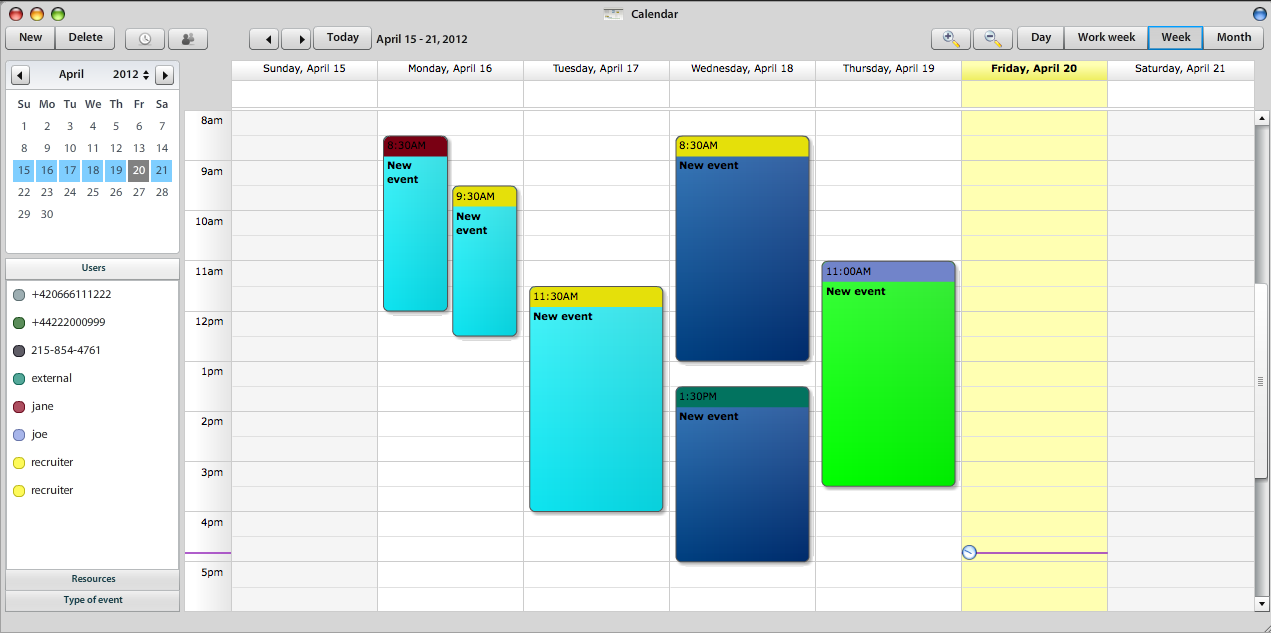
You can swith to multi-user calendar using 4th icon on screen bellow.

Multi-user calendar
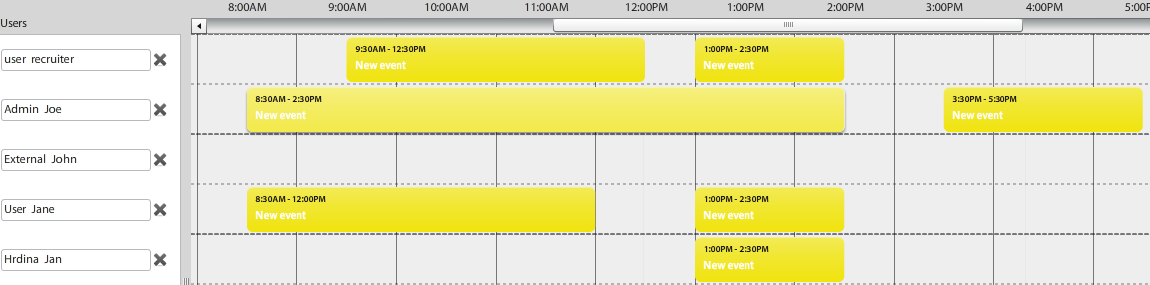
Atollon CalDAV Settings
Atollon supports synchronising your calendar with your mobile device or any CalDAV compatible calendar application.
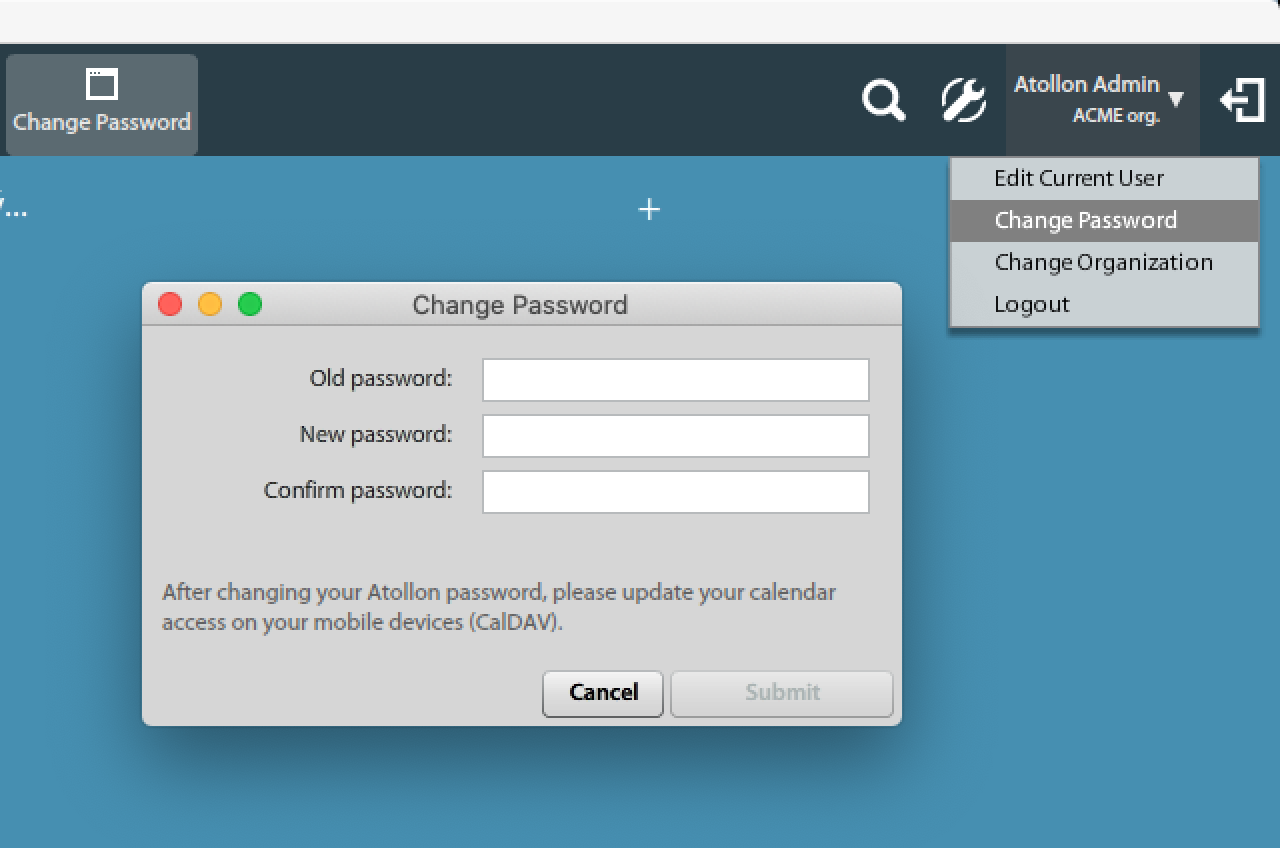
Update your Atollon password
In order to access your calendar using CalDAV, you need to first change your password in "Change password" dialog. CalDAV account is initiated after password change.
Access Credentials
Your Atollon user account is used to access CalDAV calendar server.
You can check your own access to CalDAV using simple tool in Atollon Calendar app directly. Go to your Calendar and click on Options button to see your full username and CalDAV URL.
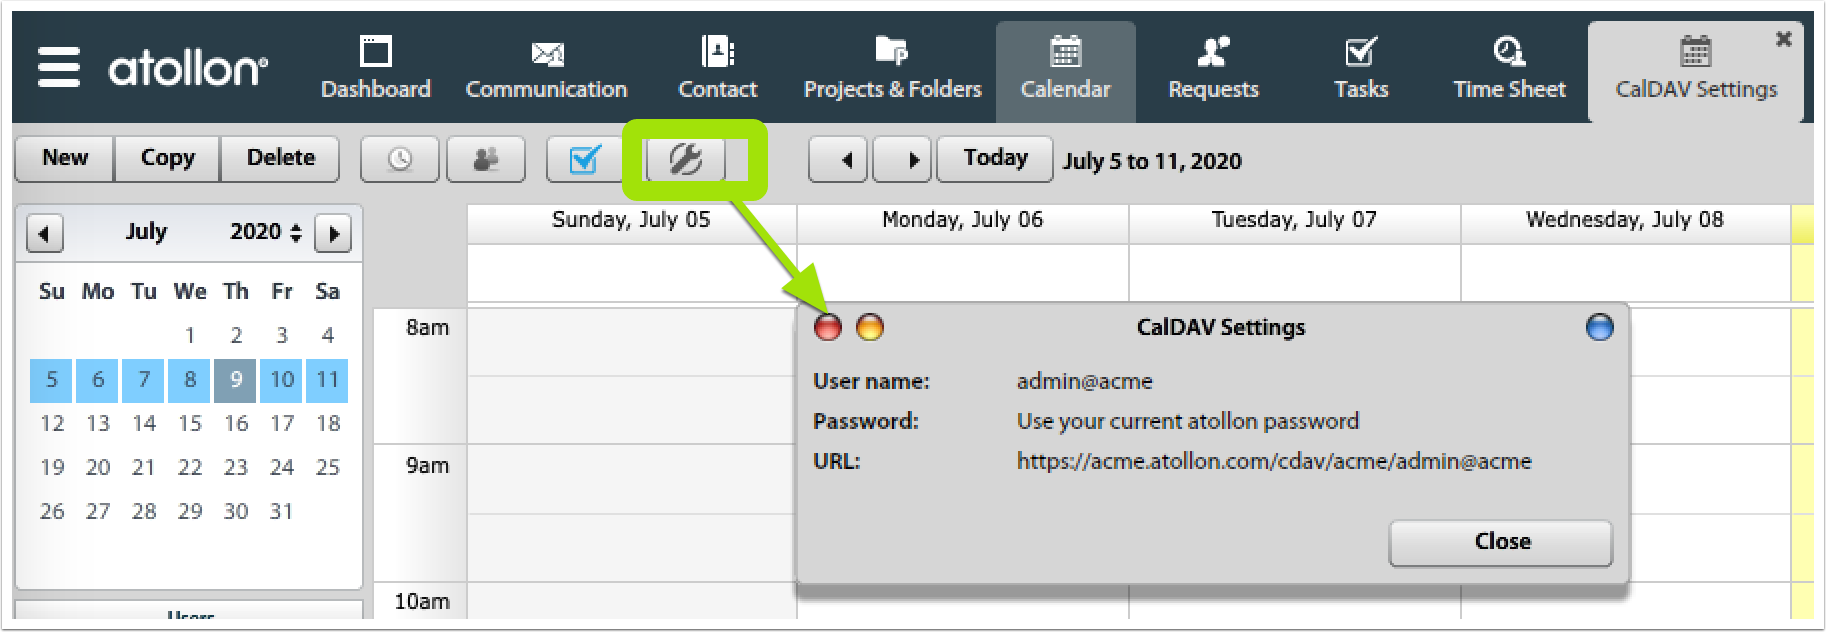
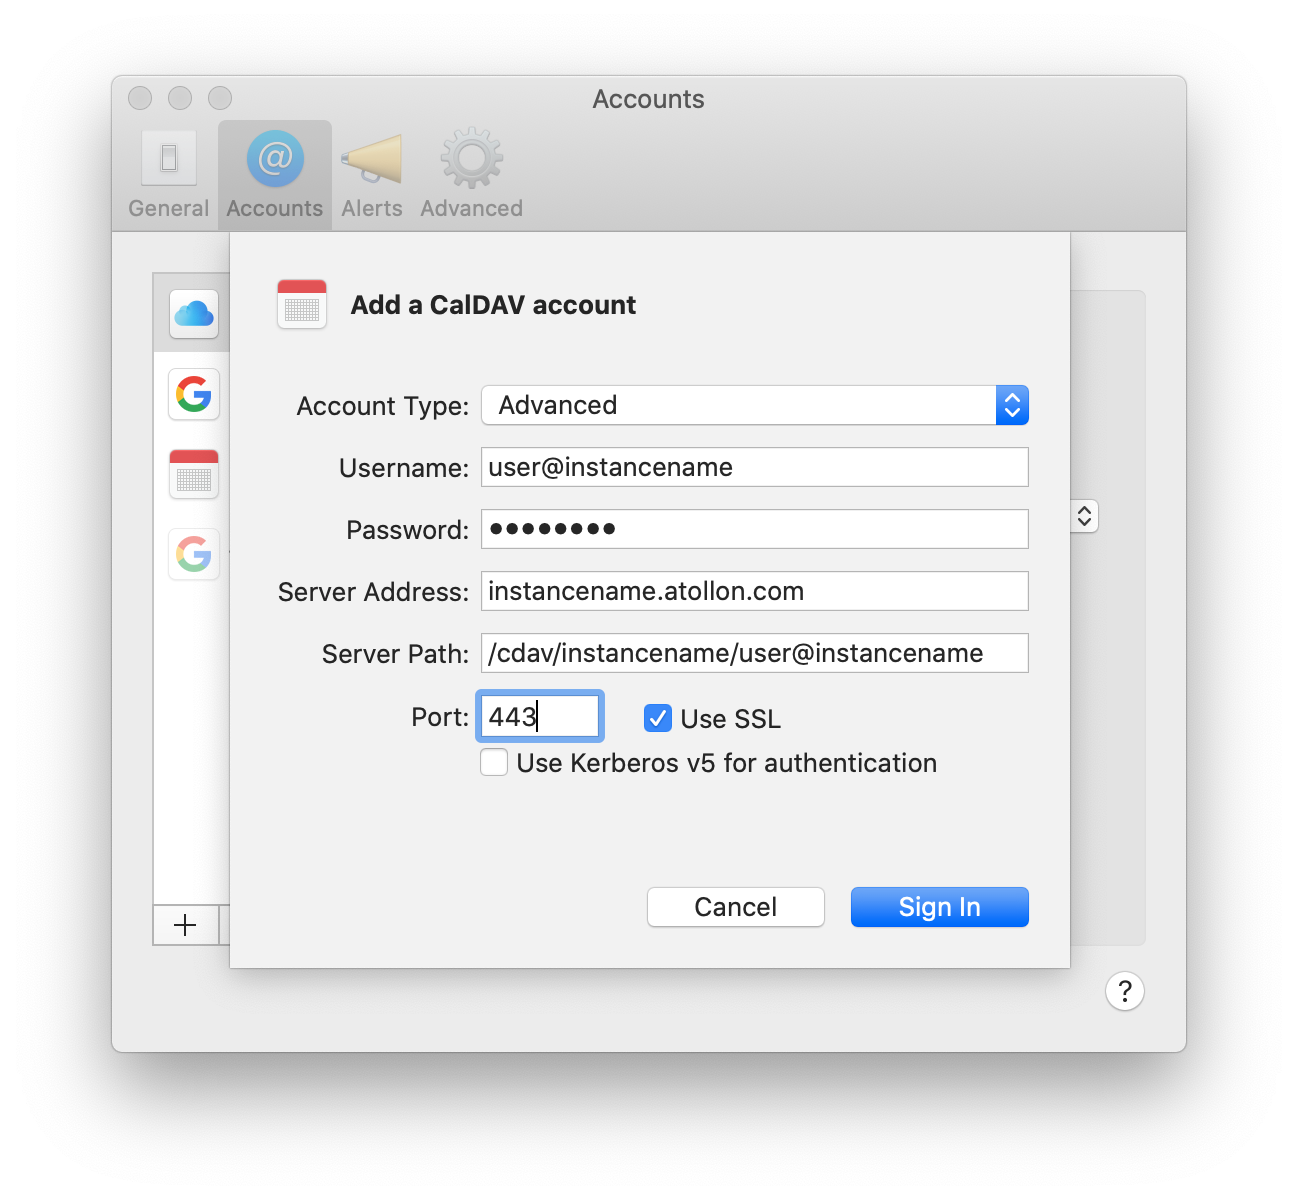
- Your username should be mentioned in its full format, which is username@instancename
- Full CalDAV URL to your Atollon calendar is: https://instancename.atollon.com/cdav/instancename/user@instancemane
- Port is 443 (https)
For "instancename" you should get your organization's instance name, for example acme.atollon.com.
Various CalDAV clients (iPhone, Android, Mac OS X calendar, etc.) will need the information in different formats. Below you can find How to on some of the most frequent solutions.
Atollon Calendar Clients Configuration Examples
Atollon Calendar in iPhone
If you want to connect your iPhone calendar to Atollon, please make sure you recently changed your Atollon's user password.
Below you can find a guide on how to set-up your access to Atollon calendar using iPhone. iPhone has built-in support for CalDAV, therefore you don't need to install anything, just add new CalDAV account to your Account Settings.
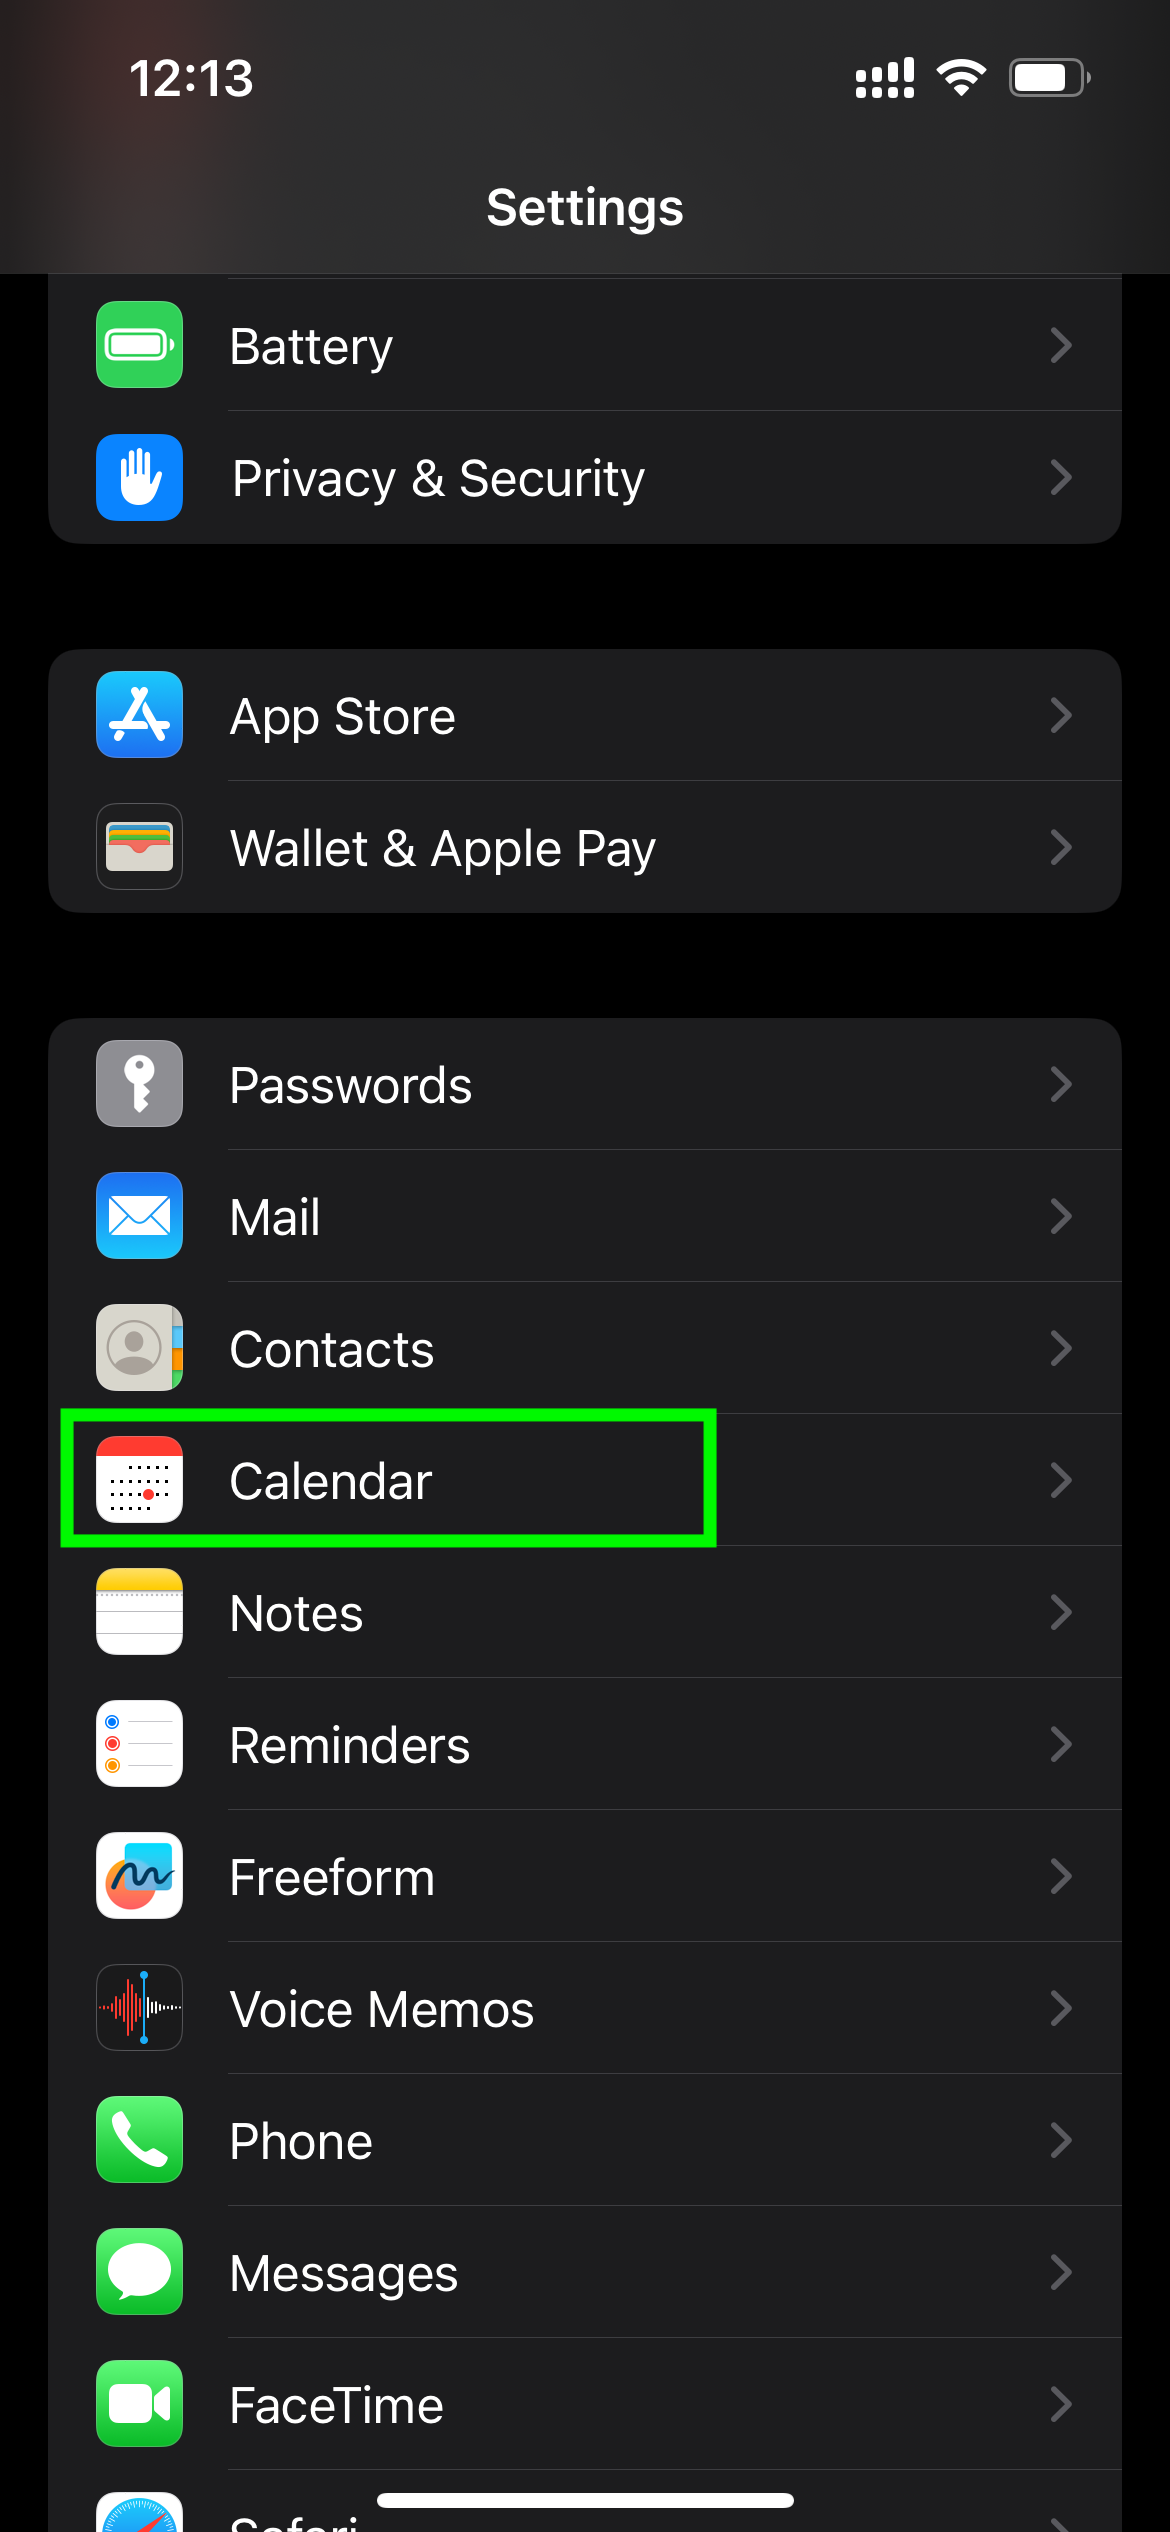
Below see the step-by-step guide:
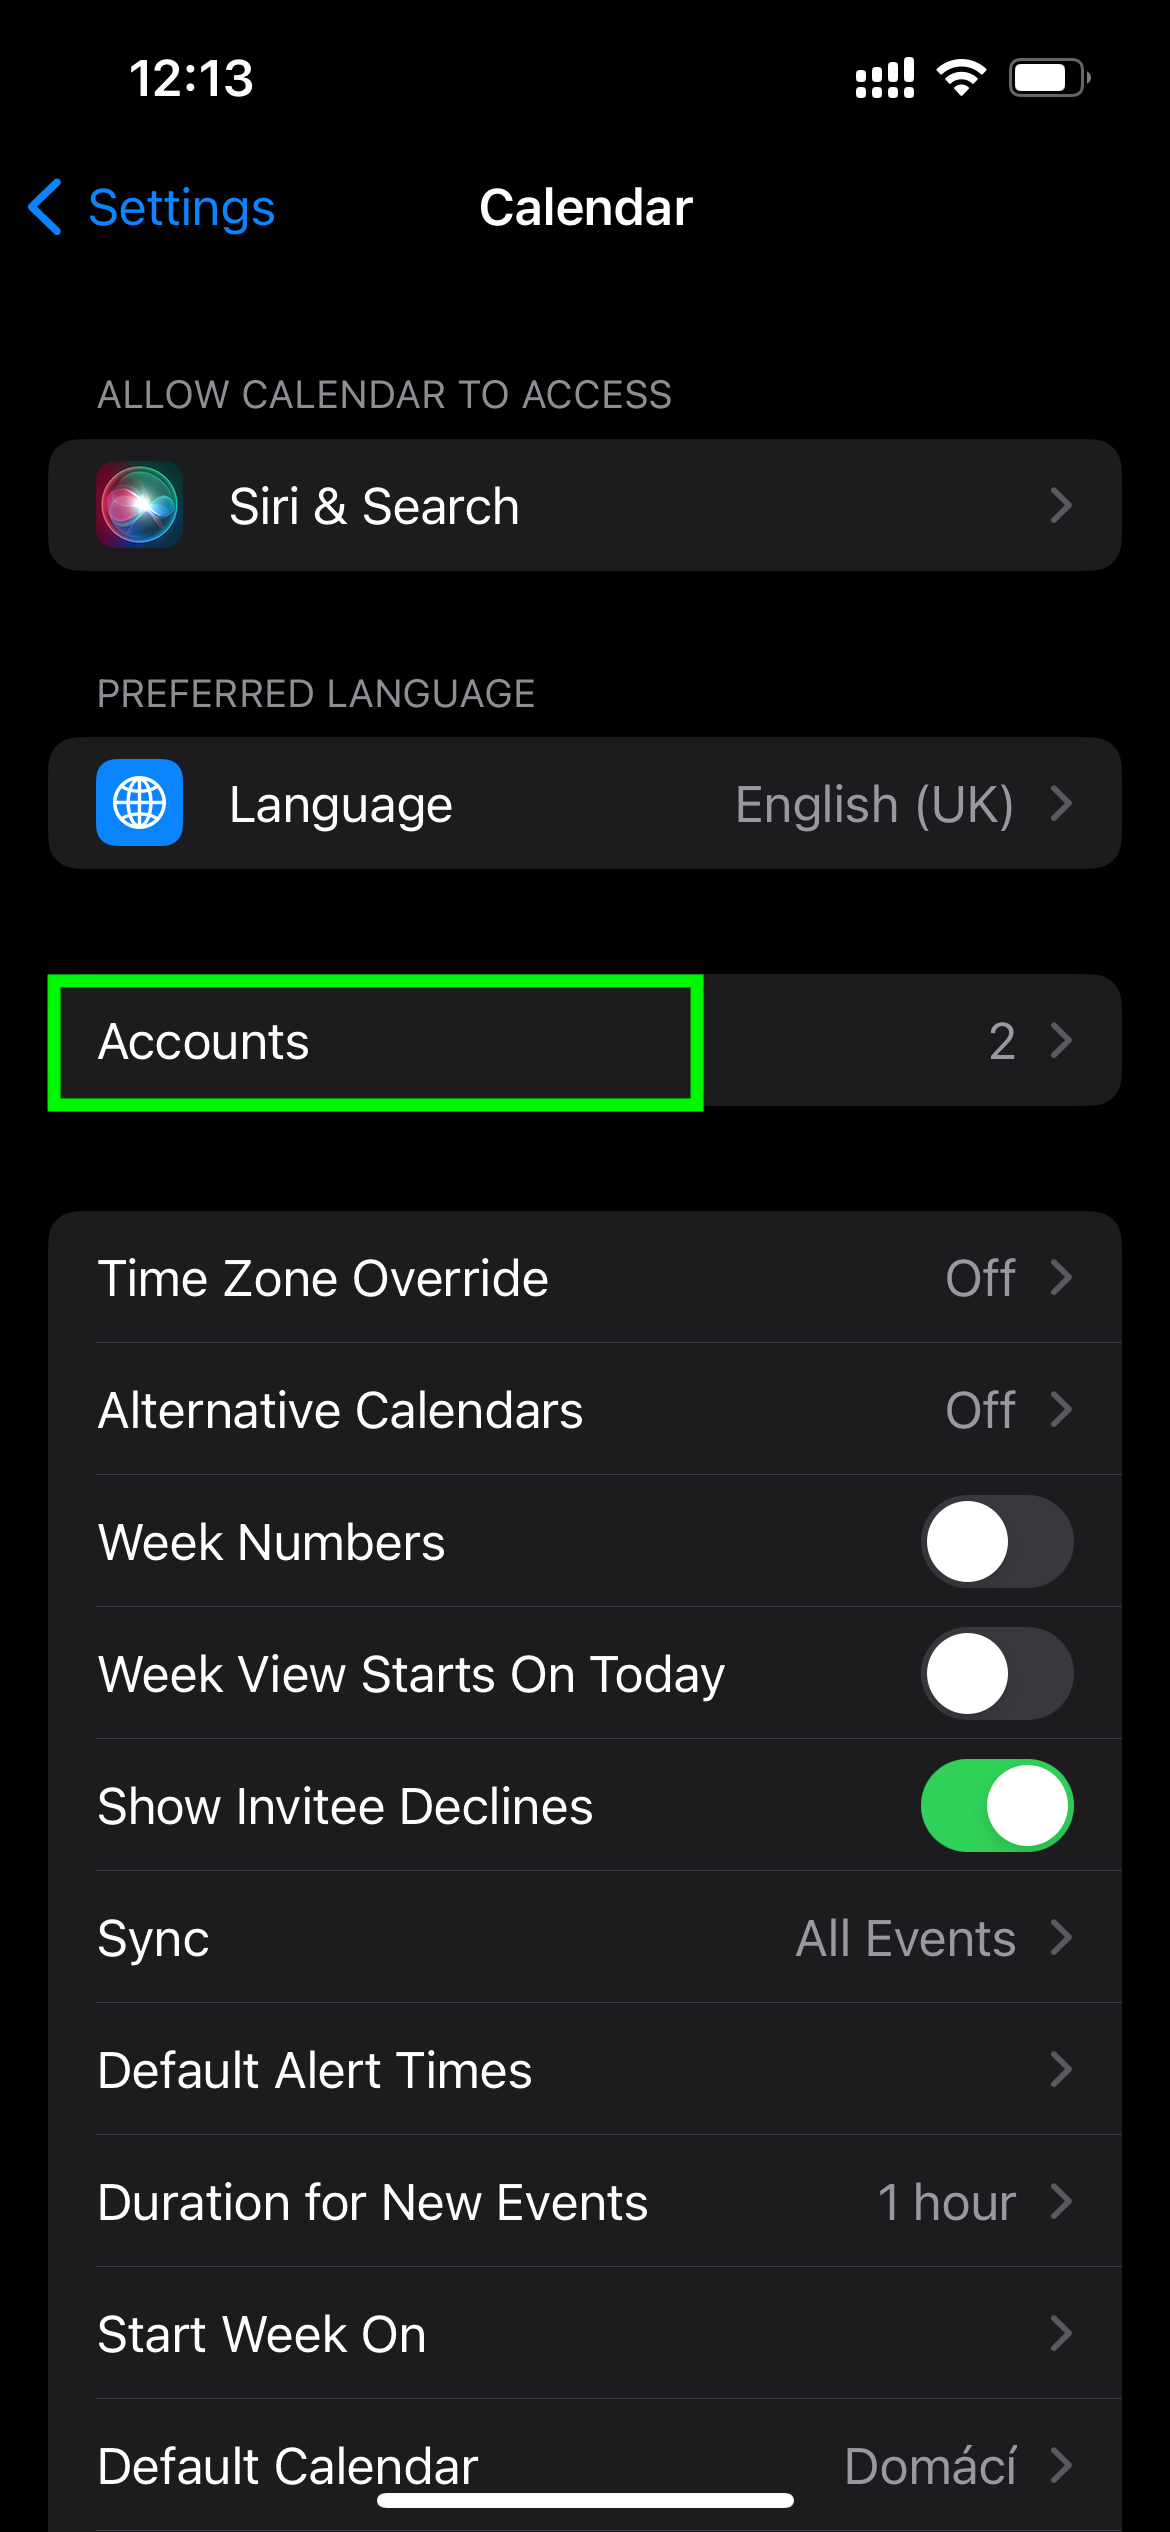
Go to iPhone Settings > Calendar
Accounts
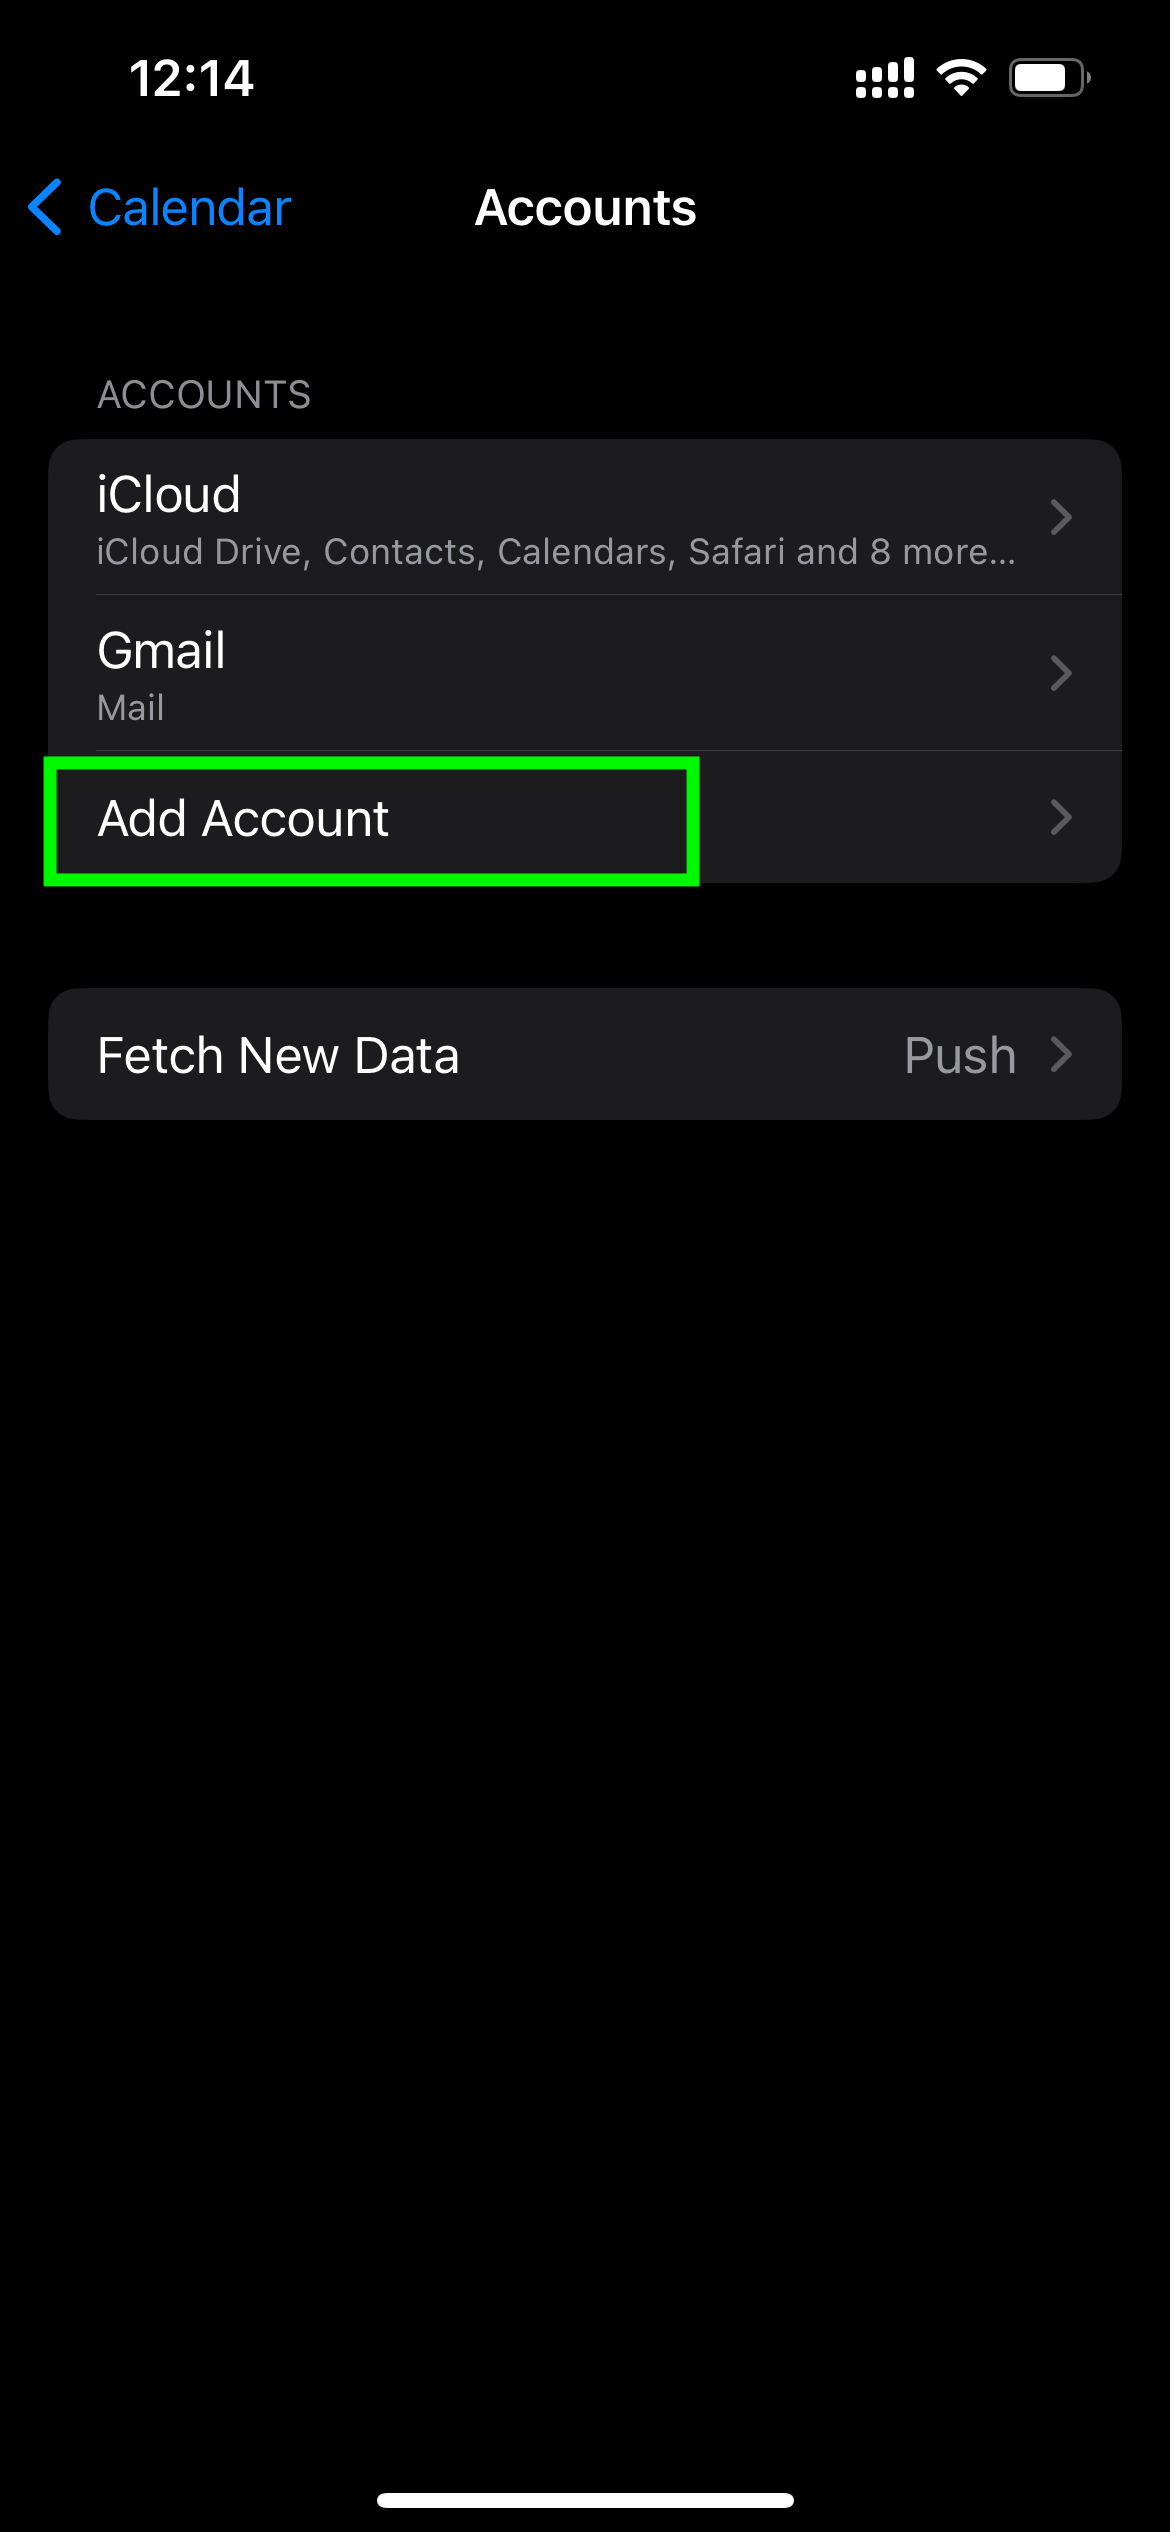
Add Account
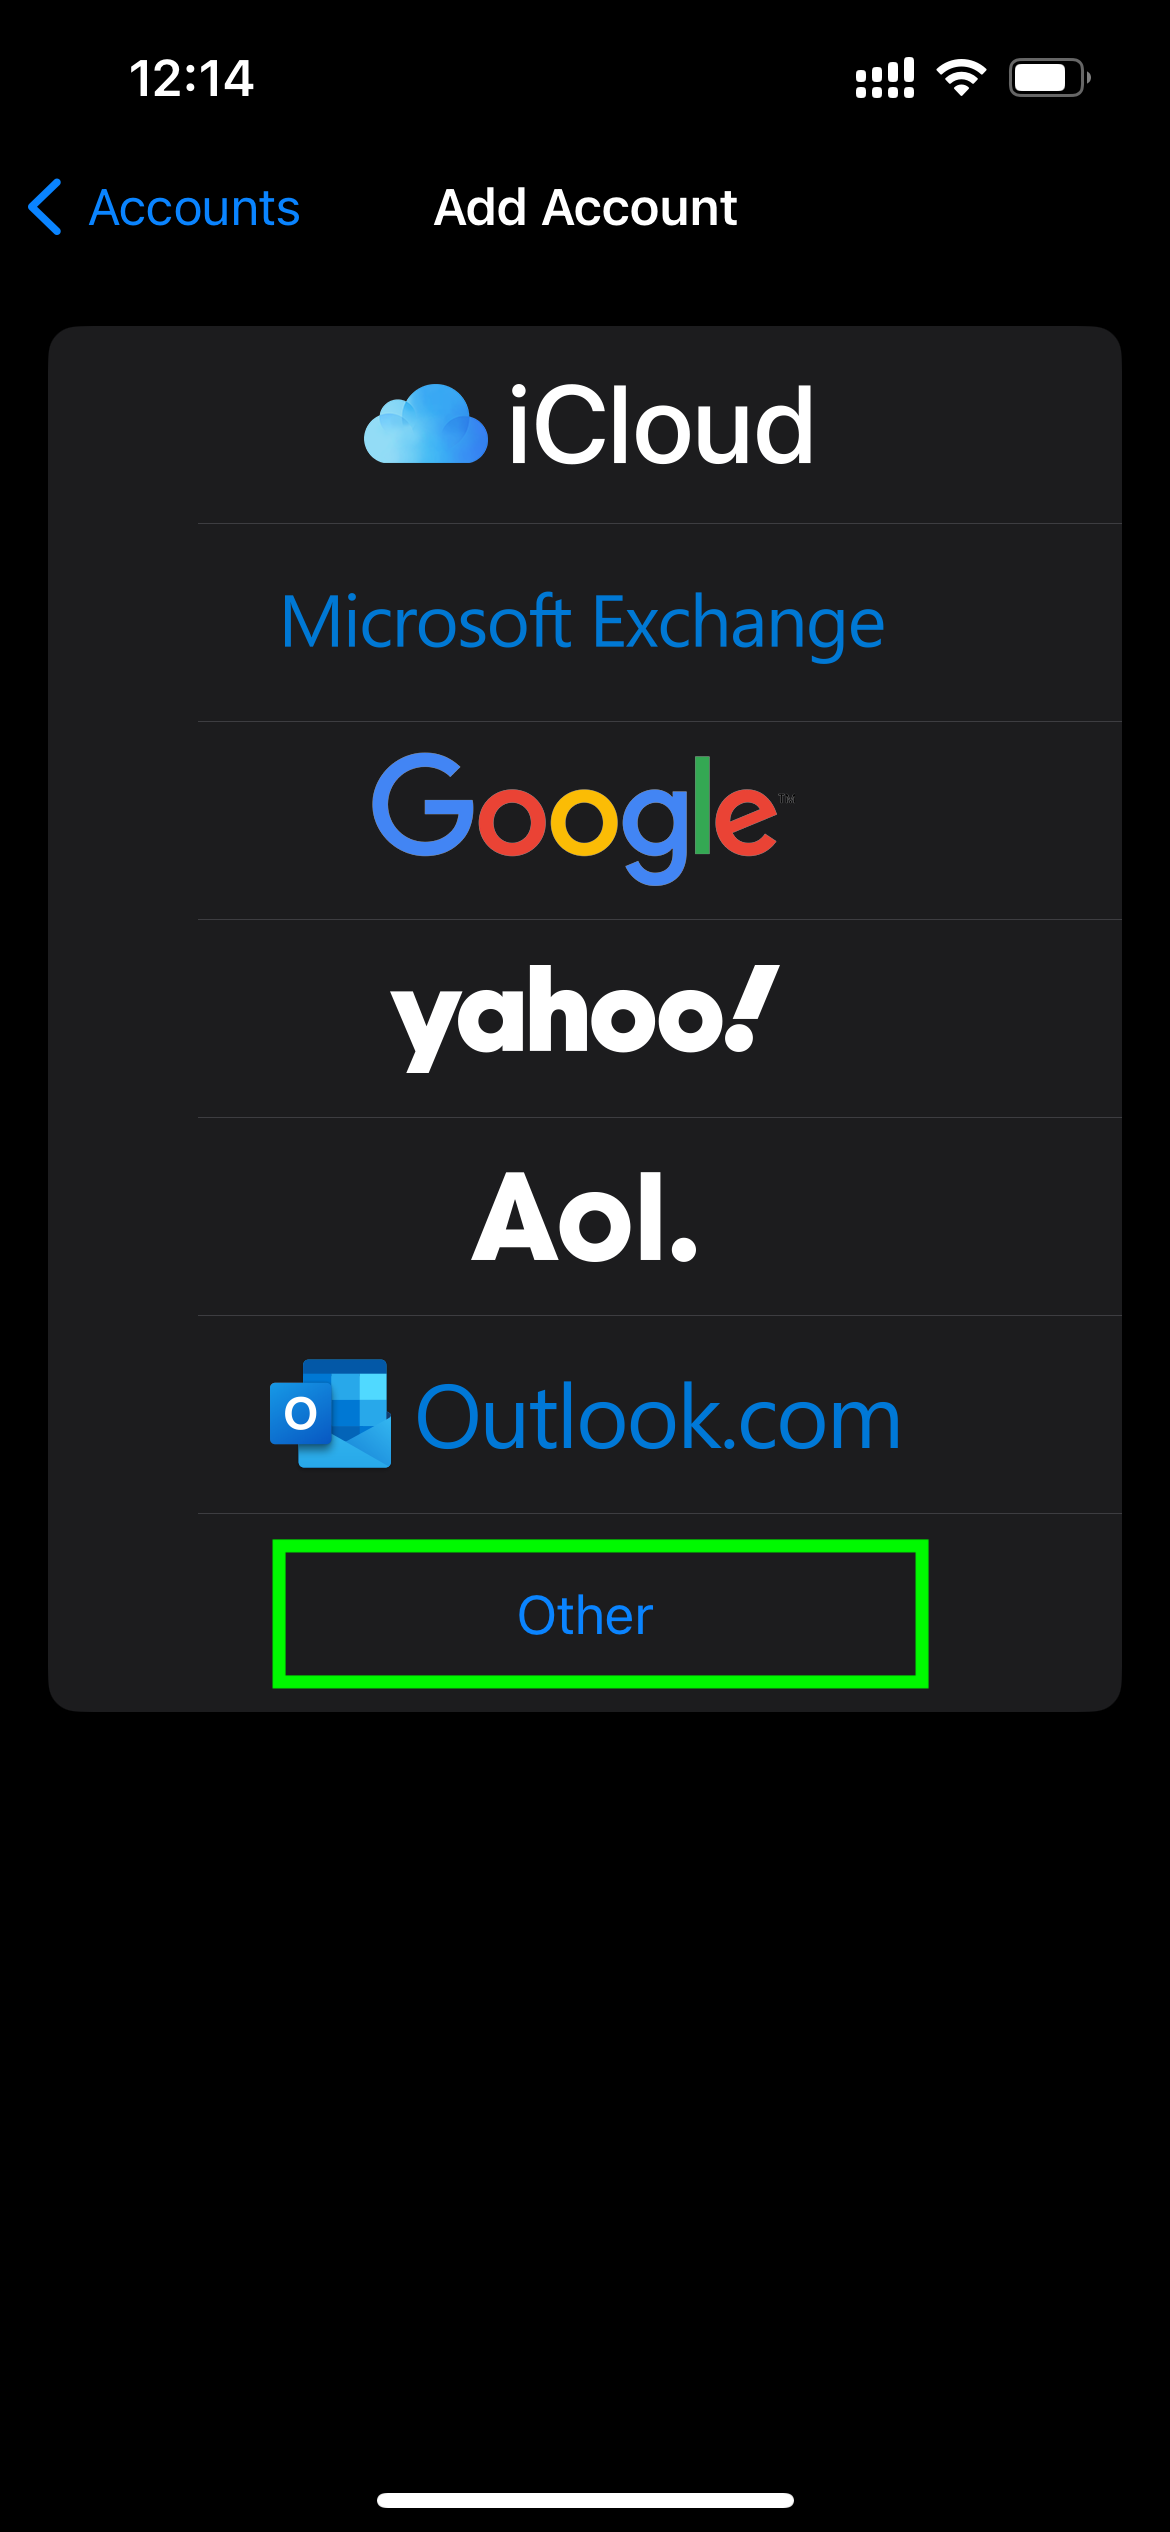
Select Other
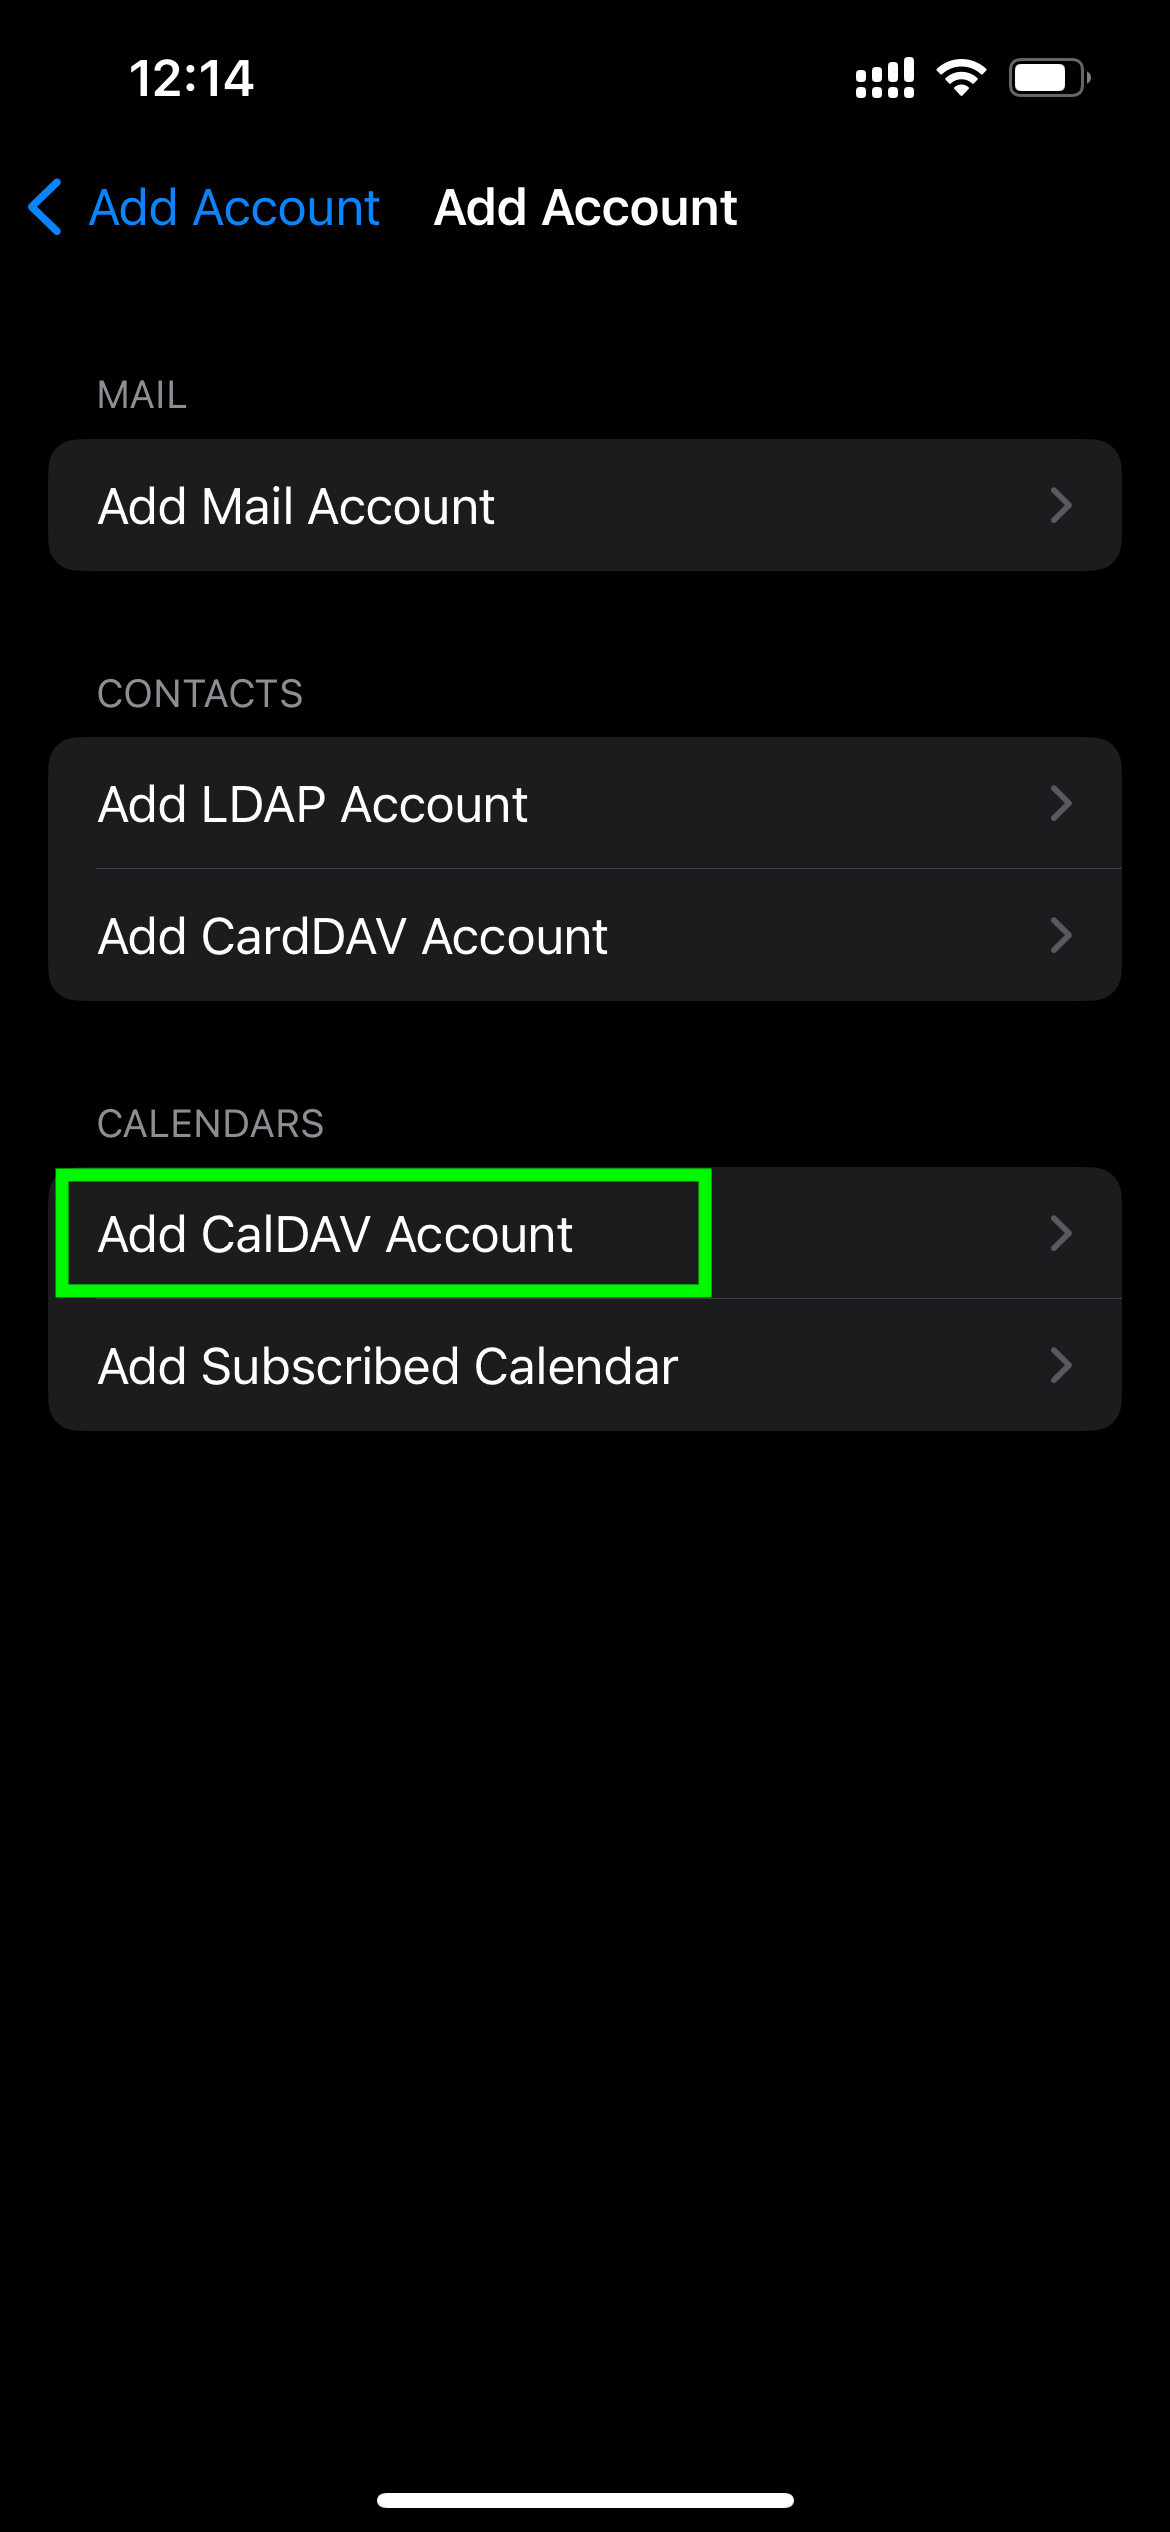
Add CalDAV Account
Add CalDAV Settings
- Server: instancename.atollon.com/cdav/instancename
- Username: username@instancename
- Password: your Atollon password
- Description: My Atollon CalDAV
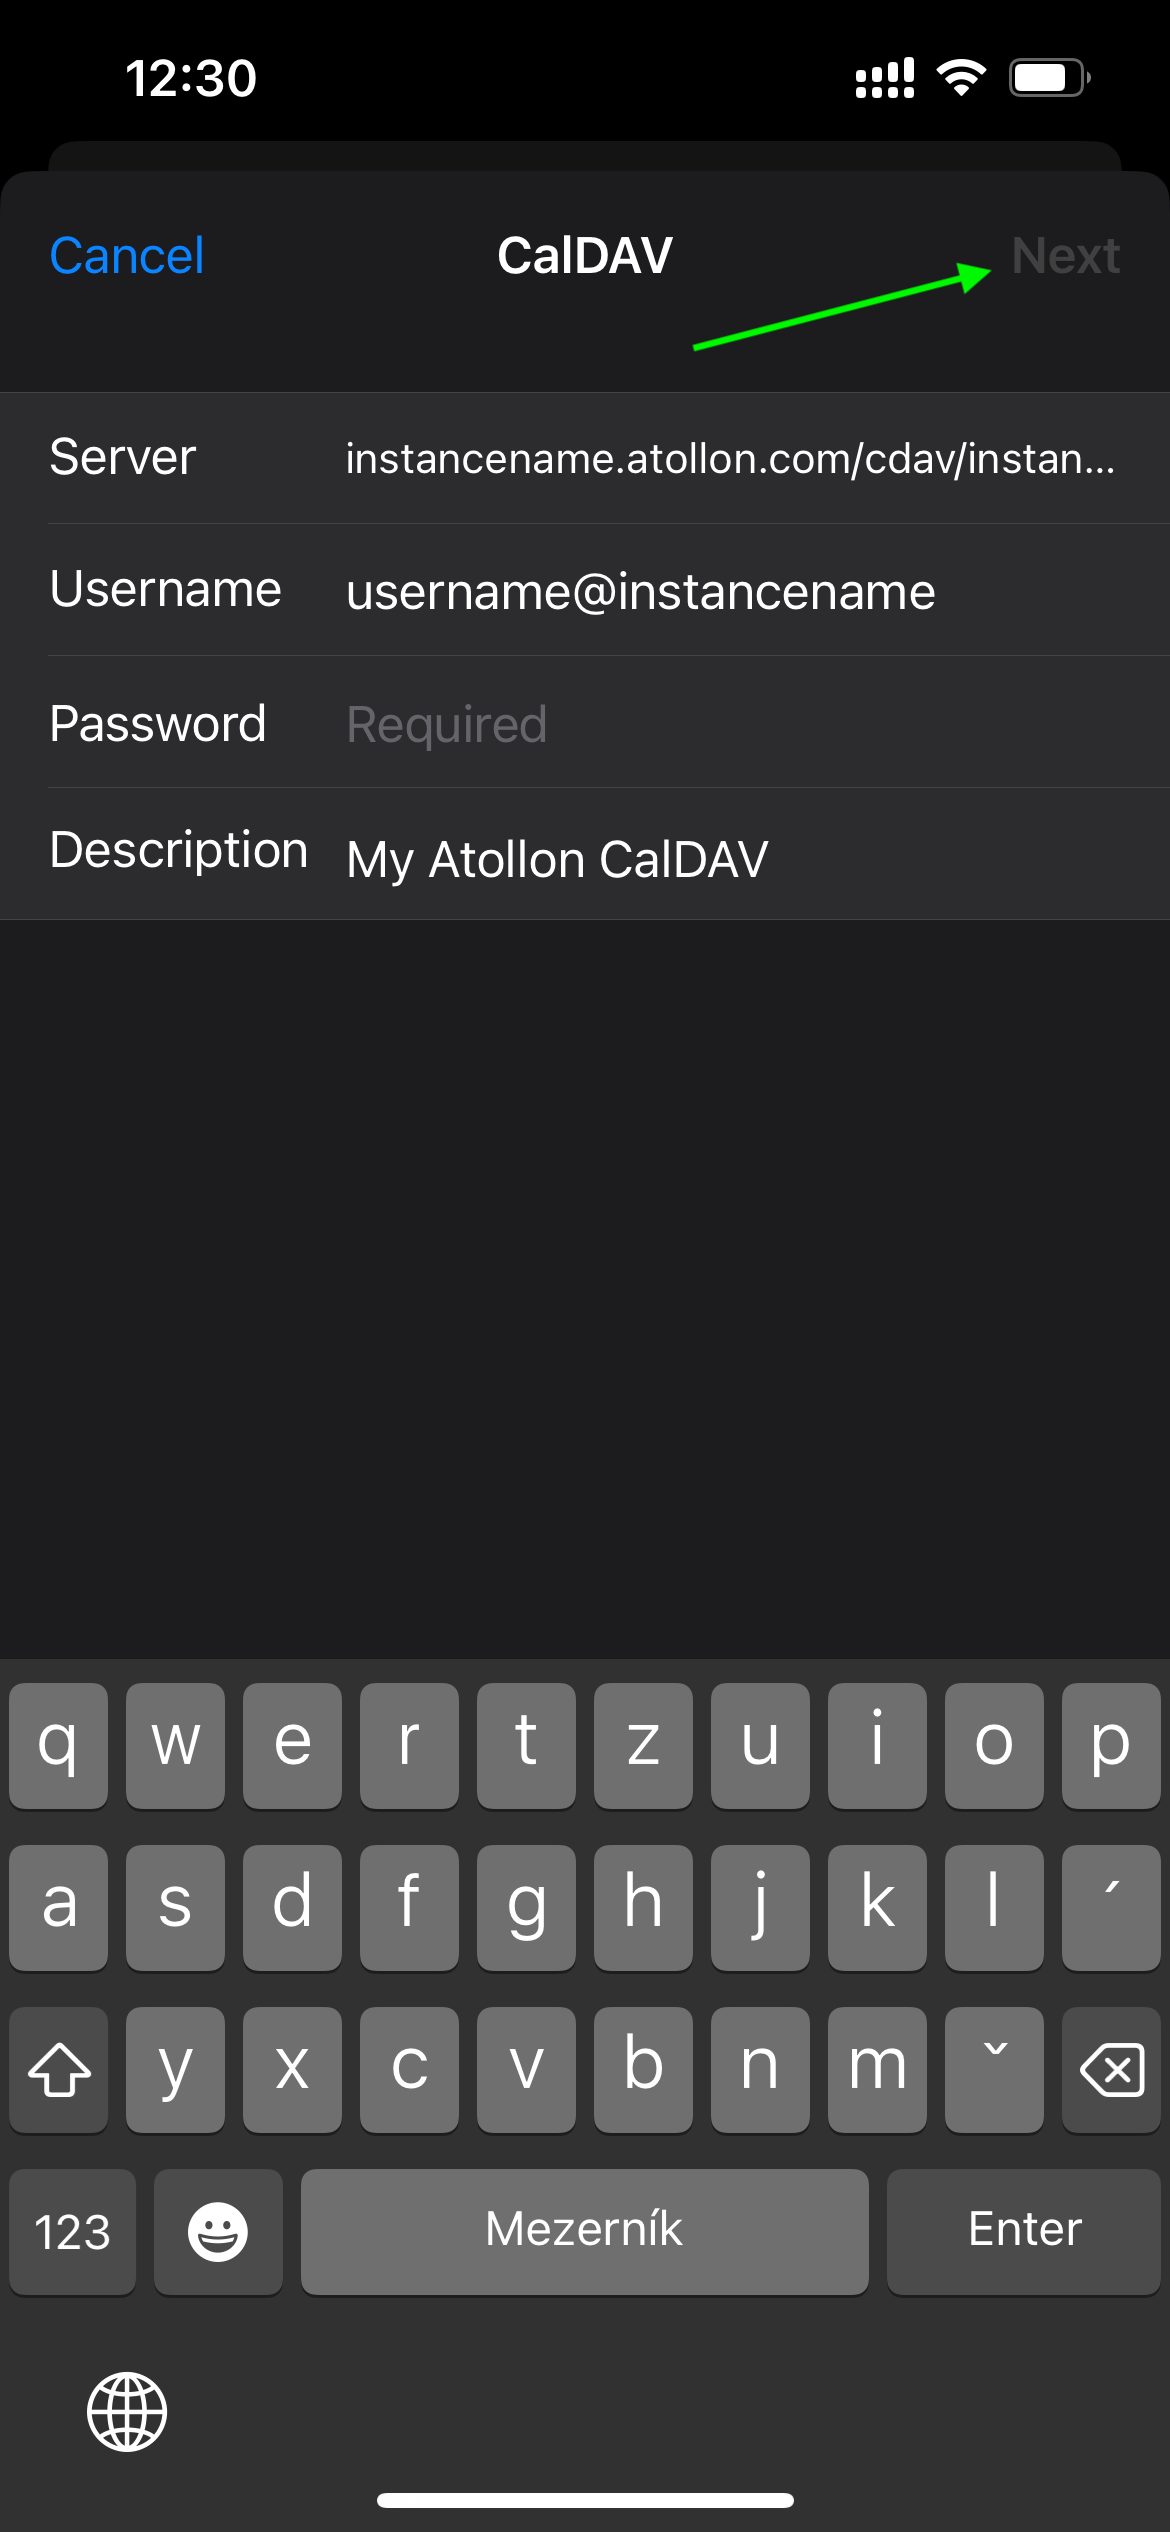
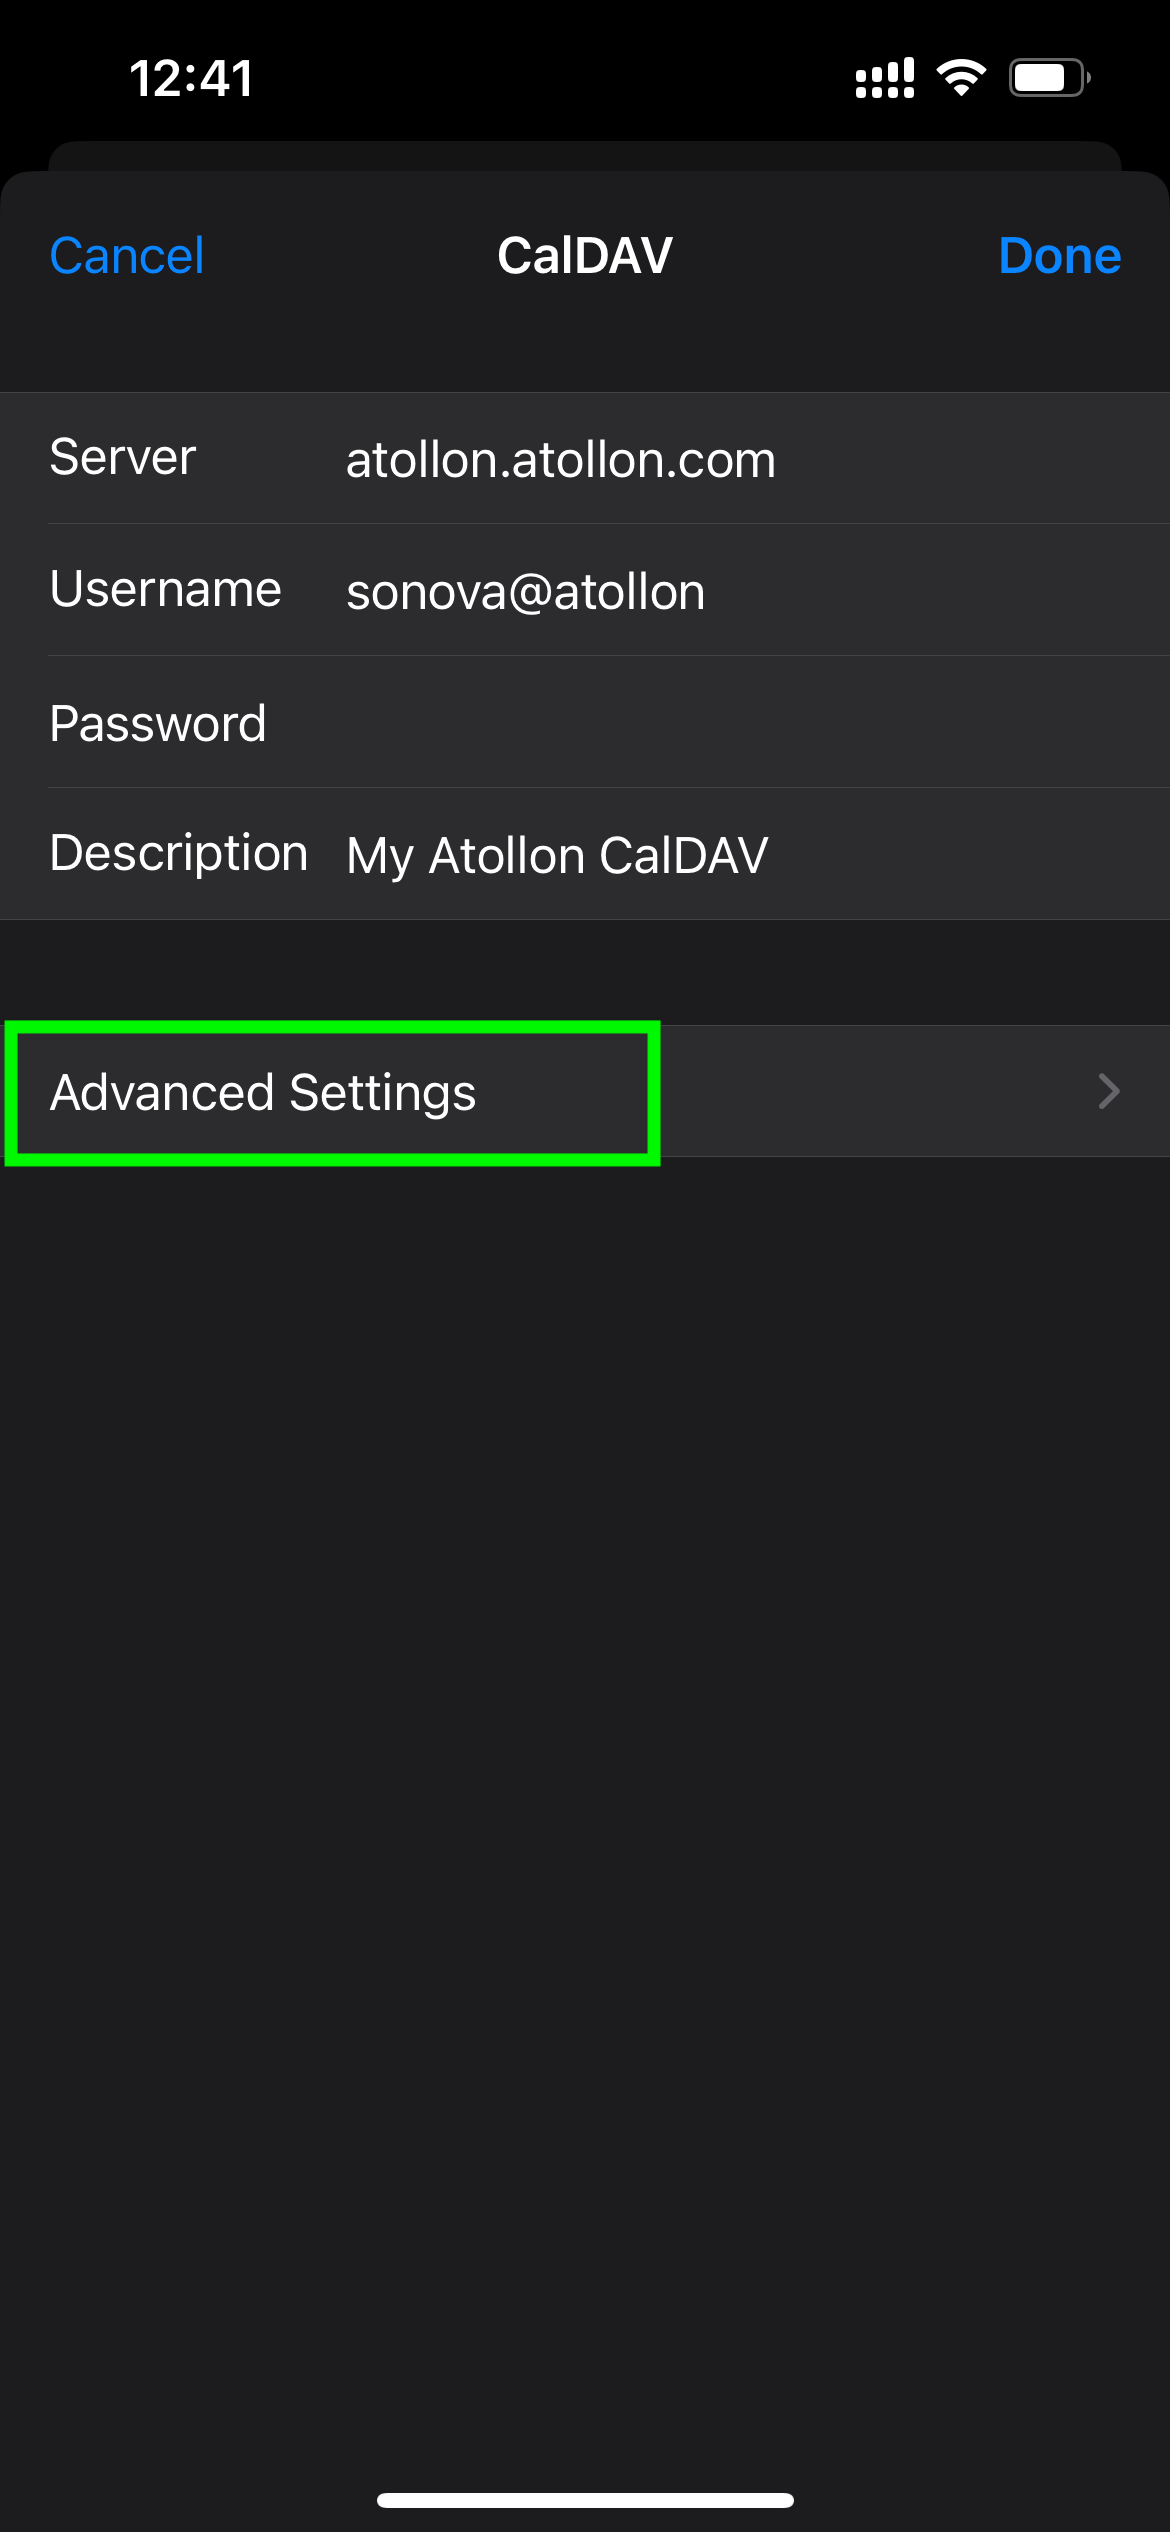
After this step you may select only Calendar events (not yet Reminders) to be synced. This won't make the account working unfortunately. You need to go back to the My Atollon CalDAV account settings again and adjust Advanced Settings of the newly created account.
Adjust Advanced Settings
Add full URL to Atollon's CalDAV account
- Account URL: instancename.atollon.com/cdav/instancename/user@instancename
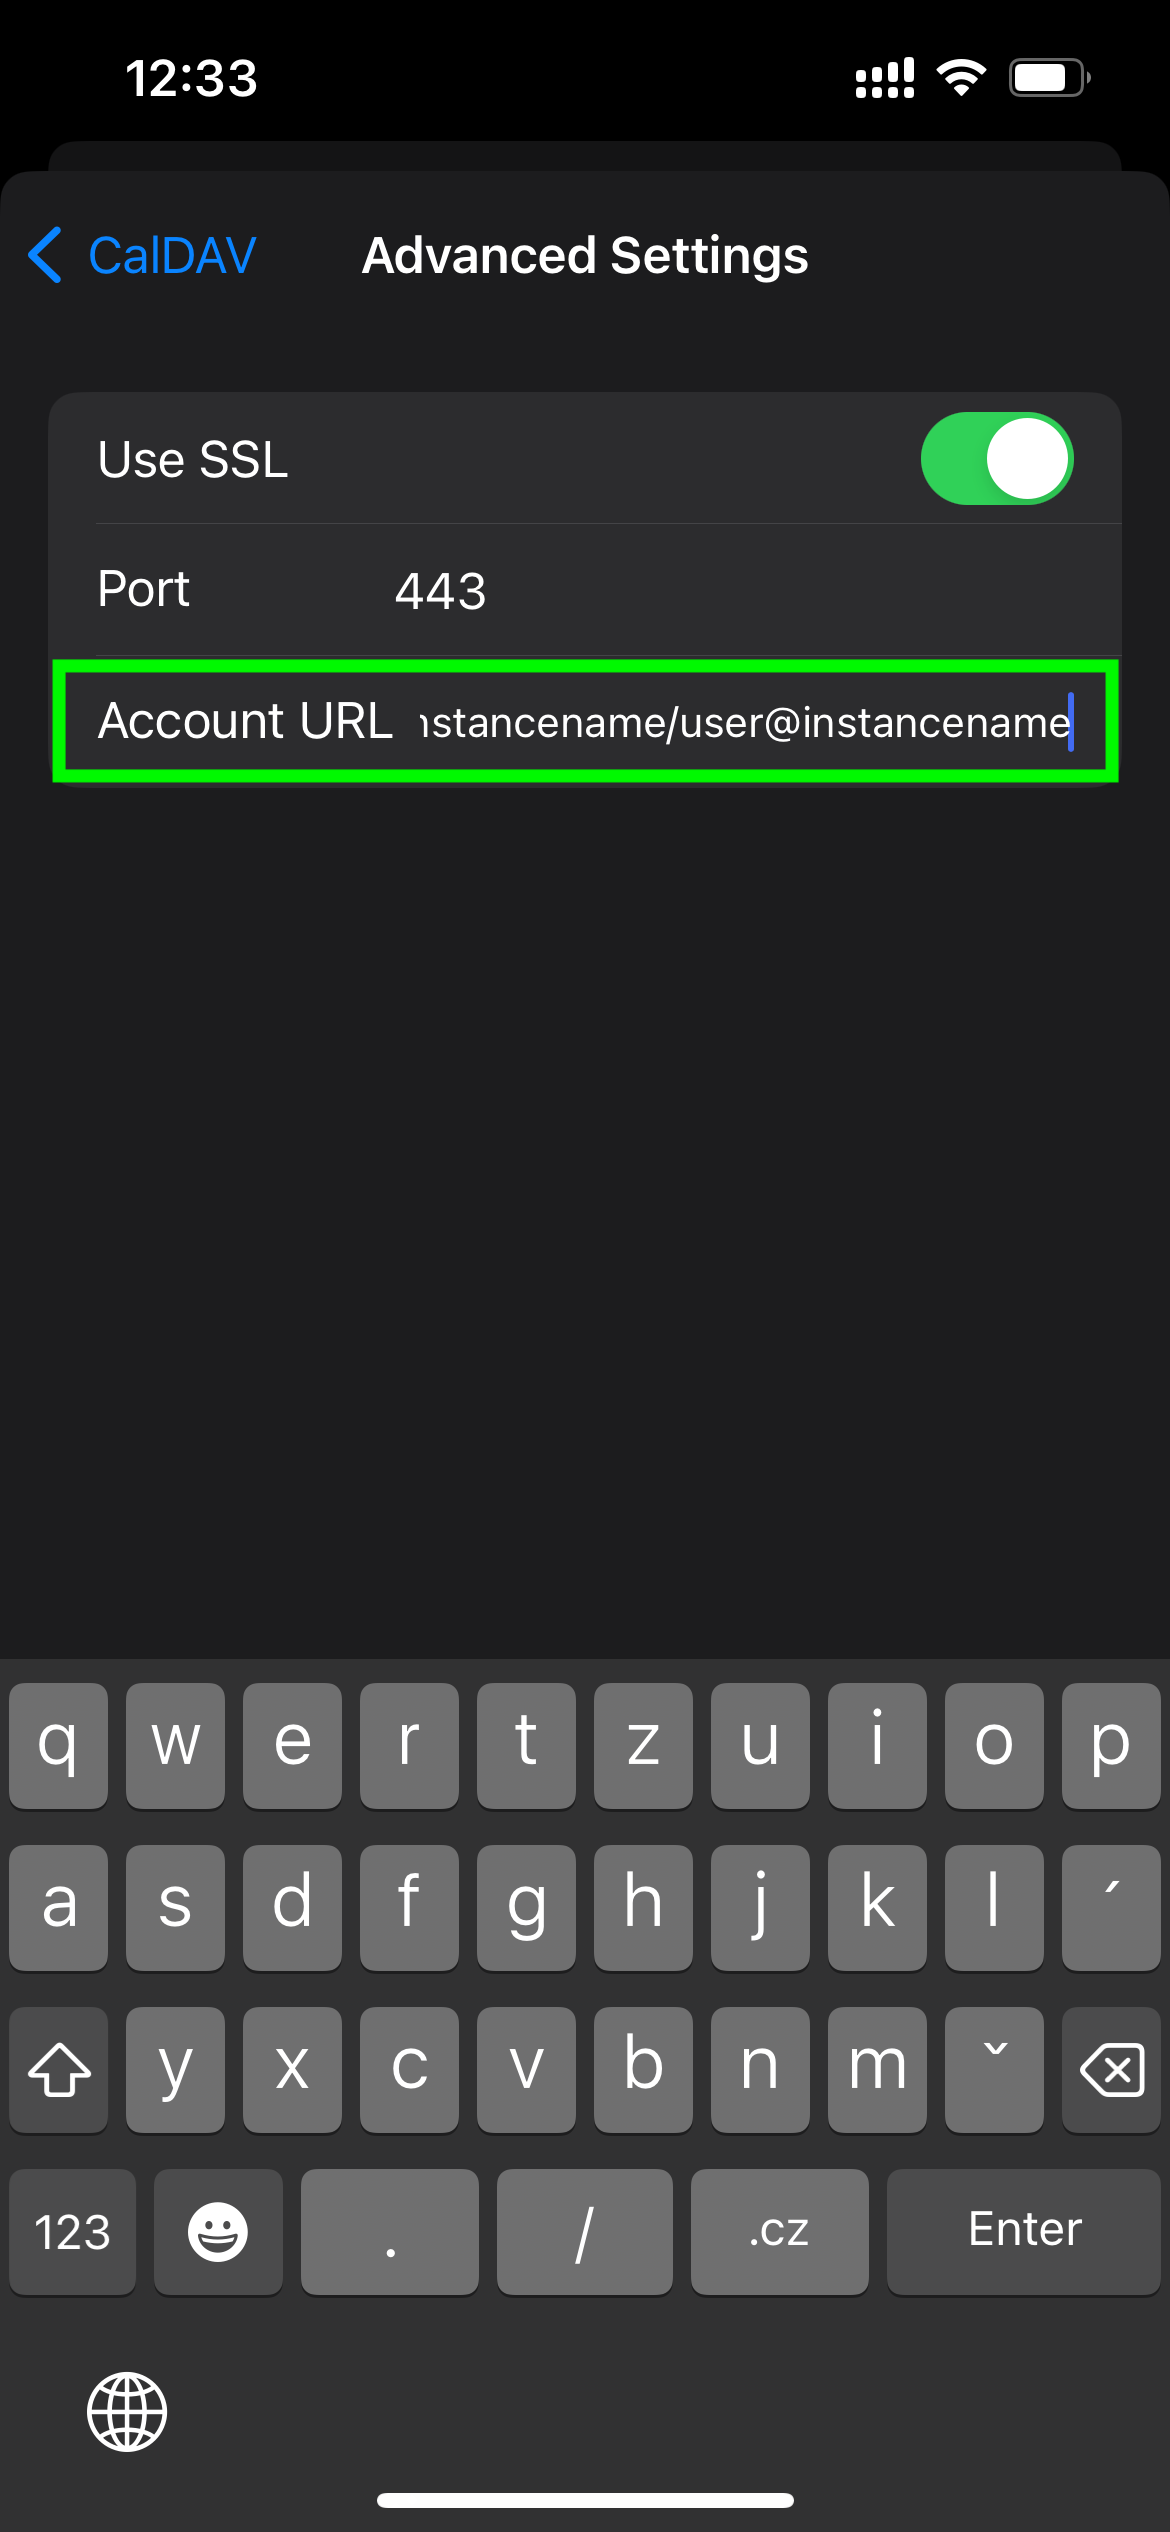
Now your account should be connected.
You can go to your calendar and force calendar refresh. Depending on your refresh settings, calendar should check new events in 5, 10, 15 minute intervals automatically (or you can opt for manual refresh).
Manual Calendar Refresh
Go to your iPhone calendar. Click on Calendars link at the bottom.
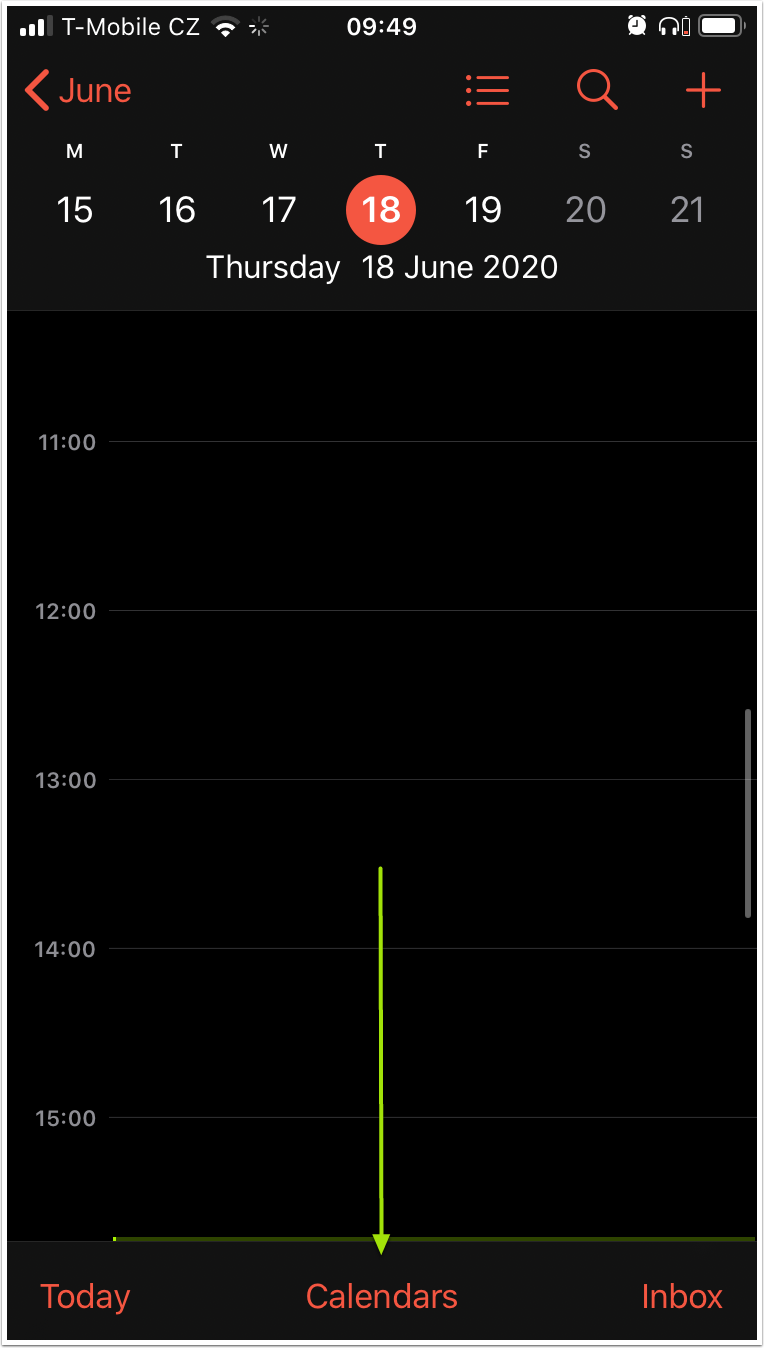
Refresh
Just pull the settings screen down and all your calendars in iPhone will refresh.

Enjoy your Atollon calendar in iPhone :-)
Atollon Calendar in Mac OS X
Mac OS X Calendar Settings
Go to Calendar > Preferences > Accounts
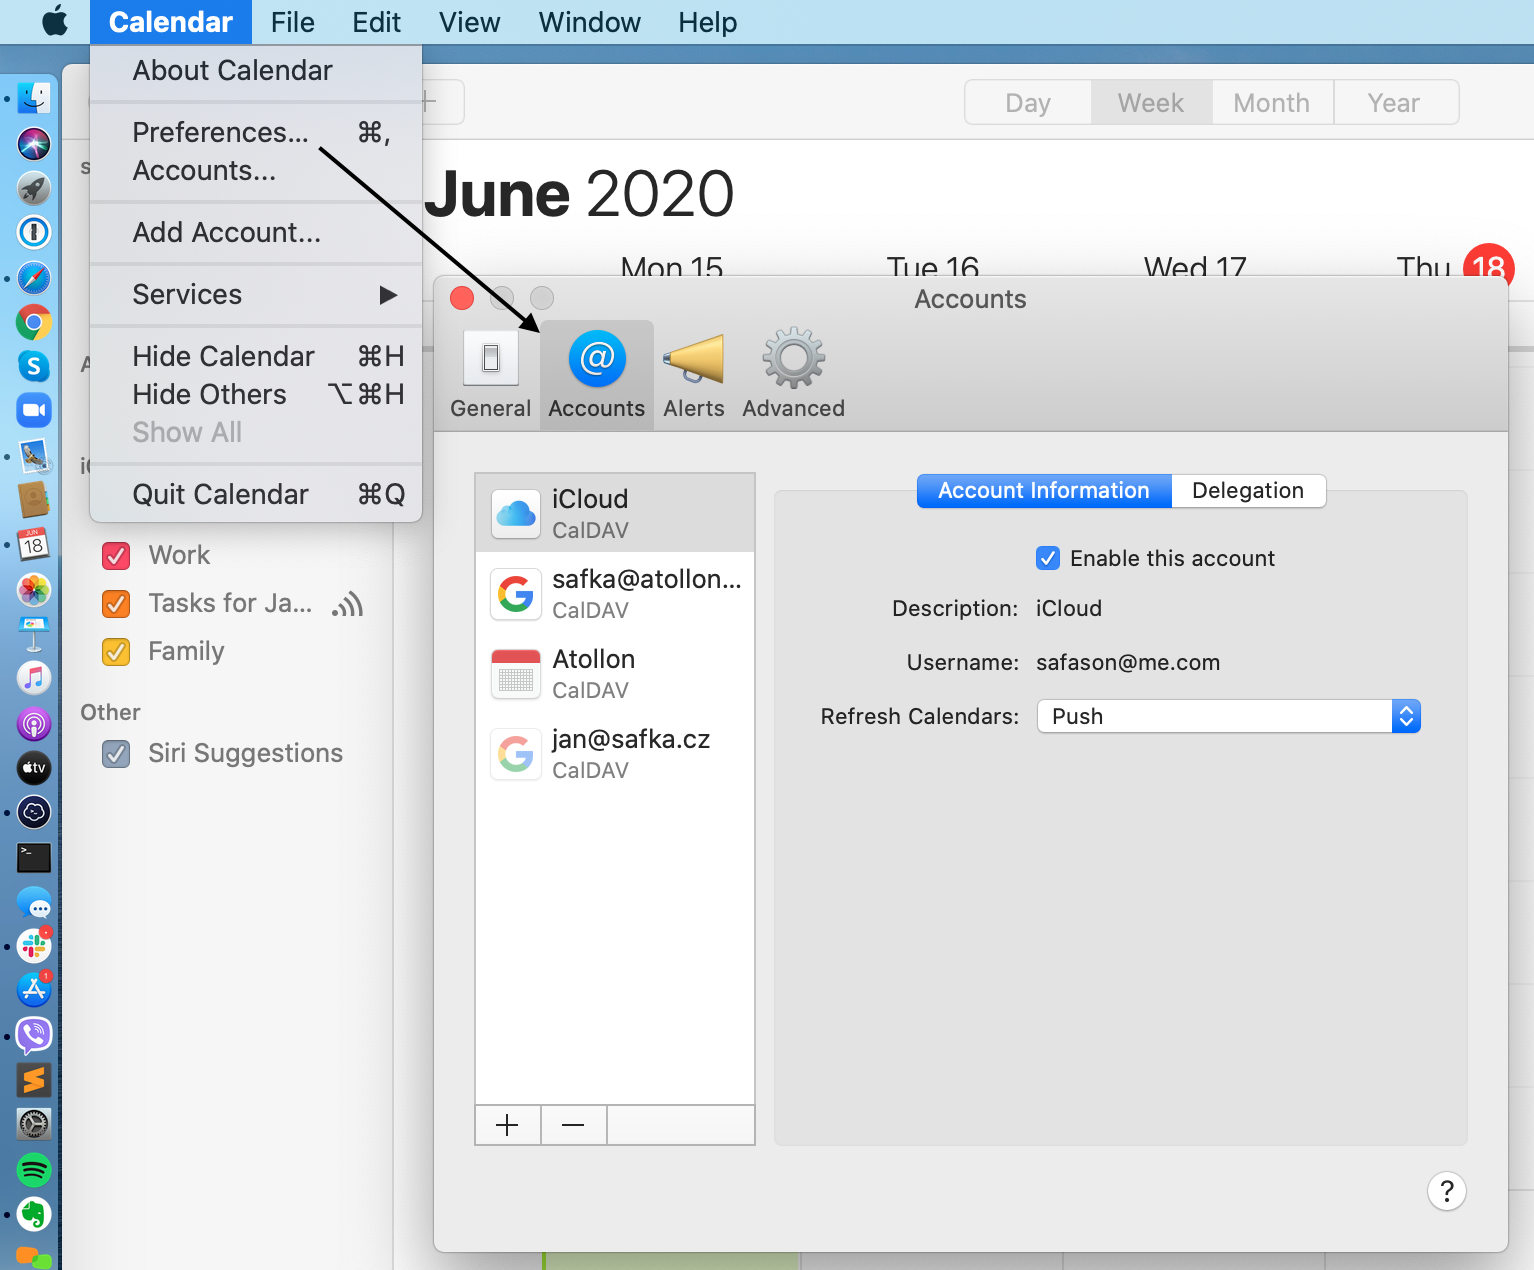
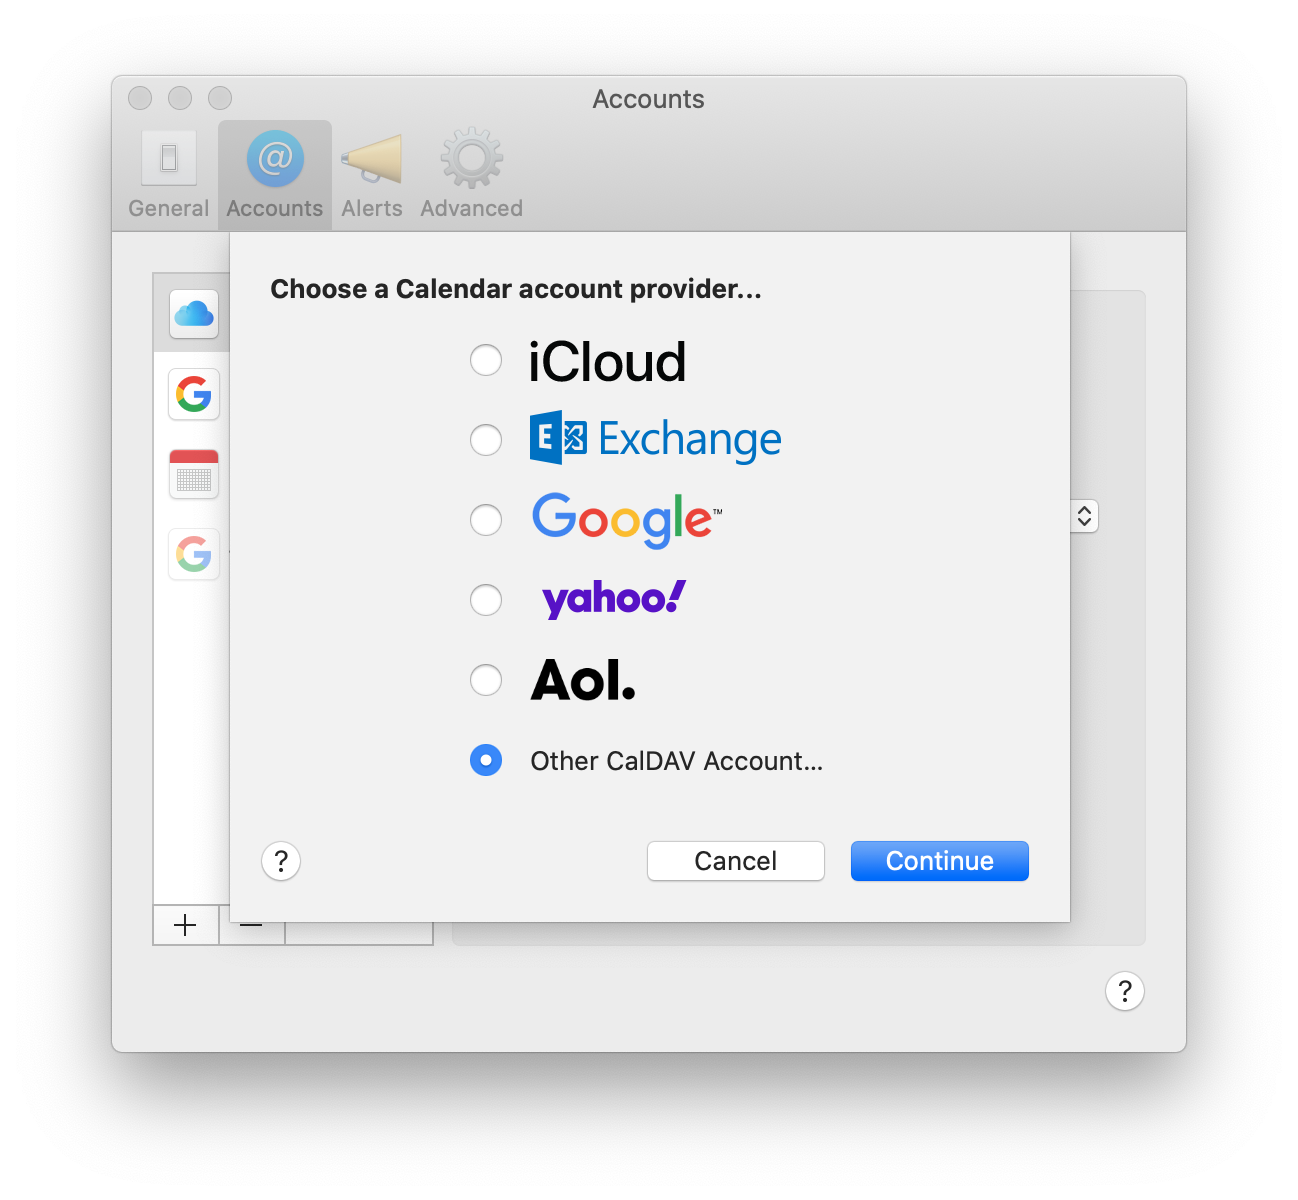
Add new Other CalDAV Account
Select Account Type: Advanced
Atollon Calendar in Android
If you want to use Atollon CalDAV calendar API, please make sure you recently changed your Atollon's user password.
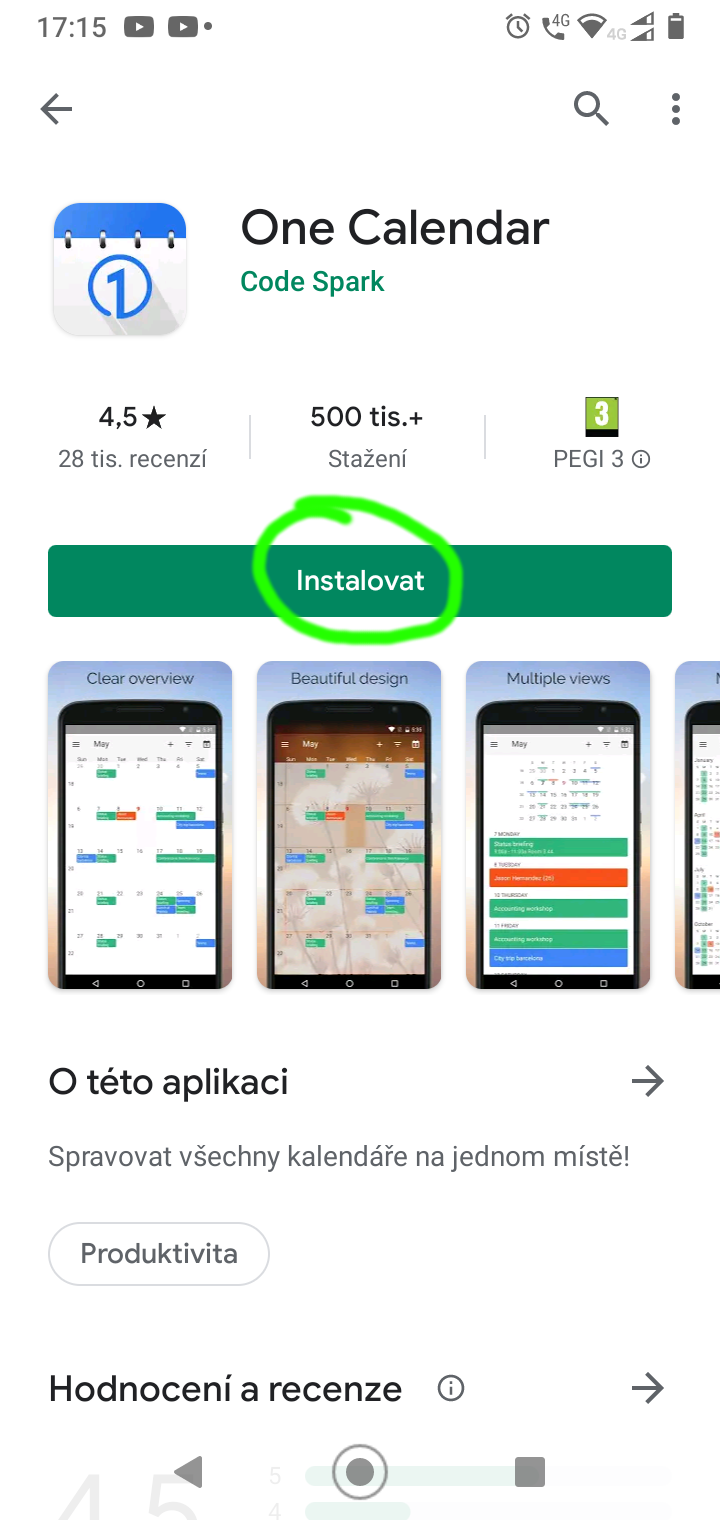
Below you can find a guide on how to set-up your access to Atollon calendar using One Caledar application for Android 10.
From GooglePlay app store install One Caledar
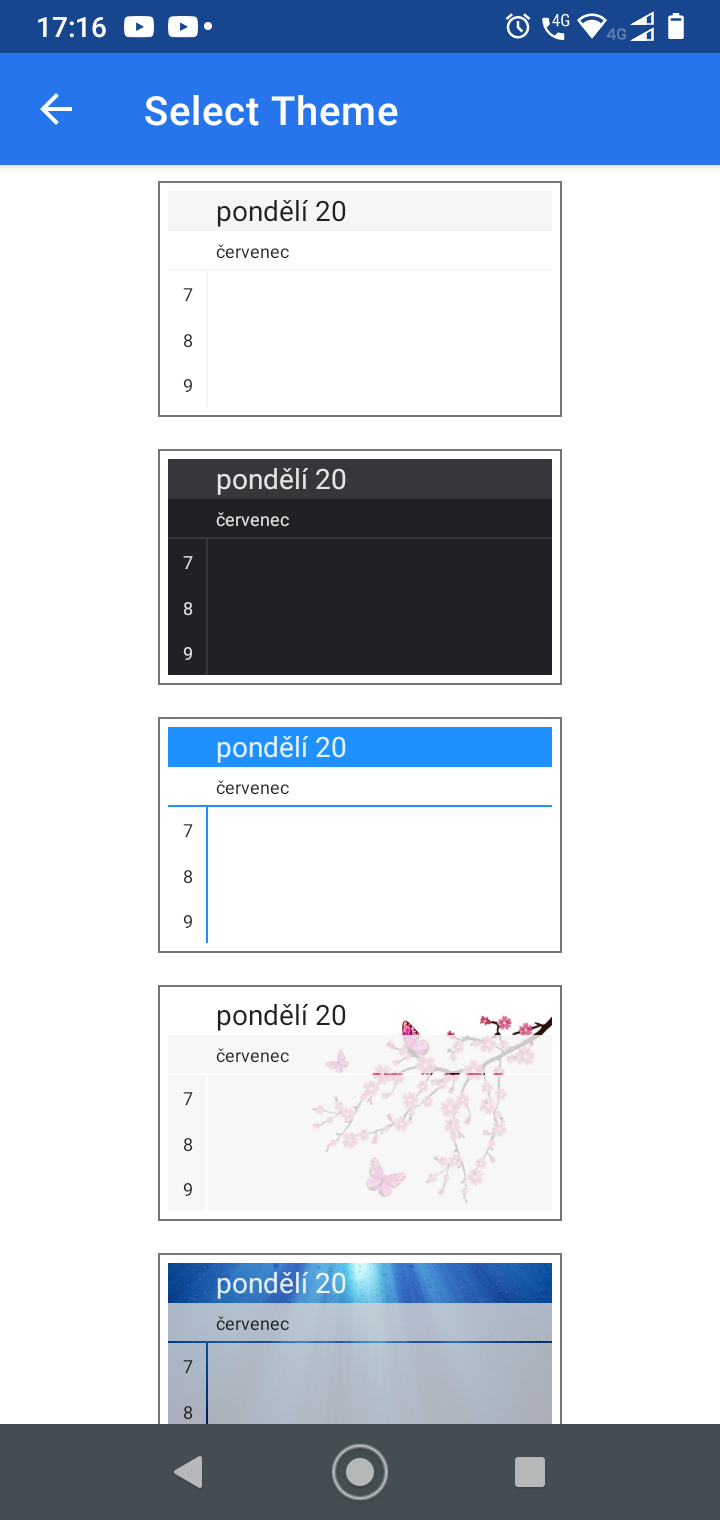
Open OneCaledar application and slect preffered theme
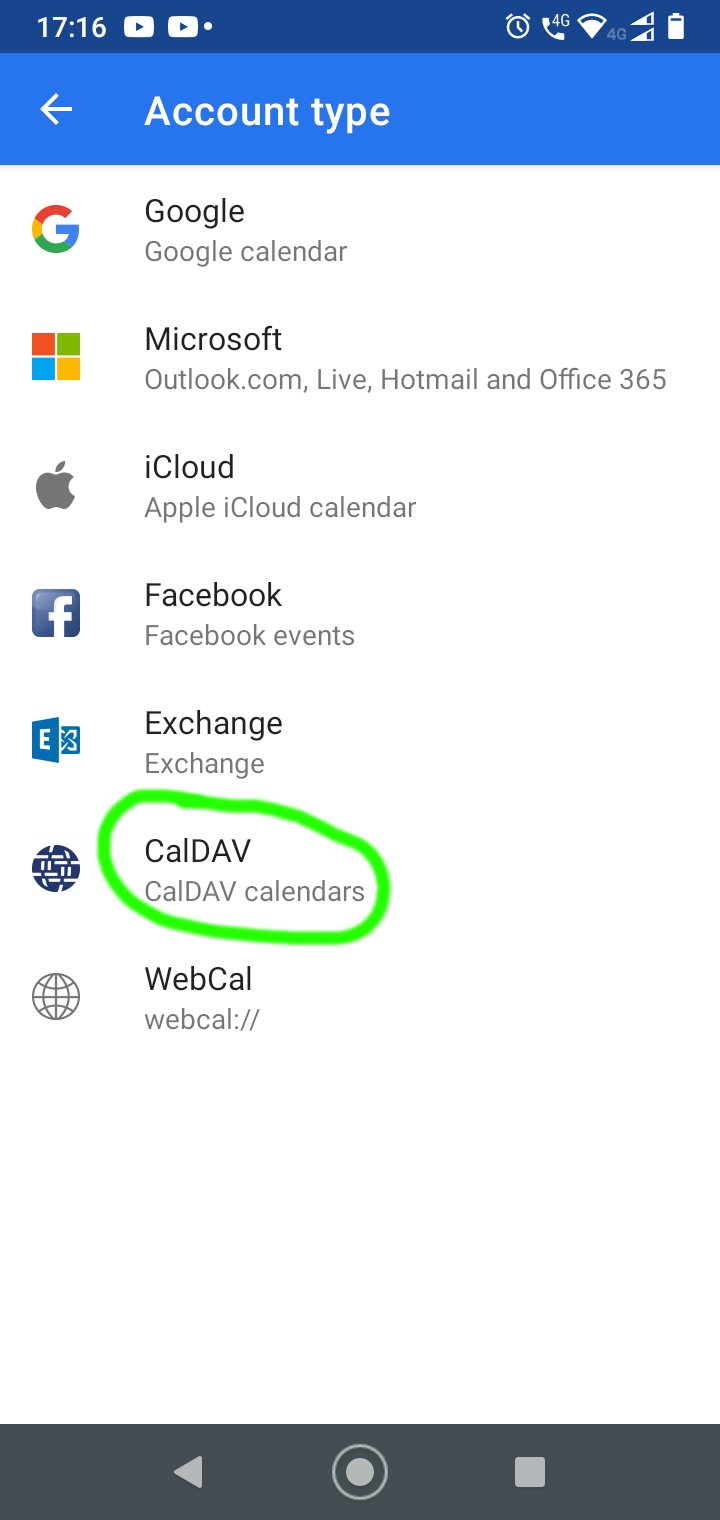
Select account type CalDAV
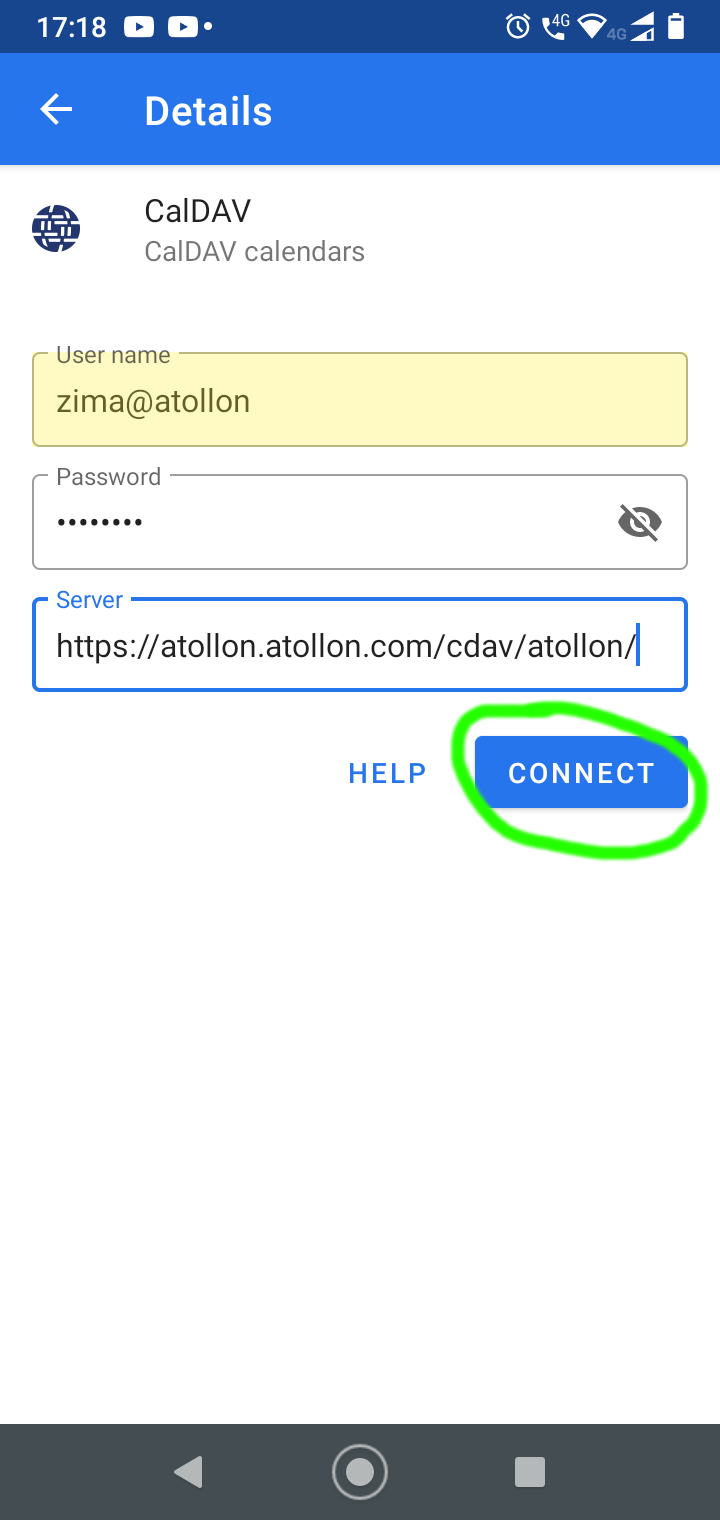
Fill-in Atollon CalDAV account details and push Connect button
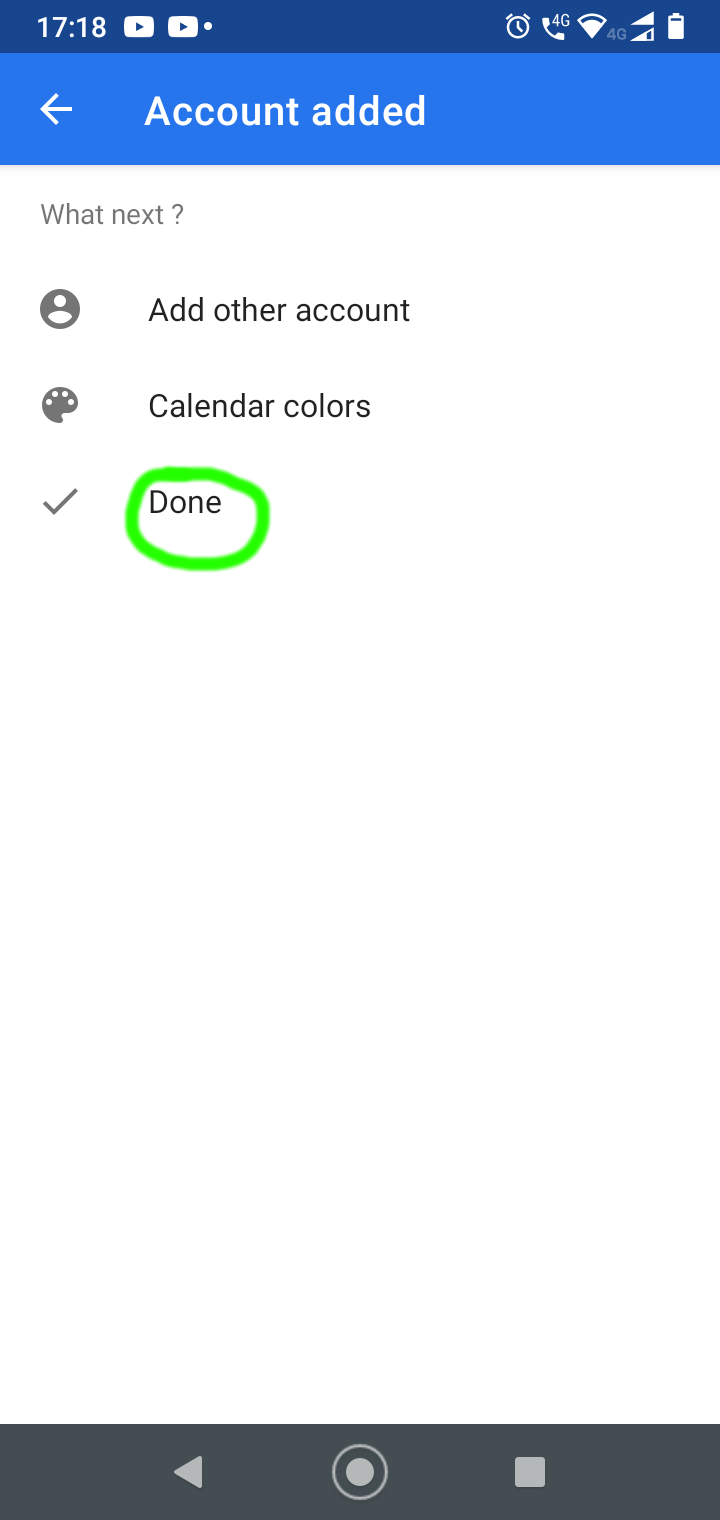
Check found Atollon caledar and push Done button

Done
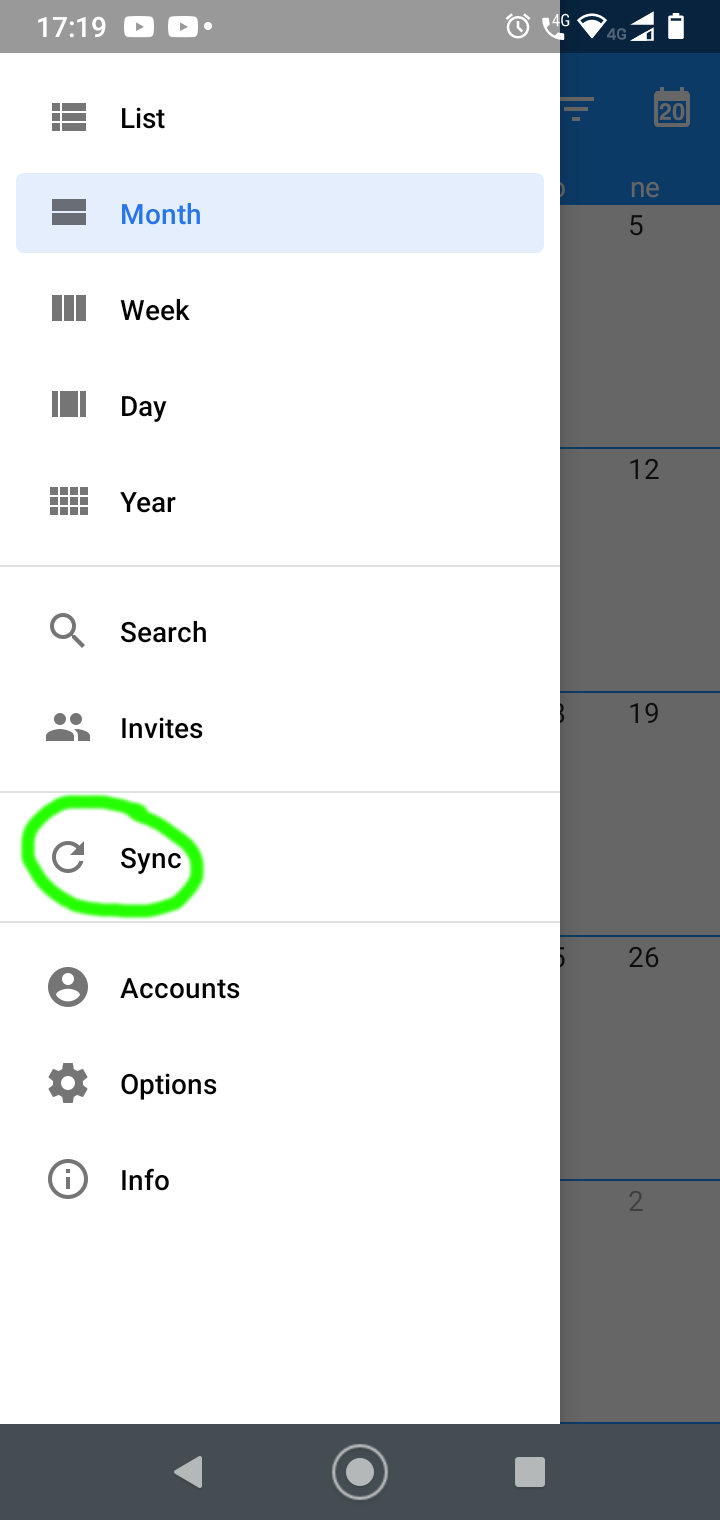
Optionally save account credentials and push menu symbol
To refresh calendar data push Sync
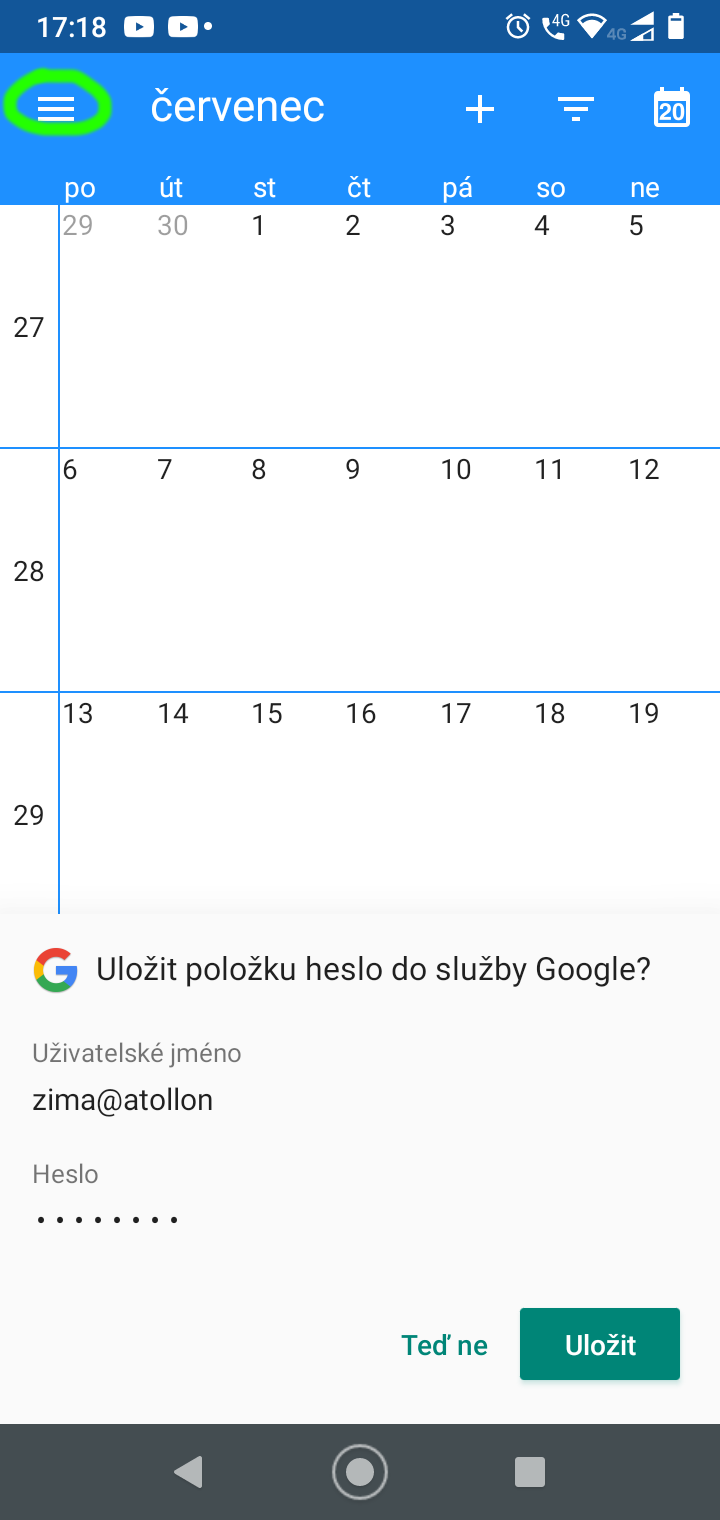
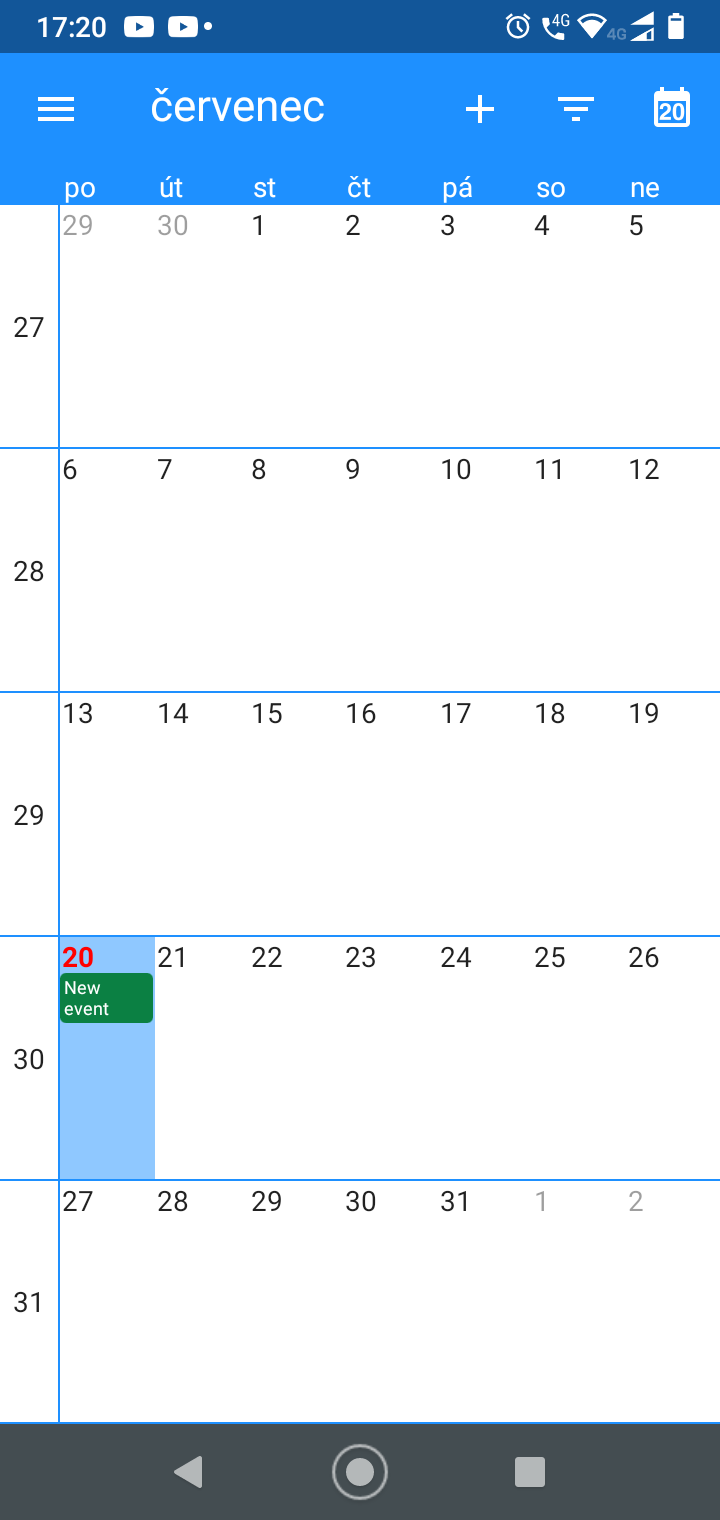
Got new event from Atollon CalDAV
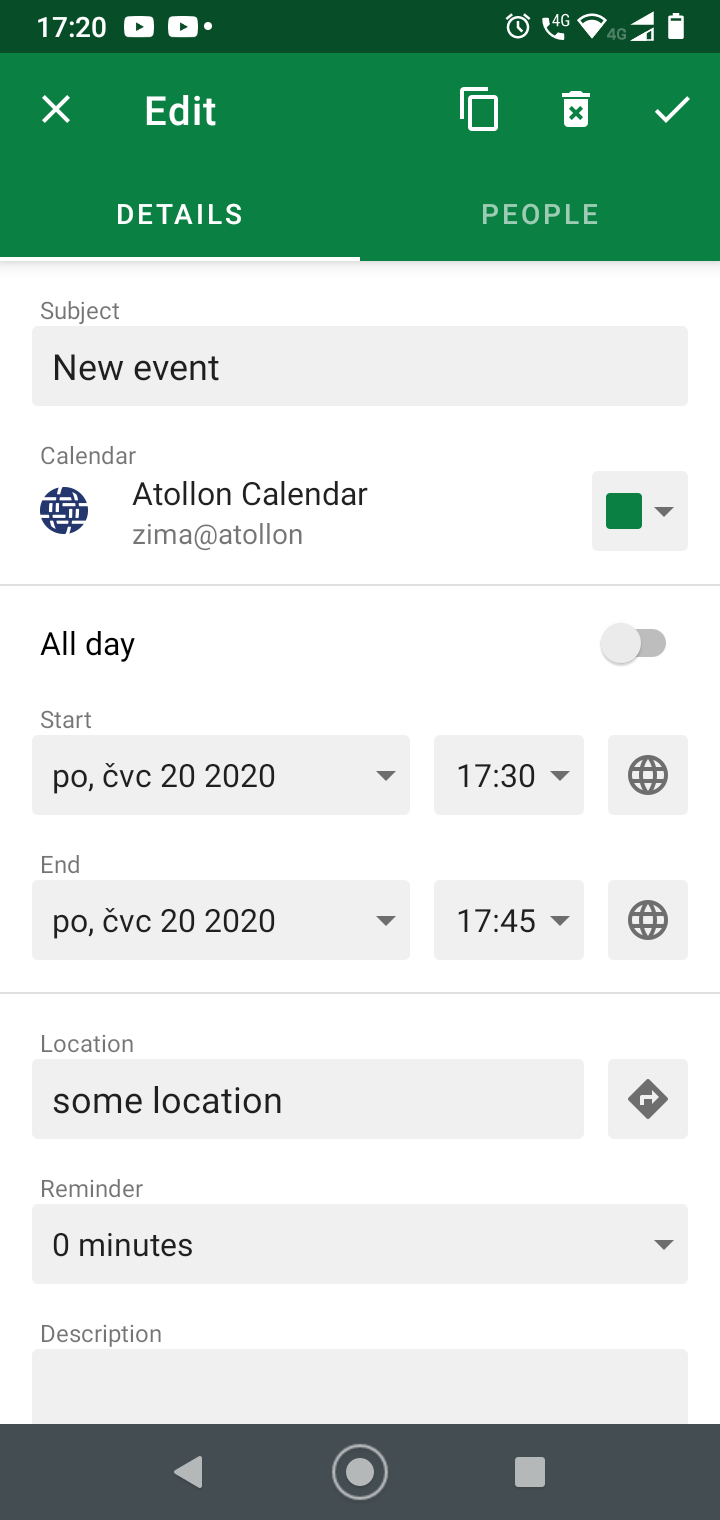
Click New event to show detail
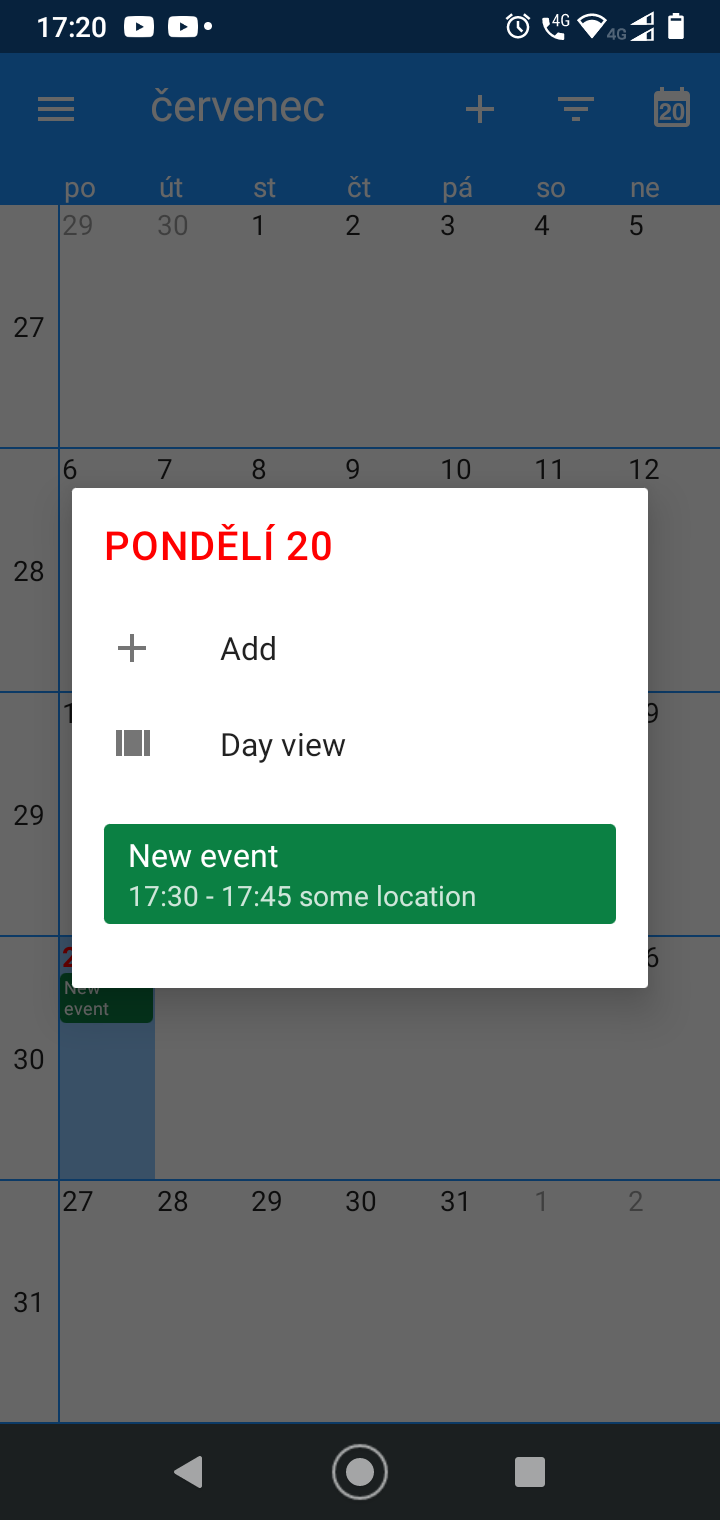
Click New event to edit event
Click somewhere in the calendar to Add event
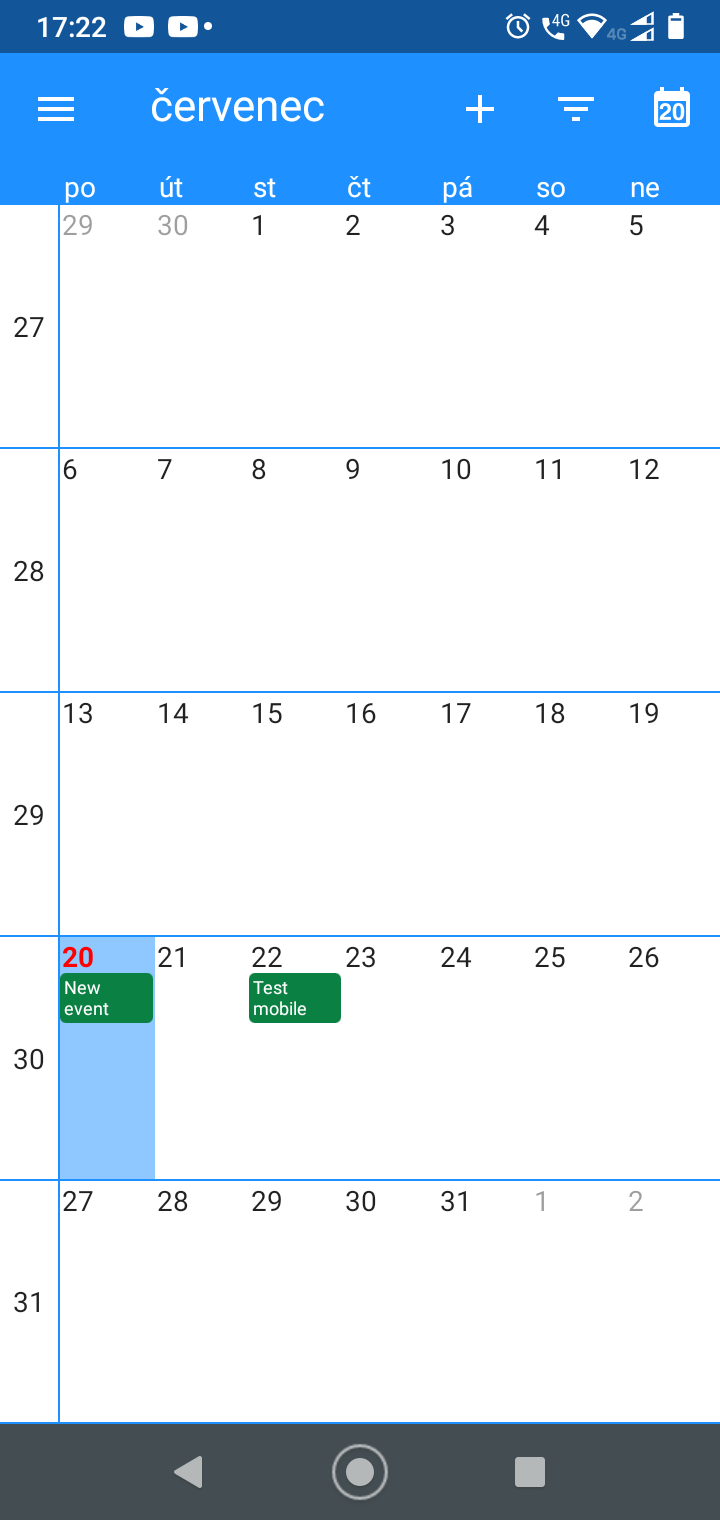
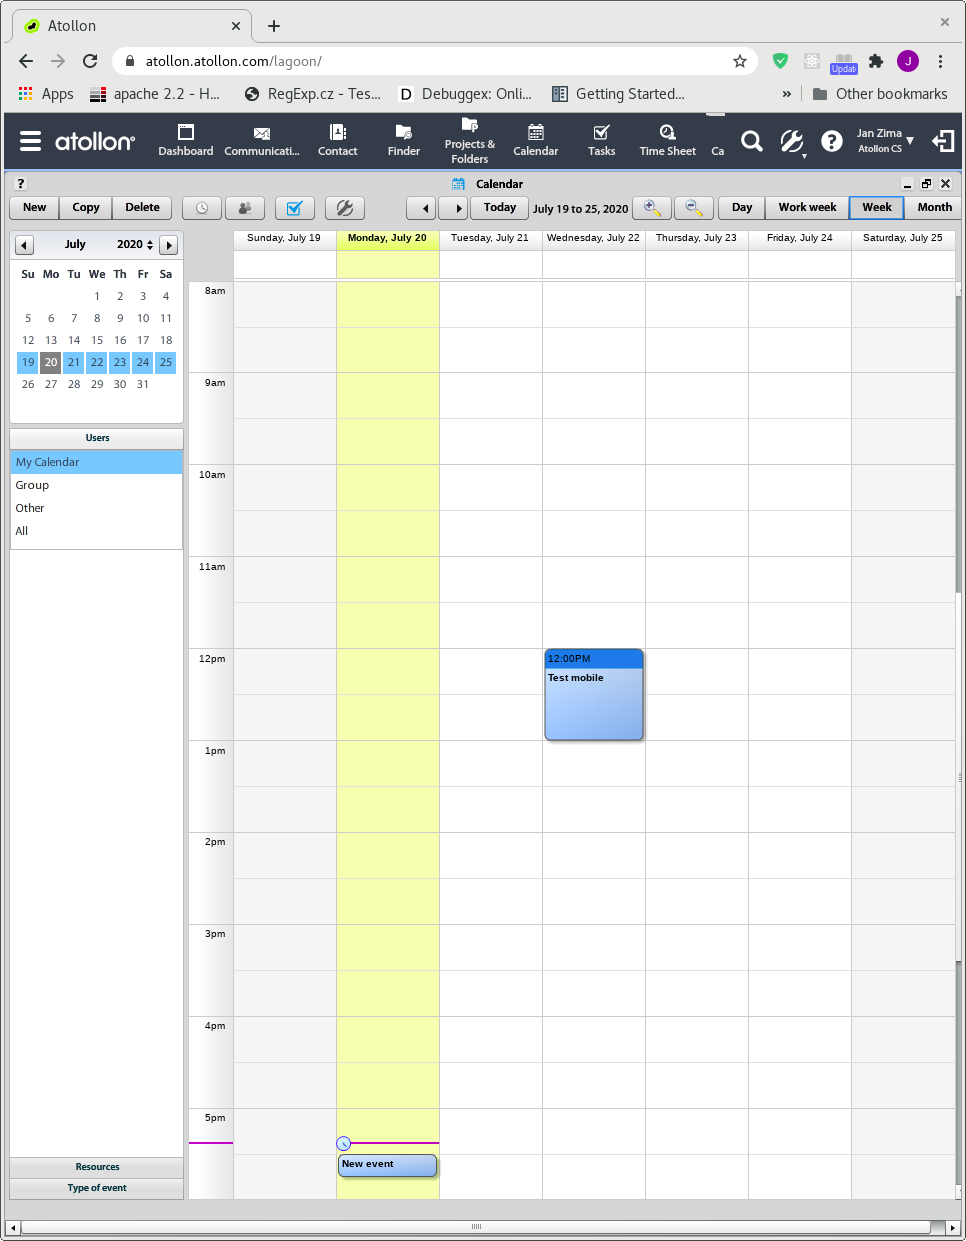
See event in Atollon Calendar, after view change
Aplication details
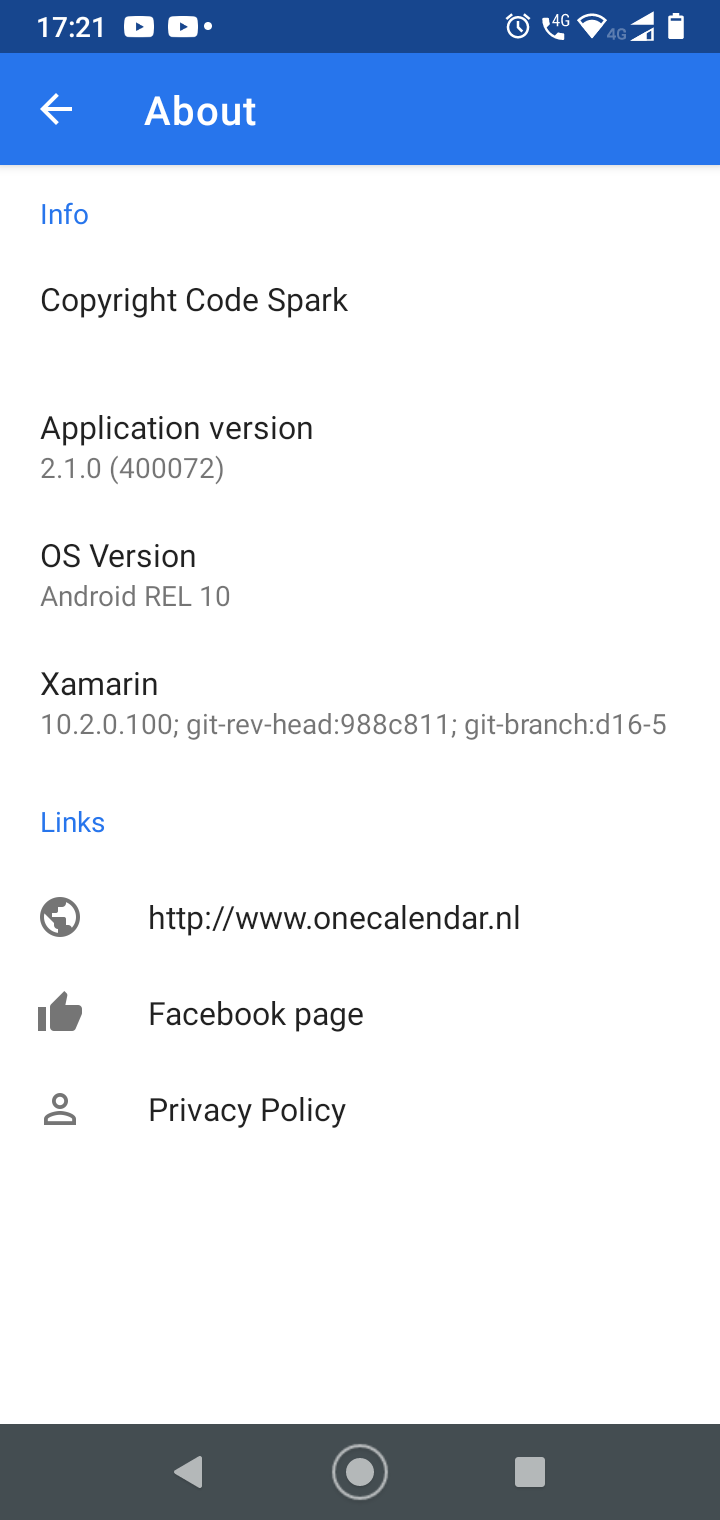
One Callendar FAQ
Atollon Dictionary
If you are unfamiliar with one of the terms specified in Atollon Help, please find your term below. In case you would like to explain more terms, please send us your question.
Atollon
Atollon is digital island, virtual desktop environment to manage small and medium sized sales & services businesses. Atollon comprises Core functionality that is useful to any Small and Medium Enterprise and may be extended by more or less advanced applications, focused on solving needs of various industries (Professional Services, Engineering, Recruitment, ...) and functional areas (Sales, Marketing, Support, Service Delivery, Project Management, ...).
External User
External users are your contacts (clients/partners) that are allowed to access the system using external / add-on applications using Atollon API.
Access to Context (Folders, Projects, Activities) is provided using Roles. Once you create new External User and assign the user on the project to External User Role, he/she will see all communication, documents & tasks (based on set-up of access rights of each user) as well as some other information.
Before using this feature, we suggest you to test & check, whether by allowing external users enter your Atollon, you do not provide sensitive information or information, which you would not like to be shown. Please consult Atollon if you would like to customize access rights for these users.
Atollon provides (within defined limits) External Users access for free. Conditions for access of External Users may change over time, as we are going to limit the number of functions to be used by External Users, mainly from security reasons.
Power User
In general, it is any Atollon user accessing the system on daily basis.
Atollon Champion
Key Atollon user in each company.
On-site
Atollon Server Platform running in client's premises or in any premises outside of Atollon.com own network / hosting infrastructure. In on-site mode, client is usually fully responsible for complete maintainance of the solution, including performance, back-ups, monitoring, security protection, etc.
SaaS
Software-as-a-Service is mode of operation of any information system that is provided usually online (from "cloud"). Atollon is provided in cloud service Atollon.com. Benefit of SaaS is that the technical system operation burden lies on Provider, not the Customer. Provider must take care of performance, scalability, regular back-up, security protection, operating systems maintainance and administration, etc.