Time Sheet & Expenses
Time Sheet Overview
The Time Sheet application allows users to:
- add new ad-hoc Time Sheet records
- get overview about existing records
- confirm Time Sheet records
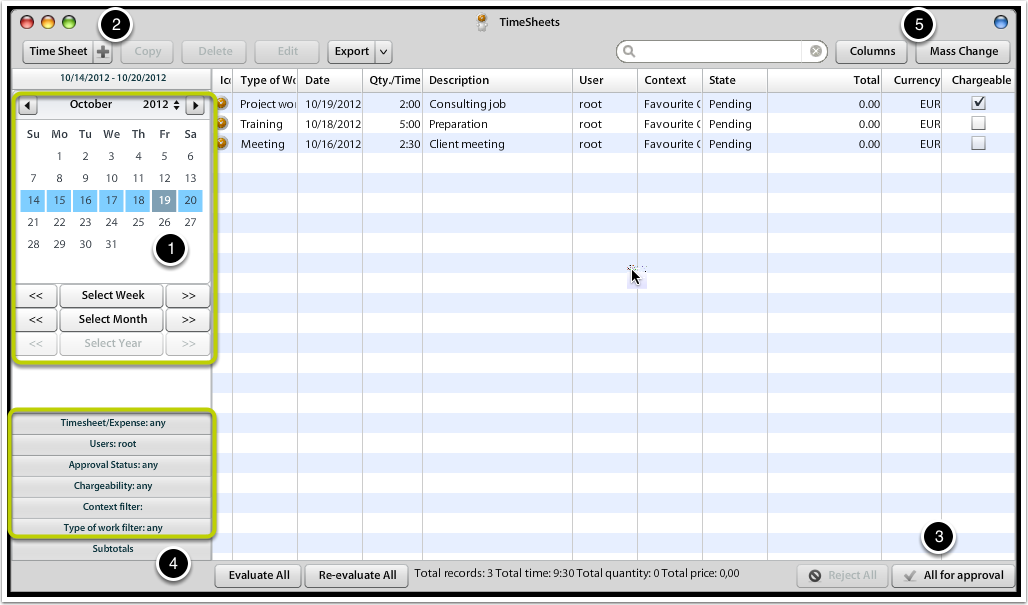
The above screenshot illustrates several features of Time Sheet application:
- Select period, for which you want to review your Time Sheets
- Select whether you want to create Time Sheet or Expense record(s)
- Confirm your Time Sheet records by sending them For Approval
- Verify your filter settings
- Adjust the Time Sheet view settings (collumns) & use mass-change features
Time Sheet Online Reporting
Users & managers that want to get quick overview about the usage of their time may use quick reporting tool directly integrated into Time Sheet application.
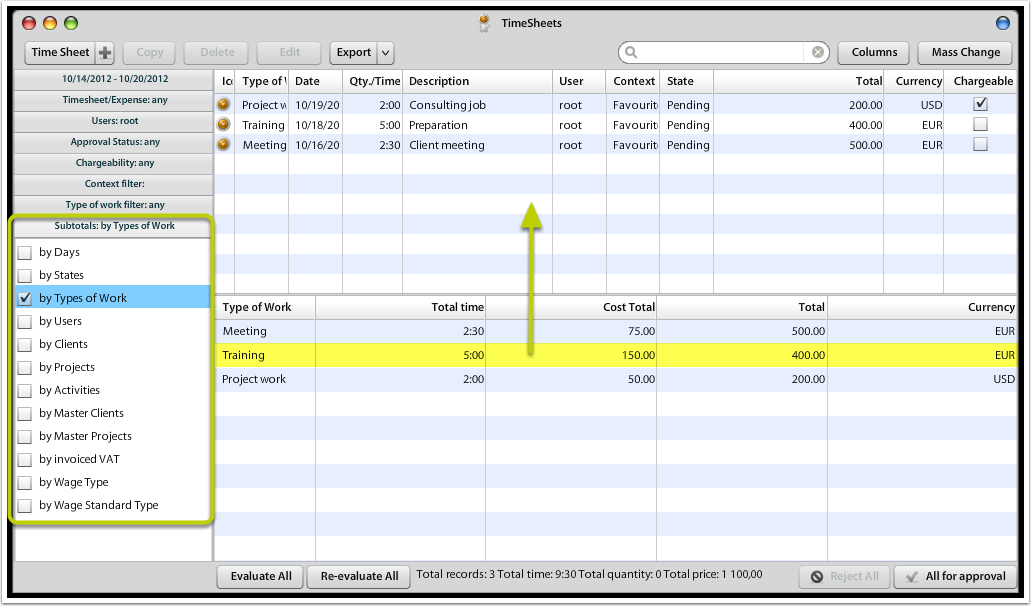
Open the Subtotals section of left accordeon. You may select various criteria upon which you can group Time Sheet record. You can even select one grouped record (in screenshot marked yellow) & above records will get filtered (it's function called record drill-down).
This online view is particularly helpful if you want to approve Time Sheet records. You may group them by projects or users to approve the time consumed.
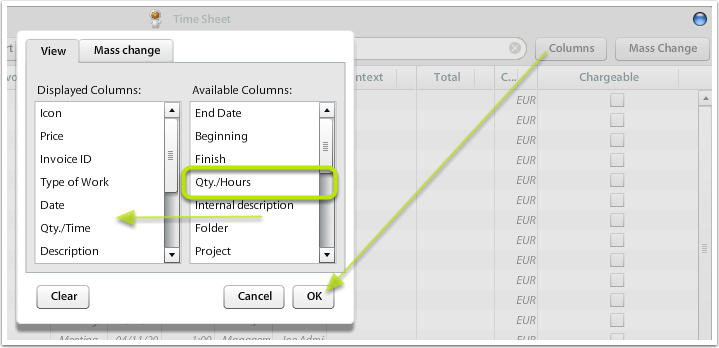
Adjust Displayed Columns
You may want to see some additional information about Time Sheet records, such as (for instance) Qty calculated in minutes (that is useful for exporting & further calculations in Excel) or you may want to add Tracking Categories visibility to see the Cost Centres, etc.
See the attached screenshot below to see how you can add more columns to Time Sheet records:
Time Sheet Adjustments
You can change multiple records by using Mass-change tool.
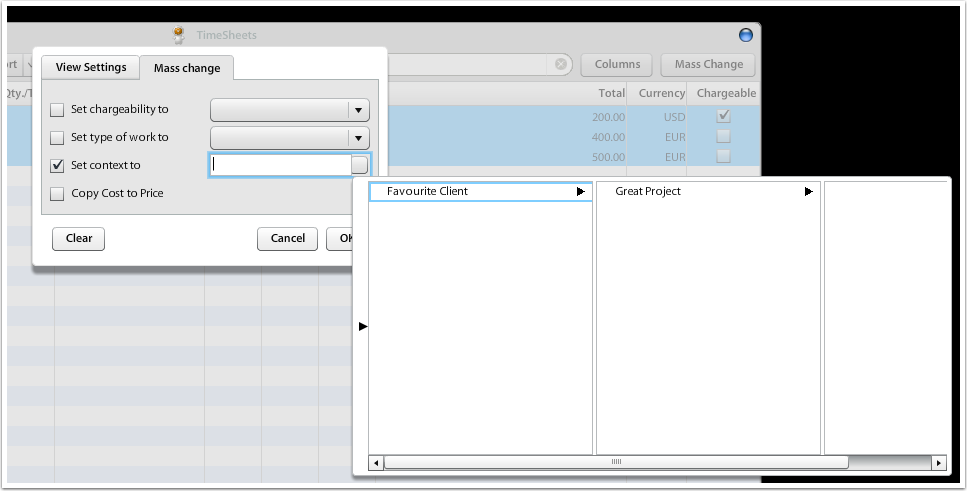
You can change multiple records's attributes:
- Set chargeability to yes/no
- Change Type of Work
- Change context (project) of Time Sheet record
- Copy Cost to Price (useful when Expenses are re-charged to clients 1:1)
Time Sheet Approvals
To approve Time Sheets, you may filter for users (or show all users), set grouping criteria in Subtotals section and filter only for records that are For Approval (in Approval Status accordeon):
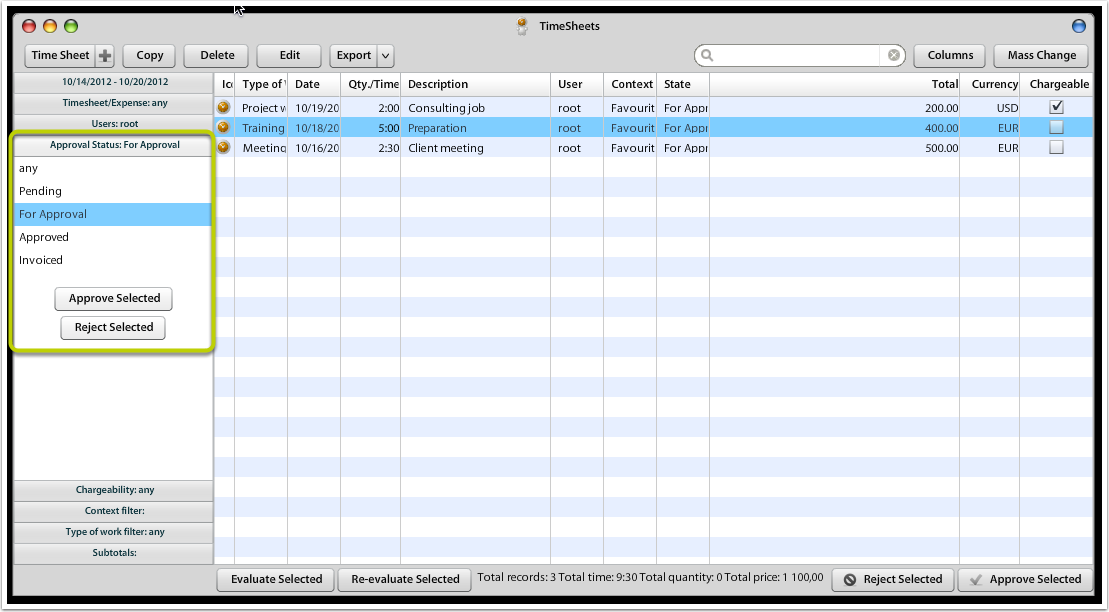
After selecting records for approval, you may click Approve Selected / (or All) records.
After Time Sheet records are approved, they may be sent to Billing for invoicing.
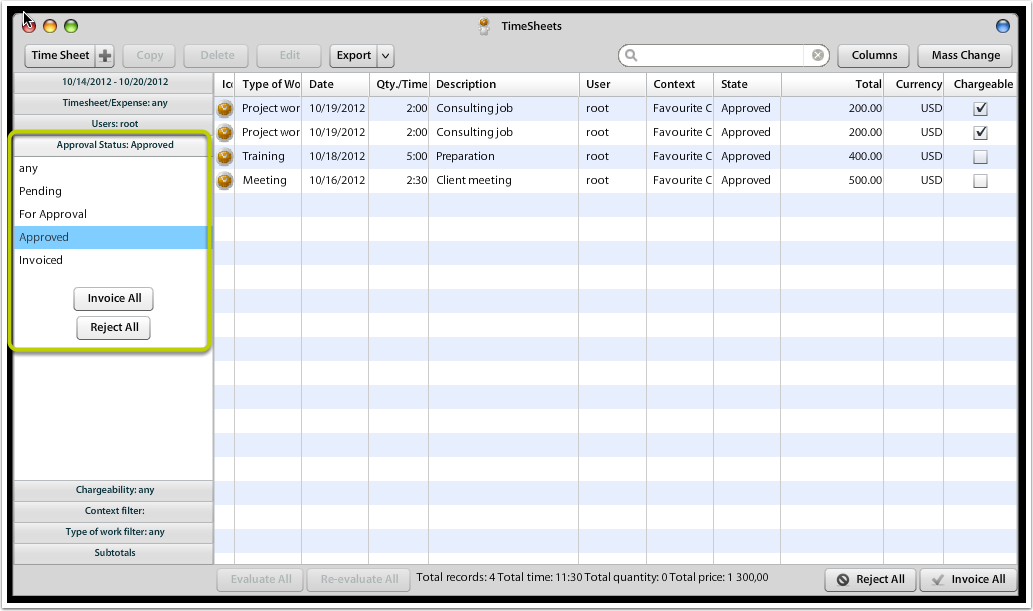
Time Sheet Invoicing
After Time Sheet records are approved, they can be sent to Billing for invoicing process.
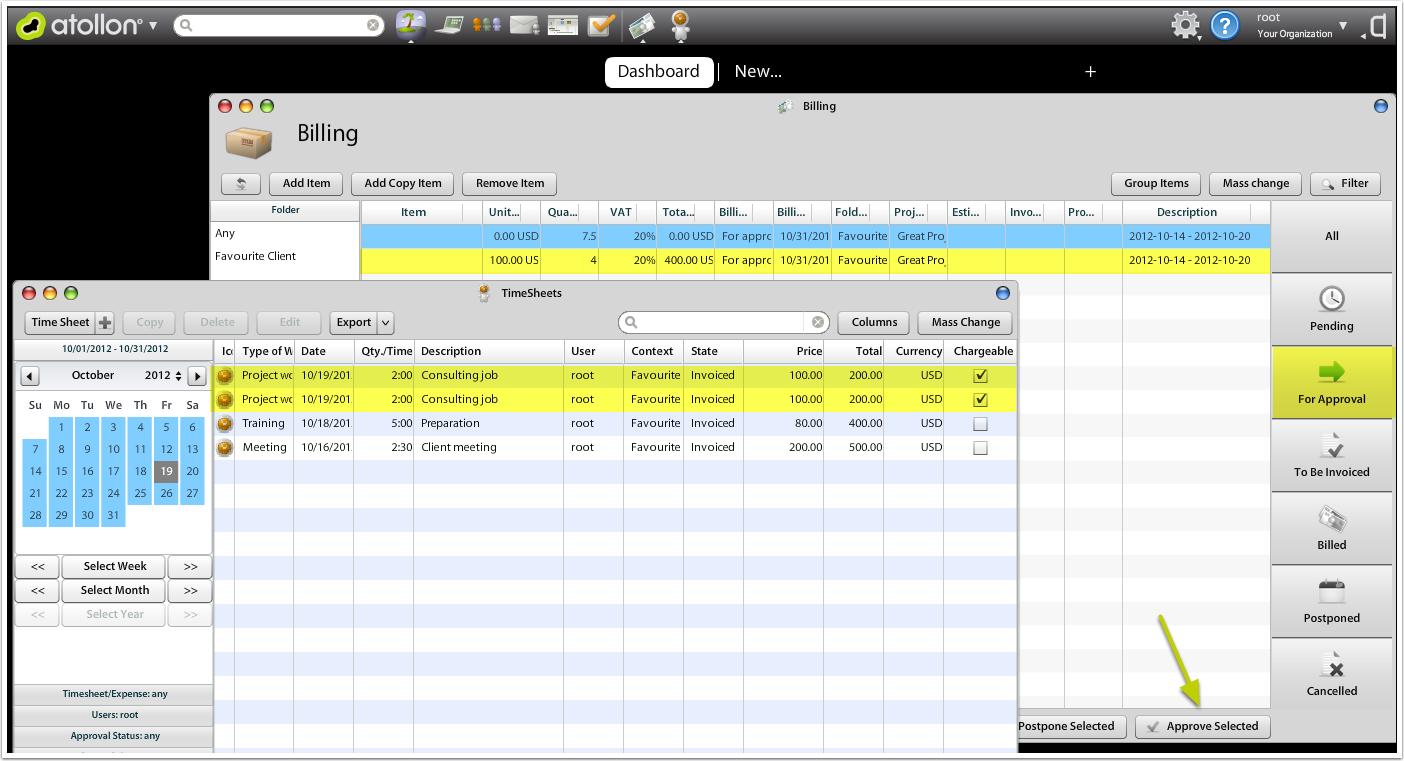
Sending Time Sheets to Billing
When invoicing Time Sheet, Time Sheet records are merged into Billing items. Each Billing Item will be created with associated Product based on Item Settings. In Item Settings (only in MS Win admin interface) each Type of Work may be associated with different Product.
During Time Sheet invoicing process, it is possible to adjust Billing details, add some fixed fees & adjust how many hours were covered by the fixed fee amount. In Billing, you can also add some other Products / Services to be charged, which allows it to you to add Time & other products & services into one invoice.
Approving Billing
Create Invoice from Billing Items
After Billing Items are approved in Billing application, they can be invoiced.
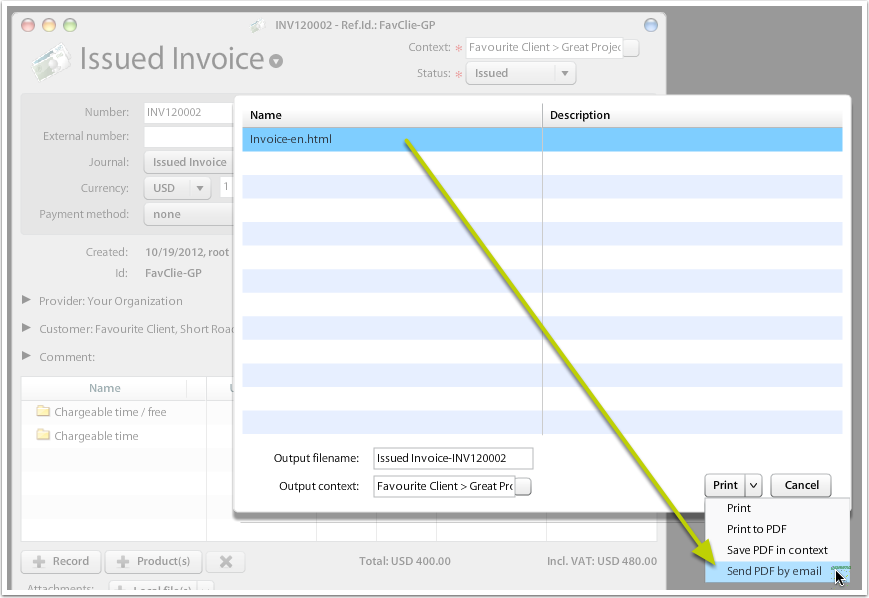
Print & send invoice
In invoice's context menu, select Print.
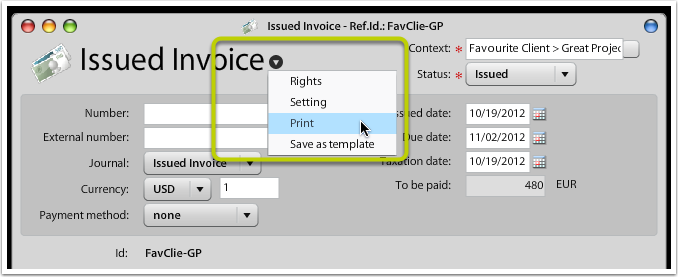
You have option to directly create PDF & attach it to your new e-mail. Before sending the e-mail you may select e-mail template & send the e-mail.
Time Sheet Valuation
The Time Sheet rates for wage (internal rate) or price (external rate) may be entered by system automatically, if you fulfill several conditions:
- You set-up valid Work Contract for the user
- In case you have customized price/rates for the Folder (Client), you select either standard or individual Work Price List at Folder/Client Billing Settings.
- In case you have customized price/rates for the Project, you select either standard or individual Work Price List at Project Billing Settings.
The valuation is done by the system automatically after user confirms the Time Sheet records. Manually entered Time Sheet records should be confirmed automatically by system (work-in-progress), automatically entered Time Sheet records should be confirmed by either user or manager.
The Time Sheet Valuation Procedure
The system tries to find available rates for the Time Sheet in the following order, individually for each of the rates (wage / price):
- Project's Work Price List
- if not found, then continue to Folder's Work Price List
- if not found, then continue to Work Contract
Example:
- You may set individual Project price (external rate) EUR 99 / hour for the "Consultant" Type of contract. No wage (internal rate) is set-up at Project level.
- The user has "Consultant" Type of Contract set at her Work Contract settings, with EUR 25 / hour wage (internal rate).
- The Time sheet entered by User on Project will be valued: EUR 25 / hour wage (internal rate) & EUR 99 / hour price (external rate)
Time Sheet Settings
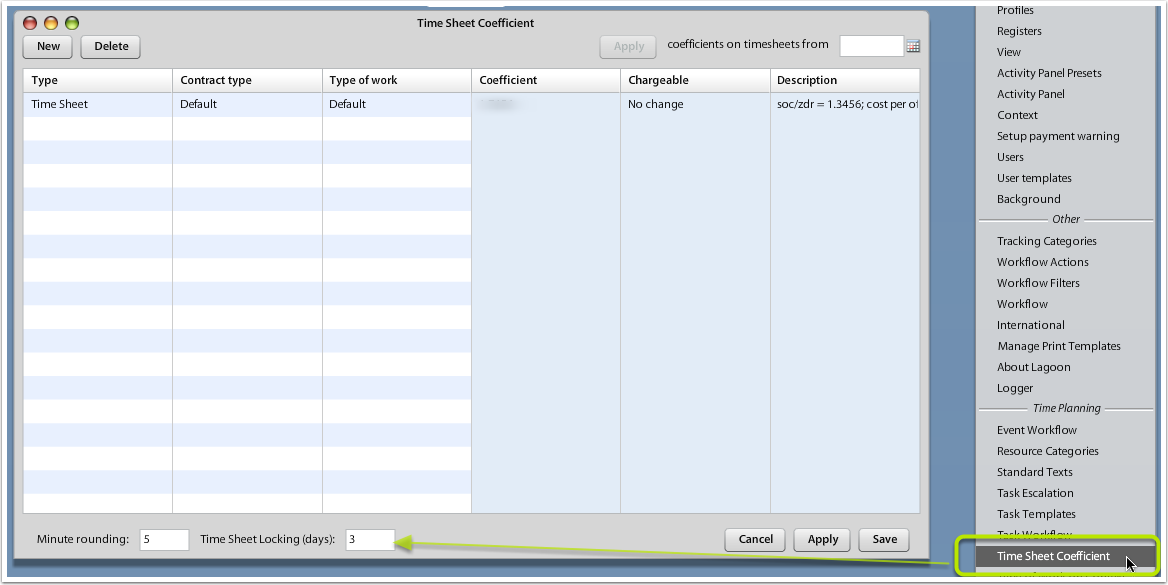
Time Sheet Locking
It is possible to set-up auto-lock Time Sheet entering for X number of (working) days. Working days are setup from Monday to Friday.
In Time Sheet Coefficient Settings screen, set-up the number of working days, after which users will not be able to enter any new or amend existing Time Sheet records. In order to enable updating older records, this lock has to be removed (clean the field & apply).
Enter Time Sheet
This lesson's aim is to provide easy help to end users to enter their Time Sheet in Atollon.
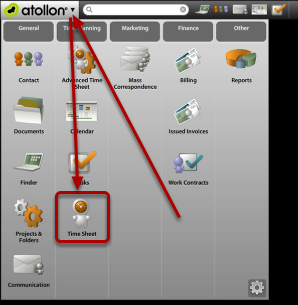
Open Time Sheet Application from Atollon menu
Enter new Time Sheet record
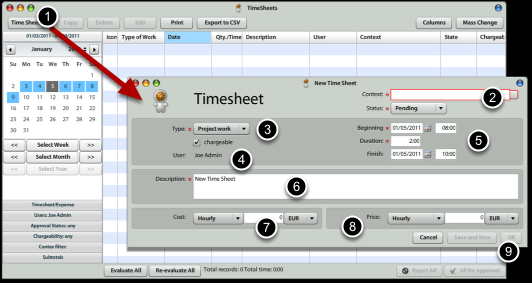
In order to enter new Time Sheet record, you should:
1.) Press on the Time Sheet button (top left) in Time Sheet application.
2.) Select Context: Client > Project > Activity (Milestone) for new Time Sheet record (it is customizable, which level is required)
3.) Select Type of Work
4.) Set whether the Time Sheet is chargeable to client or not
5.) Select Start Date & Duration (HH:MM), optionally also End Date & Time
6.) Write work description
7, 8) Cost & Price Information
You do not need to write Cost or Price, if you subscribed to Octopus Billing Automation solution. This information is not available to users, who do not have rights to view Work Contracts (in case of Cost) or Price Lists (in case of Price).
9.) Press Ok or Save & New, if you want to continue on the same project.
Copy existing Time Sheet records
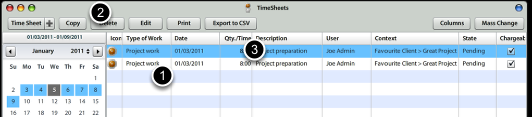
Once you want to create similar record, you can select existing record in Time Sheet grid and press Copy. The new record is displayed in grid and highlighted.
Edit existing Time Sheet record

To edit existing Time Sheet record, just select one & press Edit button.
You can make any changes to the record & press Ok button.
If you change any criteria that will make your record disappear (for instance you change the date range outside of filter), you should be notified.
Revise Time Sheet records before they are sent for approval
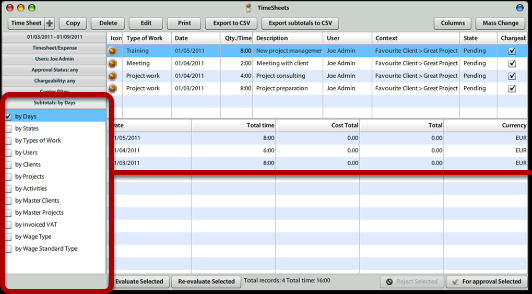
Before confirming your Time Sheet records, you should check whether everything you wanted was entered. You can open quick Time Sheet report, available at Subtotals section (bottom left). By selecting one of the grouping criteria, you will get summary below your Time Sheet. By clicking on any of the summary rows, you get detail above.
Send Time Sheet for approval

You can send one or more Time Sheet records for approval. Only items in Pending state are sent for approval.
1.) Select correct time period (month, week, day)
2.) Make sure you selected all pending items (Approval Status is Any or Pending)
3.) Click on button All (Selected) for Approval
Project Expenses
This tutorial shows the way how to enter regular project expenses.
Project expenses may be entered using Time Sheet / Expense Sheet application or using Received Invoices.
Add new project Expense
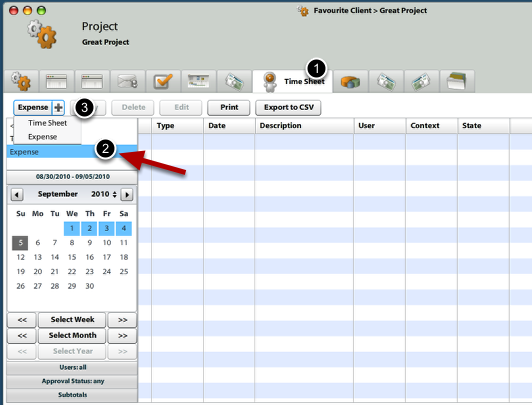
Open the project, where you would like to enter new expenses.
1.) On Time Sheet tab, you may entere new expenses.
2.) You can filter for only expense records (this will hide Time Sheet records) by clicking on Expense filter top left.
3.) Press on (+) on the button to select New expense record creation
Enter Expense details
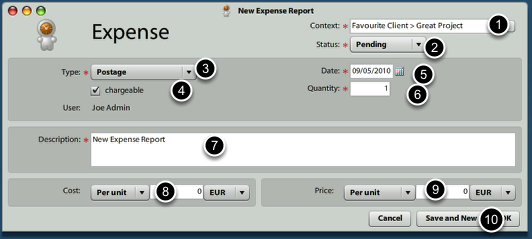
1.) Current project has been entered automatically, but you can change it
2.) Status may be changed later, once you have all expenses entered
3.) Select Type of Expense
4.) Set whether the Expense should be entered into Billing
5.) Set when the Expense incurred
6.) Set the quantity
7.) Write some notes, for instance who (from client side) ordered this expense
8.) What was the item / total cost of Expense?
9.) What are we going to charge to clients?
10.) Submit
Send expenses for billing approval

After you entered all expenses, you should send the for billing approval. It is necessary to confirm expenses entered into the system to avoid errors and inform your colleagues that you would like these expenses be billed.
1.) Select My Time Sheet
2.) Select period, for wich you are confirming your expense records
3.) Send All (selected) for approval
Approve expenses for billing
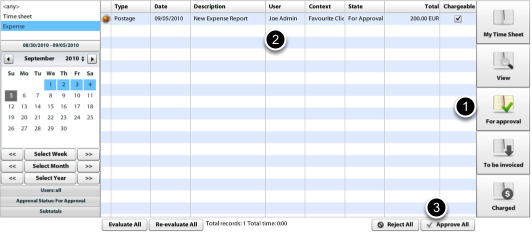
Person responsible for approving Time Sheet and/or Expenses should approve expenses before they are entered to billing.
1.) Open Time Sheet / Expense Sheet and click on For approval button
2.) Revise the expenses
3.) Approve all (selected) expenses
Send approved expenses to billing
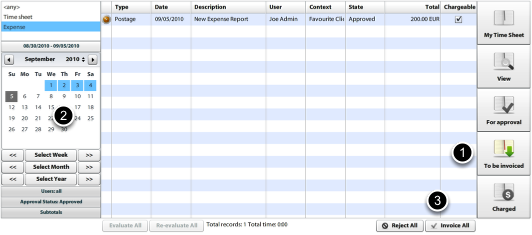
Approved expenses may be billed using Atollon Octopus Billing Manager tool. In order to send approved expenses to billing, do the following:
1.) On Time Sheet / Expense Sheet tab / application select To be invoiced button
2.) Set time period, which you wan to be billed
3.) Click on Invoice All (selected) button
This procedure will create new Billing Item in Billing tool.
Time Tracker
This lesson shows how to track time based on tasks assigned to Solvers.
Atollon Time Tracker is used to measure time spent on solving tasks. Time measured by Time Tracker is entered into Time Sheet. It is adviced to confirm the resulting every day using Time Sheet confirmation tool.
Display Time Tracker & Tasks at the same time
Display tasks & Time Tracker on the same screen. Time Tracker is placed as widget on Atollon's side bar.
Drag & Drop Task to Time Tracker
Select the task using mouse & move it on top of the Time Tracker widget.
Time Tracker starts counting time spend on solving the task.
Interrupt current Task
You can interrupt the task either by starting to solve other task or by pausing current task. To pause current task, just hover over Time Tracker counter to pause it. In order to switch to another task, just drag & drop another task on the Time Tracker. The previous task remains halted in Time Tracker Queue.
In order to open Time Tracker queue, click on the arrow on the rights side of the Time Tracker.
Stop the Time Tracker
Once you finish your work on the task, just hover with your mouse over Time Tracker counter & press stop button.
Adjust time & save to Time Sheet
Revise whether time measured by Time Tracker is in order & save it to your Time Sheet.
Confirm your Time Sheet
By the end of the day (week/month), revise the time saved in your Time Sheet and send it for approval.
Just open your Time Sheet (Atollon > Time Sheet), select the time period (left), see whether all records are properly entered, add new lines, if needed & send all Time Sheet records for approval by pressing All (selected) for approval.
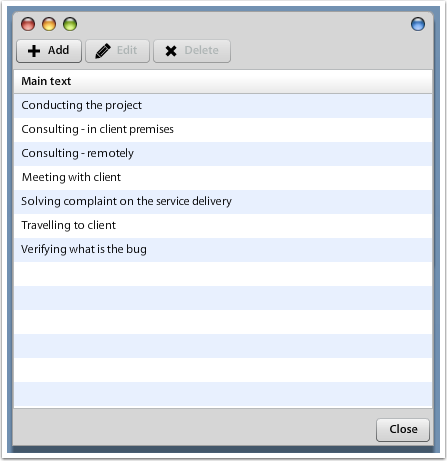
Standard Texts
Usually checking Time Sheet entries by managers when preparing work reports for clients is time consuming due to checking contents of the reports (their texts).
Standard texts are used to speed-up & improve quality of Time Sheet records data entry. When users enter Time Sheet records, they get option to select one or more "standard texts" & adjust it to their needs.
Standard texts not only allow adding description to client & internal description, they also help users preset Type of Work (which is important management controlling variable).
Open Options & Tools > Time & Planning > Standard Texts to enter the texts you need.